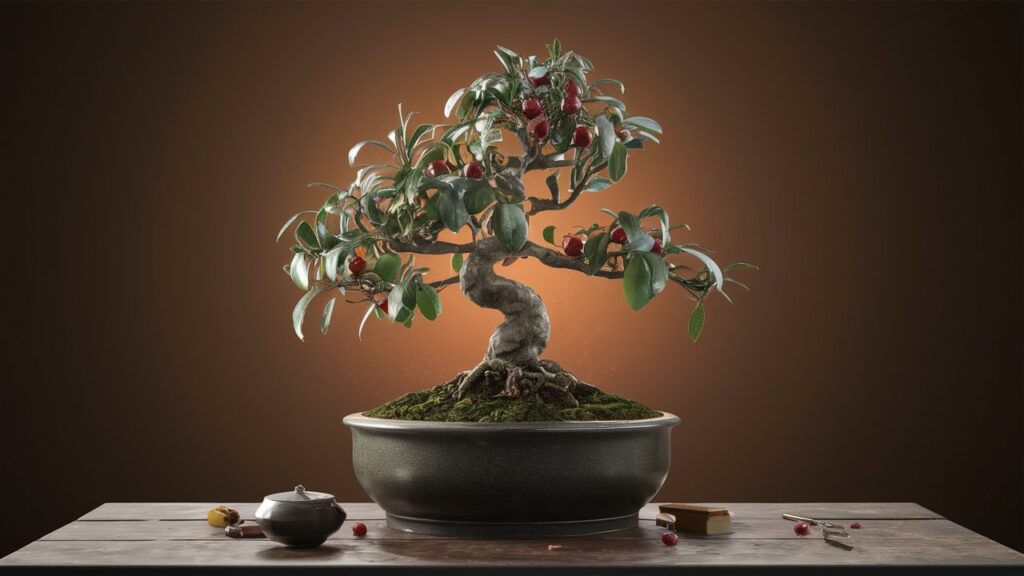
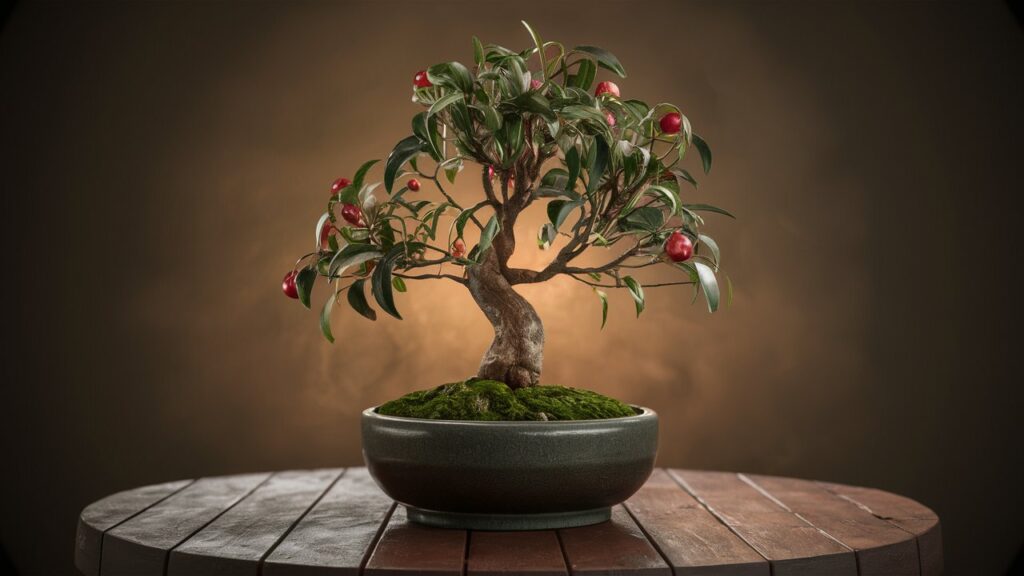
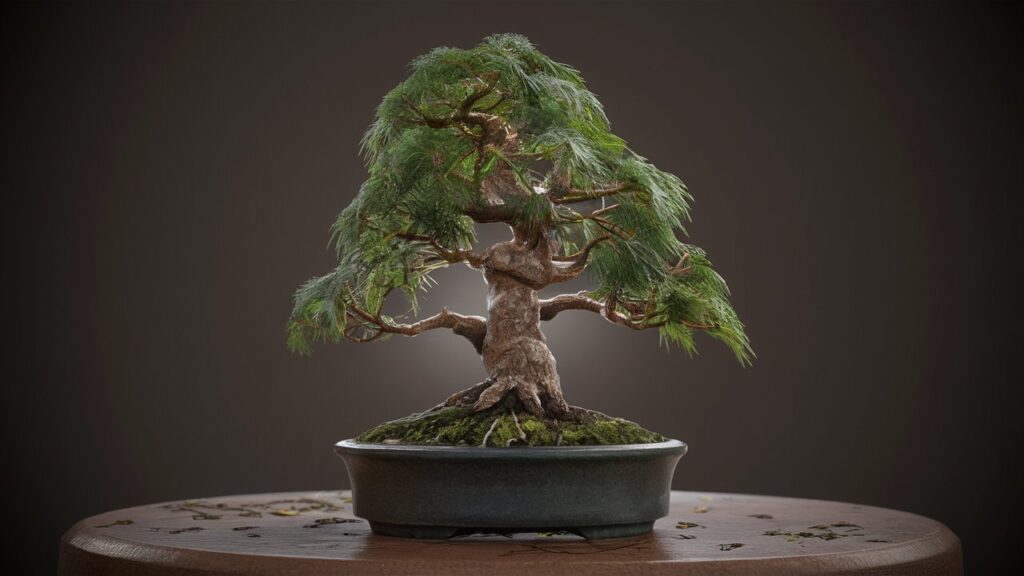
The Chinese Sweet Plum Bonsai is an evergreen tree from the Rhamnaceae family, native to southern China. It is one of the fastest-growing bonsai trees, known for its small leaves that can be reduced even smaller, making it ideal for bonsai cultivation. In spring, it produces small white flowers, followed by tiny black fruits in summer.
This bonsai is popular for indoor display due to its elegant appearance and adaptability. It’s also a classic choice in Chinese penjing, where it’s used to create miniature landscapes. Renowned for its delicate beauty and rapid growth, the Chinese Sweet Plum Bonsai adds a touch of elegance to any space.
Benefits of growing a Chinese sweet plum bonsai
Adds Character and Elegance: The Chinese Sweet Plum Bonsai enhances any room with its natural beauty and intricate design. Its graceful appearance serves as a striking focal point, elevating the aesthetics of your living or working space.
Creates a Sense of Serenity: Having this bonsai in your home or office brings a sense of tranquility and calmness. Its presence encourages mindfulness and relaxation, making it a perfect addition to any environment seeking a peaceful ambiance.
A Rewarding Hobby with Centuries-Old Traditions: Growing a Chinese Sweet Plum Bonsai connects you to a long-standing tradition of bonsai cultivation that spans centuries. It’s a fulfilling hobby that not only challenges your creativity and patience but also allows you to partake in a cultural art form that has been cherished for generations.
Placement and Light requirements
Ideal placement
Outdoors in Summer: When temperatures consistently stay above 50°F (10°C), it’s best to place your Chinese Sweet Plum Bonsai outdoors. The natural sunlight and fresh air will promote healthy growth and vibrant foliage. Ensure the bonsai is sheltered from harsh winds and heavy rain to prevent any damage.
Indoors in Winter: During the colder months, it’s advisable to bring your bonsai indoors to protect it from frost and low temperatures. Place it near a south-facing window where it can receive ample sunlight. This location ensures that the bonsai gets the warmth and light it needs to thrive in the winter.
Sunlight Requirements: The Chinese Sweet Plum Bonsai needs at least 6 hours of direct sunlight per day to maintain its health and vigor. Whether indoors or outdoors, ensure that it is placed in a spot where it can bask in the sun’s rays for an extended period, as adequate sunlight is crucial for its growth and overall well-being.
Protecting from cold
Bring Indoors When Nighttime Temps Drop Below 45°F: As temperatures start to fall, especially at night, it’s crucial to bring your Chinese Sweet Plum Bonsai indoors once the nighttime temperatures drop below 45°F (7°C). This precaution helps protect the tree from cold stress and potential damage.
Loses Leaves Below 55°F: The bonsai begins to lose its leaves when exposed to temperatures below 55°F (13°C). This leaf drop can weaken the tree, so it’s important to monitor the temperature closely and ensure it stays in a warm environment during colder months.
Suffers Dieback Below 25°F: When temperatures fall below 25°F (-4°C), the Chinese Sweet Plum Bonsai is at risk of suffering dieback, which can severely damage or even kill the tree. To prevent this, always keep the bonsai in a frost-free environment during the winter and consider using protective measures such as frost cloths if necessary.
Watering and Humidity
Watering needs
Consistently Moist Soil: Keep the soil consistently moist, but avoid letting it become waterlogged. The Chinese Sweet Plum Bonsai thrives in a balanced moisture environment, where the soil is neither too dry nor overly saturated. It’s crucial to strike this balance to maintain healthy root growth and overall plant health.
Thorough Watering: Water the bonsai thoroughly until water drains from the bottom of the pot. This ensures that the entire root system receives adequate hydration and helps to flush out any accumulated salts or impurities in the soil. Always check that the drainage holes are clear to prevent water from pooling at the bottom.
Daily Watering in Summer: During the hot summer months, the bonsai may require daily watering due to increased evaporation and growth demands. Monitor the soil moisture level regularly and adjust your watering schedule to prevent the soil from drying out completely. This consistent care helps the bonsai remain vibrant and healthy during periods of intense heat.
Humidity
Daily Misting: Mist the leaves daily, especially when the bonsai is indoors. This helps maintain the necessary humidity levels that the Chinese Sweet Plum Bonsai prefers, preventing the leaves from drying out due to indoor heating or air conditioning.
Use a Humidity Tray in Winter: To increase moisture levels during the dry winter months, place your bonsai on a humidity tray filled with water and pebbles. This setup provides a steady source of moisture as the water evaporates, creating a more humid microenvironment around the bonsai. This is particularly beneficial when indoor air tends to be drier due to heating systems.
Fertilizing and Repotting
Fertilizing
Balanced Liquid Fertilizer Monthly: Use a balanced liquid fertilizer once a month during the growing season, typically from spring through early fall. This provides essential nutrients that support healthy growth and development for your Chinese Sweet Plum Bonsai.
Half the Recommended Dosage: Reduce the dosage to half the recommended amount on the fertilizer package. Bonsai trees require less fertilizer than regular plants due to their small root systems, and over-fertilization can harm the bonsai by burning the roots.
Avoid Fertilizing in Winter: Refrain from fertilizing during the winter months. The bonsai’s growth slows down significantly during this period, and fertilizing can disrupt its natural dormancy cycle, leading to weak or spindly growth.
Repotting
Frequency: Repot deciduous varieties every 2-3 years and evergreen varieties every 4-5 years. This helps ensure healthy root growth and prevents the bonsai from becoming root-bound.
Root Trimming: When repotting, trim no more than one-third of the roots. Excessive root pruning can stress the bonsai and hinder its recovery. Focus on removing old, dead, or overly long roots to encourage new growth.
Timing: Repot in mid-summer, when the tree is most resilient and actively growing. This timing supports a smoother recovery and minimizes stress on the bonsai.
Pruning and Training
Pruning
Trim New Growth: Regularly trim new growth to maintain the desired shape of your bonsai. This helps keep the tree compact and well-formed, enhancing its aesthetic appeal.
Avoid Removing All New Growth: Never remove all new growth during pruning, as this can stress the bonsai and affect its overall health. Always leave some foliage to ensure the tree continues to thrive and photosynthesize effectively.
Use Sharp, Clean Pruners: Use sharp, clean pruning shears to avoid damaging branches and to make precise cuts. This reduces the risk of infection and promotes healthy, clean growth.
Wiring
Infrequent Use: Wiring is not commonly used for the Chinese Sweet Plum Bonsai. The tree’s natural growth habits often don’t require extensive wiring.
Brittle Branches: If you do choose to wire, be cautious as the branches can be brittle and prone to breaking. Use gentle techniques and avoid applying excessive pressure to prevent damage.
Pests and Diseases
Common pests
Aphids and Whiteflies: These pests may occasionally affect your Chinese Sweet Plum Bonsai. They can cause damage by feeding on the plant’s sap and weakening its health.
Treatment: Treat infestations with insecticidal soap or neem oil. These options are effective and safe for bonsai, helping to control pest populations without harming the plant.
Diseases
Disease Resistance: The Chinese Sweet Plum Bonsai is generally disease-resistant when properly cared for. Regular maintenance, appropriate watering, and good environmental conditions help prevent most common diseases.
Conclusion
The Chinese Sweet Plum Bonsai is a fast-growing evergreen from southern China, known for its elegance and easy care. It thrives outdoors in summer with temperatures above 50°F and at least six hours of direct sunlight. In winter, place it indoors in a south-facing window, as it loses leaves below 55°F and suffers damage below 25°F. Keep the soil moist without waterlogging, and mist daily to maintain humidity. Fertilize monthly during the growing season at half the recommended dose and avoid fertilizing in winter. Repot every 2-3 years for deciduous types and every 4-5 years for evergreens, trimming roots by no more than a third. Prune to maintain shape, using sharp pruners and leaving some new growth. Wiring is not often used due to brittle branches. Although generally disease-resistant, the bonsai may attract pests like aphids and whiteflies, which can be treated with insecticidal soap or neem oil. Overall, the Chinese Sweet Plum Bonsai is a rewarding choice for enthusiasts, offering beauty and tradition with proper care.
Karen Phillips, Bonsai expert and blogger. Read more about me here
The trident maple, with its iconic three-lobed leaves, is a bonsai superstar. This Asian native charms enthusiasts with its compact form, remarkable adaptability, and stunning seasonal displays. What sets it apart is its rapid growth rate, making it one of the fastest-developing bonsai species. This speed allows artists to quickly refine their vision, watching branches thicken and ramification develop in record time.
From its delicate spring buds to fiery autumn foliage, and bark that gains character with age, the trident maple offers year-round appeal. Its blend of beauty, versatility, and swift growth makes it an irresistible choice for bonsai artists of all levels.
Growing trident maple bonsai
Propagation
Propagating trident maples for bonsai offers enthusiasts multiple exciting avenues. Growing from seed is a rewarding, albeit patience-testing process, allowing artists to shape the tree from its earliest stages. Seeds typically require cold stratification to germinate, mimicking natural winter conditions. For those seeking quicker results, cuttings provide an efficient alternative. Softwood cuttings taken in summer often root readily, producing clones of the parent tree.
Air-layering, a technique where roots are encouraged to grow on a branch while still attached to the parent tree, is particularly effective with trident maples. This method allows for the creation of pre-branched specimens with mature bark characteristics, giving bonsai artists a head start in developing their miniature masterpieces.
Trunk development
Trident maples are prized in the bonsai world for their ability to rapidly develop thick trunks and impressive nebari (surface roots). This fast growth is a boon for artists looking to create mature-looking bonsai in a relatively short time. To capitalize on this trait, enthusiasts employ several techniques. Heavy pruning stimulates vigorous regrowth, while strategic defoliation forces the tree to redirect energy to trunk development. Aggressive fertilization, particularly in spring and fall, fuels this growth spurt.
These methods, when combined, can dramatically accelerate the thickening process, transforming a slender sapling into a stout, character-rich trunk in just a few growing seasons. The trident maple’s responsiveness to these techniques makes it an ideal species for bonsai artists eager to witness the rapid evolution of their living sculptures.
Leaf reduction
Trident maples are naturally blessed with relatively small leaves, a trait highly valued in bonsai. However, enthusiasts can further miniaturize this foliage to enhance the tree’s scaled-down appearance. Summer defoliation is a key technique, where leaves are carefully removed during the growing season, prompting the tree to produce a new set of smaller leaves. Pinching new growth is another effective method, encouraging ramification and reducing leaf size.
By consistently applying these techniques, bonsai artists can achieve remarkably diminutive foliage, creating a more proportionate and refined appearance that accentuates the tree’s miniature form. This malleability of leaf size, combined with the trident maple’s natural predisposition to smaller foliage, makes it an ideal species for creating highly detailed and realistic bonsai representations.
Ramification
Trident maples are highly responsive to bonsai techniques aimed at developing dense ramification, making them a favorite among enthusiasts seeking fine branching structure. Pruning plays a crucial role, with strategic cuts encouraging back-budding and the development of new shoots. Wiring allows artists to position branches precisely, creating the desired silhouette and spaces for new growth. Defoliation, when timed correctly, stimulates a burst of new buds and finer twigs.
The trident maple’s vigorous growth habit means it responds rapidly to these techniques, allowing bonsai practitioners to create intricate branch structures in relatively short time frames. This responsiveness, combined with the species’ natural tendency towards fine branching, enables artists to craft trees with impressively dense, delicate ramification that enhances the overall bonsai aesthetic.
Caring for trident maple bonsai
Watering
Trident maple bonsai, known for their vigorous growth, have a thirst to match their vitality. During the growing season, these trees require frequent attention to their water needs. The key is to strike a balance: water when the soil feels slightly dry to the touch, but never allow it to completely dry out. This delicate equilibrium supports healthy growth while avoiding issues like root rot from overwatering. Savvy bonsai artists recognize that watering isn’t a one-size-fits-all approach.
They adjust their watering routine based on several factors: the local climate, with hotter, drier conditions demanding more frequent watering; pot size, as smaller containers dry out faster; and the tree’s growth stage, with actively growing trees requiring more water than dormant ones. This adaptive approach to watering helps ensure trident maples maintain their lush foliage and robust health throughout the seasons.
Sun exposure
Trident maple bonsai thrive in full sun, soaking up the light to fuel their vigorous growth. However, like many plants, they have their limits. While these trees love basking in sunlight, the intense heat of scorching afternoon sun in summer can be too much of a good thing. Smart bonsai enthusiasts keep a watchful eye on the thermometer, ready to provide some relief when temperatures climb above 85-90°F (29-32°C).
Shade cloth becomes a valuable ally in these moments, offering a protective veil that filters the harshest rays while still allowing plenty of light through. Alternatively, temporarily relocating the tree to a spot with partial shade during peak heat hours can prevent leaf scorch and stress. This careful balance of sun exposure ensures trident maples maintain their lush, vibrant foliage throughout the hottest months, setting the stage for robust autumn colors and healthy winter dormancy.
Trident maple bonsai showcase remarkable resilience across a wide temperature range, but they do have their limits. With proper shading, these hardy trees can withstand scorching heat exceeding 100°F (38°C), maintaining their vigor even in sweltering conditions. However, when the mercury plummets, trident maples reveal their vulnerability. Temperatures dipping below 28°F (-2°C) can spell trouble, potentially causing dieback of branches and compromising the tree’s carefully crafted structure.
Savvy bonsai enthusiasts take precautions as winter approaches, often relocating their prized tridents to protected environments like greenhouses or cool rooms. This winter haven shields the trees from harsh freezes while still providing the necessary cold period for healthy dormancy. By respecting these temperature boundaries, bonsai artists ensure their trident maples emerge strong and vibrant each spring, ready for another season of growth and artistic refinement.
Fertilizing
Fertilizing trident maple bonsai is a nuanced practice that mirrors the tree’s natural growth cycles. During the growing season, these vigorous trees benefit from monthly feedings with organic or liquid fertilizers, fueling their rapid development. Bonsai artists often employ an aggressive fertilization strategy in spring and fall, capitalizing on these key growth periods to promote robust health and accelerate development. However, the approach shifts come summer and during periods focused on refining ramification.
At these times, fertilizer application is reduced or paused altogether. This strategic feeding schedule supports the tree’s natural rhythms while allowing for precise control over growth rates. By adjusting fertilizer timing and intensity, bonsai enthusiasts can alternately encourage vigorous growth for structural development and restrain it for fine-tuning delicate branching patterns, ultimately crafting a tree that’s both healthy and aesthetically refined.
Pruning and wiring
Pruning and wiring are essential techniques in shaping trident maple bonsai, each with its own timing and approach. Spring sees a flurry of new growth, prompting bonsai artists to prune judiciously, typically leaving just 1-2 leaf pairs on each shoot. This not only maintains the tree’s desired shape but also encourages finer branching. Throughout the growing season, selective pruning helps balance growth and prevents the die-back of inner twigs, ensuring a full, healthy canopy.
When it comes to wiring, fall and winter are prime times, as the leafless branches are more flexible and easier to manipulate. For older, thicker branches that resist traditional wiring, guy wires offer an effective alternative, allowing artists to gradually reposition stubborn limbs. This carefully timed regimen of pruning and wiring enables bonsai enthusiasts to sculpt their trident maples into living masterpieces, blending horticultural knowledge with artistic vision.
Repotting
Repotting is a crucial aspect of trident maple bonsai care, typically performed every 2-3 years to maintain optimal health and growth. The ideal time for this operation is early spring, just before the buds begin to swell with new life. Trident maples are remarkably resilient when it comes to root work, tolerating heavy pruning that would stress many other species. This tolerance allows bonsai artists to aggressively manage the root system, promoting fine root development and maintaining a compact root ball.
When repotting, enthusiasts opt for a well-draining soil mixture with a slightly acidic to neutral pH, ranging from 5 to 7. This soil composition ensures proper water retention while allowing excess moisture to escape, preventing root rot and promoting healthy growth. The combination of timely repotting, judicious root pruning, and appropriate soil selection sets the stage for vigorous growth and long-term health in trident maple bonsai.
Pests and diseases
Trident maple bonsai are renowned for their resilience, boasting relatively strong resistance to pests and diseases. However, vigilant care is still essential to maintain their health. While generally hardy, these trees can occasionally fall prey to common bonsai ailments. Aphids, scale insects, caterpillars, and spider mites may attempt to make a meal of the foliage, while fungal invaders like powdery mildew and leaf spot can mar the leaves’ beauty. Root rot poses a threat if soil drainage is poor.
To safeguard against these potential issues, bonsai enthusiasts employ a proactive approach, regularly inspecting their trees and addressing problems swiftly. One crucial practice is sealing wounds promptly after pruning or accidental damage, creating a barrier against opportunistic fungi. This combination of the trident maple’s natural resilience and the attentive care of its cultivator ensures that these bonsai specimens remain healthy, vibrant showpieces in any collection.
Conclusion
Trident maple emerges as a star in the bonsai world, prized for its rapid growth, small leaves, and responsiveness to bonsai techniques. Its versatility shines through various propagation methods and its ability to quickly develop thick trunks and dense ramification. Care involves a balance of sun exposure, regular watering, and strategic fertilization. Skilled pruning and wiring transform these trees into living art. While generally hardy, they benefit from winter protection and vigilant pest management. Repotting every few years in well-draining soil maintains their vigor. The trident maple’s blend of natural beauty and adaptability to bonsai practices makes it an excellent choice for enthusiasts of all levels, offering a rewarding journey in the art of miniature tree cultivation.
Are you a busy or frequent traveler looking for a low-maintenance yet stunning houseplant? Look no further! The Ponytail Palm, or Beaucarnea recurvata, is your perfect match. This unique plant, native to Central America’s semi-desert regions, isn’t a true palm but a member of the Asparagaceae family. It’s loved for its distinctive bulbous trunk that stores water and its long, green leaves that cascade like a ponytail. Despite its exotic appearance, it’s surprisingly easy to care for and can grow up to 6 feet indoors. This is also used for making Palm Bonsai. This article’ll provide a comprehensive care guide to help your Ponytail Palm thrive. So, are you ready to turn your home into a tropical paradise?
Understanding the Ponytail Palm
The Ponytail Palm, scientifically known as Beaucarnea recurvata, is a unique-looking, long-lived plant that thrives on benign neglect. Despite its name and palm-like appearance, it is not a true palm. It is more closely related to desert plants in the Agave and Yucca genera.
The typical Ponytail Palm consists of a large, domed “stump,” which tapers off into a thinner stem1. One or more rosettes of long, green, leathery leaves develop from the top of the stem as the plant ages. Indoors, the leaves can get up to 3 feet long, but outdoors, they may be double that length.
Origin and Natural Habitat
The Ponytail Palm is native to several regions in Mexico, including the states of Veracruz, San Luis Potosi, Hidalgo, and Tamaulipas. It primarily grows in dry, arid areas, often found on rocky slopes and cliffs. In its natural habitat, the plant can reach impressive heights of up to 30 feet.
Common Misconceptions
One common misconception about the Ponytail Palm is its classification. Despite its name and palm-like appearance, the Ponytail Palm is not a true palm. It is, in fact, more closely related to desert plants in the Agave and Yucca genera. This misunderstanding likely arises from its long, palm-like leaves and its common name.
Selecting the Right Ponytail Palm
Choosing a Healthy Plant
When purchasing a Ponytail Palm, it’s important to choose a healthy plant. Here are some tips:
Look for a plant with firm, upright leaves that are a vibrant green.
Avoid plants with yellow or droopy leaves, as this may be a sign of stress or disease.
The trunk of a Ponytail Palm should be sturdy and straight, without any signs of damage or rot.
Consideration of Size and Space
Ponytail Palms can vary greatly in size depending on their environment.
When grown outdoors in full sun, they can reach up to 30 feet tall.
Indoors, they typically stay closer to 6 feet tall at maturity.
If you plan on keeping it indoors, choose a location with a high ceiling.
Container and Soil Requirements
The right container and soil are crucial for the health of your Ponytail Palm.
Use a fast-draining soil, such as a cacti and succulent potting mix.
If you already have potting soil, sand, and perlite on hand, you can create your own desert soil mixture: Mix 1 part potting soil, 1 part perlite, and 1 part sand.
Select a pot with a hole in the bottom so that excess water can be drained off.
Ponytail palms do not like to sit in moist soil for very long.
Use a clay pot if possible; the porous material will absorb some of the water, drying out the soil more quickly.
Ideal Growing Conditions
Light Requirements
Sunlight Exposure: Ponytail Palm needs bright indirect sunlight during the afternoon period, while it needs 2 to 3 hours of morning direct sunlight. It can tolerate and take full sun, but it is better to put it in a place that is guarded against the full sun during the afternoon period in summer.
Avoiding Direct Sunlight Damage: Too much direct sunlight can burn their leaves. Therefore, place your ponytail palm near a window where the sun’s rays can reach it, but not all day long.
Temperature Considerations
Ideal Temperature Range: The perfect temperature for a ponytail palm to thrive ranges from about 60 to 80 degrees Fahrenheit. It is tolerant to higher temperatures provided that it is watered often, but it doesn’t enjoy temperatures under 40 degrees Fahrenheit.
Protecting the Plant from Extreme Conditions: If the temperature drops below the freezing point, it is likely that your plant won’t survive. Therefore, it is recommended to grow your ponytail palm outside if your location is within the USDA hardiness zones 9 to 11.
Humidity Levels
Humidity between 40-50% is sufficient for a ponytail palm. It is a succulent plant and does not need high humidity levels.
Watering Needs
Frequency and Amount: Water every 3-4 weeks. The ponytail palm plant prefers to have the soil be somewhat dry year-round. When you water Beaucarnea recurvata, fully saturate it so that the roots receive water before allowing the plant to dry out.
Signs of Overwatering or Underwatering: If you accidentally leave your Ponytail Palm’s soil completely dry for too long, you may see leaves go limp, droop, and possibly start to brown and curl. You may also notice the trunk start to wrinkle and go limp. If the soil is extremely dry all the way through the pot, a thorough soak is in order.
Potting and Repotting
Suitable containers
Ponytail Palms grow well in containers that are not too large and have good drainage. Here are some tips:
Choose a pot with a hole in the bottom so that excess water can be drained off.
Use a clay pot if possible; the porous material will absorb some of the water, drying out the soil more quickly.
The size of the pot should be just big enough to accommodate the roots and provide some room for growth.
Proper Potting Mix
The right soil mix is crucial for the health of your Ponytail Palm. Here are some guidelines:
Use a fast-draining soil, such as a cacti and succulent potting mix.
If you already have potting soil, sand, and perlite on hand, you can create your own desert soil mixture: Mix 1 part potting soil, 1 part perlite, and 1 part sand.
Guidelines for Repotting
Repotting a Ponytail Palm should be done carefully to ensure the health of the plant. Here are some steps:
Loosen the Root Ball: When plants get extremely root bound, you’ll have to work to loosen the root ball a bit.
Choose an Appropriately Sized Pot: For your new pot, choose one that is only 1-2 inches in diameter larger than your old pot.
Use an Extremely Well Drained Potting Mix: The last critical part in successfully repotting your ponytail palm is making sure to use a soil mix that is very well draining.
Repot in the Spring as Needed: If your goal is to grow a large palm tree, repot it every year, but if you want to keep it smaller, repot every two or three years.
Pruning and Grooming
Trimming Dead or Damaged Leaves
Trimming dead or damaged leaves is an essential part of maintaining the health and appearance of a Ponytail Palm. Here are some tips:
The Ponytail Palm leaves are sensitive to injury and tend to get dark at the ends.
Use good sharp scissors or yard snips to cut off just the discolored parts.
Avoid pulling too hard as this will cause more damage.
Make clean cuts as close to the trunk as possible without injuring the main stem.
Controlling the Size and Shape
The Ponytail Palm can grow quite tall over time, and pruning can help control its size and shape. Here are some guidelines:
Trimming the top growth encourages lateral growth, resulting in a fuller and more compact plant.
Pruning ponytail plants that are less than 6 inches (15 cm.) tall will result in the plant producing more heads.
Make slightly curved cuts into the main trunk to force growth.
Keep the plant in an arid region, without much humidity, to prevent the cut from rotting.
Tips for Grooming to Maintain Aesthetics
Grooming your Ponytail Palm not only helps maintain its aesthetics but also promotes its health. Here are some tips:
Use long strokes and keep the edges from looking square or boxy.
It’s better to trim too little than too much. It is better to remove the growth in stages instead of all at once.
If you notice browning tips and dry soil, cut off the crispy bits and give your plant a good drink of water.
Brown tips may also be due to too much fertilizer or hard water.
Fertilization
Understanding Nutritional Needs
Ponytail Palms are known for their ability to survive in low-nutrient environments. However, providing them with appropriate fertilization can greatly enhance their appearance and vigor. Fertilizers supply essential nutrients that may be lacking in the soil, promoting healthy leaf growth, root development, and overall strength.
Choosing the Right Fertilizer
When selecting a fertilizer for your Ponytail Palm, it is essential to choose a balanced formula that provides the necessary macronutrients (nitrogen, phosphorus, and potassium) as well as micronutrients (iron, magnesium, zinc, etc.). Look for a slow-release or time-release fertilizer specifically formulated for houseplants or palms. Slow-release fertilizers release nutrients gradually over an extended period, preventing the risk of over-fertilization. Alternatively, you can use a water-soluble fertilizer, but be sure to dilute it according to the manufacturer’s instructions to avoid burning the plant’s roots.
Frequency and Application Guidelines
Ponytail Palms should be fertilized during their active growing season, which typically spans from spring to early fall. During this time, the plant is actively producing new leaves and roots and requires additional nutrients to support this growth. It is best to avoid fertilizing during winter or periods of dormancy when the plant’s metabolic processes slow down.
Before applying any fertilizer, it is crucial to water your Ponytail Palm thoroughly. Watering before fertilizing ensures that the plant’s roots are adequately hydrated and helps prevent fertilizer burn. After watering, allow the soil to drain for a few minutes before applying the fertilizer.
For slow-release fertilizers, follow the manufacturer’s instructions regarding dosage and frequency of application. Typically, you would sprinkle the recommended amount of fertilizer evenly around the base of the plant, avoiding contact with the leaves. Gently work the fertilizer into the top layer of soil using a hand cultivator or rake. Be careful not to damage the plant’s delicate roots while doing so.
If using a water-soluble fertilizer, mix it according to the instructions provided. During the growing season, fertilize your plant once a month or every six weeks with a slow-release fertilizer. If using a water-soluble fertilizer, apply it every two to four weeks at half-strength.
Common Pests and Diseases
Identifying Potential Threats
Ponytail Palms are generally resistant to most pests, but they can still fall victim to a few common invaders. Here are some of the most common pests and diseases that can affect Ponytail Palms:
Aphids: These tiny insects can infest ponytail palms, causing damage by sucking the sap from the leaves. Signs of aphid infestation include distorted growth, yellowing leaves, and the presence of sticky honeydew on the plant’s surface.
Spider Mites: These minuscule arachnids thrive in warm and dry conditions. Spider mites feed on the sap of the leaves, causing yellow spots and eventually leading to leaf drop if left untreated. They also produce fine webbing on the plant’s surface.
Mealybugs: These small, soft-bodied insects often infest ponytail palms. They are typically found in clusters along the stems or at leaf axils. Mealybugs feed on plant tissues, causing stunted growth, yellowing leaves, and honeydew secretion.
Root Rot: This is the most common problem that kills a Ponytail Palm. Root rot occurs from overwatering and leads to yellow leaves.
Sooty Mold: Sooty mold forms from insect waste and blocks sunlight.
Botrytis Blight: This is a rare disease and appears as gray mold.
Preventive Measures
Preventive measures can help keep your Ponytail Palm healthy and free from pests and diseases. Here are some tips:
Regular Inspection: Stay vigilant and regularly inspect your plants for signs of infestation.
Proper Watering: Overwatering can cause root rot. Thus, the soil needs to dry between watering.
Proper Fertilization: Avoid over-fertilizing your plan
Maintain Humidity: Maintain a humid environment by misting the leaves or using a humidifier.
Integrated Pest Management (IPM): IPM employs cultural, biological, and mechanical controls.
Treatment Options
If your Ponytail Palm is affected by pests or diseases, here are some treatment options:
Aphids: To treat an aphid infestation, start by gently washing the leaves with a stream of water. For severe infestations, you can use insecticidal soap or neem oil spray according to the manufacturer’s instructions.
Spider Mites: To treat spider mites, start by isolating the affected plant to prevent the infestation from spreading. Increase humidity around the plant by misting it regularly and wiping the leaves with a damp cloth. Additionally, you can use insecticidal soap or neem oil spray specifically formulated for spider mites.
Mealybugs: To get rid of mealybugs, start by using a cotton swab dipped in rubbing alcohol to remove them manually. For larger infestations, you can use insecticidal soap or neem oil spray.
Root Rot: If there is enough damage to the roots, the plant will never be able to recover. Indoors, you can repot a Ponytail Palm in dry soil to try to nurse it back to health.
Sooty Mold: Horticultural soaps or oils are good non-toxic methods for controlling these pests.
Botrytis Blight: These diseases can be treated by removing the infected parts, improving air circulation, and applying fungicides if necessary.
Seasonal Considerations
Adjusting Care Routines for Different Seasons
Ponytail Palms are adaptable and can thrive in various conditions, but adjusting care routines according to the season can help optimize their growth.
Spring and Summer: This is the growing season for Ponytail Palms. They prefer to have as much light as possible, so place the plant in a bright location. Water every 3-4 weeks, allowing the top inch or two of soil to dry completely before re-watering. Fertilize twice a month.
Fall: As the weather cools, reduce watering frequency. The plant will start to enter a dormant state and won’t need as much water.
Winter: During the winter, only water occasionally. Keep the plant slightly cooler (50-55°F / 10-13°C) to replicate the natural dormancy cycle.
Winter Care Tips
During winter, Ponytail Palms enter a period of dormancy and require less water. Here are some tips for winter care:
Light: Bright, indirect sunlight is best.
Water: Water from spring through fall, allowing the top inch or two of soil to dry completely before re-watering. During the winter, only water occasionally.
Temperature: Keep the plant slightly cooler in the winter (50-55°F / 10-13°C) to replicate the natural dormancy cycle.
Preparing for Spring Growth
As spring approaches, it’s time to prepare your Ponytail Palm for the growing season:
Light: Ponytail Palms prefer to have as much light as possible, so place the plant in a bright location.
Water: Water every 3-4 weeks, allowing the top inch or two of soil to dry completely before re-watering.
Fertilizer: Fertilize twice a month in spring and summer.
Temperature: The ideal temperature range is between 60-80°F (16-27°C).
Humidity: A humidity of 40-50% is sufficient.
Karen Phillips, Bonsai expert and blogger. Read more about me here
Wiring plays a crucial role in shaping bonsai trees for two main reasons: aesthetics and stability.
Aesthetics:
Bending and positioning branches: You can carefully bend and position branches to achieve the desired design, creating elegant curves, interesting angles, and a miniature representation of a mature tree. Adding age and character: Wiring, especially on the trunk and lower branches, can mimic the effects of wind and harsh environments, giving the bonsai a sense of age and weathered character. Improving branch placement: You can adjust the placement of branches to ensure even distribution of foliage, allowing for better light penetration and promoting healthy growth.
Stability:
Strengthening weak branches: Wiring can support and strengthen weak or thin branches, helping them grow in the desired direction without breaking. Creating a strong structure: By strategically wiring the main branches and trunk, you can create a strong and stable tree that can withstand the stresses of bonsai cultivation, like strong winds or shallow pots.
Basics of Bonsai Wiring
In the art of bonsai, wiring acts as a sculptor’s touch, guiding the growth and shaping the branches to achieve your desired vision. Here’s a breakdown of its definition, purpose, and necessity:
Definition: Bonsai wiring involves strategically wrapping pliable metal wire around branches and the trunk to manipulate their direction and position.
Purpose:
Shape and style: The primary purpose is to control branch growth, allowing you to bend and position them for aesthetic appeal. Achieve graceful curves, and dramatic angles, or replicate the character of a weathered tree.
Improve structure: Wiring strengthens weak branches, preventing them from breaking and promoting healthy growth in the desired direction. Additionally, strategic wiring on the trunk and main branches contribute to a robust overall structure, crucial for the health and stability of the bonsai.
Balance and light penetration: By adjusting branch placement, you can ensure even distribution of foliage, enhancing the tree’s visual harmony and allowing light to reach all parts, promoting healthy growth.
When and Why is Wiring Necessary?
Wiring is not always essential, but it becomes crucial in several situations:
Young trees: When shaping a young bonsai, wiring allows you to establish the fundamental branch structure and set the foundation for future development.
Correcting growth: If branches grow in undesirable directions, wiring helps redirect them towards your desired design.
Creating features: Wiring enables you to introduce specific features like bends, twists, or angles that wouldn’t occur naturally, adding character and interest to the bonsai.
Strengthening branches: For thin or weak branches, wiring provides vital support, preventing them from breaking under their own weight or external forces.
Remember: Wiring is a powerful tool, but misuse can damage your bonsai. Ensure you understand the right techniques and timing for each species and branch size to achieve successful shaping without harming your miniature masterpiece.
Types of Bonsai Wire
When it comes to shaping your bonsai, the type of wire you choose plays a crucial role in success. Let’s delve into the two most common options; Annealed Copper wire and Anodized Aluminum wire.
1. Annealed Copper Wire:
Pros:
Strong and durable: Ideal for thick branches, heavy conifers, and creating dramatic bends. Holds its shape well, requiring fewer adjustments over time.
Flexible after bending: Once shaped, it retains its form, making it suitable for long-term styling.
Thin gauge for aesthetics: Due to its strength, you can use thinner wire, minimizing its visibility on the tree.
Cons:
More difficult to work with: Requires more strength and practice to bend compared to aluminum.
Can damage bark: The rougher texture and stronger grip can mark or scar delicate bark, especially on young trees.
More expensive: Generally costs more than aluminum wire.
2. Anodized Aluminum Wire:
Pros:
Easy to bend and use: Ideal for beginners and thin branches due to its softer nature.
Gentler on bark: Suitable for delicate trees as it’s less likely to cause scarring.
Affordable: Generally less expensive than copper wire.
Cons:
Less strong: Not ideal for thick branches or creating major bends, as it may lose its shape over time.
Requires more frequent adjustments: May need to be reapplied or adjusted more often due to its flexibility.
Thicker gauge for visibility: Due to its lower strength, thicker wire is often needed, making it more visible on the tree.
Choosing the Right Wire:
The best wire choice depends on several factors:
Tree species: Consider the thickness and fragility of the branches.
Desired styling: Think about the level of bend and hold you need to achieve.
Your experience level: If you’re a beginner, start with aluminum for its ease of use.
General Recommendations:
For beginners: Start with anodized aluminum wire in various thicknesses (1mm, 1.5mm, 2.5mm) to practice techniques and handle different branch sizes.
For experienced enthusiasts: Explore annealed copper wire for advanced styling and thicker branches.
Always prioritize the health of your tree: Choose a wire that allows you to achieve your desired shape without causing damage.
Tools and Equipment for Bonsai Wiring: Shaping Your Vision
Wiring your bonsai requires specific tools to ensure precise control and minimal damage. Here’s a breakdown of the essentials:
1. Bonsai Wire
Variety of sizes: As discussed earlier, have 1mm, 1.5mm, 2.5mm copper and aluminum wires to cater to different branch thicknesses.
2. Wire Cutters
Sharp and precise: Choose dedicated bonsai wire cutters to ensure clean cuts without crushing the wire.
3. Branch Benders
Multiple sizes and shapes: These pliers-like tools allow for controlled bending of thicker branches without damaging them. Opt for concave and convex forms for diverse bending options.
4. Jin Pliers
Flat, smooth jaws: Designed to shape deadwood (jin) and manipulate thinner branches without leaving marks.
5. Raffia or Twist Ties
Securing the wire: Use these materials to anchor the wire onto the branch without damaging the bark. Raffia is ideal for delicate trees, while twist ties offer extra grip for thicker branches.
6. Scissors and Tweezers
Precision adjustments: Fine scissors help with precise wire cuts and adjustments, while tweezers aid in maneuvering wire on delicate branches.
7. Optional Tools
Branch Spreaders: Create wider branch angles for specific styles.
Guy Wires and Anchors: Provide additional support for heavy branches or complex bends.
Mesh Gloves: Protect your hands from cuts while handling wire.
Remember:
Quality matters: Invest in good-quality tools for better control and minimizing damage to your bonsai.
Start small: Beginners can start with a basic set of wire cutters, branch benders, and raffia.
Sharpen regularly: Maintain sharp tools for clean cuts and efficient work.
Safety first: Wear gloves and eye protection when using wire cutters and benders.
Bonsai Wiring Techniques
Now that you understand the importance of wire, let’s delve into the essential techniques for shaping your bonsai:
1. Single Wiring:
Suitable for: Most branches, especially thinner ones.
Technique:
Choose the right wire: Select a wire 1/3 the thickness of the branch for good control without damage.
Secure the anchor: Wrap the wire around the trunk or a sturdy branch near the base of the target branch.
Guide the branch: Gently bend the branch in the desired direction, guiding the wire along with it.
Wrap and secure: Wrap the wire around the branch at a 45-degree angle, ensuring even spacing between coils. Don’t encircle the branch completely to allow for growth.
Secure the end: Tuck the wire end under a previous coil or wrap it around the trunk, ensuring it’s secure.
2. Double Wiring:
Suitable for: Thick branches needing extra support or complex bends.
Technique:
Prepare two wires: Use thinner wires than single wiring, one for each side of the branch.
Anchor both wires: Secure each wire on opposite sides of the trunk or a sturdy branch near the base.
Position the wires: Place each wire on the side where you want the branch to bend.
Bend and wrap: Gently bend the branch while simultaneously wrapping each wire individually, following the single wiring technique on each side.
Secure the ends: Tuck the wire ends under previous coils or wrap them around the trunk.
3. Guy-Wires
Suitable for: Heavy branches, complex bends, or providing additional support.
Technique:
Anchor the guy wire: Secure a wire on the trunk opposite the direction you want to bend the branch.
Connect to the branch: Attach the other end of the wire to the branch using raffia or a small hook, ensuring it won’t damage the bark.
Adjust tension: Gently tighten the wire to provide support and guide the branch in the desired direction.
Multiple wires: You can use multiple guy wires from different angles for complex bends.
Remember:
Practice on spare branches: Before working on your bonsai, practice techniques on similar-sized branches from other trees.
Go slow and be gentle: Avoid aggressive bending or over-tightening wires, as it can damage the branch.
Observe and adjust: Regularly monitor your bonsai and adjust the wires as needed throughout the growing season.
Remove wires after shaping: Once the branch has grown in the desired position, carefully remove the wire to avoid girdling.
How Long Does Bonsai Wire Stay On? Timing is Key!
The duration of bonsai wiring depends on several factors, ranging from a few weeks to several years, so there’s no one-size-fits-all answer. Here’s a breakdown to help you navigate:
Key Factors:
Branch thickness and species: Thicker branches and fast-growing species generally require shorter wiring periods (4-8 weeks) due to faster wood growth. Thinner branches and slower-growing species may need longer (2-4 months) to set in their new position.
Desired bend: Minor bends might set faster than dramatic ones, requiring shorter wiring times.
Tree health and vigor: A healthy and vigorous tree will set branches faster than a weak one, impacting wiring duration.
Climate and growing season: Warmer temperatures and active growth periods can accelerate branch development, potentially shortening wiring time.
General Guidelines:
Monitor regularly: Check your bonsai every 2-3 weeks, especially during active growth. Look for signs of wire indentation into the bark, indicating it’s time to remove the wire.
Remove before scarring: Don’t wait for deep scars to form. Prompt removal ensures minimal damage and allows for future shaping as needed.
Consider material: Aluminum wire may need more frequent adjustments due to its flexibility, while copper holds its shape longer.
Aftercare: Caring after wiring a bonsai
Immediate Aftercare:
Monitor closely: Observe the wired branches for any signs of stress or damage, such as discoloration, wilting, or cracking bark. Address any issues promptly.
Adjust tension: If the wire seems too tight or the branch appears strained, gently loosen the wire slightly to avoid girdling.
Water thoroughly: Water your bonsai deeply after wiring to help it recover from the manipulation.
Ongoing Care:
Regular observation: Continue to monitor the wired branches weekly, checking for wire indentation, branch movement, and overall health.
Watering schedule: Maintain a regular watering schedule appropriate for your tree species and climate. Avoid overwatering or underwatering.
Fertilization: Apply a balanced fertilizer according to your tree’s needs and growing season to promote healthy growth.
Adjustments: As the branch grows, you may need to adjust the wire tension or position to maintain the desired shape. Be gentle and avoid excessive manipulation.
Remove wires: Once the branch has significantly grown in the desired position (usually after a few months), carefully remove the wire to prevent girdling. Use wire cutters and gently unwind the wire, paying attention not to damage the branch.
Additional Tips:
Protect from harsh conditions: Avoid exposing your bonsai to extreme temperatures, strong winds, or direct sunlight after wiring, as it can stress the tree.
Rotate the pot regularly: Rotating the pot ensures even light distribution and prevents uneven growth.
Prune strategically: Prune other branches as needed to maintain the overall balance and design of the tree.
Troubleshooting Bonsai Wiring: Avoiding and Fixing Common Issues
While wiring unlocks creative shaping possibilities, potential problems can arise if not done correctly. Here’s a guide to identifying and addressing common issues during and after wiring:
During Wiring:
Problem: Branch cracks or snaps. Cause: Excessive force or wire too thick for the branch. Solution: Use thinner wire, apply less pressure, and bend gradually. If the branch breaks, consider grafting techniques to repair it.
Problem: Wire cuts into the bark. Cause: Wire too tight or improperly wrapped. Solution: Loosen the wire or re-wrap with gentler angles. Use raffia or twist ties for padding at pressure points.
Problem: Branch doesn’t bend as desired. Cause: Wiring during the wrong season, thick or rigid branch, or applying insufficient force. Solution: Wire during active growth, use appropriate techniques for thicker branches (branch benders), and apply controlled pressure gradually.
After Wiring:
Problem: Wire leaves indentation or scar on the branch. Solution: Remove the wire promptly once the branch holds its shape (usually within a few months). Use cut paste on minor scars to aid healing.
Problem: The branch doesn’t hold its shape after removing the wire. Cause: Insufficient wiring time, weak branch, or removing the wire too early. Solution: Rewire longer, consider branch strengthening techniques, or wait for thicker branch growth before removing the wire.
Problem: Branch growth stalls or weakens after wiring. Cause: Excessive manipulation, wire cutting off sap flow, or underlying health issues. Solution: Ensure proper technique, avoid restricting sap flow, address any underlying health problems like pests or diseases, and fertilize appropriately.
In the realm of bonsai, the age of these miniature marvels is a profound marker of mastery. A living chronicle of dedicated cultivation, each ancient bonsai tells a story etched in the rings of its tiny trunk.
As we explore the world’s oldest bonsai trees, we embark on a journey through time, discovering the secrets of trees that have witnessed centuries pass. The age of these specimens is not just a number; it is a measure of the patience, wisdom, and love invested in their growth. Join us in exploring the silent beauty of the world’s oldest bonsai trees, where the connection between humans and nature is beautifully revealed.
Crespi’s iconic Ficus Bonsai
Age: Over 1000 Years 0ld
Location: Crespi, Italy
Situated in Crespi, Italy, this remarkable bonsai has become a beacon for enthusiasts worldwide. Its age surpasses generations, offering a unique connection to the history of bonsai. As you gaze upon its intricate branches and lush foliage, you can’t help but marvel at the commitment required to nurture such a magnificent living masterpiece.
The Ficus Bonsai at Crespi is more than a tree; it’s a living artifact, showcasing the rich tapestry of the bonsai tradition. Its roots delve deep into the soil, echoing the commitment of those who have cared for it throughout the centuries. The significance of this ancient tree extends beyond its physical form, reaching into the very soul of bonsai cultivation.
Old Juniper Bonsai Tree at Mansei-en, Japan
Age: Over 1000 Years old
Location: Omiya, Japan
Nestled in the heart of Japan, the Old Juniper Bonsai Tree at Mansei-en stands as a testament to the timeless artistry of bonsai cultivation. Imagine a tree that has witnessed centuries unfold, each branch telling a story of dedication and skilled craftsmanship.
This remarkable juniper bonsai, with its confirmed age, carries the weight of history with grace. Over the years, it has become a symbol of endurance and the delicate balance between nature and human hands. Its gnarled branches seem to whisper secrets of the past, making it a unique and revered entity in the world of bonsai.
Mansei-en, the custodian of this ancient treasure, plays a crucial role in preserving the essence of bonsai. The meticulous care and attention given to the Old Juniper Bonsai Tree reflect not only the horticultural expertise of the Japanese but also their deep cultural connection to these living works of art.
Shunka-en Nursery Bonsai Trees
Age: Around 800 Years old
Location: Tokyo, Japan
Shunka-en Nursery, founded by the renowned bonsai artist Kunio Kobayashi, is home to some of the oldest bonsai trees in the world. Among these is a remarkable tree that is reported to be over 800 years old. This tree is a testament to the dedication and skill of Mr. Kobayashi, who has won the Prime Minister’s Award, the most prestigious prize in Japan, multiple times.
Shunka-en is not just a nursery, but also a museum dedicated to the art and culture of bonsai. It houses over 1,000 bonsai works on display, and attracts 50,000 visitors from all over the world every year. The museum offers a serene and traditional Japanese garden, where visitors can appreciate the beauty and harmony of these miniature trees.
In addition to showcasing bonsai, Shunka-en is also a place of learning. Mr. Kobayashi and his students offer bonsai courses every Sunday, where enthusiasts can learn the essential techniques of wiring and pruning. This dedication to teaching and promoting bonsai culture is a key part of Shunka-en’s mission.
The Japanese White Pine that Survived Hiroshima Bombing
Age: Around 400 Years Old
Location: National Arboretum, Washington, USA
The Japanese White Pine that survived the atomic bombing of Hiroshima holds immense historical and emotional significance. This bonsai tree, which is over 400 years old, was located within two miles of the epicenter of the atomic bomb dropped by American forces on Hiroshima. Despite the devastation, the tree survived, protected by a walled nursery.
The tree belonged to the Yamaki family, who had cared for it for five generations. In 1975, the family gifted the tree to the United States as a symbol of friendship and connection between the two cultures. The tree’s history was not widely known until 2001, when two grandchildren of bonsai master Masaru Yamaki visited the U.S. National Arboretum and shared the tree’s story.
Today, the Japanese White Pine stands in the U.S. National Arboretum, a living testament to history, resilience, and the enduring hope for peace.
Chabo-hiba Cypresses
Age: Around 250 Years Old
Location: Harvard University, USA
The Chabo-hiba Cypress, also known as the Hinoki Cypress, is a unique bonsai tree with distinct characteristics. It is known for its rugged trunks and compact scaled foliage. These trees are typically trained in a conical shape, resembling the image of a distant Mount Fuji. This meticulous training and the tree’s compact form make it stand out among bonsai trees.
The Chabo-hiba Cypress is believed to be between 150 and 275 years old. It is part of the Larz Anderson Collection of Japanese Dwarfed Trees at Harvard University’s Arnold Arboretum. Larz Anderson, who served as an ambassador to Japan, brought back a large collection of bonsai trees to the U.S. in 1913. This collection, including the Chabo-hiba Cypress, was later donated to the Arnold Arboretum.
The Chabo-hiba Cypress is not just a bonsai tree, but a living piece of history, embodying the spirit of horticultural collaboration and cultural exchange. It is a testament to the art of bonsai and the enduring beauty of nature.
Sandai Shogun no Matsu
Age: Over 500 Years Old
Location: Tokyo imperial palace, Tokyo, Japan
The Sandai Shogun no Matsu, a five-needle pine bonsai, is a significant part of Japan’s national heritage. This bonsai tree is believed to be over 500 years old. It is named after Shogun Tokugawa Iemitsu, who received the tree when it was about 200 years old. Since then, the bonsai has been passed down from emperor to emperor.
This bonsai tree has seen the rise and fall of shoguns and emperors, expressing the spirit of Japan’s rich cultural legacy. It has witnessed the evolution of an entire nation and the passing of generations. Today, the Sandai Shogun no Matsu is displayed in the Tokyo Imperial Palace collection.
The Sandai Shogun no Matsu stands out due to its age, historical significance, and the meticulous care it has received over centuries. Its longevity and preservation are a testament to the art of bonsai and the enduring beauty of nature.
Akao Garden’s Red Pine
Age: Around 600 Years Old
Location: Atami, Japan
The Red Pine at Akao Garden, located in Atami, Japan, is a remarkable specimen in the world of bonsai. It is not only one of the oldest bonsai trees but it is also believed to be the largest.
This Red Pine is estimated to be 600 years old. Its grandeur is truly awe-inspiring, with a width of over 30 feet and a height of 16 feet. Despite its size, which is atypical for a bonsai, it still qualifies as a bonsai tree as it is contained in a pot.
The beauty and allure of this Red Pine lie in its age, size, and the meticulous care it has received over centuries. Its branches are so massive that extra support had to be added to hold up the main ones. This tree is a testament to the art of bonsai and the enduring beauty of nature.
Karen Phillips, Bonsai expert and blogger. Read more about me here
Imagine miniature trees, carefully cultivated to grow on rocks, creating stunning and dramatic landscapes. In this article, we will explore the enchanting practice of growing bonsai on rocks, also known as bonsai rock. Discover how this ancient art form combines creativity, nature, and meticulous care to create living masterpieces.
Discovering the Art of Bonsai Rock
The art of bonsai rock is a time-honored practice that has roots in ancient China and has since gained popularity in Japan and other parts of the world. Bonsai rock involves the creation of miniature landscapes that imitate the beauty and harmony found in nature. Carefully selected rocks serve as the foundation for bonsai trees, adding depth and character to these living works of art.
This section explores the history and philosophy behind bonsai rock, shedding light on the techniques and principles that guide this unique art form. By understanding the art of bonsai rock, you can create stunning compositions and transform ordinary rocks into captivating landscapes.
Choosing the Perfect Rock for Your Bonsai
When it comes to creating a visually stunning bonsai rock planting, selecting the right rock is of utmost importance. A rock with character and unique features can add interest and enhance the overall aesthetic appeal of your bonsai. In this section, we will delve into the key factors to consider when choosing the perfect rock for your bonsai.
Finding a Rock with Character
A rock with character is one that possesses distinct features, such as interesting textures, intricate patterns, or unusual shapes. These unique qualities can create a sense of natural beauty and add visual intrigue to your bonsai rock planting. Look for rocks that have weathered and aged over time, as they tend to have more character. Additionally, consider rocks with natural erosion and subtle color variations, as these can further enhance the overall appeal of your bonsai.
Handmade Versus Natural Rocks
When selecting a rock for your bonsai, you may come across both handmade and natural options. Handmade rocks, also known as “suiseki,” are created by artisans who meticulously shape and carve rocks to achieve specific artistic qualities. These rocks are often prized for their intricate designs and craftsmanship.
On the other hand, natural rocks are formed by nature and offer a more authentic and organic feel. Consider your personal preference and the aesthetic you wish to achieve when deciding between handmade and natural rocks for your bonsai rock planting.
Positioning Your Bonsai: The Aesthetics of Balance
The positioning of your bonsai on the rock is crucial for creating a sense of balance and harmony in your composition. The aesthetics of balance in bonsai rock planting involve considering the size and shape of both the bonsai tree and the rock. Aim for a visually pleasing arrangement where the proportions of the bonsai and the rock complement each other. Experiment with different angles and positions to achieve the desired aesthetic effect.
Selecting Bonsai Species for Rock Planting
When it comes to bonsai rock planting, not all bonsai species are created equal. Some species thrive when planted on rocks, while others may struggle to adapt. In this section, we will discuss the best bonsai species for rock planting, ensuring that you choose the right trees to create stunning and harmonious bonsai rock landscapes.
Junipers: The Versatile Choice
Junipers are widely considered one of the best bonsai species for rock planting. Their adaptable nature, resilience, and ability to withstand harsh conditions make them the perfect choice for this unique cultivation method. Junipers exhibit remarkable flexibility, allowing for various styling options, from cascading branches to windswept forms. Additionally, their deep green foliage and rugged bark provide a stunning contrast against the rock surface, creating visually striking compositions.
Pine Trees: Embodying Strength and Longevity
Pine trees are another excellent choice for bonsai rock plantings. Known for their symbolism of strength and longevity, pines add character and serenity to rock landscapes. Their evergreen needles and distinctive bark evoke a sense of harmony and timelessness. The structured and elegant growth patterns of pine trees make them ideal for creating balanced and visually captivating bonsai rock designs.
Deciduous Trees: Adding Variety to Bonsai Rock Landscapes
Deciduous trees, such as maple, cherry, and birch, offer the opportunity to introduce vibrant colors and seasonal changes to bonsai rock gardens. These trees shed their leaves during the fall, revealing intricate branch structures that bring a sense of dynamism to the landscape.
The contrasting textures of the rock and the tree’s bare branches provide a visually engaging display throughout the year. Incorporating deciduous trees in your bonsai rock planting adds diversity and a touch of natural beauty to your miniature landscapes.
By selecting suitable bonsai species for rock planting, like junipers, pines, and deciduous trees, you can ensure the overall health and aesthetic appeal of your bonsai rock compositions. The unique characteristics of these species enhance the natural beauty of the rock while creating visually stunning and harmonious bonsai rock landscapes.
Bonsai Rock Care and Maintenance
Proper care and maintenance are crucial for ensuring the health and longevity of bonsai rock plantings. By following these essential care practices, you can keep your bonsai rock thriving and create a captivating miniature landscape.
Watering:
Water is vital for bonsai rock survival. Keep the soil consistently moist but not waterlogged. Water your bonsai rock thoroughly until water drains out from the bottom of the container. Monitor the moisture level regularly and adjust your watering schedule accordingly to prevent under or overwatering.
Fertilizing:
Provide your bonsai rock with regular nutrients to support its growth and development. Use a balanced liquid fertilizer specifically formulated for bonsai trees. Follow the instructions on the product label and fertilize your bonsai rock at the recommended intervals during the growing season.
Pruning:
Regular pruning helps maintain the desired size and shape of your bonsai rock. Use sharp, clean bonsai pruning shears to trim branches and foliage. Remove any dead or damaged parts, and carefully shape the plant to enhance its aesthetic appeal. Pruning should be done during the appropriate season for the specific bonsai species.
Protecting from Environmental Factors:
Bonsai rocks are exposed to various environmental conditions, including extreme temperatures, wind, and direct sunlight. To protect your bonsai rock, consider positioning it in a location that provides adequate shade and shelter from harsh weather conditions. Additionally, consider using shade cloth or moving your bonsai rock indoors during extreme weather.
When caring for your bonsai rock, it’s essential to monitor its overall health and address any issues promptly. Regularly inspect the plant for signs of pests, diseases, or nutrient deficiencies. Proper care and maintenance will ensure that your bonsai rock thrives and continues to be an eye-catching centerpiece in your garden or indoor space.
The Role of Soil in Bonsai Rock Planting
The choice of soil and its composition plays a crucial role in the success of bonsai rock plantings. The right soil mixture provides essential nutrients, promotes healthy root growth, and ensures proper drainage and moisture retention. In this section, we will guide you on how to mix the right soil for your bonsai rock, explore the use of Keto to secure the soil, and discuss the importance of drainage and retention.
Mixing the Right Soil for Rock Bonsai
Creating the perfect soil mixture for your bonsai rock is essential for the well-being of your plants. The right combination of soil components provides adequate water retention while allowing for proper aeration. One popular soil component for bonsai rock plantings is akadama, a clay-like substance that promotes drainage and root development.
Another common component is garden mold, which helps retain moisture. By mixing akadama and garden mold in the right proportion, you can create a balanced soil mixture that provides your bonsai with optimal growing conditions.
Using Keto to Secure the Soil
Stability is vital when planting bonsai on rocks, and using Keto can help secure the soil in place. Keto, a sticky river mud from Japan, acts as a bonding agent to hold the soil together and prevent it from washing away during watering or heavy rains. Applying a thin layer of Keto over the soil surface ensures that your bonsai’s roots remain firmly anchored to the rock, providing stability and support for healthy growth.
Understanding Drainage and Retention
Drainage and moisture retention are crucial factors to consider when planting bonsai on rocks. Proper drainage ensures that excess water flows out of the soil, preventing root rot and other water-related issues. On the other hand, moisture retention is essential to keep the roots hydrated between watering sessions. Achieving the right balance between drainage and retention is key to maintaining the overall health of your bonsai rock plantings. By providing adequate drainage holes in the rock and using a well-balanced soil mixture, you can ensure that water flows freely while retaining enough moisture for healthy root growth.
Soil Components
Properties
Akadama
Promotes drainage and root development
Garden Mold
Retains moisture
Keto
Secures the soil and prevents erosion
Styles and Symbolism in Bonsai Rock Design
Bonsai rock design offers a wide range of styles, each with its own symbolism and aesthetic appeal. By exploring different styles in bonsai rock design, you can create visually striking and meaningful compositions that reflect your personal taste and vision.
One popular style in bonsai rock design is the cascade style. This style mimics the appearance of a tree growing on a mountainside, with branches cascading downward in a graceful manner. The cascade style symbolizes strength, resilience, and the ability to overcome obstacles.
Another captivating style is the windswept style, which imitates the effect of strong winds shaping a tree’s growth. In this style, the branches and foliage are shaped in a manner that portrays the tree’s struggle against natural forces. The windswept style symbolizes perseverance, adaptability, and the ability to stand tall amidst adversity.
The root over rock style is also a popular choice in bonsai rock design. This style involves growing a bonsai tree with its roots firmly entwined around a rock, creating a dramatic visual effect. The root over rock style symbolizes the deep connection between nature and the bonsai tree, showcasing the tree’s ability to find strength and stability even in seemingly inhospitable conditions.
Understanding the symbolism behind different bonsai rock styles allows you to create compositions that convey meaning and evoke emotions. Whether you choose the cascade, windswept, or root over rock style, each design has a unique story to tell. Experiment with different styles and let your creativity guide you in creating one-of-a-kind bonsai rock compositions that mesmerize and inspire.
Creating Your Own Bonsai Rock
Creating your own bonsai rock planting is an incredible opportunity to unleash your creativity and showcase your passion for bonsai. By combining the natural beauty of rocks with the art of cultivating bonsai trees, you can create a unique and enchanting miniature landscape. This section will guide you through the step-by-step process of planting bonsai on rocks, nurturing and shaping the bonsai over time, and providing helpful tips for securing the bonsai to the rocks.
Step-by-Step Guide to Planting
The first step in creating your bonsai rock planting is selecting the right tree species. It’s important to choose bonsai species that are well-suited for growing on rocks. Some popular choices include junipers, pines, and deciduous trees. Once you have chosen your tree, follow these steps:
Carefully select a rock that has character and unique features. Ensure it is large enough to provide a stable foundation for the bonsai tree.
Prepare the rock by cleaning it thoroughly and removing any dirt or debris.
Place a layer of soil on the rock, providing a stable base for the roots.
Position the bonsai tree on the rock, making sure to align the roots with the soil layer.
Add more soil around the roots, carefully securing them in place.
Water the bonsai thoroughly to settle the soil and provide moisture for the tree.
By following these steps, you can successfully plant your bonsai on a rock, creating an eye-catching and harmonious composition.
Nurturing and Shaping the Bonsai Over Time
Once you have planted your bonsai on a rock, it’s essential to provide proper care and maintenance to ensure its health and development. Here are some nurturing and shaping practices:
Regularly water the bonsai to keep the soil moist but not waterlogged. Check the soil’s moisture level by inserting your finger about an inch into the soil; if it feels dry, it’s time to water.
Prune the bonsai tree to maintain its desired shape and encourage growth. Remove any dead or overgrown branches to promote healthy development.
Protect the bonsai from extreme weather conditions, such as strong winds, frost, or excessive heat. Move the bonsai to a sheltered location if needed.
Provide adequate sunlight for the bonsai, ensuring it receives the appropriate amount for its specific species.
With proper nurturing and shaping over time, your bonsai tree will thrive, achieving its desired form and aesthetics.
Tips for Securing Bonsai to Rocks
Securing the bonsai to the rocks is crucial to maintain the stability and longevity of your bonsai rock planting. Here are some tips to ensure a secure attachment:
Use wire or bonsai tie to firmly hold the roots in place and prevent movement.
Wrap the wire or tie around the roots and secure it to the rock, ensuring it is tight but not too constricting.
Keep an eye on the attachment over time and adjust as necessary to accommodate the growth of the roots.
By following these tips, you can secure your bonsai to the rocks effectively, allowing it to grow and thrive in its new environment.
Bonsai Rock Techniques: Root Over Rock Methodology
The root over rock technique is a fascinating and visually striking method used in bonsai rock cultivation. It involves shaping the roots of a bonsai tree to cascade over the surface of a rock, creating a beautiful and harmonious composition. If you’re looking to master this technique and create stunning root over rock bonsai, here are the key steps to follow:
Prepping Your Rock and Tree for the Root Over Rock Style
Start by selecting a suitable rock that complements the size and style of your bonsai tree. The rock should have crevices or depressions that can accommodate the tree’s roots. Carefully clean the rock and ensure it is free from any debris. Next, examine your bonsai tree and identify a root system that is flexible and can be trained to grow over the rock surface.
Wrapping and Securing the Root Structure
To encourage the roots to grow over the rock, gently wrap the roots around the rock’s surface using bonsai wire. Be careful not to exert too much pressure or strain on the roots. The wire should be wrapped firmly but not too tightly, allowing some room for the roots to expand and develop. Secure the ends of the wire to prevent it from unwinding, ensuring the roots remain in place.
The Importance of Patience: Growth and Development Over Years
Growing a root over rock bonsai requires patience and dedication. It takes time for the roots to establish and adhere to the rock, creating a natural and balanced appearance. Be diligent in providing the necessary care, including regular watering, fertilizing, and pruning, to support healthy growth. Over the years, the roots will continue to strengthen and intertwine with the rock, resulting in a mature and stunning root over rock bonsai.
By following these steps and exercising patience, you can master the root over rock technique and create breathtaking bonsai rock compositions. The combination of the natural beauty of rocks and the graceful cascade of roots will elevate your bonsai artistry to new heights.
Karen Phillips, Bonsai expert and blogger. Read more about me here
Mimosa bonsai, scientifically known as Albizia julibrissin, are a unique addition to any Japanese garden or indoor bonsai collection. With their delicate leaves, vibrant pink flowers, and fast growth, these bonsai trees require specific care to thrive.
Unlike other bonsai species, mimosa offer a distinct beauty that sets them apart. Their fern-like leaves and rosy-colored pom-pom flowers add an elegant touch to any Japanese garden. They can also be cultivated indoors, allowing you to enjoy their beauty all year round. Whether you are a seasoned bonsai enthusiast or just starting your gardening journey, mastering the art of caring for a mimosa bonsai tree is a rewarding endeavor.
In this guide, we will provide you with essential tips and techniques to ensure your mimosa bonsai thrives under your care. From creating the optimal environment to mastering watering techniques, pruning strategies, and repotting, you’ll have all the information you need to keep your bonsai healthy and flourishing.
Introduction to Mimosa Bonsai: A Unique Addition to Your Japanese Gardening
Mimosa bonsai, also known as Albizia julibrissin, is a popular choice for bonsai enthusiasts due to its unique features and delicate beauty. Originating from southern Mexico and Northern America, these trees have fern-like leaves and produce rosy-colored pom-pom flowers that add an elegant touch to any Japanese garden. These trees can also be cultivated indoors, allowing you to enjoy their beauty all year round. With their fast growth and distinct characteristics, mimosa bonsai trees are a captivating addition to any bonsai collection.
“The unique features of mimosa bonsai make it a captivating addition to any bonsai collection.”
Essential Care for Thriving Mimosa Bonsai
Creating the right environment is crucial for the health and growth of your mimosa bonsai tree, whether it is grown indoors or outdoors. These trees prefer full sunlight and a warm climate, making them ideal for indoor cultivation in most regions. However, they are not frost-hardy and should be protected from freezing temperatures.
The Right Environment for Your Indoor Bonsai
Mimosa bonsai trees thrive in a warm and well-lit environment. When growing your bonsai indoors, place it near a south-facing window where it can receive plenty of sunlight throughout the day. If natural light is limited, you can supplement it with artificial grow lights to provide the necessary light intensity for your bonsai’s growth.
Mastering the Art of Watering Your Mimosa Bonsai
Proper watering is essential for the health and vitality of your mimosa bonsai tree. Avoid overwatering, as it can lead to root rot and other issues. Instead, water your bonsai when the top inch of soil feels slightly dry. Use a watering can with a fine nozzle to gently water the soil until water begins to drain from the bottom of the pot. Ensure that the excess water is fully drained to prevent waterlogged roots.
Nourishment Strategies: Fertilizing Your Bonsai Tree
Fertilizing your mimosa bonsai tree is crucial for providing the necessary nutrients for healthy growth. Use a balanced, slow-release bonsai fertilizer during the growing season to promote strong foliage and vibrant blooming. Follow the manufacturer’s instructions for the recommended dosage and frequency of application. Avoid overfertilizing, as it can cause nutrient burn and damage the roots.
Mimosa Bonsai Pruning and Shaping Techniques
“Pruning and shaping play a vital role in maintaining the desired form and structure of your mimosa bonsai tree.”
Proper pruning and shaping techniques are essential for cultivating a visually appealing and balanced mimosa bonsai tree. By following these techniques, you can create a masterpiece that showcases the natural growth patterns of the tree. Here’s what you need to know:
Timing: Pruning should be done after the flowering period or in early spring. This allows the tree to recover and promote new growth.
Technique: When pruning, carefully remove dead or overgrown branches, ensuring that the overall shape of the tree is maintained. Be mindful of Albizia julibrissin’s brittle branches and soft bark, as they require gentle handling to avoid damage.
Shaping: To shape your mimosa bonsai, study the natural growth patterns of the tree and mimic them. You can use small wires to gently guide branches into the desired position. Regular monitoring of wired branches is necessary to prevent scarring and ensure proper growth.
Remember, the goal of pruning and shaping is to achieve a balanced and aesthetically pleasing bonsai tree. Take your time and enjoy the process of crafting your mimosa bonsai masterpiece.
The Delicate Process of Repotting Mimosa Bonsai
Repotting your mimosa bonsai is an important part of its care routine and is necessary every few years to ensure healthy root growth and nutrient uptake. Proper repotting helps prevent the bonsai from becoming root-bound and allows for the replenishment of essential nutrients in the soil. To successfully repot your plant, there are a few key steps to follow.
Timing and Signs for Repotting Your Bonsai Species
Timing is crucial when it comes to repotting your mimosa bonsai. The ideal time for repotting is during the tree’s active growing season, which is typically in early spring or summer. Repotting during this time allows the tree to recover quickly and establish new roots before entering a period of dormancy during the winter months.
Aside from timing, it’s important to observe the signs that indicate your bonsai tree needs repotting. Look for the following signs:
Excessive roots filling the pot
Slow growth or stunted development
Water draining too quickly or not at all
Yellowing or wilting leaves
If you notice any of these signs, it’s a clear indication that your mimosa bonsai requires repotting.
Selecting the Ideal Soil and Pot for Bonsai Care
The choice of soil and pot plays a crucial role in the health and development of your mimosa bonsai. When selecting the soil, it’s important to choose a well-draining bonsai soil mixture that provides good aeration for the roots. A mixture of akadama, pumice, and lava rock is often recommended for mimosa bonsai. Avoid using regular garden soil, as it retains too much moisture, which can lead to root rot.
In terms of choosing the right pot, select one that is slightly larger than the current pot to allow for root growth. Opt for a bonsai pot with drainage holes to prevent waterlogging and ensure proper airflow to the roots. Ceramic and clay pots are popular choices for this genus as they allow for better evaporation and provide stability.
Root Pruning and Aftercare
During the repotting process, root pruning is essential to maintain a compact and healthy root system. Carefully remove the bonsai tree from its current pot, and gently untangle and trim any tangled or circling roots. Pruning the roots stimulates new growth and encourages a more refined root structure. Make sure to use clean and sharp bonsai shears to avoid damaging the roots.
After repotting, provide proper aftercare to support the recovery and development of your mimosa bonsai. Place the repotted tree in a shaded location for a few weeks, allowing it to adjust to the new pot and soil. During this period, monitor the tree’s water requirements and ensure it receives adequate but not excessive watering. Adjust the watering schedule as needed, taking into account the specific needs of your plant and the prevailing environmental conditions.
With timely repotting, the right soil and pot selection, and careful root pruning and aftercare, your mimosa bonsai will continue to thrive and bring beauty to your bonsai collection.
Preventing and Managing Pests and Diseases in Your Mimosa Bonsai
Ensuring the health and vitality of your mimosa bonsai tree requires proactive prevention and management of pests and diseases. While these trees are generally resilient, they can still fall victim to common pests such as scale, mites, and webworms. These pests can cause damage to the foliage, weaken the tree, and even lead to its demise if left untreated.
To protect your mimosa bonsai from these pesky invaders, it is crucial to regularly inspect your tree for signs of infestation. Look out for sticky residue or a blackened appearance on the leaves, which could indicate the presence of scale insects. If you spot webbing or silken tents on the tree, it may be a sign of webworms. Mites can be more challenging to detect, but brown or discolored leaves may be a clue.
If you notice any signs of pests, act quickly to prevent the infestation from spreading. Targeted pesticides can be used to eliminate specific pests, ensuring the health and well-being of your tree. However, it’s important to choose pesticides that are safe for bonsai and follow the instructions carefully to avoid harming your tree or the environment.
In addition to pest management, maintaining proper hygiene around your mimosa bonsai is essential for disease prevention. Regularly clear away fallen leaves and debris that can harbor fungal spores or bacteria, creating a breeding ground for diseases. By keeping your bonsai’s environment clean, you can significantly reduce the risk of disease and promote its long-term health.
Karen Phillips, Bonsai expert and blogger. Read more about me here
Unlike regular Christmas trees, bonsai Christmas trees are miniaturized versions that can be displayed indoors, making them ideal for small living spaces or as captivating tabletop centerpieces. With their intricate forms and delicate foliage, bonsai Christmas trees are truly a decorative masterpiece that adds a touch of nature to your holiday celebrations.
In this comprehensive guide, we will take you through every aspect of caring for your bonsai Christmas tree, from selecting the right tree to mastering watering techniques, fertilizing, pruning, and wiring. Whether you’re a seasoned bonsai enthusiast or just starting with bonsai care, this guide will equip you with the knowledge and skills to nurture and maintain a thriving bonsai Christmas tree throughout the holiday season and beyond.
Introducing the Unique Charm of Bonsai Christmas Trees
Bonsai trees have a rich history dating back thousands of years, originating in China and gaining popularity in Japan. Unlike traditional Christmas trees, bonsai trees are not a specific type of tree but a style of horticulture. They are trained to remain small in size while exhibiting unique and artistic forms. Bonsai Christmas trees bring a fresh and distinctive look to holiday decorations, transforming the way we celebrate the season. By incorporating the beauty of nature and the artistry of bonsai, these mini Christmas trees create a sense of tranquility and wonder during the festive period.
Selecting the Right Tree for Your Bonsai Christmas Tree
Choosing the right tree is crucial for creating a stunning bonsai Christmas tree. While many tree species can be used, there are certain characteristics to consider. Factors such as size, foliage type, growth pattern, and suitability for indoor cultivation play a significant role in selecting the perfect tree. Whether you prefer evergreen trees like spruce or fir, or deciduous varieties like maple or elm, each tree has its own unique qualities and care requirements. In this section, we will explore different tree species and provide insights on selecting the ideal tree for your bonsai Christmas tree.
When choosing a tree for your bonsai Christmas tree, consider the following:
Size: Decide if you prefer a mini Christmas tree that can fit on your tabletop or a slightly larger indoor bonsai tree that can become a focal point in your living space.
Foliage Type: Choose between evergreen trees with year-round green foliage or deciduous trees that change their leaves with the seasons.
Growth Pattern: Consider the growth pattern of the tree, whether you want a tree with cascading branches or an upright form.
Suitability for Indoor Cultivation: Ensure that the tree you choose is suitable for growing indoors and can thrive in the conditions of your home or office.
Here are some popular tree species for bonsai Christmas trees:
Tree Species
Size
Foliage Type
Growth Pattern
Indoor Suitability
Spruce
Mini to Small
Evergreen
Upright
Yes
Fir
Small to Medium
Evergreen
Pyramidal
Yes
Maple
Mini to Small
Deciduous
Upright or Cascading
Yes
Elm
Medium to Large
Deciduous
Upright or Spreading
Yes
Optimal Placement and Sunlight Requirements
The proper placement of your bonsai Christmas tree is essential for its growth and overall well-being. In addition to placement, providing the right amount of sunlight is crucial. Bonsai trees require a delicate balance between sunlight and shade to thrive. Understanding the sunlight requirements for different tree species will help you create the optimal environment for your indoor bonsai tree to flourish.
When considering the placement of your bonsai Christmas tree, keep in mind the following guidelines:
Choose an area in your home that receives bright, indirect sunlight. Direct sunlight can be too intense and may scorch the leaves.
Avoid placing your bonsai tree near drafty windows, as the constant exposure to cold air can harm the tree.
Ensure the location offers consistent temperature and humidity levels, as extreme fluctuations can stress the tree.
It’s important to note that different tree species have varying sunlight requirements. Some bonsai trees, such as junipers, thrive in full sun, while others, like ficus trees, prefer partial shade. Research the specific sunlight needs of your chosen bonsai tree and adjust the placement accordingly.
Proper air circulation is also vital for the health of your bonsai Christmas tree. Adequate air movement prevents the growth of fungi and promotes healthy transpiration. Avoid placing your bonsai tree in stagnant areas or near heat sources that may dry out the foliage.
By providing the optimal placement and meeting the sunlight requirements of your bonsai Christmas tree, you will create a favorable environment for its growth and ensure its longevity.
Mastering the Watering Techniques for Your Indoor Bonsai Tree
Proper watering is crucial for the health and vitality of your indoor bonsai Christmas tree. Achieving the right balance of moisture is essential, as both overwatering and underwatering can have detrimental effects on the tree’s well-being. Each tree species has its own specific watering needs, influenced by factors such as temperature, humidity, and soil composition. In this section, we will explore different watering techniques and provide expert advice on how to determine when and how much to water your bonsai Christmas tree to ensure its long-term success.
When it comes to watering your indoor bonsai tree, it’s important to find the right balance. Overwatering can lead to root rot and other fungal diseases, while underwatering can cause the tree to dry out and eventually die. To ensure your bonsai Christmas tree receives the optimal amount of water, here are some watering techniques to follow:
Check the soil moisture: Before watering, check the moisture level of the soil by inserting your finger about an inch deep. If it feels dry, it’s time to water the tree. If it still feels slightly moist, wait for a day or two before watering.
Watering methods: There are two common methods for watering bonsai trees: immersion and top watering. Immersion involves placing the pot in a basin of water and allowing the soil to soak up moisture from the bottom. Top watering involves gently pouring water onto the soil surface, ensuring that it reaches the roots.
Watering frequency: The frequency of watering depends on various factors such as the tree species, pot size, temperature, and humidity. As a general rule, it’s better to underwater than overwater. Monitor your bonsai tree regularly and adjust the watering frequency accordingly.
Spraying the foliage: In addition to watering the soil, it’s beneficial to occasionally mist the foliage of your bonsai Christmas tree. This helps increase humidity and prevents the leaves from drying out.
Drainage: Good drainage is essential to prevent waterlogging. Ensure the bonsai tree’s pot has drainage holes and is placed on a drip tray or saucer to catch excess water.
By following these watering techniques, you can ensure that your indoor bonsai Christmas tree receives the right amount of moisture for healthy growth. Remember to always observe your tree’s specific needs and make adjustments as necessary. With proper watering, your bonsai Christmas tree will thrive and bring joy throughout the holiday season and beyond.
Fertilizing: Providing Nutrients for a Thriving Christmas Bonsai Tree
Fertilizing is an essential aspect of bonsai care, providing the necessary nutrients for your Christmas bonsai tree’s growth and development. Just like any other plant, bonsai trees require a balanced diet of essential minerals to stay healthy and vibrant. By understanding the different types of fertilizers, their nutrient composition, and the appropriate application methods, you can ensure your bonsai Christmas tree receives the optimal nutrition it needs to thrive.
When it comes to fertilizing your bonsai Christmas tree, it’s important to consider the specific requirements of your tree species. Different trees have varying nutrient needs and may benefit from specific fertilizer formulations. For example, an evergreen indoor bonsai tree may require a fertilizer with higher nitrogen levels to support vigorous growth and lush foliage, while a deciduous bonsai tree may benefit from a balanced fertilizer that promotes overall health and resilience.
Applying fertilizers at the right time is crucial to maximize their effectiveness. Generally, bonsai trees should be fertilized during the growing season, which is usually in spring and summer. However, it’s important to research and understand the specific feeding schedule for your particular tree species, as some may have different requirements.
There are different types of fertilizers available, including liquid fertilizers, granular fertilizers, and organic fertilizers. Liquid fertilizers are easily absorbed by the bonsai tree’s roots and provide immediate nutrients. Granular fertilizers release nutrients slowly over time, ensuring a steady supply of nourishment. Organic fertilizers, such as compost or fish emulsion, are derived from natural sources and help improve the overall soil health.
When applying fertilizer to your bonsai Christmas tree, it’s essential to follow the manufacturer’s instructions regarding dosage and frequency. Overfertilizing can lead to nutrient burn and damage the tree’s delicate root system, while underfertilizing can result in stunted growth and weak foliage. Remember to water your bonsai tree thoroughly before fertilizing, as this will help prevent the roots from getting burned by concentrated fertilizer.
TIP: It’s a good practice to occasionally flush the soil of your bonsai Christmas tree to remove any built-up salts and ensure optimal nutrient absorption. To do this, water your bonsai tree with plain water until it flows out from the drainage holes at the bottom of the pot.
By providing the right nutrients through proper fertilization, you can ensure that your Christmas bonsai tree remains healthy, vibrant, and ready to impress during the holiday season. Keep in mind that fertilizing is just one aspect of bonsai care, and it should be combined with other practices like proper watering, pruning, and placement to create the perfect environment for your indoor bonsai tree.
Pruning and Wiring: Crafting the Perfect Mini Christmas Tree Shape
To achieve the distinctive form and aesthetics of a bonsai Christmas tree, pruning and wiring techniques are essential. These methods allow you to shape and maintain the desired look, ensuring your mini Christmas tree captures attention and admiration.
Pruning plays a vital role in controlling the growth and shape of your bonsai Christmas tree. By selectively removing branches and foliage, you can create a compact and well-balanced tree. Start by identifying branches that detract from the desired shape and carefully trim them using sharp bonsai pruning shears. Remember to maintain the proportions and maintain a natural appearance throughout the pruning process.
Wiring is another crucial technique that enables precise manipulation of branches and foliage. By gently wrapping wire around the branches, you can guide them into the desired position. To avoid damaging the tree, ensure the wire is not too tight and regularly check for any signs of wire cutting into the bark. Once the branches have set into the desired shape, you can remove the wire to allow the tree to continue growing naturally.
It’s important to note that pruning and wiring should be done with careful consideration and patience. Always consult bonsai-specific resources or seek guidance from experienced bonsai enthusiasts to ensure you employ proper techniques suitable for your bonsai Christmas tree. With practice and attention to detail, you will master the art of pruning and wiring, creating a captivating and visually appealing miniature Christmas tree that will be the highlight of your holiday decor.
Karen Phillips, Bonsai expert and blogger. Read more about me here
Serissa bonsai, scientifically known as serissa japonica, is a stunning plant that captivates bonsai enthusiasts with its fine oval leaves, rough grey bark, and lovely flowers. However, it is important to note that serissa bonsai may require more attention and care compared to other bonsai varieties due to its delicate nature.
In this guide, we will discuss the specific care techniques for serissa bonsai, including pruning, watering, fertilization, and more. Whether you’re a beginner just starting your bonsai journey or an experienced enthusiast looking to expand your collection, this guide will equip you with the knowledge to successfully care for your serissa bonsai.
So let’s dive in and discover the secrets to cultivating a thriving serissa bonsai!
Understanding the Unique Serissa Bonsai
The serissa bonsai, also known as the snow rose, is a remarkable plant that captivates enthusiasts with its delicate nature and distinct characteristics. With its fine oval leaves, rough grey bark, and lovely flowers, the serissa bonsai is truly a sight to behold. However, its uniqueness comes with added responsibility in terms of care and maintenance.
The Delicate Nature of Serissa Japonica
The serissa japonica, commonly referred to as the snow rose, is renowned for its delicate nature. It requires meticulous attention and care, making it a cherished challenge for bonsai enthusiasts. The serissa bonsai is more sensitive compared to other bonsai varieties, necessitating a deep understanding of its specific needs and requirements.
Recognizing the Snow Rose’s Distinct Characteristics
One cannot help but fall in love with the distinct characteristics of the snow rose bonsai. Its fine oval leaves provide an elegant and aesthetic appeal, accentuated by the rough grey bark that adds a touch of rugged beauty. Additionally, the serissa bonsai produces lovely flowers that come in various colors, further enhancing its allure.
Moreover, serissa bonsai enthusiasts have the pleasure of exploring different varieties of this captivating plant. From the classic serissa japonica to the elegant variegated varieties, there is a wide range of options to suit every taste and preference.
Understanding the unique serissa bonsai is the first step towards successful care and cultivation. With its delicate nature, distinct characteristics, and diverse varieties, the serissa bonsai offers a rewarding experience for any bonsai enthusiast.
Optimal Environment for a Flourishing Serissa Bonsai
To ensure the healthy growth and development of your serissa bonsai, it is crucial to create an optimal environment that meets its specific needs. This section will guide you on finding the right temperature balance and creating an ideal lighting setup for your serissa bonsai to thrive.
Finding the Right Temperature Balance
The serissa bonsai is a delicate plant that requires a stable and moderate temperature to flourish. It is important to avoid drastic temperature drops, as they can negatively impact the health of your bonsai. Ideally, the temperature should be kept between 60°F and 75°F (15°C to 24°C) throughout the year.
In colder regions, it is advisable to bring your serissa bonsai indoors during the winter months to protect it from frost. When transitioning the bonsai indoors, gradually acclimate it to the indoor temperature by placing it in a cool room for a few weeks before moving it to a warmer location.
Creating an Ideal Lighting Setup
Proper lighting is essential for the growth and development of your serissa bonsai. These bonsai trees thrive in bright, indirect light. Place your bonsai near a window where it can receive plenty of natural sunlight. However, be cautious of direct sunlight, as it can scorch the delicate leaves.
If natural sunlight is limited, you can supplement it with artificial lighting. Grow lights are a great option to ensure that your serissa bonsai receives an adequate amount of light. Position the grow lights above your bonsai, approximately 6 to 12 inches (15 to 30 cm) away, and provide 12 to 16 hours of light per day.
In addition to lighting, the serissa bonsai requires high humidity to thrive. You can increase the humidity around your bonsai by placing a tray of water near it or using a humidifier. Mist the foliage occasionally, taking care to avoid excessive moisture on the leaves, which can lead to fungus or rot.
Creating the ideal environment for your serissa bonsai involves finding the right temperature balance and providing adequate lighting and humidity. By maintaining these conditions, you can ensure the health and vitality of your serissa bonsai, allowing it to thrive and beautify your living space.
Serissa Bonsai Watering Techniques
Proper watering is essential for the health and vitality of your serissa bonsai. To ensure the well-being of your delicate snow rose, it is crucial to understand the watering techniques that will provide optimal care.
First and foremost, maintaining a moist root ball is key. The serissa bonsai enjoys a consistently moist environment, but be cautious not to overwater. Overwatering can lead to root rot and other detrimental conditions. To achieve the perfect balance, regularly check the moisture levels of the soil by inserting your finger about an inch deep. If it feels slightly dry, it’s time to water.
Here are some important watering tips and considerations:
Water your serissa bonsai thoroughly, until water drains out from the drainage holes at the bottom of the pot.
Use a watering can or a soft spray nozzle to ensure gentle and uniform water distribution.
Allow the excess water to drain completely to prevent waterlogging and root suffocation.
Observe the signs of overwatering, such as yellowing leaves, wilting, and a foul odor. If these symptoms are present, adjust your watering routine accordingly.
Remember that containers with inadequate drainage can cause water retention, leading to root rot. Ensure your bonsai pot has sufficient drainage holes.
It is best to use room temperature water when watering your serissa bonsai. The plant prefers neutral pH water, so avoid water with high mineral content or chlorine. If possible, use lime-free water for foliage spraying to prevent leaf burn.
Proper watering will contribute to the overall health and vitality of your serissa bonsai. By following these techniques, you can provide the ideal moisture levels and ensure the longevity of your beautiful snow rose.
Pruning and Shaping Your Serissa Bonsai
To maintain the beautiful shape and form of your serissa bonsai, pruning is an essential task. Pruning helps to encourage new growth, improve overall health, and maintain the desired aesthetic appearance of your bonsai tree. In this section, we will explore the timing of pruning for best results and discuss the proper methods of pruning and shaping your serissa bonsai.
Timing Your Pruning for Best Results
The timing of pruning plays a crucial role in the success of your serissa bonsai. The ideal time for pruning is in early spring, just before new growth starts. During this time, the tree is most actively growing, which allows for faster healing and recovery. Pruning during this period also helps to promote vigorous growth throughout the upcoming season.
When pruning your serissa bonsai, focus on removing any dead, damaged, or diseased branches first. This will help improve the overall health of the tree and prevent any further spreading of diseases or pests. Additionally, you can selectively prune branches to maintain the desired shape and form of your bonsai.
Wiring Methods and Care
Wiring is another essential technique used in shaping and training serissa bonsai. It allows you to bend and position branches to achieve the desired shape and structure. However, it should be done with great care to avoid causing any damage to the tree.
When using wiring techniques, ensure that the wire is wrapped tightly enough to hold the branch in place but not too tight to avoid restricting the flow of nutrients. It is recommended to use aluminum or copper wire, as they are flexible, easy to work with, and won’t damage the branches.
After approximately six months, it is important to remove the wiring to prevent it from cutting into the bark as the branches continue to grow. Removing the wire should be done carefully to avoid any further damage to the tree.
By following proper pruning and wiring techniques, you can shape your serissa bonsai into a stunning masterpiece. Regular pruning and shaping sessions will not only help maintain the desired form but also promote healthy growth and overall vitality of your bonsai tree. Remember to always use sharp and clean tools when pruning and handle your serissa bonsai with care to ensure its long-term health and beauty.
Bolstering Your Serissa Bonsai’s Health with Proper Fertilization
In order to ensure the health and vitality of your serissa bonsai, proper fertilization is essential. By providing your bonsai with the right nutrients, you can promote optimal growth and encourage the development of a strong root system. Let’s explore the key aspects of fertilizing your serissa bonsai.
Selecting the Right Fertilizer
When it comes to choosing the right fertilizer for your serissa bonsai, it’s important to look for a product with a balanced N-P-K ratio. This means that the fertilizer should contain a mix of nitrogen (N), phosphorus (P), and potassium (K) in equal proportions. This balanced ratio will support overall plant health and provide the necessary nutrients for growth.
In addition to the balanced N-P-K ratio, it’s recommended to use a low concentration of liquid fertilizer for your serissa bonsai. This will prevent the risk of overfertilization and minimize the chance of burning the roots. Remember, it’s always better to under-fertilize than to over-fertilize your bonsai.
Feeding Schedules for Optimal Growth
Establishing a regular feeding schedule is crucial for the optimal growth of your serissa bonsai. During the growing season, which typically spans from spring to fall, it’s recommended to fertilize your bonsai once a month. This will provide a steady supply of nutrients to support vigorous growth.
However, it’s important to reduce the frequency of fertilization during the winter months when the bonsai enters a dormant state. Aim to fertilize your serissa bonsai every two to three months during this period, as it requires fewer nutrients while resting.
Keep in mind that it’s crucial to avoid fertilizing unhealthy or non-growing serissa bonsai trees. Applying fertilizer to a weak or stressed bonsai can further compromise its health. Instead, focus on providing proper care and addressing any underlying issues before resuming regular fertilization.
When it comes to the type of fertilizer, you have the option of using either solid organic fertilizers or liquid fertilizers for your serissa bonsai. Both can provide the necessary nutrients, and the choice ultimately depends on your personal preference and the specific needs of your bonsai.
Karen Phillips, Bonsai expert and blogger. Read more about me here
Reviving a dead bonsai tree can be a challenging but rewarding task. If you’ve found yourself with a lifeless bonsai tree, don’t despair – with the right knowledge and care, you can bring it back to life. In this comprehensive guide, we’ll provide you with all the information you need to revive your beloved bonsai tree and help it thrive once again.
Whether your bonsai tree has suffered from neglect, improper care, or other factors, We will discuss How to revive a dead bonsai tree, step-by-step. From diagnosing the problem to implementing the right techniques, we’ve got you covered. Not only will your bonsai tree be revived, but you’ll also gain valuable insights into how to prevent its decline in the future.
Identify Your Bonsai Species: Before you begin the revival process, it’s crucial to identify the species of your bonsai tree. Different species have different care requirements, and understanding the specific needs of your tree is vital for its revival. We’ll guide you on how to identify your bonsai species and provide tailored care guidelines.
Diagnose the Problem: To revive your dead bonsai tree, it’s essential to diagnose the cause of its demise. By understanding the underlying problem, such as improper watering, lack of sunlight, or root issues, you can address it effectively and take the appropriate steps for revival.
Revive Your Bonsai Tree: Our step-by-step revival process will empower you to bring your bonsai tree back to life. From proper pruning techniques for damaged branches to assessing hydration and soil health, you’ll learn the essential steps to revive your bonsai tree and promote its healthy growth.
Preventive Measures for Long-Term Care: To ensure the long-term health and vitality of your bonsai tree, we’ll share preventive measures and care tips. Learn how to avoid common watering mistakes, optimize the placement of your bonsai for optimal growth, and make seasonal adjustments to nurture your tree throughout the year.
Reviving a dead bonsai tree requires patience, dedication, and a willingness to learn. With our expert guidance, you’ll soon be on your way to reviving your bonsai and enjoying the beauty of this ancient art form. Get ready to give your bonsai tree a new lease on life!
Understanding Your Bonsai’s Needs
Before you can revive a dead bonsai tree, it’s important to understand its specific needs. Identifying the species of your bonsai is crucial, as different species have different care requirements. We’ll guide how to identify your bonsai species and offer specific care guidelines for both indoor and outdoor bonsai trees. Additionally, we’ll emphasize the importance of sunlight and location for the health of your bonsai and provide tips on finding the perfect spot for optimal growth.
Identify Your Bonsai Species
Each bonsai species has unique characteristics and care requirements. By identifying your bonsai species, you can tailor your care routine to meet its specific needs. Look for distinguishing features such as leaf shape, bark texture, and growth patterns. Consult bonsai books, guides, or experts for help with identification. Once you know the species, you can research its specific care guidelines to ensure your bonsai thrives.
Specific Care Guidelines for Indoor vs Outdoor Bonsai
Indoor and outdoor bonsai require different care approaches due to varying environmental conditions. Indoor bonsai typically needs more attention to factors such as humidity, temperature, and air circulation, while outdoor bonsai relies on natural elements like sunlight and seasonal changes. Research the specific care requirements for your type of bonsai and keep in mind the unique needs associated with its placement.
The Importance of Sunlight and Location for Bonsai Health
Sunlight is crucial for the health and vitality of your bonsai tree. Most bonsai species thrive in locations with bright, indirect light. However, the specific sunlight requirements vary depending on the species. Research the ideal lighting conditions for your bonsai and place it in a spot where it can receive adequate light without being exposed to direct sunlight, which can cause leaf burn. Remember to consider the lighting conditions of both indoor and outdoor locations when choosing the best spot for your bonsai.
Bonsai Species
Indoor Care Guidelines
Outdoor Care Guidelines
Juniper
Place in a bright room near a window with filtered sunlight. Maintain consistent humidity levels.
Position in an area with ample sunlight. Water regularly and provide protection from extreme weather conditions.
Ficus
Keep in a well-lit room away from drafts. Maintain consistent temperature and water when the soil becomes slightly dry.
Expose to partial sunlight for several hours a day. Water regularly and protect from frost during winter.
Pine
Place near a window with bright, indirect light. Maintain cool temperatures and provide good ventilation.
Position in an area with full sun exposure. Water deeply and ensure proper drainage to prevent root rot.
Diagnosing the Problem: Why Did Your Bonsai Die?
To effectively revive a dead bonsai tree, it’s necessary to diagnose the problem and understand why it died in the first place. There can be various reasons for bonsai tree death, and identifying the specific cause is essential for successful revival.
Neglect is one of the common causes of bonsai death. If you’ve been neglecting your bonsai, it may have suffered from lack of water, improper pruning, or inadequate sunlight. Improper care, such as using the wrong soil or fertilizer, can also lead to the decline and death of a bonsai tree.
Watering issues are another common culprit. Overwatering can cause root rot and lead to the death of your bonsai while underwatering can result in dehydration and wilting. Finding the right balance in watering your bonsai is crucial for its health and survival.
Light deprivation is a significant factor in bonsai tree death. Bonsai trees require sufficient sunlight for photosynthesis and growth. If your bonsai has been kept in a dark or shaded area, it may have struggled to thrive and eventually died.
By carefully examining your bonsai tree and considering these potential reasons for its death, you’ll be able to diagnose the problem accurately. This knowledge will then enable you to take the appropriate steps towards revival and ensure that the same issues don’t occur again in the future.
How to Revive a Dead Bonsai Tree
This section will provide a detailed step-by-step process for reviving a dead bonsai tree. Following these instructions will help you bring your bonsai back to life and restore its beauty. Let’s dive into the revival process!
Step-by-Step Revival Process
Reviving a dead bonsai tree requires patience and careful execution. Follow these steps to breathe new life into your beloved bonsai:
Inspect the tree: Begin by examining the tree thoroughly to identify any signs of life. Look for green leaves or buds on the branches. If there are no signs of life, proceed to the next step.
Prune damaged branches: Using the proper pruning techniques, remove any dead or diseased branches. This will promote new growth and improve the overall health of the tree. Image suggested for visual reference:
Assess hydration and soil condition: Check the moisture level in the soil and adjust the watering schedule accordingly. Ensure that the soil is well-draining and not waterlogged, as excess moisture can lead to root rot. Assess the health of the soil and consider repotting if necessary. A nutrient-rich soil mix will provide the essential elements for revival.
Provide optimal light and temperature: Place your bonsai tree in a location where it can receive the appropriate amount of sunlight. Different bonsai species have varying light requirements, so research the specific needs of your tree. Avoid extreme temperature fluctuations to prevent stress on the tree.
Monitor and nurture: Keep a close eye on your revived bonsai tree and monitor its progress. Adjust care practices as needed, such as watering, fertilizing, and pruning. With time and care, your bonsai tree will regain its vitality and flourish once again.
Pruning Techniques for Damaged Bonsai
Proper pruning is essential for reviving a damaged bonsai tree. Here are some pruning techniques to employ:
Remove dead and diseased branches: Eliminate any branches that show no signs of life or are affected by disease.
Thin out overcrowded branches: Create space within the tree’s canopy by selectively removing overlapping or densely packed branches. This will improve airflow and light penetration.
Shape the tree: Trim and shape the remaining branches to achieve the desired form and aesthetic appeal. Follow the natural growth pattern of the tree and use sharp, clean tools to prevent further damage.
Hydration and Soil Assessment for Recovery
Hydration and soil health are crucial factors in reviving a dead bonsai tree. Consider the following tips:
Water correctly: Find the right balance between under-watering and over-watering. Stick your finger about an inch into the soil; if it feels dry, it’s time to water. Avoid letting the soil dry out completely or becoming waterlogged.
Improve drainage: Ensure that the bonsai pot has adequate drainage holes. This will prevent water from accumulating and causing root issues. Additionally, use well-draining soil to facilitate water movement.
Fertilize appropriately: Provide your bonsai tree with the necessary nutrients by fertilizing it regularly. Use a balanced, slow-release fertilizer or organic options suitable for bonsai trees.
Repot when needed: If the soil is compacted or nutrient-deficient, consider repotting your bonsai tree. Choose a slightly larger pot, carefully trim the roots, and replace the soil with a fresh, well-draining mixture.
By following these pruning techniques and ensuring proper hydration and soil health, you can effectively revive your once-dead bonsai tree. Stay committed to the care and maintenance of your bonsai, and you’ll witness it thriving once again.
Preventive Measures to Keep Your Bonsai Thriving
Now that you have successfully revived your bonsai tree, it’s essential to implement preventive measures to ensure its long-term health and vitality. By following these bonsai tree care tips, you can create the optimal environment for your bonsai’s growth and prevent future problems.
Avoiding Common Watering Mistakes
Proper watering is crucial for the well-being of your bonsai. Avoid the common mistake of overwatering, as it can lead to root rot and fungus growth. Instead, water your bonsai when the top inch of the soil feels slightly dry. This ensures that the roots receive adequate moisture without being saturated. Additionally, ensure proper drainage by using a well-draining bonsai soil mix, and avoid placing your bonsai in saucers that can trap excess water.
Placement and Seasonal Adjustments for Optimal Growth
The placement of your bonsai plays a significant role in its overall health. Choose a location that provides the right amount of sunlight for your bonsai species. Most bonsai trees thrive in bright, indirect light, while others may require more shade. Experiment with different locations to find the optimal spot for your bonsai’s growth. Also, consider seasonal adjustments. In winter, when sunlight is limited, move your bonsai to a spot with more natural light or use artificial grow lights to ensure it receives adequate illumination.
Protecting your bonsai from extreme weather conditions is crucial to its survival. During hot summers, shield your bonsai from scorching heat or excessive sun exposure by providing shade or placing it in a cooler area. In winter, protect your bonsai from freezing temperatures by moving it indoors or using insulation techniques such as wrapping the pot in burlap or placing it in a protective enclosure. These measures will help your bonsai withstand harsh weather conditions and promote its optimal growth throughout the year.
Karen Phillips, Bonsai expert and blogger. Read more about me here
If you’re a fan of bonsai trees and looking to add a unique touch to your collection, birch bonsai is the perfect choice. With their slender lines, attractive bark, and delicate leaves, these miniature trees exude charm and elegance.
In this comprehensive guide, we will walk you through everything you need to know about growing and caring for birch bonsai. Whether you’re a beginner or an experienced bonsai enthusiast, you’ll discover Japanese techniques, specific to birch bonsai, that will help you create stunning foliage right in your living space.
From understanding the different birch bonsai species to mastering pruning and styling techniques, we will provide you with the knowledge and tips necessary to nurture your birch bonsai tree. With the right care, you can create a captivating masterpiece that will be the envy of every bonsai lover.
Understanding the Uniqueness of Birch Bonsai Species
Birch bonsai trees possess a captivating charm that sets them apart from other bonsai varieties. Their slender lines, exquisite bark, and delicate leaves contribute to their distinct allure. The elegant shape and flexible hanging twigs of birch bonsai make them a popular choice among bonsai enthusiasts. Whether you are a seasoned bonsai enthusiast or a beginner, understanding the uniqueness of birch bonsai species is essential for successful cultivation and care.
The Charming Appeal of Birch Bonsai Trees
Birch bonsai trees emanate an undeniable charm that captivates the eye. Their slender trunks and branches impart a graceful character, symbolizing strength and resilience. The smooth, often peeling bark of birch bonsai adds texture and visual interest, showcasing a palette of colors ranging from creamy white to pale brown. When paired with luscious green foliage and delicate leaves, the overall effect is both enchanting and serene. The inherent natural beauty of birch bonsai trees makes them perfect for creating tranquil and harmonious miniature landscapes.
Identifying Different Birch Bonsai Varieties
Within the world of birch bonsai, there are several species that exhibit unique traits and requirements. It is crucial to identify the specific birch bonsai variety you own to ensure the optimal care and cultivation practices. Some of the most commonly cultivated birch bonsai species include:
Silver Birch (Betula pendula)
Downy Birch (Betula pubescens)
Dwarf Birch (Betula nana)
Each variety has its own distinct characteristics, growth patterns, and care requirements. By understanding the specific species of birch bonsai you own, you can provide the tailored care necessary for its optimal health and development.
Recognizing the Signs of a Healthy Birch Bonsai
Maintaining the health of your birch bonsai is crucial for its long-term survival and beauty. To ensure the well-being of your bonsai tree, it is essential to recognize the signs of a healthy specimen:
Vibrant and green leaves: Healthy birch bonsai trees boast an abundance of vibrant, luscious green leaves.
Strong root system: A healthy root system is the foundation of a thriving bonsai tree. Inspect the roots to ensure they are well-developed and free from signs of decay or rot.
Sturdy branches: Healthy birch bonsai trees exhibit sturdy branches that are free from cracks or signs of weakness.
Pest and disease-free: Regularly check your bonsai tree for any signs of pests or diseases. Early detection and prompt action are crucial for preventing further damage.
By actively observing and tending to the needs of your birch bonsai, you can promote its overall health and longevity, allowing it to thrive as a beautiful and vibrant miniature tree.
Essential Care for Your Birch Bonsai
Proper care is essential for the growth and development of your birch bonsai. By following these essential care practices, including watering, fertilizing, and repotting, you can ensure the health and vibrancy of your bonsai tree.
Watering: Birch bonsai trees have a high water requirement, especially during the summer months. It is important to keep the soil moist, but not waterlogged. To provide adequate hydration, consider using a shallow water bowl during hot periods. This will help maintain the moisture level and prevent water stress.
Fertilizing: Fertilizing your birch bonsai is crucial for its overall health and vitality. Organic solid fertilizer can be applied every four weeks, providing essential nutrients to support growth. Alternatively, you can opt for a liquid fertilizer for weekly feeding during the growing season. Apply the liquid fertilizer to moist soil to maximize absorption and promote healthy foliage and root development.
Repotting: Repotting your birch bonsai every two to four years is necessary to promote healthy root growth. During the repotting process, it is important to use a well-draining soil mix. While repotting, remove about 1/4 of the roots to ensure the proper space for fresh root growth. This will help maintain the health and vitality of your bonsai tree.
By providing essential care through proper watering, regular fertilizing, and timely repotting, you can create the ideal environment for your birch bonsai to thrive. Remember to observe your tree closely and make adjustments to your care routine as needed. With proper care, your birch bonsai will bring beauty and tranquility to your living space for years to come.
The Art of Birch Bonsai Pruning and Styling
Pruning and styling are essential for shaping and maintaining the aesthetic appeal of your birch bonsai. By implementing proper techniques, you can create a visually stunning tree while ensuring the tree’s health and vitality.
When pruning your birch bonsai, it’s important to avoid making larger cuts that could lead to rot and hollow trunks. Instead, focus on smaller, strategic cuts to maintain balance and shape. Use precise tools designed for bonsai pruning to achieve desired results without causing harm to the tree.
Styling the branches and twigs of a birch bonsai requires frequent attention and training. Wiring is a popular method used to shape branches and create the desired aesthetic. Carefully wrap wire around branches and gently bend them into position. Guy-wiring and hanging weights can also be used to guide the growth and shape of the bonsai tree.
“Pruning and styling are like sculpting art. Take your time, observe the natural growth patterns of your birch bonsai, and sculpt it into a masterpiece.”
Remember, pruning and styling should be done with precision and mindfulness to ensure the long-term health and beauty of your birch bonsai.
Pruning Tips
Styling Techniques
Use sharp bonsai pruning shears for precise cutsRemove any dead, damaged, or crossing branchesThin out dense areas to allow for proper airflow and sunlight penetrationPrune during the dormant season for best results
Wire branches to shape them into desired positionsEnsure the wire is not too tight to avoid damaging the branchFrequently monitor and adjust wires as the branches growUse guy-wires or hanging weights to achieve specific angles and shapes
Optimal Placement and Lighting Conditions for Birch Bonsai
Placing your birch bonsai in the right location is crucial for its overall health and growth. To ensure your bonsai thrives, here are some key insights into the optimal placement and lighting conditions for your birch bonsai tree:
Bright and Sunny Locations: Birch bonsai trees thrive in bright, sunny locations. They require ample sunlight to carry out photosynthesis and promote healthy growth. Place your birch bonsai in an area where it can receive at least 6 hours of direct sunlight each day. This will provide the necessary energy for the tree to thrive.
Exposure to Weather: Birch bonsai trees benefit from exposure to the weather. The wind will gently sway the branches, promoting strength and flexibility in the tree. Rainfall will help keep the foliage hydrated and nourished. However, during extreme heatwaves, it is advisable to provide some shade for your birch bonsai to prevent leaf burn.
Proper Lighting Conditions: Ensuring the right lighting conditions is essential for the growth and development of your birch bonsai. Rotate the tree regularly to avoid uneven growth and ensure that all parts receive equal amounts of light. This will help maintain a balanced and visually appealing silhouette.
To give you a better understanding of how optimal placement and lighting conditions can influence the growth of your birch bonsai, take a look at the following table:
Lighting Conditions
Growth and Development
Insufficient sunlight
Weak and spindly growth; yellowing leaves
Excessive sunlight
Leaf scorching; wilting foliage
Uneven lighting
Asymmetrical growth; imbalanced silhouette
Optimal sunlight exposure
Vibrant and healthy growth; lush foliage
Propagating Birch Bonsai: From Seed to Sapling
Propagating birch bonsai allows you to expand your collection and create new trees. Whether you prefer using cuttings or seeds, this section will provide you with step-by-step instructions for successfully propagating birch bonsai.
Starter Tips for Propagating Cuttings
If you choose to propagate birch bonsai through cuttings, follow these starter tips to ensure successful root development:
Select healthy branches: Choose branches that are young, flexible, and disease-free. Look for branches with buds that are just about to open.
Prepare the cuttings: Take 6 to 8-inch cuttings from the selected branches. Remove any leaves from the lower half of the cutting, leaving only a few at the top.
Provide optimal conditions for root development: Dip the cuttings in rooting hormone and plant them in a well-draining rooting medium, such as perlite and peat moss. Place the cuttings in a greenhouse or cover them with a plastic bag to maintain high humidity. Keep them in a shaded area with indirect light.
Monitor and water regularly: Check the moisture level of the rooting medium frequently and water as needed to keep it consistently moist. Avoid overwatering, as it can lead to rotting.
Be patient: Root development can take several weeks to several months. During this time, continue to provide optimal conditions and be patient.
Using Seeds for Growing Birch Bonsai
If you prefer to start birch bonsai from seeds, follow these guidelines for successful growth:
Proper seed collection: Collect the seeds from mature birch trees during the autumn months. Look for healthy, fully developed seeds.
Seed preparation: Soak the seeds in water for 24 hours, then stratify them by placing them in a moist paper towel inside a sealed plastic bag. Leave the bag in the refrigerator for 4 to 6 weeks.
Cultivation techniques: Plant the stratified seeds in a well-draining bonsai soil mix in a seed tray or individual pots. Keep the soil moist but not waterlogged. Place the tray or pots in a well-lit area with indirect sunlight.
Provide proper care: Continue to water the seeds regularly, ensuring they receive the right amount of moisture. Protect the seeds from extreme temperatures and provide adequate ventilation to prevent mold or fungal growth.
Monitor and nurture growth: As the seedlings emerge, thin them out and provide proper spacing. Continue to nurture their growth by providing adequate light, watering, and fertilizing as needed.
Ensuring Successful Growth After Propagation
After successfully propagating birch bonsai through cuttings or seeds, it is important to provide the right care and support for their continued growth:
Transplantation: Once the cuttings or seedlings have developed a strong root system, transplant them into individual bonsai pots or desired growing locations.
Follow proper care guidelines: Continue following the care practices outlined in the previous sections, including watering, fertilizing, pruning, and styling.
Monitor for pests and diseases: Regularly inspect your propagated birch bonsai for signs of pests or diseases and take appropriate action to prevent their spread.
Provide adequate light and optimal conditions: Place your propagated birch bonsai in a location that receives the right amount of sunlight and ensure they have proper ventilation.
By following these propagation techniques and providing proper care, you can enjoy the fulfillment of creating and nurturing new birch bonsai trees.
Preventing Common Pests and Diseases in Birch Bonsai
Protecting your birch bonsai from pests and diseases is crucial for its long-term health. These miniature trees require special care to thrive, and being proactive in preventing and controlling common issues will help ensure their well-being.
Aphids and sawfly larvae are common pests that can attack birch bonsai trees. To combat these pests, use specific insecticides that are safe and effective for bonsai trees. Regularly inspect your bonsai for any signs of infestation, such as curled or discolored leaves or the presence of small insects. Early detection is key to preventing further damage and controlling the pests.
Birch rust, a fungal disease, can also affect birch bonsai. To prevent and manage this disease, it is important to maintain good airflow around the tree and keep the foliage dry. Applying a suitable fungicide can help in controlling the spread of birch rust. Regularly check your bonsai for any signs of disease, such as unusual discoloration, spots, or lesions. Taking immediate action and providing proper treatment will help keep your birch bonsai healthy and vibrant.
By staying vigilant and taking proactive measures, you can prevent common pests and diseases from damaging your birch bonsai. Regular inspections, proper care, and timely treatment will ensure that your birch bonsai thrives and remains a beautiful addition to your living space.
Karen Phillips, Bonsai expert and blogger. Read more about me here
Gardenia bonsai trees are admired for their exquisite beauty and delightful fragrance. The lush, glossy green leaves and stunning white flowers make them a prized addition to any indoor or outdoor bonsai collection. However, achieving the perfect balance of care and cultivation for these delicate trees can be a challenge.
In this guide, we will cover everything you need to know to ensure the health and vitality of your gardenia bonsai. From creating the ideal environment to understanding proper watering techniques, from choosing the right soil to mastering pruning and fertilizing – we’ve got you covered.
Whether you’re a beginner looking to embark on your bonsai journey or an experienced gardener seeking to enhance your skills, this guide will provide you with the expert advice and techniques you need to take your gardenia bonsai care to the next level.
So, let’s dive in and explore the fascinating world of gardenia bonsai care
An Overture to Gardenia Bonsai: The Joy of Growing
Gardenia bonsai trees are a delight for both experienced bonsai enthusiasts and those new to the art of bonsai. Gardenia bonsai trees offer a captivating and rewarding growing experience with their unique features and delightful fragrances. This section will explore what makes gardenia bonsai special and delve into their unique charm and fragrance that sets them apart from other bonsai varieties.
What Makes Gardenia Bonsai Special?
Gardenia bonsai trees, known for their elegance and beauty, offer a truly captivating sight to behold. Here are some of the unique features that make gardenia bonsai stand out:
Their stunning flowers: Gardenia bonsai trees produce beautiful white flowers that bloom in the warm summer months. These blossoms add a touch of elegance and sophistication to any garden or indoor space.
Lush, glossy leaves: The deep green foliage of gardenia bonsai trees showcases a glossy texture, creating a visually appealing contrast with the delicate white flowers.
Compact size: The compact size of gardenia bonsai trees makes them a perfect addition to small spaces, such as apartments, patios, or balconies. They can also be cultivated indoors with proper care and maintenance.
Long lifespan: With proper care, gardenia bonsai trees can live for many years, providing a lasting source of joy and beauty in your garden or living space.
Understanding Gardenia Bonsai’s Unique Charm and Fragrance
“The fragrance of gardenia blossoms is truly enchanting, captivating your senses with its sweet and floral aroma.”
Gardenia bonsai trees are renowned for their captivating fragrance, which is one of their most distinctive characteristics. The scent of gardenia blossoms is truly enchanting, captivating your senses with its sweet and floral aroma. Whether placed indoors or outdoors, the alluring fragrance of gardenia bonsai can transform any space into a tranquil oasis of serenity and beauty.
The unique charm and fragrance of gardenia bonsai trees make them an appealing choice for bonsai enthusiasts. Their elegant flowers, lush foliage, compact size, and long lifespan contribute to their desirability. Next, we will explore the crucial aspects of creating the perfect environment for your gardenia bonsai to thrive.
Creating the Perfect Environment
In order for your gardenia bonsai to thrive, it is essential to create and maintain the perfect environment. The right temperature, light, and humidity conditions are crucial for the health and well-being of your bonsai tree.
Temperature: Gardenia bonsai trees prefer warm temperatures, ideally between 65-75°F (18-24°C). Avoid exposing your bonsai to extreme temperature fluctuations, as it can cause stress and affect its growth.
Light: Gardenia bonsai trees thrive in bright, indirect sunlight. Place your bonsai near a window with filtered light or use artificial grow lights to provide the necessary amount of light. Avoid exposing your bonsai to direct sunlight, as it can scorch the leaves.
Humidity: Gardenia bonsai trees require high humidity levels to thrive. You can increase humidity by placing the bonsai on a humidity tray filled with water and pebbles. Regular misting of the leaves also helps to maintain the humidity levels.
To further enhance the humidity, you can create a mini-greenhouse effect by covering your bonsai with a clear plastic bag or using a humidity dome.
By providing the optimal conditions for your gardenia bonsai, you will create an environment where it can flourish and showcase its unique beauty. Remember to monitor temperature, light, and humidity levels regularly and make any necessary adjustments to ensure the well-being of your bonsai tree.
The Delicate Balance of Watering Gardenia Bonsai
Proper watering is crucial for the health and vitality of your gardenia bonsai tree. Finding the delicate balance between under-watering and over-watering is essential to ensure optimal growth and blooming. In this section, we will explore the importance of recognizing when your gardenia bonsai is thirsty and discuss effective methods for watering.
Recognizing When Your Gardenia Bonsai is Thirsty
It is important to pay attention to the signs that indicate your gardenia bonsai requires watering. Here are some common indicators that your tree is thirsty:
Wilting leaves: When the leaves of your gardenia bonsai appear droopy and limp, it is a clear sign that the tree needs water. Wilting can happen at any time of the day, even when the soil appears moist.
Dry soil: Gently touch the soil with your finger about an inch below the surface. If it feels dry, it is time to water your gardenia bonsai.
Yellowing leaves: When the leaves of your bonsai start turning yellow or brown, it can be a sign of both over-watering and under-watering. However, if the tips of the leaves are brown and crispy, it is more likely due to under-watering.
By regularly observing and monitoring your gardenia bonsai, you will become adept at recognizing its unique needs for water.
Methods for Effective Watering
When it comes to watering your gardenia bonsai, it is important to follow these guidelines to ensure effectiveness:
Water thoroughly: When watering, make sure to thoroughly saturate the soil. This will help to flush out any accumulated salts and ensure that the roots are properly hydrated.
Avoid stagnant water: Proper drainage is essential for a gardenia bonsai. Avoid letting the water sit in saucers or trays, as excessive water retention can lead to root rot.
Frequency of watering: The frequency of watering will depend on various factors such as the size of the pot, the type of soil, and the environmental conditions. However, a general guideline is to water your gardenia bonsai when the top inch of soil feels dry.
Use filtered or distilled water: Gardenia bonsai trees are sensitive to chlorinated water. To avoid any potential damage, it is best to use filtered or distilled water.
By following these methods for effective watering, you will provide your gardenia bonsai with the proper moisture it needs to thrive.
Best Soil for Gardenia Bonsai: Foundation of Health
Choosing the right soil for your gardenia bonsai is crucial for its overall health and well-being. The soil serves as the foundation that supports the tree’s growth and provides it with essential nutrients. With the proper soil mix, you can ensure your gardenia bonsai thrives and produces beautiful blooms.
Gardenia bonsai trees require a well-draining soil mix that retains moisture without becoming waterlogged. A good soil mix should also have the right acidity level, as gardenias prefer slightly acidic soil with a pH range of 5.5 to 6.5.
To create an ideal soil mix for your gardenia bonsai, consider the following components:
Organic matter: Incorporating organic matter, such as peat moss or compost, helps improve soil fertility and structure. It also aids in water retention while maintaining good drainage.
Perlite: Adding perlite to the soil mix increases its porosity and improves drainage, preventing water from pooling around the roots.
Pine bark: Pine bark provides aeration to the roots and helps maintain the acidity level of the soil.
When preparing the soil mix, ensure that the components are well mixed and evenly distributed throughout. This will provide a consistent environment for the roots to grow and develop.
Once you have prepared the soil mix, it’s important to regularly check its moisture level. Overly dry or waterlogged soil can cause stress to the tree and lead to root rot. Water your gardenia bonsai when the top inch of the soil feels slightly dry to the touch.
Remember, finding the best soil mix for your gardenia bonsai may require some experimentation and adjustment based on your specific growing conditions. By providing the right soil environment, you can establish a solid foundation for the health and vitality of your gardenia bonsai.
Gardenia Bonsai Fertilizer: Nourishing for Vigor
Fertilizing your gardenia bonsai tree is critical for its overall health and vitality. By providing the proper nutrients, you can ensure that your bonsai has the strength to grow, bloom beautifully, and withstand any challenges it may face. Feeding your gardenia bonsai requires careful consideration of the right fertilizer and timing. Here, we will guide you through the process of fertilizing your gardenia bonsai and recommend the best fertilizer options to maximize its growth.
Feeding your gardenia bonsai requires a balanced fertilizer that contains essential nutrients such as nitrogen (N), phosphorus (P), and potassium (K). These nutrients promote healthy foliage, vibrant blooms, and overall vigor. Look for a fertilizer specifically formulated for acid-loving plants like gardenia, with a higher ratio of nitrogen to encourage leafy growth and ample phosphorus to support abundant flower production.
When it comes to timing, it’s crucial to fertilize your gardenia bonsai during its active growth periods. Typically, these periods occur in spring and summer. Avoid fertilizing during winter, as the tree goes into a dormant state and doesn’t require additional nutrients. Keep in mind that over-fertilizing can lead to excessive leaf growth and reduced blooms, while under-fertilizing can result in weak growth and lackluster flowers.
Here are some of the best fertilizer options for your gardenia bonsai:
Gardenia-specific slow-release fertilizer: These are designed specifically for gardenias and provide a steady release of nutrients over time. They are convenient and ensure that your bonsai receives a continuous supply of nourishment.
Organic fertilizers: If you prefer an organic approach, there are several options available. Organic fertilizers enriched with compost, fish emulsion, or seaweed extract are excellent choices for promoting healthy growth without the risk of chemical build-up.
Liquid fertilizers: Liquid fertilizers are easy to apply and quickly absorbed by the bonsai’s roots. They are typically diluted in water and can be applied during regular watering sessions, ensuring that your gardenia bonsai receives the necessary nutrients consistently.
Remember to follow the manufacturer’s instructions regarding dosage and frequency when fertilizing your gardenia bonsai. Always start with a lower concentration and gradually increase as needed, being careful not to overfeed. Additionally, avoid fertilizing immediately after repotting, as the tree needs time to acclimate to its new environment.
Feeding your gardenia bonsai with the right fertilizer at the proper time will contribute to its overall health, resilience, and beautiful blooms. Take the time to understand the specific needs of your bonsai tree and choose the best fertilizer option that suits your preferences and gardening style. With proper nourishment, your gardenia bonsai will thrive and bring you joy for years to come.
Masterful Pruning of Gardenia Bonsai
Proper pruning is essential for maintaining the health and beauty of your gardenia bonsai tree. By employing effective pruning techniques, you can shape and control its growth, ensuring a stunning and well-maintained bonsai.
When it comes to shaping your gardenia bonsai, there are a few strategies you can employ. One popular method is the wiring technique, where you carefully wrap copper or aluminum wire around the branches to guide their growth. This technique allows you to create elegant curves and unique shapes, giving your bonsai a distinct personality. Remember to remove the wire promptly to prevent it from cutting into the branches.
Another strategy to shape your gardenia bonsai is through pinching. This involves removing the tips of new growth to encourage branching and a fuller appearance. By pinching regularly, you can achieve a desirable compact shape and encourage the development of vibrant foliage.
Pruning at the right time is crucial to promote optimal blooms in your gardenia bonsai. The best time to prune is after the blooming period, usually in late spring or early summer. This allows the tree to recover and put its energy into new growth. Pruning during this period also encourages the development of flower buds for the following season. Remember to use clean and sharp pruning shears to avoid damaging the tree.
When pruning your gardenia bonsai, always prioritize the removal of dead, diseased, or damaged branches. These branches not only detract from the tree’s aesthetic appeal but can also negatively affect its overall health. Additionally, thinning out crowded branches allows for better airflow and light penetration, reducing the risk of pests and diseases.
Remember to observe the natural shape and growth pattern of your gardenia bonsai when pruning. Aim to maintain a balanced and harmonious appearance, ensuring that the tree’s beauty shines through. With practice and patience, you’ll become a master at pruning your gardenia bonsai, allowing it to flourish and thrive.
Overcoming Gardenia Bonsai Problems: Expert Tips
Identifying and Treating Pests and Diseases
One of the challenges gardenia bonsai owners may face is dealing with pests and diseases that can adversely affect the health of their trees. It is essential to identify these issues early on and take prompt action to prevent further damage.
Common pests that can infest gardenia bonsai include aphids, scale insects, and spider mites. To identify the presence of pests, closely inspect the leaves, stems, and branches of your bonsai tree. Look for signs such as sticky residue, discoloration, distorted growth, or the presence of webs. If you notice any of these symptoms, it is crucial to take action immediately to prevent the infestation from spreading.
Treating gardenia bonsai pests can be done through various methods, including:
Manual Removal: Use a soft brush or cloth to physically remove pests from the affected areas.
Insecticidal Soap: Apply an insecticidal soap specifically formulated for bonsai trees to control pests. Follow the instructions provided by the manufacturer.
Neem Oil: Neem oil is an organic solution that can be effective in treating various pests. Dilute the neem oil according to the instructions and apply it to the affected parts of the tree.
However, it is crucial to exercise caution when using any chemical or organic treatments to ensure the health and safety of your gardenia bonsai.
Troubleshooting Bud Drop and Leaf Discoloration
Another common issue that gardenia bonsai owners encounter is bud drop and leaf discoloration. These problems can be the result of various factors, including improper care, environmental stress, or nutrient deficiencies.
If you notice buds dropping or leaves turning yellow or brown, it is essential to identify the underlying cause and take appropriate measures to address the issue. Here are some troubleshooting tips:
Watering: Ensure your gardenia bonsai is receiving adequate and consistent watering. Over-watering or under-watering can lead to both bud drop and leaf discoloration.
Lighting: Ensure your bonsai is receiving the right amount of light. Lack of sunlight or excessive exposure to direct sunlight can cause bud drop and leaf discoloration. Adjust the location of your bonsai accordingly.
Nutrients: Gardenia bonsai trees require specific nutrients to thrive. Make sure you are providing a balanced fertilizer suitable for acid-loving plants. Avoid over-fertilizing, as it can lead to burn and further damage.
Pests and Diseases: As mentioned earlier, pests and diseases can cause bud drop and leaf discoloration. Regularly inspect your bonsai for any signs of infestation and take appropriate action if necessary.
By troubleshooting and addressing these common problems, you can help ensure the health and vitality of your gardenia bonsai, allowing it to flourish and bring you joy for years to come.
Root Pruning and Repotting: Ensuring Longevity
One of the key factors in maintaining the long-term health and longevity of your gardenia bonsai tree is proper root pruning and repotting. Root pruning is a crucial technique that helps control the root growth, ensuring a healthy and balanced root system. By removing excess or tangled roots, you allow the tree to absorb nutrients more efficiently.
To root prune your gardenia bonsai, gently remove the tree from its container, being careful not to damage the delicate roots. Use pruning shears or scissors to trim any overly long or thick roots. Be sure to prune conservatively, as excessive root removal can harm the tree. After root pruning, repot the tree using a well-draining bonsai soil mix, providing fresh nutrients and room for growth.
Knowing when to root prune and repot your gardenia bonsai is crucial. It is generally recommended to perform this task every two to three years, preferably during the springtime when the tree is entering its growing season. However, keep an eye on the root system of your bonsai. If you notice roots circling the edge of the container or if the tree’s growth seems stunted, it may be a sign that root pruning and repotting are necessary.
By regularly performing root pruning and repotting, you ensure that your gardenia bonsai receives the necessary space and nutrients to thrive. This practice helps prevent root binding, improves water and nutrient absorption, and stimulates healthy growth. Invest time in the proper care of your gardenia bonsai’s roots, and you’ll be rewarded with a beautiful and vibrant tree for years to come.
Karen Phillips, Bonsai expert and blogger. Read more about me here
If you’re looking to add a touch of elegance and beauty to your bonsai collection, the bonsai peach tree is a perfect choice. Known for its delicate flowers and miniature fruit, this tree offers a unique and captivating aesthetic.
Throughout this guide, you will learn the unique features and requirements of bonsai peach trees. We will cover essential care techniques, including watering, fertilizing, and providing adequate sunlight.
Additionally, we will explore pruning and shaping methods to maintain the tree’s aesthetic appeal. You will also gain insights into the flowering and fruiting cycle of the bonsai peach tree, as well as techniques to overcome common challenges such as pests and diseases. If you are an advanced bonsai enthusiast, we have a section dedicated to grafting methods and multi-trunk bonsai styles using peach trees.
Let’s dive in and unlock the secrets to creating a stunning bonsai masterpiece!
Choosing the Perfect Bonsai Peach Tree
When it comes to starting your bonsai journey with a peach tree, selecting the perfect specimen is crucial. Your choice will significantly impact the future health and aesthetics of your bonsai. Here are some essential factors to consider:
Assessing Health and Vitality
Assessing the health and vitality of a bonsai peach tree is the first step in making an informed decision. Look for signs of a healthy tree, such as vibrant and evenly colored leaves, sturdy branches, and a well-developed root system. Avoid trees with any visible distress, such as yellowing leaves, wilting, or signs of pests or diseases. A healthy bonsai tree will serve as a strong foundation for your future cultivation efforts.
Understanding the Importance of Genetic Diversity
Genetic diversity plays a vital role in the long-term success of any plant species, including bonsai trees. When it comes to peach bonsai, genetic diversity helps enhance the tree’s resilience to diseases, pests, and environmental stresses. Selecting bonsai trees from a diverse gene pool ensures healthier and more robust specimens. By promoting genetic diversity in our cultivation practices, we contribute to the overall sustainability and vitality of bonsai trees.
Selecting the Right Nursery or Vendor
Whether you buy your bonsai peach tree in person or online, selecting a reputable bonsai nursery or vendor is essential. Reputable vendors take pride in their cultivation practices, ensuring their trees are healthy, well-cared-for, and disease-free. Look for vendors with a strong reputation, positive customer reviews, and a wide selection of bonsai trees. Buying from a trusted source gives you peace of mind and ensures that you invest in a high-quality bonsai tree for your collection.
Essential Care for Your Bonsai Peach Tree
Bonsai peach trees require proper care to thrive and maintain their health and beauty. By following these essential care techniques, you can ensure the longevity and success of your bonsai peach tree.
Watering: Adequate watering is crucial for the well-being of your bonsai peach tree. Keep the soil consistently moist but avoid overwatering, as it can lead to root rot. Water your tree deeply when the top inch of soil feels dry, ensuring water penetrates evenly throughout the root system.
Fertilizing: Providing your bonsai peach tree with regular fertilization is essential for its growth and vitality. Use a balanced, slow-release bonsai fertilizer to provide the necessary nutrients. Follow the manufacturer’s instructions for the recommended dosage and frequency, adjusting as needed depending on the tree’s growth and the growing season.
Sunlight: Bonsai peach trees thrive in bright, indirect sunlight. Place your tree in a location where it can receive at least 6 hours of sunlight each day. If sunlight is limited, you can use artificial grow lights to supplement the tree’s light requirements.
Soil Selection and Potting: Choosing the right soil and pot is crucial for the health of your bonsai peach tree. Use well-draining bonsai soil that allows excess water to escape, preventing waterlogged roots. When repotting, prune back the roots and place the tree in a bonsai pot that is proportionate to its size, ensuring proper airflow and drainage.
Tools and Equipment: To properly care for your bonsai peach tree, you will need a few essential tools and equipment. These include bonsai shears for pruning and shaping, a watering can or hose with a fine mist nozzle for gentle watering, bonsai wire for branch training and shaping, and a bonsai rake or chopstick for soil maintenance. Keep your tools clean and sharp to ensure precise cuts and minimize the risk of infections.
With these essential care techniques, you can create a thriving bonsai peach tree that brings beauty and joy to your home or garden. Remember to observe your tree closely, adjusting care as needed based on its individual needs and growth patterns. By providing the right care, your bonsai peach tree will reward you with years of natural beauty.
Mastering the Art of Peach Tree Pruning and Shaping
Pruning and shaping play a vital role in maintaining the aesthetic appeal of a bonsai peach tree. By employing effective pruning techniques, you can promote both optimal growth and pleasing aesthetics in your bonsai tree. In this section, we will explore various pruning techniques that serve the dual purpose of promoting healthy tree growth and creating visually stunning bonsai shapes.
Pruning Techniques for Growth and Aesthetics
Proper pruning is essential for shaping bonsai trees and maintaining their compact size. By selectively removing branches, you can control the growth and structure of your peach bonsai tree. When pruning for growth, focus on:
Trimming back vigorous shoots to redistribute energy
Removing overcrowded branches to enhance airflow and light penetration
Pruning branches that detract from the desired shape or silhouette
Encouraging outward growth by cutting at a 45-degree angle, just above a bud or branch
In addition to growth-related pruning, aesthetic pruning is essential for shaping your bonsai peach tree into visually appealing forms. Aesthetic pruning involves carefully shaping the canopy, defining branch structure, and creating elegant curves and proportions. Pay attention to the overall balance and harmony of the tree, ensuring that each branch contributes to the desired aesthetic vision.
Training Branches with Bonsai Wire and Weights
Bonsai wire is a versatile tool that allows you to shape and train the branches of your peach bonsai tree. By gently wrapping the branches with wire, you can guide their growth and manipulate their position. The wire should be wrapped in a spiral fashion, ensuring it is snug but not too tight to avoid injuring the branches. Leave the wire in place for a few months to allow the branch to set into its desired position before removing it.
For more challenging branches that require additional support, bonsai weights can be used. These weights help to gradually bend and shape branches over time. By attaching the weights to specific branches, you can create elegant curves and unique bonsai forms. Leave the weights on for several weeks or months, regularly checking and adjusting their position to achieve the desired shape.
Remember to check the wire and weights regularly, ensuring they are not causing any damage or constriction to the branches. Careful monitoring and adjustment are essential to avoid harming the tree.
By mastering the art of peach tree pruning and shaping, you can transform your bonsai peach tree into a living masterpiece. Through proper pruning techniques for growth and aesthetics, coupled with the use of bonsai wire and weights, you can create unique shapes and forms that reflect your artistic vision and enhance the beauty of your bonsai peach tree.
The Flowering and Fruiting Cycle of the Bonsai Peach Tree
The bonsai peach tree undergoes a captivating flowering and fruiting cycle that adds beauty and excitement to your bonsai collection. Understanding the stages of this cycle can help you appreciate the natural wonders of your bonsai peach tree and ensure optimal care for its continued health and productivity.
The first stage of this cycle is the blooming of delicate flowers on the bonsai peach tree. These flowers, often in shades of pink and white, create a stunning display that adds a touch of elegance to your garden or indoor space. The vibrant blossoms not only contribute to the aesthetic appeal of your bonsai peach tree, but they also attract pollinators such as bees and butterflies, which play a vital role in the fruiting process.
After the flowers have bloomed, the bonsai peach tree enters the fruiting stage. Tiny, miniature peaches begin to develop and grow, adding a touch of sweetness to the overall charm of your bonsai. It is important to note that not all bonsai peach trees will bear fruit, as this depends on various factors such as the tree’s age, health, and environmental conditions.
To encourage healthy flowering and fruiting, there are some key factors to consider. Providing adequate sunlight is crucial, as bonsai peach trees thrive in sunny locations. Additionally, regular and proper pruning helps maintain the tree’s shape and promotes better air circulation, which can contribute to the formation of robust flowers and fruits. Lastly, fertilization with a balanced formula specifically formulated for fruit trees can provide the necessary nutrients for optimal growth and productivity.
By understanding and nurturing the flowering and fruiting cycle of your bonsai peach tree, you can create a visually captivating and rewarding bonsai experience. Witness the delicate blossoms and enjoy the miniature peaches as they add a touch of nature’s beauty to your bonsai collection.
Overcoming Challenges: Pests and Diseases in Peach Bonsai
Common Peach Tree Diseases and Preventative Care
Just like any other plant, bonsai peach trees are susceptible to diseases. It’s important to be aware of common diseases that can affect peach trees and take proactive measures to prevent them. Some of the most common diseases in peach trees include:
Peach Leaf Curl: This fungal disease causes curling and distortion of the leaves, leading to poor growth and reduced fruit production. To prevent peach leaf curl, apply a protective fungicide spray during the dormant season, before the buds break in spring.
Peach Scab: Peach scab is characterized by scaly, brown lesions on the fruit and leaves. Regularly inspect your bonsai peach tree for signs of scab and remove any infected plant material. Apply a fungicide according to the manufacturer’s instructions to prevent further infection.
Peach Brown Rot: Brown rot causes the decay of peaches, resulting in soft, brown spots with a fuzzy appearance. To prevent brown rot, ensure proper air circulation around the tree, prune out infected branches, and remove any fallen fruit or plant debris from the area.
Pest Control Strategies for Your Bonsai
In addition to diseases, pests can also pose a threat to the health of your bonsai peach tree. Common pests that may attack bonsai trees include:
Aphids: These small, sap-sucking insects can cause stunted growth and deformation of leaves and flowers. To prevent aphids, regularly inspect your bonsai tree and remove any infested leaves. You can also use insecticidal soap or neem oil to control aphid populations.
Mites: Mites are tiny arachnids that feed on plant sap, causing yellowing, stippling, and webbing on leaves. Increase humidity around your bonsai tree to discourage mite infestations. If necessary, use miticides to control mite populations.
Caterpillars: Caterpillars can chew on leaves and cause defoliation in bonsai trees. Handpick caterpillars and destroy them or use organic insecticides to control their population.
Preventing pests in peach bonsai requires good garden hygiene practices and regular inspections. Remove fallen leaves, debris, and any decaying plant material from the area around your bonsai tree. Additionally, avoid over-fertilization and over-watering, as it can attract pests. Keeping your bonsai tree healthy and well-maintained will also help to prevent pest infestations.
Peach Tree Disease
Preventative Measures
Peach Leaf Curl
Apply a protective fungicide spray during the dormant season before buds break in spring. Ensure good air circulation around the tree.
Peach Scab
Regularly inspect the tree for signs of scab. Remove infected plant material. Apply a fungicide according to the manufacturer’s instructions.
Peach Brown Rot
Ensure proper air circulation around the tree. Prune out infected branches. Remove fallen fruit and plant debris.
Advanced Techniques for the Bonsai Enthusiast
For those who are passionate about bonsai cultivation, there are advanced techniques that can elevate your skills to new heights. In this section, we will explore two exciting techniques specifically for peach bonsai trees: grafting and multi-trunk styles.
Exploring Grafting Methods for Peach Bonsai
Grafting is a technique that allows you to combine different peach tree varieties or introduce new characteristics into your bonsai. By carefully joining a scion (a desired plant part) with a rootstock, you can create a unique and customized bonsai tree. There are several grafting methods you can try, such as whip and tongue grafting or side-veneer grafting, each with its own benefits and challenges. With patience and practice, you can master this technique and create bonsai trees that stand out in terms of both form and variety.
The Beauty of Multi-Trunk Peach Bonsai Styles
Multi-trunk bonsai styles offer a captivating and naturalistic aesthetic that can be particularly stunning when applied to peach trees. This technique involves shaping multiple trunks into harmonious and visually pleasing compositions. By carefully pruning and wiring the branches, you can create bonsai trees that resemble miniature forests, showcasing the graceful elegance and character of peach trees. With the right techniques and an eye for design, you can achieve a highly intricate and artistic multi-trunk peach bonsai that is sure to impress.
By exploring these advanced techniques, you can expand your bonsai skills and create truly unique and remarkable peach bonsai trees. Remember, practice and experimentation are key to mastering these techniques, so don’t be afraid to explore and let your creativity flourish. The art of bonsai cultivation is an ever-evolving journey, and these advanced techniques will undoubtedly take your bonsai adventures to the next level.
Karen Phillips, Bonsai expert and blogger. Read more about me here
If you’ve always been fascinated by the unique beauty and historical significance of bonsai, pomegranate bonsai is an excellent choice to explore. Not only are these trees visually stunning with their vibrant flowers, intriguing fruit, a really fast growth but they also offer a delightful challenge for bonsai enthusiasts.
We will start by exploring the historical significance and aesthetic appeal. Discover the cultural and symbolic meanings behind these captivating trees and learn about the unique dwarf varieties with twisted trunks.
You will then dive into the essential tips for beginners, from selecting the right varietal for your climate to potting and basic shaping techniques. We will guide you in positioning your bonsai for optimal growth and teach you about the importance of the soil mix and watering techniques. Additionally, we will explore the key aspects of fertilization and share pruning and wiring techniques to help you shape and maintain your pomegranate bonsai’s form. We will also discuss seasonal care and provide insights into dealing with common pests.
Unveiling the Unique World of Pomegranate Bonsai
Pomegranate bonsai trees have a rich historical and mythical lore, making them unique and captivating additions to any bonsai collection. These miniature versions of the pomegranate tree are not only aesthetically appealing but also carry cultural and symbolic meanings.
The Historical Significance and Aesthetic Appeal of Pomegranate Bonsai
The pomegranate tree holds cultural significance in various civilizations throughout history. It is often associated with fertility, abundance, and prosperity. In ancient Greek mythology, the pomegranate symbolized life, regeneration, and the underworld. Its vibrant red flowers and fruit evoke a sense of beauty and vitality, making it a popular choice for bonsai enthusiasts seeking a visually striking tree.
Understanding the Dwarf Variety ‘Nana’ and ‘Nejikan’ with Twisted Trunks
Among the many pomegranate bonsai varieties, two popular dwarf options stand out: ‘Nana’ and ‘Nejikan’. These varieties are known for their twisted trunks, which add an intriguing element to the bonsai design. With their unique growth patterns and visually captivating forms, these varieties are highly sought after by bonsai artists and collectors alike.
Bonsai – A Blend of Art and Horticulture
Bonsai is more than just a horticultural practice; it is a harmonious blend of art and cultivation. Shaping and styling a pomegranate bonsai requires creative expression and an understanding of horticultural principles. It is a form of art that involves sculpting living trees into miniature masterpieces. By carefully nurturing these trees and channeling artistic vision, bonsai enthusiasts create captivating displays that reflect their unique style and creativity.
Essential Starting Tips for Pomegranate Bonsai Newbies
If you are new to growing pomegranate bonsai, there are a few essential tips to help you get started on the right track. In this section, we will guide you through the process of selecting the right varietal for your climate, the initial steps of potting and basic shaping, and the importance of positioning your bonsai for optimal growth and health.
Selecting the Right Varietal for Your Climate
When choosing a pomegranate bonsai varietal, it is important to consider your climate. Different varieties have specific temperature and humidity requirements, so selecting the right one will greatly contribute to the success of your bonsai. Research the climate conditions in your area and choose a varietal that can thrive in those conditions. Some popular pomegranate bonsai varieties that are known for their adaptability include ‘Wonderful’, ‘Nana’, and ‘Nejikan’.
The Initial Steps: Potting and Basic Shaping
Once you have selected the right varietal, it’s time to pot and shape your pomegranate bonsai. Start by choosing a suitable bonsai container that is slightly larger than the root ball of your tree. Use a well-draining bonsai soil mix and ensure that the pot has drainage holes to prevent waterlogging. Carefully position the tree in the pot, making sure the roots are spread evenly and not cramped.
After potting, basic shaping is crucial to establish the bonsai’s form. Remove any dead, damaged, or crossing branches with clean and sharp bonsai pruning shears. Shape the tree by creating a compact and balanced structure, keeping in mind the desired design and style. Take your time and pay attention to detail during this important shaping process.
Positioning Your Bonsai for Optimal Growth and Health
Proper positioning of your pomegranate bonsai is essential for its overall growth and health. Ensure that your bonsai receives adequate sunlight for at least 4-6 hours a day, as pomegranate trees need ample light to thrive. Place your bonsai near a south or west-facing window, patio, or balcony to provide the necessary sunlight. However, be cautious of excessive heat or direct sunlight during the hottest parts of the day, as it can scorch the leaves.
In addition to sunlight, pay attention to the temperature and humidity levels. Pomegranate bonsai trees prefer a mild climate with temperatures ranging from 50°F to 86°F (10°C to 30°C). Avoid exposing your bonsai to extreme temperatures or drafts that can stress the tree.
Create a suitable microclimate by grouping your bonsai with other plants or using humidity trays filled with water to maintain ideal humidity levels. Regularly mist the foliage to mimic the humid conditions that pomegranate trees thrive in.
By following these essential starting tips, you will set a solid foundation for your pomegranate bonsai’s growth and ensure its long-term health and vitality.
Mastering the Soil Mix and Watering Techniques for Pomegranate Bonsai
The soil mix and watering techniques are essential factors that contribute to the overall health and well-being of your pomegranate bonsai. Creating the perfect soil mix and adopting proper watering practices will ensure that your bonsai thrives and flourishes. Let’s explore these two key aspects in detail.
1. Creating the perfect soil mix:
When it comes to pomegranate bonsai, the right soil mix is crucial for providing adequate drainage, nutrient availability, and a suitable environment for root growth. A well-draining soil mix will prevent waterlogged roots and the onset of root rot. Ideally, a pomegranate bonsai requires a mixture of organic matter, inorganic particles, and moisture-retaining components. Here’s a simple recipe to create the perfect soil mix:
Start with a base of well-draining soil, such as bonsai soil or a mix of coarse sand and perlite.
Add organic matter such as peat moss or compost to enhance nutrient retention.
Include a small amount of crushed lava rock or pumice to improve aeration and prevent compaction.
By blending these components in the right proportions, you will create a soil mix that promotes healthy root development and allows the pomegranate bonsai to thrive.
2. Mastering watering techniques:
Watering your pomegranate bonsai correctly is crucial for its overall health. Both under and overwatering can have adverse effects on the tree’s growth and vitality. Here are some guidelines to help you master the art of watering:
Observe your bonsai closely to determine its watering needs. Pomegranate bonsai prefer slightly moist soil, so aim to keep the soil evenly moist without letting it become overly saturated.
Water your bonsai thoroughly until you see water draining from the bottom of the pot. This ensures that the entire root system is adequately hydrated.
Check the moisture level of the soil by inserting your finger into the soil up to the second knuckle. If the soil feels slightly moist, it indicates that it’s time to water again. If it’s still wet, hold off on watering for a few more days.
Remember, the watering frequency may vary depending on factors such as climate, humidity, and the specific needs of your pomegranate bonsai. Regularly monitoring and adjusting your watering routine will help you provide optimal care for your bonsai.
Nurturing Your Pomegranate Bonsai with Proper Fertilization
Fertilization plays a crucial role in the growth and vitality of your pomegranate bonsai. By providing the necessary nutrients, you can ensure that your bonsai tree thrives and flourishes. In this section, we will discuss the proper techniques and frequency for fertilizing your pomegranate bonsai, as well as the specific types of fertilizers that are best suited for these trees.
When it comes to fertilizing your pomegranate bonsai, it is important to strike a balance. Too much fertilizer can lead to excessive foliage growth but may hinder flowering and fruiting. On the other hand, insufficient fertilization can result in stunted growth and a lack of vigor.
To achieve optimal fertilization, it is recommended to use a balanced, slow-release fertilizer specifically formulated for bonsai trees. Look for a fertilizer with a balanced NPK ratio, such as a 10-10-10 or 14-14-14 blend. This balanced ratio ensures that your pomegranate bonsai receives a sufficient supply of nitrogen, phosphorus, and potassium, essential nutrients for its overall health and development.
Please note that the fertilization requirements of your pomegranate bonsai may vary depending on its age and stage of development. Younger bonsai trees may require less frequent fertilization, while more mature trees may benefit from a slightly higher frequency.
When applying fertilizer, be sure to follow the manufacturer’s instructions regarding dosage and frequency. Typically, fertilization is performed every four to six weeks during the growing season, which is typically spring through early autumn. During the dormant season, it is best to refrain from fertilizing to allow the tree to rest and prepare for the upcoming growth cycle.
Remember, consistency is key when it comes to fertilizing your pomegranate bonsai. Establish a regular fertilization schedule and monitor the tree’s response to ensure it is receiving the proper nutrients for healthy growth. With the right fertilization approach, you can nurture your pomegranate bonsai into a stunning and thriving centerpiece of your bonsai collection.
Pomegranate Bonsai Pruning and Wiring Techniques
Pruning and wiring are essential techniques for shaping and maintaining the desired form of your pomegranate bonsai. By strategically pruning and utilizing wiring, you can guide the growth of your bonsai and enhance its aesthetic appeal. In this section, we will explore the art of pruning, the use of wiring, and how to manage flowering and fruiting for an attractive display.
Shape of Your Bonsai through Strategic Pruning
Pruning is a crucial aspect of bonsai care that involves selectively removing branches, shoots, and foliage to achieve the desired shape and style. With pomegranate bonsai, pruning is particularly important for maintaining a compact form and enhancing the tree’s natural characteristics.
When pruning your pomegranate bonsai, it’s essential to keep the following in mind:
Timing: Prune your bonsai during the dormant period in late winter or early spring, before new growth emerges.
Tools: Use sharp, clean pruning shears to make precise cuts without causing damage.
Techniques: Employ various pruning techniques, including branch selection, thinning, and shortening, to shape your bonsai effectively.
Aesthetic considerations: Consider the overall design and flow of your bonsai when making pruning decisions, focusing on creating balance and harmony.
Utilizing Wiring to Achieve Desired Growth Patterns
Wiring is another valuable technique that allows you to shape the branches and trunk of your pomegranate bonsai. By gently bending and guiding the branches, you can create movement and structure that contribute to the tree’s overall aesthetic appeal.
Here are some key points to keep in mind when wiring your pomegranate bonsai:
Timing: Wire your bonsai during the active growth period in spring or early summer when the branches are flexible and pliable.
Selection: Choose appropriate gauge wire that is strong enough to hold the branches in position without causing damage.
Techniques: Apply the wire in a spiral motion, starting from the base and working your way up, ensuring it is wrapped snugly around the branch.
Monitoring: Regularly check the wiring to prevent it from cutting into the branches as they grow and thicken. Adjust or remove the wire as needed.
Managing Flowering and Fruiting for an Attractive Display
In addition to shaping your pomegranate bonsai, managing flowering and fruiting is essential for creating a stunning visual display. By following specific care practices, you can encourage your bonsai to produce beautiful flowers and edible fruits.
Consider the following tips for managing flowering and fruiting in your pomegranate bonsai:
Fertilization: Use a balanced fertilizer with a higher ratio of phosphorus to promote flower and fruit development.
Temperature and Light: Provide your bonsai with the optimal temperature and light conditions for fruit set, which typically require warm temperatures and full sunlight.
Pollination: If growing your bonsai indoors, manually pollinate the flowers using a small brush or cotton swab to transfer pollen from one flower to another.
Thinning: As the fruits develop, thin them out to ensure proper growth and spacing, allowing for better air circulation and reducing the risk of disease.
Seasonal Care and Common Pests Affecting Pomegranate Bonsai
To ensure the long-term health and vitality of your pomegranate bonsai, it is crucial to understand its seasonal care requirements and be aware of common pests that can affect its well-being. By following these guidelines, you can keep your bonsai thriving throughout the year.
During each season, specific care tasks should be performed to promote optimal growth. In spring, focus on pruning any dead or damaged branches, which will stimulate new growth. Additionally, repotting your pomegranate bonsai every two to three years will provide fresh soil and nutrients. Summer care involves protecting your bonsai from extreme heat and sunlight by providing shade during the hottest part of the day. In autumn, gradually reduce watering and fertilizer to prepare the tree for dormancy. And in winter, protect your bonsai from freezing temperatures by placing it in a sheltered area or using insulation materials.
Unfortunately, common pests can pose a threat to the health of your pomegranate bonsai. Aphids, mealybugs, and scale insects are known to infest bonsai trees, causing damage to the foliage and overall health. To prevent infestations, regularly inspect your bonsai for any signs of pests, including sticky residue, yellowing leaves, or distorted growth. If you spot any pests, there are several treatment options available, including insecticidal soaps and oils. Applying these solutions according to the instructions will help eliminate pests and protect your bonsai.
By following the recommended seasonal care tasks and staying vigilant against common pests, you can ensure that your pomegranate bonsai thrives. With proper care and attention, your bonsai will continue to delight you with its beauty and provide a stunning centerpiece for your home or garden.
Karen Phillips, Bonsai expert and blogger. Read more about me here
If you’re a bonsai enthusiast looking to add something unique and fascinating to your collection, baobab bonsai trees are an excellent choice. With their distinct features and specific care requirements, they offer a rewarding and captivating experience for bonsai enthusiasts of all levels.
Baobab bonsai trees, also known as Adansonia digitata, are native to Africa and are known for their iconic swollen trunks and stunning canopy of foliage. Unlike traditional bonsai trees, baobabs exhibit remarkable adaptability to the art of bonsai cultivation, making them a captivating choice for enthusiasts seeking something extraordinary.
If you’re wondering how to grow baobab bonsai, this guide has got you covered. We’ll explore everything from plant care and maintenance to propagation and styling techniques. Whether you’re a beginner or an experienced bonsai cultivator, you’ll find valuable insights and practical tips to help you successfully nurture and cultivate your bonsai tree.
Understanding the Unique Requirements of Baobab Bonsai
Baobab bonsai trees have specific requirements that are crucial for their successful growth and development. To ensure the health and vitality of your plant, it’s important to understand and meet these unique needs.
Necessity of Warm Environments and Temperature Sensitivity
Baobab bonsai trees thrive in warm environments and are highly sensitive to cold temperatures. It is essential to provide them with a suitable climate to promote their growth. These bonsai trees should be protected when temperatures fall below 12°C/54°F. In colder regions, it is advisable to keep them indoors or provide additional insulation to shield them from the cold.
The Significance of Sunlight and Grow Lights
Adequate sunlight is crucial for the growth and overall well-being of baobab bonsai trees. They require a minimum of six hours of direct sunlight every day. However, in cases where natural sunlight is limited, the use of grow lights can be a beneficial alternative. Grow lights provide the necessary light spectrum for photosynthesis, ensuring that your bonsai receives the energy it needs to thrive.
Characteristics of Baobab Bonsai Dormancy
Understanding the dormancy patterns of baobab bonsai trees is crucial for their care and maintenance. These bonsai trees undergo a period of dormancy, where their growth significantly slows down. During this time, it’s important to reduce watering and avoid fertilizing. Baobab bonsai trees typically enter dormancy in the late fall or winter, and their growth resumes in the spring. By recognizing and respecting their natural dormancy cycle, you can provide optimal conditions for your plant’s long-term health and vitality.
Requirement
Description
Warm Environments
Thrive in warm climates; sensitive to cold temperatures
Sunlight
Require a minimum of six hours of direct sunlight daily
Grow Lights
Beneficial in cases where natural sunlight is limited
Dormancy
Enter dormancy during late fall or winter; reduced watering and fertilization
Mastering the Watering Techniques for Baobab Bonsai
Proper watering is essential for the health and vitality of baobab bonsai trees. These trees can store water in their trunks and only need to be watered about once a month during the growing season. However, during their dormancy period, they should not be watered at all. Overwatering can lead to root rot and ultimately harm the tree. Understanding the moisture needs of your plant and learning how to accurately gauge when to water is essential for their successful cultivation.
When it comes to baobab bonsai watering, there are a few key considerations to keep in mind:
Frequency: Baobab bonsai trees only need to be watered about once a month during the growing season. This allows their trunks to naturally store and release water as needed.
Dormancy: During the dormancy period, which typically occurs in the winter months, baobab bonsai should not be watered at all. This is because they are not actively growing and do not require as much moisture.
Gauging Moisture: Accurately determining when to water baobab bonsai can be a bit tricky. One method is to check the moisture level of the soil by inserting your finger about an inch deep into the soil. If it feels dry, it’s time to water. However, it’s important to avoid overwatering, as this can lead to root rot. Err on the side of underwatering rather than overwatering.
By following these watering techniques, you can ensure that your baobab bonsai tree receives the right amount of moisture for optimal growth and health.
The Art and Science of Baobab Bonsai Fertilization
Fertilization plays a vital role in the growth and development of baobab bonsai trees. Selecting the appropriate fertilizer and establishing an optimal fertilization schedule are essential for promoting vigorous growth and overall health.
Selecting the Appropriate Fertilizer
When choosing a fertilizer for your plant, it’s important to consider the specific nutrient requirements of the tree. Opt for a balanced fertilizer that provides equal amounts of nitrogen (N), phosphorus (P), and potassium (K). A popular choice is a 20-20-20 fertilizer, which ensures a well-rounded nutrient supply.
Additionally, look for a fertilizer that contains essential micronutrients such as iron, manganese, and zinc. These micronutrients are crucial for the overall health and vitality of your bonsai tree.
Optimal Fertilization Schedule for Vigorous Growth
Establishing a proper fertilization schedule is essential for ensuring vigorous growth and preventing nutrient deficiencies or excesses. Here’s a general schedule to follow:
Fertilize your plant tree during the growing season, which typically spans from spring to early fall.
Apply fertilizer every 4-6 weeks, following the instructions provided by the manufacturer.
During the winter dormancy period, refrain from fertilizing as the tree’s metabolic activity slows down.
Remember to adjust the fertilization schedule based on your specific plant’s needs and growth patterns.
Fertilizer Type
Nitrogen (N)
Phosphorus (P)
Potassium (K)
Micronutrients
0
20%
20%
20%
Contains essential micronutrients
Other balanced fertilizers
Varying percentages
Varying percentages
Varying percentages
Check the label for included micronutrients
By selecting the appropriate fertilizer and adhering to an optimal fertilization schedule, your bonsai will receive the necessary nutrients to thrive and display healthy growth. Remember to monitor the tree’s response to fertilization and make adjustments as needed. With proper fertilization, your plant will flourish and bring you years of beauty and enjoyment.
Pruning and Styling Your Baobab Bonsai
Pruning and styling are essential for maintaining the health and beauty of your baobab bonsai tree. Through proper pruning, you can control the shape and size of the tree, while styling allows you to create unique and visually appealing designs.
When it comes to pruning baobab bonsai trees, the good news is that you can prune at any time of the year. However, it is best to focus on cutting back branches before new leaves appear. This helps maintain the overall structure of the tree and prevents excessive growth in certain areas. Trimming new shoots to manage their length is also a common practice in baobab bonsai pruning.
In addition to pruning, styling techniques such as wiring can be used to shape and position the branches of your baobab bonsai. Wiring allows for precise manipulation of the branches, creating elegant and harmonious designs. Be careful not to leave the wire on for too long to avoid wire scars.
When styling your baobab bonsai, consider the natural characteristics of the tree and aim to create a design that complements its unique features. You can experiment with different styles, such as formal upright, slanting, or cascade, to bring out the distinctive beauty of your baobab bonsai.
Expert Tip: Before pruning or styling your baobab bonsai, make sure you have the right tools, such as sharp pruning shears and bonsai wire. This will ensure clean cuts and minimize the risk of damage to the tree.
Remember, each baobab bonsai tree is unique, and as an artist, you have the opportunity to shape and guide its growth. Whether you prefer a classic form or a more creative design, pruning and styling techniques allow you to create a bonsai masterpiece that reflects your personal style and vision.
Best Practices for Repotting and Propagating Baobab Bonsai
Repotting and propagation are essential techniques to ensure the healthy growth and development of your baobab bonsai trees. Knowing when and how to safely repot your baobab bonsai is crucial for their continued well-being. Generally, you should repot your baobab bonsai every two to three years, or when you notice the roots circling the pot or becoming pot-bound. Late winter or early spring, before the tree enters its active growth phase, is the best time to repot.
To safely repot your baobab bonsai, gently remove the tree from its current pot, being careful not to damage the delicate roots. Trim any congested or excessively long roots and prune away any dead or unhealthy root parts. Choose a slightly larger pot that allows room for the roots to grow, and use a well-draining soil mix specifically formulated for bonsai trees. Place the tree in the new pot, making sure it is centered. Fill the pot with the soil mix, gently tapping it down to eliminate air pockets. Finally, water the tree thoroughly and place it in a location with appropriate sunlight.
Innovative Techniques for Propagating Baobab Bonsai
Expanding your baobab bonsai collection can be achieved through innovative propagation techniques. One method is propagating baobab bonsai from cuttings. Select a healthy branch and make a clean cut just below a leaf node. Remove the lower leaves, leaving only a few at the top. Dip the cut end in a rooting hormone and plant it in a well-draining soil mix. Keep the cutting in a warm and humid environment, and mist it regularly to promote root growth. With patience and care, the cutting will develop roots and can be transplanted into its own pot.
Another technique is starting baobab bonsai from seeds. Baobab seeds have a hard shell and may require scarification, which involves nicking or filing the seed coat, to help with germination. Soak the seeds in warm water for 24 hours, and then plant them in a well-draining soil mix. Keep the soil moist and place the pot in a warm and sunny location. Germination can take several weeks to months, but with proper care, you’ll soon have new baobab bonsai seedlings.
Understanding the Importance of Soil Mix and Drainage
The right soil mix and proper drainage are crucial for the health and vitality of your baobab bonsai trees. Baobab bonsai prefer well-draining soil that allows for adequate air circulation and prevents waterlogging. A suitable soil mix for baobab bonsai typically consists of a mixture of akadama, lava rock, and pumice, which provides good drainage and nutrient availability for the roots.
Drainage is essential to prevent root rot and other moisture-related problems. Ensure your pots have drainage holes to allow excess water to escape. When watering your baobab bonsai, water thoroughly but avoid overwatering. Allow the soil to dry between waterings to prevent root suffocation. Regularly check the moisture level by inserting your finger into the soil; if it feels dry up to your first knuckle, it’s time to water. Remember, overwatering is more harmful than underwatering for baobab bonsai.
Karen Phillips, Bonsai expert and blogger. Read more about me here
If you’re looking to add a touch of vibrant color and beauty to your space, this unique plant is the perfect choice. In this guide, we will provide you with all the essential tips and techniques to ensure the successful growth and care of your Rainbow Eucalyptus Bonsai tree.
Rainbow Eucalyptus Bonsai is unlike any other bonsai species you have encountered. Its bark peels off to reveal a magnificent display of green, blue, purple, orange, and maroon hues, resembling a beautiful rainbow. This distinctive feature sets the Rainbow Eucalyptus Bonsai apart and makes it a captivating addition to any bonsai collection.
However, caring for this unique bonsai requires specific knowledge and techniques. This guide will take you through the essential steps of watering, lighting, temperature, and humidity requirements to create the ideal environment for your Rainbow Eucalyptus Bonsai. We will also explore the art of pruning and provide seasonal care practices to ensure your bonsai thrives throughout the year.
Understanding the Rainbow Eucalyptus Bonsai
The Rainbow Eucalyptus Bonsai is a truly captivating and unique plant that captivates bonsai enthusiasts with its remarkable beauty and vibrant colors. Unlike traditional bonsai trees, the Rainbow Eucalyptus Bonsai showcases an extraordinary feature – its bark peels off to reveal an array of stunning hues, including green, blue, purple, orange, and maroon. This distinctive characteristic sets it apart from other bonsai species, making it a true standout in any bonsai collection.
What Sets the Rainbow Eucalyptus Bonsai Apart
The Rainbow Eucalyptus Bonsai’s bark shedding process creates a mesmerizing display of colors that resemble the vibrant hues of a rainbow. This natural phenomenon is a result of its species, Eucalyptus deglupta, known for its incredibly colorful bark. The patches of shed bark create an ever-changing panorama of colors, making the Rainbow Eucalyptus Bonsai a captivating choice for bonsai enthusiasts looking to add a visually stunning element to their collection.
The Colorful Allure of Eucalyptus Deglupta
Eucalyptus deglupta, the species from which the Rainbow Eucalyptus Bonsai is derived, is renowned for its exceptionally vibrant bark. The tree’s bark naturally sheds in patches, exposing different layers of colors that range from greens and blues to purples, oranges, and maroons. This natural display of vibrant hues creates an awe-inspiring visual spectacle, making the Rainbow Eucalyptus Bonsai a prized addition to any bonsai collection.
Why This Species Is Unique Among Bonsais
Among the wide variety of bonsai species, the Rainbow Eucalyptus Bonsai stands out as a truly distinct and exceptional choice. Its ability to thrive in tropical climates, combined with its strikingly colorful bark shedding process, makes it a unique and celebrated addition to any bonsai enthusiast’s collection. The Rainbow Eucalyptus Bonsai offers unparalleled beauty and a captivating aesthetic that is sure to leave a lasting impression.
Essential Care for Your Rainbow Eucalyptus Bonsai
Proper care is essential for the health and longevity of your Rainbow Eucalyptus Bonsai. By following the essential care practices outlined below, you can ensure that your bonsai thrives and displays its vibrant beauty for years to come.
1. Watering
Watering is a vital aspect of rainbow eucalyptus bonsai care. It is crucial to maintain a consistent level of moisture in the soil, as both underwatering and overwatering can be detrimental to the health of your bonsai.
To water your rainbow eucalyptus bonsai properly, follow these guidelines:
Check the moisture level of the soil regularly by inserting your finger about an inch deep into the soil. If it feels slightly dry, it’s time to water.
Water your bonsai thoroughly until you see water flowing out of the drainage holes.
Allow the excess water to drain completely before placing the bonsai back in its tray or saucer.
Remember to adjust your watering schedule according to factors such as climate, season, and the specific needs of your bonsai.
2. Light Requirements
Proper lighting is crucial for the health and growth of your rainbow eucalyptus bonsai. These bonsai trees thrive in bright, indirect sunlight. Place your bonsai near a window or in an area where it can receive bright, filtered light for at least 6-8 hours a day.
3. Temperature and Humidity Needs
Rainbow eucalyptus bonsai prefers warm and humid environments. The ideal temperature range for these bonsai trees is between 60°F (15°C) and 85°F (29°C). It’s essential to avoid exposing your bonsai to extreme temperatures, sudden temperature fluctuations, and drafts.
To maintain the required humidity level, you can:
Place a humidity tray filled with water and pebbles beneath your bonsai to increase humidity around the plant.
Mist the leaves of your bonsai daily, especially during drier months or when the indoor humidity level is low.
Consider using a humidifier to maintain optimal humidity levels for your bonsai.
4. Fertilization
Fertilizing your rainbow eucalyptus bonsai is essential for providing the necessary nutrients for healthy growth. Use a balanced, organic bonsai fertilizer during the growing season. Follow the instructions on the packaging for the appropriate amount and frequency of application, as overfertilizing can harm your bonsai.
Additionally, consider applying a slow-release fertilizer in early spring to provide long-lasting nourishment to your bonsai throughout the growing season.
5. Pruning
Regular pruning is necessary to maintain the desired shape and form of your rainbow eucalyptus bonsai. Prune back any excessive growth, including branches, leaves, and shoots, using sterile pruning shears or bonsai-specific tools.
When pruning, keep the following tips in mind:
Remove any dead or diseased branches immediately to prevent the spread of diseases.
Thin out dense foliage to improve air circulation and promote healthy growth.
Shape your bonsai by carefully trimming branches to achieve the desired aesthetic.
Essential Care Practices
Methods
Watering
Regularly check soil moisture and water thoroughly when necessary.
Light Requirements
Place your bonsai in a bright, indirect sunlight location.
Temperature and Humidity Needs
Maintain a temperature range of 60°F to 85°F and provide adequate humidity.
Fertilization
Apply a balanced, organic bonsai fertilizer during the growing season.
Pruning
Regularly prune to maintain shape, remove dead or diseased branches, thin out dense foliage, and promote healthy growth.
Creating the Ideal Environment for Rainbow Eucalyptus Bonsai
Creating the ideal environment for your Rainbow Eucalyptus Bonsai is crucial for its overall health and growth. By providing the right conditions, you can ensure that your bonsai thrives and displays its vibrant beauty to the fullest.
Lighting and Temperature Requirements
Proper lighting and temperature are essential factors in the successful cultivation of Rainbow Eucalyptus Bonsai. These unique trees require a balance of sunlight and shade to thrive.
The Rainbow Eucalyptus Bonsai prefers bright, indirect light. Placing it near a south-facing window or under grow lights with a daylight spectrum can provide the optimal lighting conditions. Avoid exposing your bonsai to direct sunlight, as it can lead to leaf burn.
When it comes to temperature, Rainbow Eucalyptus Bonsai flourishes in warm tropical climates. It prefers temperatures between 65°F to 85°F (18°C to 29°C) throughout the year. Protect your bonsai from extreme temperature fluctuations and drafts, as they can cause stress to the tree.
From Humidity to Watering: Keeping Your Bonsai Thriving
High humidity levels are crucial for the health of your Rainbow Eucalyptus Bonsai. These trees naturally thrive in humid environments. To maintain the ideal humidity, you can use a humidity tray or a humidifier near your bonsai. Misting the leaves with water can also help increase humidity.
Watering
Lighting
Temperature
Humidity
Regular watering
Bright, indirect light
65°F to 85°F (18°C to 29°C)
High humidity levels
Proper watering is essential for the health of your Rainbow Eucalyptus Bonsai. It’s important to keep the soil evenly moist but not waterlogged. Check the moisture level of the soil regularly by using your finger or a moisture meter.
Water your bonsai thoroughly, ensuring that water reaches the roots. Make sure to allow excess water to drain away, as waterlogged roots can lead to root rot. Adjust your watering frequency based on environmental conditions and the specific needs of your Rainbow Eucalyptus Bonsai.
By providing the right lighting, maintaining the optimal temperature range, and ensuring proper humidity and watering, you can create the ideal environment for your Rainbow Eucalyptus Bonsai to thrive and showcase its stunning colors and beauty.
Mastering the Art of Rainbow Eucalyptus Bonsai Pruning
Pruning is a crucial aspect of caring for your Rainbow Eucalyptus Bonsai. By mastering the art of pruning, you can shape and maintain the desired form of your bonsai tree, ensuring its health and aesthetic appeal.
When it comes to pruning techniques for Rainbow Eucalyptus Bonsai, there are several methods you can employ:
Branch Pruning: This involves selectively removing branches to enhance the tree’s structure and allows more light to reach the lower foliage.
Leaf Pruning: By removing excess leaves, you help reduce the overall size of the bonsai and promote better air circulation.
Root Pruning: This technique involves trimming the roots to prevent them from becoming root-bound and encourage the development of a compact root system.
Canopy Pruning: Trimming the upper part of the tree helps maintain its shape and prevent it from growing too tall or out of proportion.
Timing is key when it comes to pruning your Rainbow Eucalyptus Bonsai. The ideal time for pruning is during the tree’s dormancy period in late winter or early spring. Avoid pruning during periods of active growth, as this can disrupt the tree’s development.
Regular pruning offers numerous benefits for your Rainbow Eucalyptus Bonsai, such as:
Improving the overall structure and form of the bonsai.
Encouraging new growth and the development of denser foliage.
Removing diseased or damaged branches to promote the tree’s health.
Creating a visually pleasing bonsai that reflects your artistic vision and style.
Seasonal Practices for Rainbow Eucalyptus Bonsai Cultivation
Cultivating Rainbow Eucalyptus Bonsai requires attention to seasonal practices. By understanding the specific care practices that should be followed throughout the year, you can ensure the optimal growth and development of your bonsai tree. From spring to winter, there are different tasks and techniques that will contribute to the continued health and beauty of your Rainbow Eucalyptus Bonsai.
In the spring, as the weather begins to warm up, it is essential to focus on providing adequate sunlight and maintaining proper moisture levels in the soil. This will promote healthy growth and vibrant foliage. Pruning during this season can help shape the bonsai and remove any dead or damaged branches.
As summer arrives, pay close attention to watering your Rainbow Eucalyptus Bonsai. The hot weather may cause the soil to dry out quickly, so regular watering is crucial to prevent dehydration. Adequate humidity is also important during this time, as it mimics the bonsai’s natural tropical environment. Consider misting the foliage to increase humidity levels.
In the fall, you may notice the bark of your Rainbow Eucalyptus Bonsai becoming more colorful as it sheds in patches. This is a natural process and adds to the bonsai’s unique beauty. During this season, focus on reducing watering frequency to prevent overhydration. Additionally, ensure the bonsai is placed in a location where it can receive ample indirect sunlight.
As winter approaches, it’s important to protect your Rainbow Eucalyptus Bonsai from freezing temperatures. Move it indoors or provide proper insulation to shield it from the cold. Reduce watering during this season to prevent excessive moisture in the soil, which can lead to root rot.
By following these seasonal practices for Rainbow Eucalyptus Bonsai cultivation, you can ensure the continued health and vibrancy of your bonsai tree throughout the year. Take the time to understand the specific needs of your bonsai and make adjustments accordingly. With proper care and attention, your Rainbow Eucalyptus Bonsai will thrive and provide a stunning display of color and beauty.
Starting Your Rainbow Eucalyptus Bonsai from Scratch
If you’re interested in embarking on the rewarding journey of growing your own Rainbow Eucalyptus Bonsai, there are various methods you can consider. This section will provide valuable insights into starting your bonsai from scratch, whether it’s from seed or cuttings. Additionally, we’ll explore the option of purchasing a pre-grown Rainbow Eucalyptus Bonsai for those who prefer a more established tree.
If you’re eager to witness the entire growth process, starting your Rainbow Eucalyptus Bonsai from seed is a fascinating option. It will require patience and attention, but the reward will be a deep sense of accomplishment as you witness your bonsai flourish from a tiny seedling. You can find rainbow eucalyptus bonsai seeds for sale online or at specialized nurseries. Follow the provided instructions carefully to ensure successful germination and growth.
Another method of propagation is starting your Rainbow Eucalyptus Bonsai from cuttings. This technique involves taking a healthy branch or stem from an established tree and cultivating it into a new bonsai. It offers the advantage of faster growth and the ability to retain the unique characteristics of the parent tree. Select a suitable cutting and follow proper rooting and planting techniques to give your new bonsai the best chance of success.
If you prefer a more immediate option, you can consider purchasing a pre-grown Rainbow Eucalyptus Bonsai. Many reputable bonsai nurseries offer rainbow eucalyptus bonsai for sale, allowing you to skip the early stages of growth and focus on nurturing and maintaining an established tree. When selecting a pre-grown bonsai, look for healthy foliage, well-developed branches, and a sturdy root system. Take your time to find a bonsai that resonates with you and fits your desired aesthetic.
Rainbow Eucalyptus Bonsai Soil Composition and Fertilization
Proper soil composition and fertilization are crucial for the health and vitality of your Rainbow Eucalyptus Bonsai. The right soil mix will ensure adequate drainage and provide essential nutrients for your bonsai tree to thrive.
When it comes to soil composition, it is important to create a well-draining mix that mimics the natural habitat of the Rainbow Eucalyptus tree. A combination of organic materials such as peat moss, perlite, and pine bark is recommended. This blend allows for proper airflow and prevents waterlogging, which can lead to root rot. Make sure the soil is slightly acidic, with a pH level between 5.5 and 6.5, as this is optimal for Rainbow Eucalyptus Bonsai.
Fertilization is also essential for maintaining the health and vigor of your bonsai tree. Use a balanced, slow-release fertilizer that is specifically formulated for bonsai plants. Apply the fertilizer according to the instructions on the packaging, typically once every two to four weeks during the growing season. Be careful not to over-fertilize, as this can cause root burn and damage to your Rainbow Eucalyptus Bonsai.
By understanding the soil composition and fertilization requirements of your Rainbow Eucalyptus Bonsai, you can provide the necessary nutrients and support for its growth and development. A well-draining soil mix and regular fertilization will contribute to the overall health and vibrant beauty of your bonsai tree.
FAQ
What sets the Rainbow Eucalyptus Bonsai apart?
The Rainbow Eucalyptus Bonsai stands out due to its remarkable beauty and vibrant colors. Its bark peels off to reveal a stunning display of green, blue, purple, orange, and maroon hues, making it a true standout in any bonsai collection.
Why is the Eucalyptus Deglupta bonsai species unique among bonsais?
The Eucalyptus Deglupta bonsai species is renowned for its colorful bark, which naturally sheds in patches and creates a mesmerizing display of colors resembling a rainbow. This uniqueness, along with its ability to thrive in tropical climates, makes it a prized addition to any bonsai collection.
How do I care for my Rainbow Eucalyptus Bonsai?
Proper care is essential for the health and longevity of your Rainbow Eucalyptus Bonsai. This includes providing the right amount of water, light, temperature, and humidity, as well as regular fertilization and pruning to ensure optimal growth and shape.
What are the lighting and temperature requirements for Rainbow Eucalyptus Bonsai?
Rainbow Eucalyptus Bonsai thrives in bright, indirect light and prefers temperatures between 60°F and 85°F. Avoid placing the bonsai in extremely hot or cold areas, as it is sensitive to temperature fluctuations.
How should I prune my Rainbow Eucalyptus Bonsai?
Pruning is crucial for shaping and maintaining the desired form of your Rainbow Eucalyptus Bonsai. Regular pruning will allow you to sculpt your bonsai into a beautiful and aesthetically pleasing shape. It is best to prune during the tree’s dormancy period, typically in late winter or early spring.
What are the seasonal practices for Rainbow Eucalyptus Bonsai cultivation?
Rainbow Eucalyptus Bonsai requires specific care practices throughout the year. These include adjusting watering frequency, fertilization, and light exposure based on the changing seasons. Adapting your care routine to the needs of your bonsai during different seasons is vital for its optimal growth and development.
How can I start my Rainbow Eucalyptus Bonsai from scratch?
You can start your Rainbow Eucalyptus Bonsai from scratch by growing it from seed or cuttings. Alternatively, you can purchase a pre-grown bonsai tree. Considerations such as the level of expertise required and the time it takes for the bonsai to mature should be taken into account when deciding your preferred method of starting your Rainbow Eucalyptus Bonsai.
What is the optimal soil composition and fertilization for Rainbow Eucalyptus Bonsai?
Rainbow Eucalyptus Bonsai thrives in well-draining soil composed of specific ingredients such as peat moss, perlite, and bonsai soil mix. Fertilization is essential, and using a balanced bonsai fertilizer during the growing season will provide the necessary nutrients for your bonsai’s growth and development.
Karen Phillips, Bonsai expert and blogger. Read more about me here
Have you ever heard of cannabis bonsai? This unique growing technique combines the art of bonsai with the cultivation of cannabis plants, resulting in miniature masterpieces that are both beautiful and functional. In this comprehensive guide, we will explore the fascinating world of cannabis bonsai, from understanding the phenomenon to expert techniques and care tips.
Unlike traditional bonsai trees, it offers a unique twist on the art form. Imagine having a compact cannabis plant that fits perfectly on your windowsill or brings a touch of nature to your office desk. Cannabis bonsai allows you to enjoy the artistry of bonsai while also indulging in your love for Bonsai cultivation.
As a cannabis hobbyist, you may already be familiar with the basics of cultivation. However, growing cannabis bonsai requires specific techniques and care to achieve the desired results. In the following sections, we will guide you through the entire process, covering everything from choosing the right strain to long-term cultivation and maintenance.
Understanding the Cannabis Bonsai Phenomenon
Before diving into the step-by-step process of growing cannabis bonsai, it’s important to understand the origins and significance of this unique phenomenon. Cannabis bonsai is not a new concept, but rather a modern adaptation of the ancient art of bonsai. Originating in China and refined by Japanese Buddhist monks, bonsai is the practice of growing miniaturized trees in small containers. This art form requires meticulous care and shaping to create miniature replicas of full-sized trees. Cannabis bonsai takes this concept and applies it to the cultivation of cannabis plants, resulting in compact, aesthetically pleasing specimens. By exploring the history and cultural significance of bonsai, we can better appreciate the artistry and dedication required to cultivate cannabis bonsai.
Ancient bonsai practices date back thousands of years, with evidence of miniature tree cultivation found in ancient Chinese artwork and writings. Buddhist monks in Japan further refined the art form, incorporating principles of Zen Buddhism and harmony with nature. Cannabis bonsai represents a modern fusion of this ancient tradition with the unique characteristics of the cannabis plant.
“Cannabis bonsai is a testament to the creativity and adaptability of growers who seek to combine artistry and horticulture. By cultivating cannabis plants in miniature form, enthusiasts are able to showcase their skills and create stunning living sculptures.” – Dr. Hiroshi Nakamura, Bonsai Expert
The cannabis bonsai phenomenon has gained popularity among cannabis enthusiasts and gardening hobbyists alike. The combination of the ancient bonsai practice with the unique features of the cannabis plant presents a captivating challenge and an opportunity to create truly one-of-a-kind creations.
In the next section, we will delve into the step-by-step approach to creating your own cannabis bonsai, from choosing the right strain to essential training techniques. By understanding the cultural heritage and significance of bonsai in conjunction with the artistry of cannabis cultivation, you will be equipped with the knowledge and inspiration to embark on your cannabis bonsai journey.
Creating Your Own Cannabis Bonsai: A Step-by-Step Approach
Cultivating your own cannabis bonsai tree is a rewarding and artistic endeavor. In this section, we will guide you through the step-by-step process of creating a healthy and beautiful cannabis bonsai masterpiece. It all begins with making the right choices from the start.
Choosing the Right Strain for Your Miniature Masterpiece
When choosing a strain for your cannabis bonsai, it’s important to select one that is suitable for compact growth. Look for strains with a short stature and compact structure. This will ensure that your bonsai remains manageable and visually appealing. Consider strains like Northern Lights, White Widow, or Hindu Kush, which have naturally compact growth patterns and are well-suited for bonsai cultivation.
Preparing and Positioning: Pots and Planting for Bonsai Success
The next step in creating your cannabis bonsai is preparing and positioning the pot for optimal growth. Choose a pot that is appropriate for the size of your bonsai tree. A shallow pot with excellent drainage is recommended to promote healthy root development. Select a well-draining bonsai soil mix and plant your cannabis bonsai carefully, ensuring the roots are properly positioned.
Position your cannabis bonsai in a location with adequate sunlight. Cannabis plants require at least 6 hours of direct sunlight each day. If outdoor cultivation is not possible, consider using grow lights or placing your bonsai near a sunny window.
Essential Training Techniques to Shape Your Cannabis Bonsai
Training and sculpting your cannabis bonsai is a crucial part of the bonsai cultivation process. These techniques allow you to shape and guide the growth of your tree, creating a visually stunning bonsai masterpiece. Some essential training techniques for your cannabis bonsai include:
Low-Stress Training (LST): Gently bending and securing branches to encourage lateral growth and create a desired shape.
Topping: Pruning the top growth of your cannabis bonsai to promote bushiness and compact growth.
Pruning: Regularly pruning your bonsai to maintain its shape and remove any unwanted growth.
By implementing these essential training techniques, you can shape your cannabis bonsai into a work of art, showcasing your creativity and passion.
Expert Cannabis Bonsai Techniques
For those looking to take their cannabis bonsai to the next level, expert techniques can elevate your miniature masterpiece to new heights. In this section, we will explore advanced techniques used by experienced cannabis bonsai growers. These techniques require skill and precision to achieve desired results, allowing you to create truly unique and artistic creations that showcase your talent and dedication.
One of the key aspects of advanced bonsai training is mastering shaping techniques. This involves using methods such as wiring and bending to manipulate the growth of your cannabis bonsai. By carefully wiring branches and gently bending them, you can create elegant curves and intricate designs, giving your bonsai tree its own distinct character. This technique requires patience and attention to detail, but the results are well worth the effort.
Grafting and air layering are more complex techniques often used by experienced growers. Grafting involves joining two different cannabis plants together to create a single tree with unique characteristics. This method allows you to combine the desirable traits of different strains, resulting in a bonsai tree that is truly one-of-a-kind. Air layering, on the other hand, is a method of propagating new plants from existing branches, creating additional points of interest and complexity in your bonsai design.
By incorporating these expert cannabis bonsai techniques into your cultivation process, you can unlock endless creative possibilities. Experiment with different shaping techniques, try your hand at grafting, and explore the artistry of air layering. These advanced techniques will not only enhance the visual appeal of your cannabis bonsai but also provide a rewarding challenge for the dedicated hobbyist.
Cannabis Bonsai Care and Maintenance
Successful cannabis bonsai cultivation goes beyond just shaping and training techniques. Proper care and maintenance are essential for the health and longevity of your miniature masterpiece. In this section, we will cover the key aspects of cannabis bonsai care, including lighting and temperature control, watering and feeding, and pruning practices for perfect aesthetics.
Proper Lighting and Temperature Control
Providing the right lighting and maintaining optimal temperature is crucial for the healthy growth of your cannabis bonsai. Cannabis plants require specific light intensities and durations at different stages of growth. For the vegetative stage, they thrive under a consistent 18-24 hours of light per day. During the flowering stage, reducing the light to 12 hours per day promotes bud development. Consider using LED grow lights for energy-efficient and customizable lighting.
In addition to lighting, maintaining the right temperature is vital. Keep your cannabis bonsai in a controlled environment with temperatures between 70-80°F (21-27°C) during the day and slightly cooler at night. Avoid drastic temperature fluctuations, as they can stress the plant and affect its overall health.
Watering and Feeding Your Compact Cannabis Plant
Proper watering and feeding are essential for the overall health and growth of your cannabis bonsai. The key is to strike a balance between providing enough moisture and avoiding waterlogging. Regularly check the moisture level of the soil by inserting your finger about an inch deep. Water the plant when the soil feels dry to the touch, but be cautious not to overwater.
When it comes to feeding your cannabis bonsai, choose a well-balanced fertilizer formulated specifically for cannabis plants. Follow the instructions on the fertilizer package, and adjust the feeding schedule based on the plant’s growth and nutrient requirements.
Pruning Practices for Perfect Cannabis Bonsai Aesthetics
Pruning plays a vital role in shaping and maintaining the aesthetics of your cannabis bonsai. Regular pruning helps control the plant’s size, improves airflow, and encourages new growth. When pruning, focus on removing dead or diseased branches, as well as any growth that disrupts the desired bonsai form.
Start pruning your cannabis bonsai when it is young to establish the desired shape. Use clean and sharp pruning shears or scissors to make clean cuts and minimize damage to the plant. Regularly inspect your bonsai for any signs of pests or diseases and take appropriate action if necessary.
Aspect
Recommendation
Lighting
18-24 hours of light during the vegetative stage 12 hours of light during the flowering stage
Temperature
70-80°F (21-27°C) during the day, slightly cooler at night
Watering
Check soil moisture level regularly and water when dry Avoid waterlogging
Feeding
Use a well-balanced fertilizer for cannabis plants Follow instructions on the fertilizer package Adjust feeding schedule based on growth and nutrient requirements
Pruning
Regularly prune dead, diseased, or disruptive growth Start pruning when the bonsai is young Use clean and sharp pruning shears or scissors Inspect for pests and diseases regularly
Cannabis Bonsai: Harvesting and Long-Term Cultivation
Congratulations on successfully growing and shaping your cannabis bonsai! Now, it’s time to dive into the process of harvesting and long-term cultivation to ensure the health and longevity of your miniature masterpiece.
Harvesting your cannabis bonsai requires careful timing to achieve the desired potency and flavor. The optimal time for harvest varies depending on the strain and your personal preferences. Look for the trichomes on the buds to become cloudy or amber in color, indicating that the cannabinoids are at their peak. Once you have determined the ideal time to harvest, carefully cut the branches and hang them upside down in a dark, well-ventilated area to dry. This curing process allows the buds to develop their full aroma and potency.
Long-term cultivation of your cannabis bonsai involves proper care and maintenance to ensure its health and vitality. Regular pruning is essential to remove any dead or yellowing leaves and promote healthy growth. Additionally, monitor the lighting and temperature conditions to create an optimal environment for your bonsai tree. Provide adequate light, either natural or artificial, and maintain a moderate temperature range of 70-85°F during the day and slightly cooler at night.
To maintain a healthy bonsai tree, remember to water it regularly but avoid overwatering, as excessive moisture can lead to root rot. Use well-draining soil specifically formulated for bonsai cultivation and feed your cannabis bonsai with a balanced fertilizer to provide the necessary nutrients for growth. Remember to monitor the overall health of your plant, keeping an eye out for any signs of pests or diseases.
Karen Phillips, Bonsai expert and blogger. Read more about me here
Bonsai lemon trees offer a miniature version of the traditional lemon tree, allowing you to enjoy the beauty of citrus right in your own home or garden. These trees require dedicated cultivation to maintain their small size, intricate branches, and vibrant foliage.
Proper care is vital for the health and growth of your bonsai lemon tree. From providing the optimal climate conditions to mastering watering techniques, pruning, and pest management, each aspect contributes to the overall well-being of your tree. In the upcoming sections, we will explore these topics in detail, providing you with expert guidance and practical tips to ensure your lemon tree bonsai thrives.
Understanding the Basics of Bonsai Lemon Tree Care
When it comes to cultivating a bonsai lemon tree, understanding the basics of care is essential for its health and growth. This section will delve into the optimal climate conditions required for its successful development, the right citrus species suitable for bonsai cultivation, and the benefits of incorporating lemon tree bonsai into your gardening endeavors.
Optimal Climate Conditions for Growth
To ensure healthy growth and vibrant foliage, bonsai lemon trees require specific climate conditions. These trees thrive in warm and sunny environments, ideally with temperature ranges between 70°F to 85°F (21°C to 29°C) during the day and no lower than 50°F (10°C) at night. To provide the perfect balance, it is recommended to place your lemon tree bonsai in a location where it can receive ample sunlight but is protected from extreme heat or cold.
Identifying the Right Citrus Species for Bonsai
When selecting the citrus species for your bonsai, lemon trees are highly favored due to their adaptability and aesthetic appeal. The lemon tree (Citrus limon) offers petite leaves, fragrant blossoms, and the potential to bear fruit, making it a popular choice among bonsai enthusiasts. Other suitable citrus species include the calamondin orange (Citrus microcarpa) and the yuzu tree (Citrus junos) for their small-sized leaves and striking features.
Benefits of Cultivating Bonsai Lemon Trees
The benefits of growing and cultivating bonsai lemon trees extend beyond their beauty and artistic appeal. By incorporating these miniature citrus trees into your gardening space, you can enjoy the following advantages:
Aesthetic appeal: Bonsai lemon trees add a touch of natural beauty and elegance to any indoor or outdoor setting, transforming it into a serene and captivating landscape.
Fresh fruit: With proper care, your lemon tree bonsai has the potential to produce small, edible lemons, bringing the joy of harvesting your own fruits to your gardening experience.
Stress relief: Engaging with bonsai trees, including caring for and shaping them, has been shown to have stress-reducing effects, providing a therapeutic and meditative activity.
Learning experience: Cultivating a bonsai lemon tree provides an opportunity to understand the intricacies of growth, patience, and the delicate balance required to nurture a living organism.
Now that you have a solid understanding of the basic care aspects of bonsai lemon trees, let’s move on to how you can initiate your own bonsai lemon tree journey in the next section.
Initiating Your Bonsai Lemon Tree Journey
Growing a bonsai lemon tree from seed is an exciting and rewarding experience. It allows you to witness the tree’s development from its humble beginnings and develop a personal connection with your bonsai. In this section, we will guide you through the process of finding the best lemon seeds, preparing them for planting, and highlight the advantages of growing lemon bonsai from seed.
Finding the Best Lemon Seeds: Meyer Lemons and Beyond
To start your lemon tree bonsai journey, it is crucial to find high-quality lemon seeds. Among the various citrus species suitable for bonsai, Meyer lemons are particularly popular due to their compact size, beautiful foliage, and fragrant flowers. They are well-suited for bonsai cultivation and can thrive both indoors and outdoors.
Preparation Steps for Seed Planting
Once you have obtained the lemon seeds, it is essential to prepare them for planting. Follow these step-by-step instructions to ensure successful germination:
Clean the seeds: Rinse the lemon seeds thoroughly to remove any residual pulp or debris that may hinder germination.
Soak the seeds: Place the cleaned lemon seeds in a bowl of warm water and let them soak for 24 to 48 hours. This soaking process helps soften the seed coat and promote germination.
Advantages of Growing Lemon Bonsai from Seed
Growing lemon bonsai from seed offers several advantages that make it a worthwhile endeavor:
Personal connection: By starting your bonsai lemon tree from seed, you establish a unique bond with the tree. You witness its growth and development from the very beginning, creating a sense of pride and a deeper appreciation for the art of bonsai.
Uniqueness: Each lemon bonsai grown from seed is inherently unique. As the tree matures, you will witness distinct characteristics and variations, making it truly one-of-a-kind.
Cost-effective: Growing from seed is a cost-effective way to start your bonsai journey. Lemon seeds are readily available and affordable, making it accessible for beginners and seasoned enthusiasts alike.
Embark on your bonsai lemon tree journey by finding the best lemon seeds, preparing them for planting, and enjoy the unparalleled experience of growing a lemon bonsai tree from seed.
Proper placement is essential for the health and growth of your bonsai lemon tree. Whether you choose to keep it indoors or outdoors, there are specific factors to consider to ensure optimal conditions for your tree’s well-being.
Indoor Placement for Bonsai Lemon Tree
When selecting an indoor location for your bonsai lemon tree, it’s crucial to provide access to sunlight and create a suitable environment for its growth. Here are some tips:
Place your bonsai lemon tree near a south-facing window with maximum sunlight exposure. This will provide the necessary light for photosynthesis and promote healthy foliage.
Ensure that the temperature in the chosen area remains consistent and within the preferred range for lemon tree bonsai, which is around 60-70°F (15-21°C).
Protect your indoor bonsai from extreme temperature fluctuations, such as drafts or direct heat sources like radiators. Sudden changes in temperature can stress the tree and negatively impact its health.
Consider using artificial grow lights if natural sunlight is limited. LED or fluorescent lights can supplement the sunlight requirements of your bonsai lemon tree.
Outdoor Placement for Bonsai Lemon Tree
If you prefer to keep your bonsai lemon tree outdoors, it’s important to select an appropriate location that takes into account climate conditions and protection from extreme weather. Here’s what you need to know:
Choose a spot that receives full sun exposure for at least 6-8 hours a day. Lemon trees thrive in well-lit areas, so direct sunlight is crucial for their growth and fruit production.
Ensure that the outdoor area is protected from strong winds and frost. Place your bonsai lemon tree in a sheltered spot or use windbreaks to shield it from harsh weather conditions.
Consider using a greenhouse or cold frame to provide additional protection during colder months, especially if you live in regions with freezing temperatures.
Monitor the moisture levels in the soil regularly and adjust your watering schedule accordingly. Outdoor bonsai lemon trees may require more frequent watering during hot and dry periods.
By following these strategies for indoor and outdoor placement, you can create the ideal environment for your lemon bonsai tree to thrive and bring beauty to your space.
Mastering Watering Techniques
Proper watering is essential for the health and growth of your bonsai lemon tree. Watering techniques for lemon bonsai tree differ from regular garden plants due to their unique size and container-bound environment.
Understanding the needs of your bonsai lemon tree and implementing the right watering practices will help ensure its longevity and vibrancy. Here are some important tips and guidelines:
Observe soil moisture levels: Before watering, check the moisture level of the soil by gently inserting your finger into the soil up to the second knuckle. If the soil feels slightly dry, it’s time to water. Avoid overwatering as it can lead to root rot and other health issues.
Watering frequency: The frequency of watering depends on various factors such as the size of the bonsai pot, climate, and time of year. As a general rule, water your bonsai lemon tree when the top layer of the soil feels slightly dry. However, it’s important to note that overwatering or underwatering can have detrimental effects on your bonsai.
Watering method: To water your bonsai lemon tree, gently pour water onto the soil until it begins to drain out of the drainage holes at the bottom of the pot. This ensures that water reaches the entire root system. Avoid watering the foliage directly, as it can promote fungal diseases.
Proper drainage: Good drainage is crucial for lemon bonsai tree to prevent waterlogged soil, which can lead to root rot. Ensure that your bonsai pot has sufficient drainage holes, and place it on a tray or saucer to catch excess water.
Moisture retention: Bonsai lemon trees benefit from maintaining a slightly moist environment. Consider using moisture-retaining techniques such as humidity trays, mulching, or placing a layer of sphagnum moss on the soil surface to help retain moisture.
Adapt to changing needs: Be observant of your bonsai lemon tree’s changing watering needs throughout different seasons. Adjust your watering schedule accordingly to accommodate changes in temperature, humidity, and growth rate.
Remember, watering is just one aspect of caring for your bonsai lemon tree. By mastering watering techniques and combining them with proper nutrition, pruning, and disease prevention, you can ensure the well-being and beauty of your bonsai lemon tree.
Fertilizing your bonsai lemon tree is essential for its health and growth. Just like any other living organism, your bonsai lemon tree requires proper nutrition to thrive. Fertilizers provide the necessary nutrients that may be lacking in the soil, ensuring that your tree receives the essential elements it needs for optimal growth.
When it comes to fertilizing your bonsai lemon tree, it’s important to select and apply the right type of fertilizer. There are various options available, including organic and synthetic fertilizers. Organic options such as compost or fish emulsion provide natural nutrients and promote overall soil health. Synthetic fertilizers, on the other hand, are specifically formulated to deliver concentrated nutrients to the tree.
The frequency and dosage of fertilizer application depend on the specific needs of your bonsai lemon tree. Generally, during the growing season (spring and summer), you can fertilize your tree every two to four weeks. However, it’s crucial to read and follow the instructions provided by the manufacturer of the chosen fertilizer, as the recommended dosage may vary.
Monitoring the growth and response of your bonsai lemon tree is essential in adjusting your fertilization practices. Observe how your tree is growing, its leaf color, and overall vigor. If the tree appears healthy and shows good growth, continue with your current fertilization routine. However, if the tree appears weak, lacks vigor, or displays signs of nutrient deficiency, such as pale leaves or stunted growth, it may be necessary to increase the frequency or adjust the dosage of fertilizer.
Remember, fertilizing your bonsai lemon tree is part of an overall care routine that includes proper watering, pruning, and pest management. By providing your tree with the right nutrition, you’ll ensure its long-term health and enjoy the beauty of a thriving bonsai lemon tree.
1. Slow-release, may take longer to see results 2. May attract pests if not properly managed
Synthetic
1. Concentrated nutrients for targeted feeding 2. Faster results and visible growth 3. Easy to use and apply
1. Potential risk of nutrient burn if overused 2. May disrupt soil microorganisms
Maintaining Your Bonsai: Pruning and Shaping
To keep your bonsai lemon tree healthy and visually pleasing, regular pruning and shaping are essential. Pruning helps remove dead or overgrown branches, encourages the growth of new shoots, and maintains the desired shape of the tree. Shaping, on the other hand, allows you to have creative control and bring out the artistic beauty of your bonsai lemon tree.
Start by inspecting your bonsai lemon tree for any dead or weak branches. Using sharp pruning shears, carefully remove these branches, ensuring a clean cut close to the trunk or main branch. This promotes overall tree health and prevents the spread of pests or diseases.
Additionally, pruning can assist in shaping the bonsai lemon tree. Carefully consider the desired shape or style you want to achieve, whether it’s informal upright, slanting, or cascade. Use pruning shears to selectively trim and shape the branches, creating a balanced and aesthetically pleasing form.
For more intricate shaping, you can use wiring techniques. Gently wrap bonsai wire around selected branches, bending them to the desired position. Be careful not to apply too much pressure to avoid damaging the tree. Over time, as the branches grow and thicken, you can remove the wire to retain the shape.
Remember that shaping and pruning bonsai lemon trees require patience and an eye for detail. It’s a gradual process that allows you to nurture and sculpt your tree over time, creating a unique piece of living art.
Benefit of Pruning and Shaping
How to Prune a Bonsai Lemon Tree
1. Promotes healthy growth
1. Inspect for dead or weak branches
2. Maintains desired shape
2. Remove dead branches with pruning shears
3. Allows for creative expression
3. Shape branches using pruning shears
4. Enhances aesthetic appeal
4. Use wiring techniques for intricate shaping
Pest Management and Disease Prevention in Lemon Bonsai Care
When cultivating a bonsai lemon tree, it is essential to be aware of potential pest infestations and diseases that can affect its health. By implementing proactive measures for pest management and disease prevention, you can ensure the longevity and vitality of your lemon bonsai. Regular inspection, proper hygiene, and targeted treatments, if necessary, can help protect your tree from various threats.
Common pests that may target bonsai lemon trees include aphids, scales, and spider mites. These tiny invaders can cause damage to both the leaves and the trunk of the tree, compromising its overall health. To detect and control pests early on, make it a habit to thoroughly inspect your lemon bonsai on a regular basis. Look for signs such as discoloration, wilting, or the presence of webs or sticky residue.
In addition to regular inspections, practicing proper hygiene is crucial. Keep the surrounding area clean, removing any fallen leaves or debris that could harbor pests or diseases. Cleanliness helps reduce the risk of infestations and creates an environment that is less conducive to pests and fungal infections.
If pest infestations or diseases are detected, it is important to take swift and appropriate action. Opt for organic or targeted treatments whenever possible to minimize any potential harm to your lemon bonsai and the environment. Always follow the instructions provided with the treatment and ensure proper application to effectively address the issue.
Karen Phillips, Bonsai expert and blogger. Read more about me here
In this guide, we will provide you with expert advice and practical tips to ensure the health and vitality of your oak bonsai tree. Whether you’re a beginner or an experienced bonsai enthusiast, you’ll find valuable information on every aspect of oak bonsai care.
From understanding the unique aspects of oak bonsai cultivation to creating the optimal environment for your tree, we’ll cover it all. You’ll learn the art of watering your oak bonsai, mastering fertilization techniques, and the importance of pruning and shaping to maintain its desired form and beauty.
Let’s dive in and discover the secrets of growing and caring for these magnificent miniature trees!
Understanding the Unique Aspects of Oak Bonsai Cultivation
When it comes to oak bonsai cultivation, selecting the right species is crucial. Each species has its own requirements and challenges. Some species are better suited for specific climates, while others may require more maintenance or specific care techniques.
To choose the right species for your needs, consider factors such as your climate, available growing space, and personal preferences. You may prefer a certain leaf size or a particular growth pattern. By carefully selecting the right ospecies, you can ensure a healthier and more successful bonsai tree.
While cultivation can present challenges, the rewards are well worth it. The unique beauty and presence of oak bonsai trees make them a captivating addition to any collection.
Creating the Optimal Environment for Your Oak Bonsai
Creating the perfect environment for your oak bonsai is paramount to ensuring its health and growth. The unique nature of these trees necessitates specific considerations for placement, sunlight requirements, and protection from harsh weather conditions.
To provide your plant with an optimal environment, it is crucial to strike a balance between sunlight exposure and shade. While they thrive in well-lit areas, they should be protected from excessive direct sunlight, especially during the hottest hours of the day.
Pro Tip: Place your oak bonsai in an area where it receives morning sun, but is shaded during the intense afternoon heat. This will help prevent leaf scorching and maintain optimal photosynthesis.
In addition, it is crucial to shield your plant from extreme temperatures, frost, and strong winds, as these can cause damage to its delicate foliage and overall health. Consider using protective measures such as translucent covers during harsh weather conditions to protect your bonsai tree.
Pro Tip: During winter, if freezing temperatures are expected, move your oak bonsai to a sheltered location, such as a garage or greenhouse, to avoid frost damage.
By providing the optimal environment for your plant, you can ensure its longevity and create a nurturing space for it to thrive. Remember to regularly evaluate the placement, sunlight exposure, and protection of your bonsai to adapt to changing seasons and weather conditions.
Mastering the Art of Watering Your Oak Bonsai
Proper watering is vital for the health and survival of your oak bonsai tree. In this section, we will guide you through the art of watering your bonsai, including determining the right watering frequency, understanding the moisture needs of the tree, and avoiding common watering mistakes. Whether it’s during the growing season or in winter, you will gain the knowledge and skills to keep your oak bonsai properly hydrated.
Watering bonsai trees, including oak bonsai, can be a delicate balance. Overwatering can lead to root rot and other issues, while underwatering can cause the tree to wither and die. Here are some techniques to help you master the art of watering your oak bonsai:
Check for Moisture: Before watering your oak bonsai, check the moisture of the soil by inserting a wooden chopstick or your finger into the soil. If it comes out dry, it’s time to water.
Watering Frequency: The frequency of watering depends on various factors such as climate, season, and the size of your bonsai pot. As a general rule, water your oak bonsai when the top inch of soil feels slightly dry.
Watering Technique: When watering your oak bonsai, use a gentle and even stream of water. Avoid using a strong jet of water that can dislodge the soil or damage the delicate roots. Water thoroughly until water comes out of the drainage holes at the bottom of the pot.
Moisture Retention: To help retain moisture in the soil, you can place a layer of organic mulch, such as moss or bark, on top of the soil surface. This will help prevent evaporation and keep your oak bonsai hydrated for longer periods.
Winter Watering: During winter, when your oak bonsai goes into dormancy, reduce the watering frequency—only water when the soil surface feels dry to the touch. Be careful not to let the soil dry out completely.
“Remember, every oak bonsai has unique watering needs, so it’s important to observe and adjust your watering routine based on the specific requirements of your tree.”
By following these watering techniques and closely monitoring the moisture needs of your oak bonsai, you will be able to maintain a healthy and thriving tree. Adequate hydration is key to the overall well-being of your oak bonsai, ensuring its beauty and longevity for years to come.
Oak Bonsai Fertilization: Timing and Techniques
Proper fertilization is key to ensuring the health and vigor of your bonsai tree. By supplying the right nutrients at the right time, you can promote healthy growth and vibrant foliage. In this section, we will discuss the optimal timing for fertilizing your bonsai, as well as the various techniques you can use to achieve the best results.
Timing of Fertilizing Oak Bonsai:
Timing is crucial when it comes to fertilizing oak bonsai trees. Here are some guidelines to help you determine the best time to apply fertilizer:
Early Spring: During the start of the growing season, as the buds begin to swell, it is a good time to apply a balanced slow-release fertilizer. This will provide the necessary nutrients to support new growth and overall plant health.
Mid-Spring: As the leaves start to emerge, you can switch to a fertilizer with a higher nitrogen content. Nitrogen promotes foliage development and helps achieve lush greenery.
Early Summer: In early summer, when the bonsai is in its active growth phase, you can continue using a balanced fertilizer. Make sure to follow the manufacturer’s instructions for application rates and frequency.
Late Summer: Towards the end of summer, you can reduce the amount of fertilizer applied. This will help the tree prepare for dormancy without excessive shoot elongation.
Fertilization Techniques for Oak Bonsai:
When it comes to fertilizing oak bonsai, there are several techniques you can utilize:
Solid Organic Fertilizers: These are slow-release fertilizers that provide a steady supply of nutrients over an extended period. They are commonly available in pellet or granular forms and can be applied by sprinkling them on the soil surface around the base of the tree.
Liquid Fertilizers: These are fast-acting fertilizers that are dissolved in water and applied to the bonsai’s soil. The roots quickly absorb them and provide an immediate nutrient boost. Liquid fertilizers can be applied during the growing season as a supplement to solid organic fertilizers.
It is important to note that over-fertilization can be detrimental to the health of your plant. Always follow the recommended application rates and frequency specified by the fertilizer manufacturer. Regularly monitor the health of your bonsai and adjust your fertilization routine accordingly.
Pruning and Shaping Your Oak Bonsai Tree
Pruning and shaping are essential practices to maintain the desired form and aesthetics of your tree. By properly pruning your bonsai, you can control its size, improve branch structure, and enhance its overall appearance. In this section, we will provide you with step-by-step guidance on how and when to prune your bonsai, as well as techniques for reducing leaf size and controlling branch growth.
When it comes to pruning your oak bonsai, it’s crucial to understand the different types of cuts. These include:
Pinching: This method involves using your fingers or bonsai shears to pinch off the new growth, promoting the development of smaller leaves and denser foliage.
Thinning: Thinning is done by removing selected branches or foliage to improve light penetration and airflow within the tree, reducing the risk of disease and promoting healthy growth.
Heading: Heading cuts involve removing a portion of a branch, stimulating new growth in a specific direction, and encouraging ramification, a branching pattern that creates the characteristic look of a mature bonsai.
It is recommended to prune your tree during its dormant season, typically in late winter or early spring before new buds start to emerge. This timing ensures that the tree can heal quickly and minimize stress on the tree.
Shaping your plant is an art form that requires patience and a keen eye for aesthetics. Wiring is a common technique used to shape bonsai trees. By wrapping copper or aluminum wire around the branches, you can guide their growth and create the desired structure. However, it’s important to monitor the wire regularly to prevent it from cutting into the bark as the branches thicken.
When shaping your plant, consider the tree’s natural growth pattern and mimic it in the design. Aim for a balance between the visual weight of the branches, ensuring that no section of the tree appears top-heavy or unbalanced.
Remember that shaping your bonsai is an ongoing process. Regular pruning and wiring will help maintain the desired form and encourage new growth. With practice and careful observation, you can develop your skills and create a visually captivating oak bonsai tree that showcases the unique characteristics of this species.
“Pruning and shaping are essential practices in bonsai cultivation, allowing you to sculpt your oak bonsai into a miniature work of art.”
Pruning and Shaping Techniques for Oak Bonsai
Method
Pinching
Using your fingers or bonsai shears to pinch off new growth, promoting smaller leaves and denser foliage.
Thinning
Removing selected branches or foliage to improve light penetration and airflow within the tree, promoting healthy growth.
Heading
Removing a portion of a branch to stimulate new growth in a specific direction and encourage branching patterns.
Wiring
Wrapping copper or aluminum wire around branches to guide their growth and create the desired structure. Monitor the wire regularly.
Propagation and Long-Term Care of Oak Bonsai
Propagation and long-term care are key aspects when it comes to cultivating beautiful oak bonsai trees. This final section will discuss effective propagation methods specifically tailored for oak bonsai. You will learn about seed propagation and techniques such as cuttings and air layers that can be used to propagate your plant successfully.
Additionally, we will address common pests and diseases that can impact them. Identifying these issues is crucial for maintaining the health and vitality of your tree. We will guide how to recognize the signs of pests and diseases and offer preventive measures to keep your plant protected.
By incorporating the tips and techniques outlined in this guide, you will be equipped to provide the best care for your tree. Whether it’s through proper propagation methods or effectively managing pest and disease challenges, you will ensure the long-term well-being and beauty of your tree for years to come.
Karen Phillips, Bonsai expert and blogger. Read more about me here
The Dwarf Hinoki Cypress, known for its unique features and elegance, requires special attention and care to thrive. Our expert tips and techniques will empower you to nurture your bonsai with confidence and serenity.
In this comprehensive guide, we’ll provide you with all the essential information you need to ensure the health and beauty of your exceptional bonsai masterpiece.
Understanding the Unique Dwarf Hinoki Cypress
In this section, we will talk about the origins, characteristics, and variations of the Hinoki Cypress tree. Understanding these unique aspects will provide valuable insights for cultivating the captivating Dwarf Hinoki Cypress bonsai.
The Majestic Origins and Characteristics of Hinoki Cypress Trees
The Hinoki Cypress, scientifically known as Chamaecyparis obtusa, is an evergreen conifer tree native to Japan. Renowned for its majestic appearance and calming aroma, this tree has a rich cultural significance in Japanese gardens and architecture.
The Hinoki Cypress features a beautiful symmetrical growth pattern, with dense foliage that can range from dark green to a striking golden hue, depending on the variety and age of the tree. The aromatic scent emitted by the foliage adds to its allure.
“The Hinoki Cypress exudes a sense of tranquility and grace, making it a sought-after choice for bonsai enthusiasts.”
The Hinoki Cypress can grow to impressive heights, reaching up to 115 feet (35 meters) in its full-size variety. It possesses a straight-trunked structure, with bark that begins as reddish-brown when the tree is young and transforms into a distinctive reddish-brown with pronounced furrows as it matures.
Distinguishing Between Full-Size and Dwarf Hinoki Cypress Varieties
When it comes to bonsai cultivation, understanding the differences between full-size and dwarf varieties of the Hinoki Cypress is crucial. While both types share many similarities in terms of appearance and characteristics, the dwarf Hinoki Cypress offers distinct advantages for those seeking to create bonsai masterpieces.
The full-size Hinoki Cypress is undeniably stunning, but its towering height makes it challenging to maintain as a bonsai. On the other hand, the dwarf Hinoki Cypress, as the name suggests, is a compact version of the tree that is perfect for bonsai cultivation. The dwarf variety maintains the impeccable features of the full-size tree but in a more manageable size, allowing for greater artistic expression and easier care.
Full-Size Hinoki Cypress
Dwarf Hinoki Cypress
Height
Up to 115 feet (35 meters)
Approximately 2-4 feet (60-120 cm)
Trunk Diameter
Thick
Delicate and slender
Foliage
Abundant and voluminous
Densely packed and proportional to the tree’s size
Bark
Reddish-brown with pronounced furrows
Similar to full-size variety
Choosing the dwarf Hinoki Cypress for your bonsai not only offers ease of care but also allows for greater versatility in shaping and training the tree. Its delicate trunk diameter and proportional foliage contribute to its overall visual appeal, making it an ideal choice for both beginners and experienced bonsai enthusiasts.
Essential Location and Sunlight Requirements for Your Hinoki Cypress
Proper location and sunlight play a crucial role in the health and growth of your Hinoki Cypress bonsai. By understanding the optimal outdoor placement and seasonal light exposure, you can ensure the vitality and beauty of your bonsai tree.
Choosing the Optimal Outdoor Placement for Growth and Aesthetics
When selecting the location for your Hinoki Cypress bonsai, consider both its growth requirements and aesthetic appeal. Here are some factors to keep in mind:
Light exposure: Hinoki Cypress thrives in locations with partial to full sunlight. Place your bonsai in an area where it can receive at least 4-6 hours of direct sunlight per day. Avoid placing it in full shade or intense, scorching sunlight.
Protection from elements: Protect your bonsai from strong winds, as they can damage the delicate foliage. Consider placing it near a windbreak, such as a wall or taller plants, to shield it.
Air circulation: Ensure proper air circulation around your bonsai by avoiding congested areas or corners. This will help prevent the development of fungal diseases and ensure the health of your tree.
Visual impact: Choose an outdoor location that complements the aesthetic beauty of your Hinoki Cypress bonsai. Consider factors such as garden design, color coordination, and creating a focal point within your outdoor space.
Seasonal Light Exposure: Balancing Summer Growth and Winter Protection
Managing seasonal light exposure is crucial to strike a balance between summer growth and winter protection for your Hinoki Cypress bonsai. Here’s what you need to know:
Summer growth: During summer, ensure your bonsai receives sufficient sunlight for healthy foliage growth. Monitor the light intensity and duration to avoid sunburn and excessive dehydration. Consider providing shade during peak summer months to protect your bonsai.
Winter protection: As winter approaches, protect your Hinoki Cypress bonsai from harsh winter conditions. Provide shelter from freezing temperatures, drying winds, and excessive snow. Consider moving your bonsai indoors or providing a protective covering, such as burlap, to shield it from winter stress.
Year-round care: Throughout the year, monitor the light exposure of your bonsai and make adjustments as needed based on the changing seasons. Regularly observe the health and vitality of your Hinoki Cypress and make necessary adaptations to optimize its growth and overall well-being.
By carefully considering the location and sunlight requirements of your Hinoki Cypress bonsai, you can create an ideal environment that promotes its growth, health, and aesthetic appeal.
Proper Watering Techniques for Hinoki Bonsai Health
Watering is a critical aspect of bonsai care, and understanding the proper watering techniques for your Hinoki Cypress bonsai is essential. Maintaining the right balance of moisture is vital for the health and vitality of your bonsai tree.
When watering your Hinoki Bonsai, it is important to consider the following:
Frequency: Water your bonsai tree when the topsoil begins to feel slightly dry. This ensures that the roots receive adequate moisture while preventing waterlogged soil.
Amount: Water your bonsai thoroughly to ensure that the entire root system receives moisture. Allow the water to soak through the soil and drain out from the bottom of the pot.
Soil Type: Use well-draining soil to prevent water from pooling and causing root rot. A mix of akadama, pumice, and lava rock is commonly used for Hinoki Cypress bonsai.
Watering Tools: Use a watering can with a fine rose or a misting spray bottle to evenly distribute water across the foliage of your bonsai tree.
It is important to note that overwatering or underwatering can be detrimental to the health of your Hinoki Cypress bonsai. Overwatering can lead to root rot, while underwatering can cause drought stress. It is essential to find the right balance and adjust your watering routine based on the specific needs of your bonsai tree.
By mastering the proper watering techniques, you will be able to provide the optimal conditions for your Hinoki Cypress bonsai, supporting its growth and ensuring its long-term health and beauty.
Nutrient Management: Fertilizing Your Hinoki Cypress Bonsai
Fertilizing is crucial for the proper growth and development of your Hinoki Cypress bonsai. To ensure optimal growth, it is important to select the right fertilizer that provides the necessary nutrients for your bonsai tree. When choosing a fertilizer, consider factors such as nutrient composition and pH level.
To achieve healthy and vibrant growth, it is recommended to use a balanced bonsai fertilizer with an NPK ratio of 10-10-10 or similar. This balanced ratio ensures that your Hinoki Cypress bonsai receives all the essential macronutrients: nitrogen (N), phosphorus (P), and potassium (K). These macro nutrients support overall growth, root development, and flowering.
Additionally, consider using a slow-release fertilizer to provide a consistent and gradual nutrient supply over time. This helps prevent nutrient imbalances and minimizes the risk of burning the roots.
It is important to fertilize your Hinoki Cypress bonsai at the right time and frequency. During the growing season, typically from spring to early autumn, fertilize your bonsai every two to four weeks. This ensures that your bonsai receives a steady supply of nutrients for healthy growth. However, reduce or eliminate fertilization during the dormant season, usually in late autumn and winter, as the tree’s metabolic activities slow down.
Remember to always follow the manufacturer’s instructions for the specific fertilizer you are using, as different brands may have varying application rates and guidelines.
Fertilizer
NPK Ratio
Application Frequency
Brand A Bonsai Fertilizer
10-10-10
Every 2 weeks during the growing season
Brand B Bonsai Fertilizer
12-6-6
Every 4 weeks during the growing season
Brand C Bonsai Fertilizer
8-12-6
Every 3 weeks during the growing season
Maintaining the Aesthetic: Pruning and Wiring Techniques
Pruning and wiring are essential techniques for maintaining the aesthetic appeal of your Hinoki Cypress bonsai. By carefully pruning and shaping the tree’s branches, you can create a visually harmonious and balanced bonsai. Additionally, wiring allows you to enhance the overall structure and design of your bonsai tree. Let’s explore these techniques in detail.
Pruning Techniques:
Pruning is the process of selectively removing branches, foliage, and buds to maintain the desired shape and size of your Hinoki Cypress bonsai. It helps create a more refined silhouette and encourages healthy growth. Here are some pruning techniques to consider:
Branch Pruning: Regularly prune your bonsai tree to remove any unwanted or excess branches. This helps maintain the tree’s overall shape and prevents overcrowding.
Foliage Pruning: Trim the foliage to maintain balance and proportion. Remove any dead, damaged, or yellowing leaves to promote new growth.
Bud Pruning: Pinch or prune buds to control the direction and growth of branches. This technique encourages back budding and helps develop a more compact tree.
Wiring Techniques:
Wiring is the process of applying specialized bonsai wire to gently shape and position the branches of your Hinoki Cypress bonsai. It allows you to create precise curves and angles, enhancing the tree’s overall aesthetics. Here’s how to apply wiring techniques:
Selecting the Right Wire: Choose a wire that matches the thickness and flexibility of the branch. Aluminum or annealed copper wire are commonly used for Hinoki Cypress bonsai.
Wrapping the Wire: Starting from the base, gently wrap the wire around the branch, following its natural curve. Avoid wrapping too tightly to prevent damage.
Bending and Positioning: Carefully bend and position the wired branches to achieve the desired shape and aesthetic appeal. Take your time and make adjustments as needed.
Monitoring and Removing the Wire: Check the wired branches regularly to avoid wire cutting into the bark. Once the branches have set in the desired position, remove the wire carefully.
To visually illustrate the process of pruning and wiring techniques, here’s an image of a beautifully maintained Hinoki Cypress bonsai:
By incorporating these pruning and wiring techniques into your regular Hinoki Cypress bonsai care routine, you can effectively maintain and enhance its aesthetics, ensuring a visually captivating and well-balanced bonsai tree.
The Delicate Process of Repotting Hinoki Cypress Bonsai
Repotting your Hinoki Cypress bonsai is an essential step in its care and maintenance. This delicate process requires careful attention to ensure the health and vitality of your bonsai tree.
When it comes to repotting, timing is crucial. It’s best to repot your Hinoki Cypress bonsai every two to three years, preferably in early spring before the new growth begins. This allows the tree to establish new roots and recover from any potential root damage during the repotting process.
Before repotting, gather the necessary materials, including a suitable soil mix. Hinoki Cypress bonsai trees prefer a well-draining soil that provides adequate moisture retention. A good soil mix can consist of a blend of Akadama, pumice, and lava rock.
Start the repotting process by gently removing the bonsai from its current pot. Carefully loosen the roots, ensuring you don’t damage them in the process. Trim any overly long or damaged roots using sharp pruning shears.
Place a layer of fresh soil mix at the bottom of the new pot. Position the bonsai tree on top of the soil, making sure it is centered and at the desired height. Fill the gaps between the roots with the soil mix, being mindful not to leave any air pockets.
Once the bonsai is securely repotted, water it thoroughly to settle the soil around the roots. Avoid placing the bonsai in direct sunlight immediately after repotting as it may increase the risk of stress and dehydration. Instead, place it in a shaded area for a few weeks to allow it to recover.
Remember to monitor your bonsai’s water needs carefully during the post-repotting phase. The newly repotted tree may require slightly less water as the roots adjust and establish themselves in the fresh soil.
By following these step-by-step instructions and providing the necessary care and attention, you can successfully repot your Hinoki Cypress bonsai, promoting its growth, health, and overall beauty.
Hinoki Cypress: Dealing with Pests and Diseases
Just like any other plant, Hinoki Cypress bonsai trees are susceptible to pests and diseases. It’s important to be proactive in identifying, preventing, and managing these issues to ensure the health and longevity of your bonsai tree.
Common pests that can affect your Hinoki Cypress bonsai include aphids, spider mites, and scale insects. These tiny creatures can cause damage to the foliage and weaken the overall health of your tree. Regularly inspect your bonsai for any signs of infestation, such as sticky residue on the leaves, webbing, or tiny insects. If you spot any pests, take immediate action to eliminate them. There are various pest control methods available, including natural remedies, insecticidal soaps, and horticultural oils. Choose the method that suits your preferences while considering the well-being of your bonsai.
When it comes to diseases, Hinoki Cypress bonsai trees can be affected by fungal infections like root rot and powdery mildew. These diseases thrive in moist and humid conditions, so it’s important to maintain proper watering practices to prevent their development. Avoid overwatering your bonsai and ensure good drainage. If you notice any signs of disease, such as wilting leaves, discoloration, or powdery growth, take immediate action. Treatments may involve removing affected areas, using fungicides, or adjusting cultural practices, depending on the specific disease.
To effectively manage pests and diseases, it’s crucial to stay vigilant and regularly monitor your Hinoki Cypress bonsai. Keep a close eye on the health of your tree, and take steps to prevent any potential issues. By selecting the right pest control methods and disease management techniques, you can create a healthy and thriving environment for your bonsai, ensuring its beauty for years to come.
Karen Phillips, Bonsai expert and blogger. Read more about me here
Flame Tree Bonsai, also known as Delonix regia, is renowned for its stunning red flowers and lush foliage. Its vibrant colors and graceful form make it a prized addition to any bonsai collection. However, this bonsai tree requires specific care and attention to thrive.
Throughout this guide, we’ll cover everything you need to know, from understanding the distinct characteristics of the Flame Tree Bonsai to mastering the art of shaping, watering, soil and fertilization, pruning and wiring, repotting, and even propagating your own Flame Tree Bonsai. So Let’s dive in!
Understanding the Exquisite Flame Tree Bonsai
Origin and Distinct Characteristics of Delonix Regia
The Flame Tree Bonsai, scientifically known as Delonix regia, is renowned for its stunning beauty and unique characteristics. Originating from the island of Madagascar, this tropical bonsai tree has captivated enthusiasts worldwide with its vibrant flowers and delicate foliage.
Delonix regia has adapted to its native habitat, where it thrives in warm climates and full sunlight. The tree boasts compound leaves, which consist of long, feathery leaflets that create an elegant appearance. The foliage features bright green coloration, providing an attractive contrast to the tree’s fiery blossoms.
Speaking of blossoms, the Flame Tree Bonsai is renowned for its vibrant red and orange flowers, resembling a fiery crown. These showy, trumpet-shaped blooms add a touch of tropical allure to any bonsai collection and make the tree truly stand out.
Navigating the Bonsai’s Fast Growth Rate and Size Management
One of the challenges in caring for the Flame Tree Bonsai is managing its rapid growth rate. This species has a tendency to grow vigorously, which requires regular attention and maintenance to maintain its ideal size and shape.
To keep the Flame Tree Bonsai in check, pruning, and training techniques are essential. Regular pruning helps control the growth and encourages branching, creating a more compact and aesthetically pleasing shape. Wiring can also be employed to guide the branches and create the desired bonsai form. You can create a balanced and visually appealing Flame Tree Bonsai by carefully managing growth through pruning and wiring.
When it comes to size management, repotting plays a crucial role. Repotting the bonsai when it outgrows its container prevents the tree from becoming root-bound and promotes healthier growth. Furthermore, selecting an appropriate pot size and soil mixture helps regulate the tree’s size and prevents it from becoming too large or disproportionate.
Creatively Shaping Your Flame Tree Bonsai
Shaping a Flame Tree Bonsai is an art form that allows you to sculpt and mold the tree into your desired shape. With the right techniques and styling methods, you can transform your bonsai into a true masterpiece. In this section, we will explore the various techniques and tools you can use to shape your Flame Tree Bonsai and unleash your creativity.
Pruning:
Pruning is an essential technique in shaping your Flame Tree Bonsai. By selectively removing branches and foliage, you can control the tree’s growth and direct its energy toward specific areas. Use sharp pruning shears to make clean cuts, ensuring the health of your bonsai.
Wiring:
Wiring is another effective method for shaping your bonsai. By gently wrapping bonsai wire around branches and trunks, you can guide their growth and create elegant curves and bends. Remember to use flexible wire that won’t damage the tree, and remove the wires before they dig into the bark.
Using Guy Wires:
In certain cases, where branches are too thick or rigid, or you desire specific angles or positions, you can use guy wires. Attach the wire to the branch or trunk and anchor it with weights to gradually shape and position the tree over time. Patience is key when using this technique, as it takes time for the desired shape to be achieved.
To get started with shaping your Flame Tree Bonsai, assess the tree’s natural growth pattern and determine the style you want to achieve. Whether it’s a formal upright, slanting, or cascade style, each requires different pruning and wiring approaches. Consider the tree’s unique characteristics and strive to highlight its beauty and balance.
Remember, shaping a Flame Tree Bonsai is a continuous process that requires regular maintenance and adjustment. As the tree grows, prune and wire accordingly to maintain its desired shape and form. With dedication and practice, you can transform your Flame Tree Bonsai into a stunning work of art.
Ideal Environmental Requirements for Flame Tree Bonsai
Creating the ideal environment is crucial for the health and vitality of your Flame Tree Bonsai. By understanding its environmental requirements, you can ensure that your bonsai thrives and flourishes. Here are the key factors to consider:
Sunlight: Flame Tree Bonsai thrives in bright, indirect sunlight. Place your bonsai in a location where it can receive at least 6 hours of sunlight each day.
Temperature: These bonsai trees prefer warm temperatures ranging between 65°F and 85°F (18°C to 29°C). Protect your Flame Tree Bonsai from freezing temperatures and harsh winter conditions.
Humidity: Delonix regia enjoys moderate to high humidity levels. Consider using humidity trays or misting the foliage regularly to maintain optimal humidity.
Protection: Shield your Flame Tree Bonsai from strong winds, as they can damage the delicate foliage and branches. Provide adequate shelter or move your bonsai indoors during extreme weather conditions.
Remember, proper environmental conditions are essential for the successful growth and development of your Flame Tree Bonsai. Take the time to understand and provide the ideal environment, and your bonsai will reward you with its vibrant beauty.
Environmental Factor
Ideal Range
Sunlight
Bright, indirect sunlight for at least 6 hours per day
Temperature
65°F to 85°F (18°C to 29°C)
Humidity
Moderate to high humidity levels
Protection
Shield from strong winds and extreme weather
Mastering the Art of Watering Your Flame Tree Bonsai
Proper watering is essential for the health and vitality of your Flame Tree Bonsai. As with any bonsai tree, understanding its unique water requirements is crucial to ensure optimal hydration without overwatering or underwatering.
Frequency: Flame Tree Bonsai should be watered regularly, especially during the growing season. Depending on the climate and environmental conditions, you may need to water your bonsai every 2-3 days or when the topsoil feels slightly dry.
Quantity: When watering your Flame Tree Bonsai, it’s important to provide enough water to moisten the entire root system thoroughly. Water until you see it reaching the drainage holes at the bottom of the pot. This ensures that the roots receive adequate hydration.
Techniques: To ensure proper watering without disturbing the fragile root structure, it is recommended to use a gentle watering can or a fine mist sprayer. This helps to avoid compaction of the soil and allows the water to evenly penetrate the root zone.
Monitoring: Keep a close eye on your Flame Tree Bonsai to prevent both underwatering and overwatering. Check the soil moisture levels by gently inserting your finger into the topsoil. If it feels dry, it’s time to water. If it feels damp, allow the soil to dry out slightly before watering again.
By mastering the art of watering your Flame Tree Bonsai and providing it with the right amount of water at the right frequency, you can ensure the overall health and vibrant growth of your bonsai tree.
Soil and Fertilization: Nourishing Your Flame Tree Bonsai
To ensure the health and vitality of your Flame Tree Bonsai (Delonix regia), proper soil composition and fertilization are essential. The right soil provides the necessary nutrients and drainage, while fertilizers supplement the tree’s nutritional requirements for robust growth and abundant flowering.
The ideal soil composition for Flame Tree Bonsai starts with a well-draining mixture that allows oxygen to flow to the roots. A recommended mixture is a combination of Flame tree bonsai soil, which is a well-balanced blend of organic matter, sand, and perlite, ensuring good water retention without becoming waterlogged. This special soil provides a fertile environment for the roots to develop and thrive.
When it comes to fertilization, it is important to understand the specific nutrient needs of the Flame Tree Bonsai. A balanced, slow-release organic fertilizer, such as Delonix regia fertilizer, should be applied during the growing season to provide essential nutrients gradually. Organic fertilizers not only supply the necessary macronutrients like nitrogen, phosphorus, and potassium but also offer micronutrients that are beneficial for the overall health of the tree.
It is recommended to follow the fertilizer manufacturer’s instructions for application rates and frequency. Applying fertilizer in moderation is important to prevent over-fertilization, which can damage the bonsai tree. Regularly monitoring the soil’s nutrient levels and adjusting the fertilization schedule accordingly will help to maintain the proper balance for optimal growth.
Proper soil composition and fertilization are crucial for the health and vitality of your Flame Tree Bonsai. The right soil blend, such as Flame tree bonsai soil, ensures good drainage and provides a nutrient-rich environment for your bonsai. A balanced, slow-release organic fertilizer, like Delonix regia fertilizer, supplies the necessary nutrients for robust growth and abundant flowering.
Flame Tree Bonsai Techniques for Pruning and Wiring
Pruning and wiring are essential techniques for shaping and training your Flame Tree Bonsai (Delonix regia). By understanding when and how to prune branches, shoots, and roots, you can maintain the desired shape of your bonsai tree while promoting healthy growth.
When pruning your Flame Tree Bonsai, it’s important to remove any dead, damaged, or overgrown branches. This not only improves the overall appearance of the tree but also allows for better airflow and sunlight penetration. Use clean and sharp pruning shears to make clean cuts, minimizing the risk of infection and promoting faster healing.
In addition to branch pruning, root pruning is also crucial in managing the growth and health of your Flame Tree Bonsai. Carefully inspect the root system and trim away any circling or tangled roots. This encourages the development of a strong and well-structured root system.
Wiring is another technique that can help shape your bonsai tree. By carefully wrapping copper or aluminum wire around branches, you can guide their growth and create beautiful bonsai tree forms. It’s important to select the appropriate thickness of wire that can support branches without causing damage. Remember to check the wire regularly and adjust it as needed to prevent it from cutting into the branches.
When using wiring, it’s crucial to follow the natural growth patterns of your Flame Tree Bonsai. Avoid excessive bending or forcing branches into unnatural angles, as this can cause harm to the tree. Always use guy wires and clips when necessary to provide additional support and maintain the desired shape.
By mastering the art of pruning and wiring, you can transform your Flame Tree Bonsai into a stunning masterpiece that showcases its unique beauty. Remember to always take a patient and careful approach, as bonsai tree training techniques require time, dedication, and a keen eye for detail.
The Significance of Proper Flame Tree Bonsai Repotting
Repotting plays a crucial role in the care and maintenance of your Flame Tree Bonsai. It provides an opportunity to refresh the soil, prune the roots, and ensure the overall health and vitality of your bonsai tree. In this section, we will discuss the significance of proper repotting for your Flame Tree Bonsai, focusing on key techniques and considerations to enhance its growth and development.
When it comes to repotting your Flame Tree Bonsai, timing is essential. Ideally, you should repot your bonsai tree every two to three years, depending on its growth rate and the health of the root system. Repotting during the spring or early summer, when the tree is actively growing, is generally recommended.
One important repotting technique for your Flame Tree Bonsai is root pruning. This process involves carefully trimming and pruning the roots to promote new growth and prevent root-bound conditions. By removing excess roots, you encourage a healthy and well-balanced root system, which is crucial for the overall well-being of your bonsai tree.
After root pruning, selecting the right pot for your Flame Tree Bonsai is crucial. The pot should be slightly larger than the root ball to allow for future growth, but not too large to hinder proper drainage. Consider using a shallow bonsai pot made of a durable material that promotes good airflow and drainage, such as clay or ceramic.
Creating a well-draining soil mix is another important aspect of proper repotting for your Flame Tree Bonsai. A mixture of organic and inorganic components, such as akadama, pumice, and lava rock, can provide the necessary drainage and nutrient retention for your bonsai tree. Additionally, adding a layer of mesh or small stones at the bottom of the pot can prevent soil erosion and ensure proper drainage.
Properly repotting your Flame Tree Bonsai not only ensures its health and vitality but also allows for future growth, development, and flourishing. By following the techniques and considerations discussed in this section, you will be able to maintain a thriving bonsai tree that brings joy and beauty to your home or garden.
Propagating Your Own Flame Tree Bonsai
In this final section, we will explore the process of propagating your own Flame Tree Bonsai. By following these steps, you can expand your bonsai collection and enjoy the satisfaction of growing your own trees.
Flame Tree Bonsai Seed Selection and Germination Strategies
To start the propagation process, select high-quality Flame Tree Bonsai seeds. Look for mature pods that have turned brown and dried on the tree. Collect the pods and gently extract the seeds. Discard any damaged or discolored seeds.
Next, prepare the seeds for germination. Soak them in warm water for 24 hours to soften the hard outer shell. This will help facilitate germination. After soaking, carefully plant the seeds in a well-draining soil mix and cover them with a thin layer of soil.
Maintaining Seedlings for Future Transplanting into Bonsai Form
As the seeds germinate and seedlings emerge, it is crucial to provide them with proper care and attention. Place the seedlings in a warm and well-lit area, ensuring they receive indirect sunlight. Keep the soil consistently moist (but not overly wet) to promote healthy growth.
Once the seedlings have developed strong root systems and several pairs of true leaves, they can be transplanted into individual pots. Use a bonsai-specific soil mix that provides excellent drainage. As the seedlings continue to grow, monitor their development closely and adjust watering and fertilization accordingly.
With patience and dedication, your Flame Tree Bonsai seedlings will mature into beautiful and unique bonsai trees. Remember to maintain consistent care and provide the ideal environment to ensure their health and longevity. Soon, you’ll have a thriving collection of Flame Tree Bonsai trees that are a testament to your passion for bonsai artistry.
Karen Phillips, Bonsai expert and blogger. Read more about me here
Olive tree bonsais, with their unique traits and requirements, offer a captivating and rewarding bonsai experience. By following the proper care techniques, you can create a miniature masterpiece that adds elegance and beauty to any space.
Throughout this guide, we’ll explore the exceptional hardy nature of miniature olive trees, the identifying characteristics of different bonsai olive tree varieties, and the historical significance and symbolism encompassing olive bonsais.
Let’s delve into the world of olive tree bonsai and uncover the secrets to nurturing these magnificent trees.
Understanding the Unique Traits of Olive Tree Bonsai
Olive tree bonsais possess unique traits that set them apart from other bonsai varieties. Let’s explore these exceptional characteristics and delve into their significance.
The Exceptional Hardy Nature of Miniature Olive Trees
Miniature olive trees, commonly used for bonsai cultivation, are known for their remarkable hardiness. They can withstand both cold temperatures and dry conditions, making them adaptable to various environments. This resilience is a testament to their ability to thrive in challenging circumstances, making them a popular choice for bonsai enthusiasts seeking a resilient and enduring tree.
Identifying Characteristics of Bonsai Olive Tree Varieties
Bonsai olive trees come in different varieties, each displaying its own unique identifying characteristics. These characteristics can include variations in foliage color, leaf shape, and growth patterns. By selecting from a range of olive tree varieties, bonsai enthusiasts have the opportunity to create diverse and captivating bonsai displays.
Historical Significance and Symbolism Encompassing Olive Bonsais
Olive trees have a rich historical significance and are often associated with symbolism that transcends cultures and centuries. Their presence is closely intertwined with peace, wisdom, and longevity. The ancient Greeks revered the olive tree as a symbol of peace, and its iconic branches and leaves continue to be used in various ceremonies and traditions. Incorporating an olive tree bonsai in your collection can add a touch of historical symbolism and profound meaning to your bonsai journey.
“The olive tree is surely the richest gift of Heaven. I can scarcely expect bread.” – Thomas Jefferson
Embrace the unique traits and rich symbolism of olive tree bonsais as you embark on your bonsai cultivation journey. The hardy nature of miniature olive trees coupled with their diverse varieties and deep historical significance make them an exceptional choice for bonsai enthusiasts seeking a captivating and meaningful bonsai experience.
The Ideal Environment for Cultivating an Olive Tree Bonsai
Creating the right environment is crucial for the successful growth of an olive tree bonsai. These trees thrive in full sun and require protection from frost. While they can tolerate slightly below freezing temperatures, it’s best to keep them in a cold greenhouse to ensure their health. Proper lighting, temperature, and moisture levels are important for creating the ideal environment for your olive tree bonsai.
When it comes to lighting, olive tree bonsais need at least six hours of direct sunlight each day. Place your bonsai near a south-facing window or use grow lights to provide the necessary light intensity. This ensures that your tree receives the energy it needs for photosynthesis and healthy growth.
The temperature is another important factor to consider. Olive tree bonsais prefer warm temperatures between 65°F and 85°F (18°C and 29°C). Avoid exposing your bonsai to extreme heat or cold, as it can stress the tree and hinder its growth. If you live in an area with harsh winters, it’s best to provide protection, such as moving the bonsai indoors or using a greenhouse.
Moisture levels play a vital role in the health of your olive tree bonsai. It’s important to strike a balance between underwatering and overwatering. Allow the soil to slightly dry out between waterings to avoid root rot, but avoid letting it completely dry out. Use well-draining soil and water thoroughly, ensuring that the excess water drains out through the drainage holes of the bonsai pot.
To give you a better understanding of the ideal environment for olive tree bonsais, take a look at the table below:
Environmental Factor
Ideal Conditions
Light
At least 6 hours of direct sunlight per day or grow lights
Temperature
65°F to 85°F (18°C to 29°C)
Moisture
Allow soil to slightly dry out between waterings
Protection
Shield from frost and extreme temperatures
By providing the ideal environment for your olive tree bonsai, you’ll set the stage for healthy growth and vibrant foliage. Always monitor the conditions and make adjustments as necessary to ensure the well-being of your bonsai tree.
Olive Tree Bonsai Watering Rituals
Watering is a fundamental aspect of bonsai care, and when it comes to olive tree bonsais, specific watering rituals are essential for their health and vitality. These magnificent bonsai trees require thorough watering whenever the soil becomes dry, but it’s crucial to avoid overwatering and constant wetness. By understanding and implementing proper watering techniques, you can ensure the optimal growth and well-being of your olive tree bonsai.
When it comes to watering your olive tree bonsai, it’s important to strike the right balance. Follow these tips and techniques to establish a successful watering routine:
Observe the soil: Regularly check the moisture level of the soil by gently inserting your finger about an inch deep. Water your olive tree bonsai only when the soil feels dry at this depth.
Thorough watering: When it’s time to water, make sure to thoroughly soak the soil until water drains from the drainage holes at the bottom of the bonsai container. This ensures proper hydration and allows the roots to absorb the necessary moisture.
Avoid overwatering: Overwatering can lead to root rot and other water-related issues. It’s essential to let the soil dry out slightly between waterings to prevent waterlogged conditions. Always remember that olive tree bonsais prefer a slightly drier environment compared to other bonsai varieties.
Consider the environmental conditions: Factors such as temperature, humidity, and sunlight exposure can influence the watering needs of your olive tree bonsai. During hot and dry periods, you may need to water more frequently, while cooler and more humid conditions may require less frequent watering.
By following these watering rituals, you can provide your olive tree bonsai with the optimal moisture balance it needs for healthy growth and development. Remember, maintaining a consistent watering schedule is key, but always adapt it to the specific needs of your bonsai by closely monitoring the soil moisture and environmental conditions.
Feeding Your Bonsai: Fertilization Strategies for Olive Tree Bonsai
Fertilizing your olive tree bonsai is essential for providing it with the necessary nutrients for growth and overall health. A well-fed bonsai tree is more likely to exhibit vibrant foliage, strong branches, and robust root development. By understanding and implementing proper feeding techniques, you can ensure that your olive tree bonsai receives the right amount of nutrients to thrive.
There are several fertilization strategies you can employ to nourish your bonsai olive trees:
Use solid organic fertilizer: Solid organic fertilizers, such as slow-release pellets or granules, are an excellent choice for feeding your olive tree bonsai. These fertilizers gradually release nutrients over an extended period, providing a steady supply of essential elements. Apply the recommended amount according to the manufacturer’s instructions, and be sure to distribute it evenly around the base of the tree.
Opt for liquid fertilizer: Liquid fertilizers offer a quicker nutrient uptake for your olive tree bonsai. They are easily absorbed by the roots, allowing the tree to access the nutrients rapidly. Dilute the liquid fertilizer according to the package instructions, and apply it to your bonsai’s soil during the growing season. Take care not to over-fertilize, as excessive nutrients can lead to leaf burn or root damage.
Consider the nutrient requirements: Olive tree bonsais have specific nutritional needs that you should be mindful of. They typically require a balanced fertilizer with a ratio of nitrogen (N), phosphorus (P), and potassium (K) such as a 10-10-10 or 20-20-20 fertilizer. Nitrogen promotes leaf and stem growth, phosphorus aids in root development, and potassium enhances overall plant vigor. Adjust the fertilizer formulation based on the specific requirements of your olive tree bonsai.
It’s important to follow a regular fertilization schedule, providing your bonsai with nutrients at the appropriate times. During the active growing season, typically spring and early summer, your olive tree bonsai will require more frequent fertilization. As the tree enters dormancy in the fall and winter, reduce or stop fertilizing to accommodate its natural growth cycles.
To determine the optimal amount and frequency of fertilization, monitor the growth and health of your bonsai tree. Adjust the feeding regimen accordingly based on its response and any specific needs it may have.
By incorporating these fertilization strategies into your olive tree bonsai care routine, you can nourish your bonsai tree and promote its overall well-being. Remember to always consider the unique needs of your bonsai, regularly observe its growth patterns, and provide it with the appropriate nutrients to ensure its long-term health and vitality.
Pruning and Wiring Your Olive Tree Bonsai
Pruning and wiring are vital techniques for shaping and maintaining the desired form of your olive tree bonsai. To ensure the health and aesthetic appeal of your bonsai, it’s important to understand when and how to properly prune and wire your tree.
Pruning: Pruning involves selectively removing branches, leaves, and roots to achieve the desired shape and size. The main purposes of pruning are to encourage branching, control growth, and maintain the bonsai’s overall balance. Begin by removing any dead, damaged, or weak branches. Then, carefully trim back the remaining branches to achieve the desired shape. Remember to always use clean and sharp pruning shears to prevent damage and disease.
Wiring: Wiring is a technique used to shape the branches and trunk of your olive tree bonsai. By using bonsai wire, you can guide the growth and position of the branches, creating a pleasing aesthetic appearance. Start by choosing the appropriate thickness and length of wire for each branch. Gently wrap the wire around the branch, starting from the base and working towards the tip. Be careful not to wrap the wire too tightly as it may damage the branch. After a few months, the wire can be removed or replaced with a larger one to allow the branch to set in the desired shape.
Pruning and wiring should be done with care and precision, as improper techniques can harm your olive tree bonsai. It is recommended to learn from experienced bonsai enthusiasts or seek guidance from a professional to master these techniques effectively.
Repotting Procedures for Olive Tree Bonsai
Repotting is an essential part of bonsai care, and olive tree bonsais require repotting every two or three years. By repotting your olive tree bonsai, you provide it with fresh soil, essential nutrients, and ample space for root growth, ensuring its continued health and vitality.
When it comes to repotting your olive tree bonsai, timing is crucial. The optimal time for repotting is during the early spring before new growth starts. This allows the tree to recover from any root pruning and adapt to its new environment.
The first step in the repotting process is to carefully remove the bonsai from its current pot. Gently loosen the soil around the roots with a root rake or chopstick, being careful not to damage the delicate root structure.
Next, carefully prune the roots to encourage new growth. Trim away any overly long or damaged roots, making sure to maintain a balance between the roots and the foliage above. This will help ensure that the tree remains healthy and well-proportioned.
After root pruning, it’s time to select the right soil mix for your olive tree bonsai. A well-draining soil with a good balance of organic matter and inorganic particles is ideal. Avoid heavy soils that retain excess moisture, as this can lead to root rot.
Once you have prepared the soil mix, place a layer of fresh soil in the bottom of the new pot. Position the bonsai in the pot, making sure that it is centered and at the desired angle. Fill the remaining space with the soil mix, gently firming it around the roots to eliminate any air pockets.
After repotting, it’s crucial to thoroughly water the bonsai to settle the soil around the roots. Place the bonsai in a shaded area for a few weeks, gradually reintroducing it to full sunlight. This will help reduce stress on the tree and promote its recovery.
Remember to monitor the moisture levels and provide proper care as the bonsai adjusts to its new pot. Regular watering, fertilization, and attention to pruning and wiring will ensure the continued health and beauty of your olive tree bonsai.
By following these step-by-step repotting procedures, you can ensure the long-term success of your olive tree bonsai and enjoy its beauty for years to come.
Common Pests and Diseases in Olive Tree Bonsai Care
Just like any other plant, olive tree bonsais are prone to pests and diseases that can impact their health and overall vitality. It’s important to be vigilant and proactive in identifying and addressing these issues to preserve the beauty of your olive tree bonsai. In this section, we’ll explore the common pests and diseases that you might encounter in bonsai olive tree care, along with possible remedies and prevention strategies.
Common Pests in Olive Tree Bonsai
Pests can cause significant damage to your olive tree bonsai if left unchecked. Here are some common pests to be wary of:
Scale: These small, sap-sucking insects can be found on the leaves and branches of your bonsai. Look out for small brown or black bumps on the plant surface.
Mealybugs: Mealybugs are soft-bodied pests that often appear as white, waxy clusters on your bonsai tree. They feed on the plant sap, causing yellowing and stunted growth.
Olive Tree Bonsai Diseases
In addition to pests, your olive tree bonsai may also be susceptible to certain diseases. Understanding these diseases can help you take appropriate preventive measures:
Fungal Diseases: Fusarium wilt, root rot, and powdery mildew are some common fungal diseases that can affect your bonsai olive tree. These diseases can cause wilting, yellowing leaves, and overall decline in the health of the plant.
Bacterial Infections: Bacterial infections, such as bacterial leaf spot, can lead to the development of dark spots on the leaves and stems of your bonsai. If left untreated, these infections can spread and damage the plant.
Prevention and Treatment
The key to dealing with pests and diseases in olive tree bonsai care is prevention. Here are some preventive measures to keep in mind:
Regularly inspect your bonsai tree for any signs of pests or diseases.
Maintain good hygiene by regularly removing dead leaves and cleaning the bonsai’s growing area.
Ensure proper air circulation and sunlight exposure to promote a healthy environment for your bonsai.
Use organic pest control methods, such as neem oil or insecticidal soaps, to treat infestations.
If the infestation or disease persists, consult a bonsai expert or horticulturist for proper diagnosis and treatment.
By taking these preventive measures and promptly addressing any issues, you can ensure the long-term health and beauty of your olive tree bonsai.
Propagation Techniques for Olive Tree Bonsai Enthusiasts
If you’re an olive tree bonsai enthusiast, you may have considered propagating your own trees. Propagation allows you to expand your collection and create new olive tree bonsais. There are two common techniques for propagating bonsai olive trees: from seeds and from cuttings.
If you choose to propagate from seeds, start by harvesting the ripe olive fruits. Extract the seeds, clean them, and soak them in water for a day or two. After soaking, plant the seeds in a well-draining potting mix, covering them lightly with soil. Keep the soil consistently moist and place the pot in a warm location. With patience, your olive tree bonsais will begin to sprout.
Another option is propagation from cuttings. Choose healthy olive tree branches that are about pencil-thick. Cut the branch into sections, ensuring each section has at least two nodes. Dip the cut end of the section in rooting hormone and plant it in a pot filled with a well-draining soil mixture. Maintain a moist environment, either by using a humidity dome or misting the cuttings regularly. Over time, the cuttings will develop roots and grow into new bonsai olive trees.
If you’re not up for the challenge of propagating your own olive tree bonsais, you can also find them for sale. Many reputable nurseries and online retailers offer a wide variety of olive tree bonsais for purchase. Make sure to select healthy trees that suit your preferences and needs. Buying established bonsais can save you time and effort, allowing you to enjoy the beauty of these miniature olive trees right away.
Karen Phillips, Bonsai expert and blogger. Read more about me here
If you’re looking to add a touch of elegance and exoticism to your bonsai collection, the Blue Jacaranda tree is a stunning choice. With its vibrant blue or purple flowers and unique fern-like leaves, this bonsai variety is sure to captivate your heart.
Discover the secrets to successfully growing and nurturing the Blue Jacaranda bonsai. From understanding its origins and uniqueness to providing proper placement, watering practices, soil and fertilizing needs, pruning and wiring techniques, repotting guidelines, and dealing with pests, this guide has got you covered.
Let’s dive in and explore the world of Blue Jacaranda bonsai together!
Do jacaranda make good bonsai?
Jacaranda trees, including the Bonsai Blue Jacaranda, have become increasingly popular among bonsai enthusiasts due to their stunning foliage and vibrant purple flowers. With proper care and cultivation techniques, jacaranda can make excellent bonsai trees. They are known for their unique fern-like leaves and beautiful blue or purple flowers, which add an aesthetic appeal to any bonsai collection. However, caring for a jacaranda bonsai requires specific knowledge and practices to ensure its health and growth. In this guide, we will delve into the details of caring for a Bonsai Blue Jacaranda, covering all the essential aspects of bonsai care to help you decide if this variety is right for you.
An Introduction to Bonsai Blue Jacaranda
The Blue Jacaranda Bonsai, scientifically known as Jacaranda mimosifolia, is a semi-evergreen tree native to South America. This unique and elegant tree has captured the hearts of bonsai enthusiasts with its delicate fern-like foliage and stunning blue or purple flowers. One particular variety that stands out is the ‘Bonsai Blue’, a dwarf bonsaiblue jacaranda that is highly sought after for its compact size and manageable height.
Origins and Uniqueness of Blue Jacaranda Bonsai
The jacaranda mimosifolia, also known as the Blue Jacaranda, has its roots in South America. It boasts a distinctive appearance with its intricate, fern-like leaves and vibrant blue or purple flowers. The uniqueness of the Blue Jacaranda Bonsai lies in its ability to replicate the beauty of a full-sized jacaranda tree in a miniature form, making it an excellent choice for bonsai enthusiasts.
Understanding the Dwarf Variety: ‘Bonsai Blue’
The ‘Bonsai Blue’ is a sought-after variety of the Blue Jacaranda Bonsai. It is known for its compact size and manageable height, making it easier to care for and perfect for smaller spaces. The dwarf bonsaiblue jacaranda has all the unique features of its larger counterparts, including the fern-like foliage and stunning blue or purple flowers. Its smaller stature makes it an ideal choice for bonsai enthusiasts looking for a more manageable tree to cultivate and showcase.
Why Blue Jacaranda Bonsai Captures Enthusiasts’ Hearts
The Blue Jacaranda Bonsai captures the hearts of bonsai enthusiasts for several reasons. Firstly, its delicate and intricate fern-like foliage adds a touch of elegance to any bonsai collection. Secondly, the stunning blue or purple flowers create a captivating display when in bloom, making it a focal point of admiration. Lastly, the ability to cultivate a miniature version of a majestic and exotic tree like the jacaranda mimosifolia brings a sense of awe and accomplishment, making it a cherished addition to any bonsai enthusiast’s collection.
Average height of Jacaranda Bonsai
The average height of a Jacaranda Bonsai can vary depending on the specific variety and growing conditions. While the full-sized jacaranda tree can reach heights of up to 15 meters, the bonsai version typically ranges from 1.5 meters to a few feet tall. The compact size of the bonsai blue jacaranda allows for easier cultivation and maintenance, making it a popular choice among bonsai enthusiasts.
Proper Placement for Your Blue Jacaranda Bonsai Tree
The proper placement of your Blue Jacaranda Bonsai tree is essential for its growth and overall development. To ensure the health and vitality of your bonsai, it is crucial to consider the light and temperature requirements specific to this variety.
The Blue Jacaranda Bonsai thrives in well-lit environments and requires a significant amount of light to support its optimal growth. It is best to place your bonsai in a sunny spot or semi-shade, depending on the specific variety. This will ensure that the tree receives the necessary amount of light for photosynthesis and overall health.
When considering placement, it is important to protect your Blue Jacaranda Bonsai from temperatures below 15°C (59°F). Extreme cold can be detrimental to the tree’s health, so it is crucial to avoid exposing it to freezing temperatures. Additionally, it is advisable to keep the bonsai away from direct hot air, such as that emanating from heating devices, as it can cause damage.
In warmer climates, where the temperatures remain consistently above 15°C (59°F), you can place your Blue Jacaranda Bonsai outside. A sunny location with sufficient airflow and ventilation will provide the ideal environment for the tree to flourish. Remember to regularly monitor the temperature, especially during colder nights or sudden drops in temperature.
Optimal Watering Practices for Bonsai Blue Jacaranda
When it comes to caring for your Bonsai Blue Jacaranda, proper watering is crucial for maintaining its health and vitality. By following optimal watering practices, you can ensure that your bonsai tree thrives and displays its stunning blue and purple flowers.
To keep your Blue Jacaranda bonsai in its best condition, it is essential to keep the root ball slightly moist. However, be careful not to overwater or let the roots dry out, as both can cause harm to the tree.
Regularly monitoring the moisture levels of the soil is key to determining the watering needs of your bonsai. You can test the moisture level by gently poking your finger into the soil up to your first knuckle. If it feels moist, you can hold off on watering. If it feels dry, it’s time to water the tree.
However, it’s important to recognize that watering frequency can vary based on factors such as the temperature, humidity, and the specific needs of your Blue Jacaranda Bonsai. As a general guideline, bonsai trees typically require watering every 2-3 days, but this may need to be adjusted based on your specific growing conditions.
Here are some expert tips to help you maintain optimal watering practices for your Bonsai Blue Jacaranda:
Use a watering can or a gentle spray nozzle to water your bonsai tree to avoid disturbing the delicate roots.
Water the tree thoroughly, allowing the water to penetrate the entire root system.
Avoid leaving stagnant water in the saucer or tray, as this can lead to root rot.
During hot summer months or in dry indoor environments, consider misting the foliage regularly to create a humid microclimate.
Remember, proper watering is a balancing act. Be attentive to the moisture levels in the soil and adjust your watering frequency accordingly. With consistent care, your Bonsai Blue Jacaranda will reward you with its beautiful blooms and lush foliage.
For a visual representation of the optimal watering practices for Bonsai Blue Jacaranda, refer to the table below:
The Importance of Soil and Fertilizing for Jacaranda mimosifolia Bonsai
The soil composition and fertilization of your Blue Jacaranda Bonsai play a crucial role in its overall health and growth. A well-draining soil mix that provides proper nutrient availability is essential for the development of a thriving bonsai tree.
When it comes to blue jacaranda soil, it is important to create a well-draining mixture that promotes healthy root growth. A bonsai tree soil mix specifically formulated for jacaranda bonsai is ideal. This mix should consist of a combination of organic and inorganic materials, such as organic potting soil, perlite, and crushed granite. The organic potting soil provides the necessary nutrients, while the perlite and crushed granite ensure proper drainage and aeration.
Soil drainage is particularly important for blue jacaranda bonsai as they prefer slightly acidic to neutral soil pH levels. Poor drainage can lead to root rot and other soil-related issues. Therefore, it is crucial to select a soil mixture that allows excess water to flow freely, preventing waterlogging.
When it comes to fertilizing your jacaranda bonsai, using a balanced liquid fertilizer during the growing season is recommended. This type of fertilizer provides essential nutrients and trace elements that promote healthy growth and flowering. It is important to follow the instructions on the fertilizer packaging and avoid over-fertilization, as it can cause root burn and other adverse effects.
Furthermore, it is advisable to apply a slow-release fertilizer in spring to provide a steady supply of nutrients over an extended period. This helps support the long-term health and vitality of your blue jacaranda bonsai.
Soil Composition
Benefits
Organic potting soil
Provides essential nutrients
Perlite
Improves drainage
Crushed granite
Enhances aeration
By ensuring the proper soil composition and providing adequate fertilization, you can create an optimal growing environment for your Blue Jacaranda Bonsai. This will support its overall health, growth, and stunning displays of vibrant blooms.
Pruning and Wiring Your Jacaranda Plant
Pruning and wiring techniques are essential for shaping and maintaining the desired form of your Blue Jacaranda Bonsai. Regular pruning helps control the growth of the tree and encourages branching, while wiring allows you to bend and guide the branches into the desired shape.
To prune your Jacaranda Bonsai, start by identifying any undesirable or overgrown branches. Using clean and sharp bonsai shears, make precise cuts just above a leaf node or bud to encourage new growth in the desired direction. It’s important to remove any dead, damaged, or crossing branches to maintain the overall health and aesthetics of your bonsai tree.
When wiring your Jacaranda Bonsai, choose flexible bonsai wire that is appropriate for the thickness of the branches. Gently wrap the wire around the branch, starting from the base and working your way up. Be careful not to wrap the wire too tightly, as it can damage the branch. Once the wire is in place, gently shape the branch by bending it in the desired direction. The wire should remain in place for several months or until the branch has hardened into the desired shape. Remember to regularly check the wire to ensure it is not cutting into the branch or causing any harm.
Both pruning and wiring should be done with care and precision to avoid stressing or injuring your Jacaranda Bonsai. It’s important to understand the growth patterns and natural form of the tree, and to make adjustments accordingly to achieve the desired shape and aesthetics.
When and How to Repot Jacaranda mimosifolia
Repotting is an essential aspect of bonsai tree care, including the Blue Jacaranda Bonsai. It allows for the refreshment of the soil, root pruning, and root repositioning, promoting the overall health and vitality of the tree.
To determine the ideal repotting schedule for your Blue Jacaranda Bonsai, consider the following factors:
Growth rate: Repot younger trees every 1-2 years to encourage development. Mature trees may only need repotting every 3-5 years.
Root system: Inspect the root ball by gently removing the tree from its pot. If you notice a dense root system circling the pot, it’s time to repot.
Season: Repot during the spring or early summer when the tree is actively growing and can recover quickly.
When repotting your Blue Jacaranda Bonsai, follow these step-by-step instructions:
Choose a slightly larger pot with good drainage to accommodate the tree’s root system.
Prepare the new pot by adding a layer of bonsai soil mix to the bottom.
Gently remove the tree from its current pot, taking care not to damage the roots.
Trim the roots to promote new growth and maintain a balanced root-to-foliage ratio.
Position the tree in the new pot, ensuring the root system is spread evenly.
Add bonsai soil mix around the roots, gently firming it to eliminate air pockets.
Water the tree thoroughly, allowing the excess water to drain out.
Place the repotted Blue Jacaranda Bonsai in a shaded area for a few weeks to aid in recovery.
By following these repotting instructions along with using an appropriate soil mix for repotting, you can promote the growth and longevity of your Blue Jacaranda Bonsai.
Blue Jacaranda: Dealing with Pests and Ensuring Healthy Blooms
As a bonsai enthusiast, you know that maintaining the health and beauty of your Blue Jacaranda Bonsai is crucial. Just like any other plant, this unique tree is susceptible to pests and diseases that can hinder its growth and flowering. By being aware of common pests and taking proactive measures for pest control, you can ensure healthy blooms and vibrant foliage that will captivate any viewer.
Some common pests that can infest your Jacaranda Bonsai include aphids, whiteflies, and mealybugs. These tiny insects can cause leaf damage, sap depletion, and hinder proper growth. To combat these pests, you can use organic pest control methods such as insecticidal soap or neem oil. Regularly inspect your bonsai tree and treat any infestations promptly to prevent further damage.
In addition to pest control, ensuring healthy blooms on your Blue Jacaranda Bonsai requires proper care and attention. Adequate sunlight, proper watering, and nutrient-rich soil are essential. Provide your tree with sufficient sunlight for at least 6 hours a day, making sure it receives the right amount of light without scorching its delicate leaves.
Furthermore, water your bonsai tree carefully, avoiding overwatering or letting the soil dry out completely. Keep a close eye on the moisture levels, adjusting your watering frequency accordingly. Lastly, use a well-draining soil mix and fertilize your Jacaranda Bonsai during the active growth period to provide the necessary nutrients. With these practices in place, your Blue Jacaranda Bonsai will thrive and reward you with stunning blooms.
Karen Phillips, Bonsai expert and blogger. Read more about me here
If you’re looking to add a touch of elegance and natural beauty to your home or garden, bonsai palm trees are an excellent choice. These miniature versions of palm trees have their unique charm and require special care to thrive. In this comprehensive guide, we’ll explore everything you need to know about growing and caring for Palm tree Bonsai.
Unlike traditional bonsai trees, bonsai palm trees offer a distinct aesthetic appeal with their graceful fronds and tropical allure. They bring a sense of tranquility and sophistication to any space they adorn, making them a coveted choice among bonsai enthusiasts.
Growing bonsai palm trees requires a keen understanding of their unique features and specific care requirements.
In this guide, we’ll cover everything from understanding the fascination behind miniature palm bonsai and debunking common myths about Palm tree bonsai, to selecting the right palm tree species and providing ideal growing conditions.
We’ll also discuss care fundamentals, including watering techniques, fertilizer preferences, and the importance of pruning. Lastly, we’ll explore styling and pruning techniques and discuss the process of repotting and transplanting your bonsai palm tree.
Understanding Bonsai Palm Trees
When it comes to bonsai trees, palm trees may not be the first variety that comes to mind. However, palm trees can indeed be transformed into stunning bonsai specimens. In this section, we will explore the unique fascination with miniature palm bonsai, debunk the myth surrounding the ability to bonsai a palm tree, and highlight the essential features that make bonsai palm trees a captivating choice for enthusiasts.
The Unique Fascination with Miniature Palm Bonsai
Miniature palm bonsai trees have a charm of their own. These tiny versions of majestic palm trees captivate with their delicate proportions, intricate foliage, and artistic appeal. They offer a different perspective on palm trees, showcasing their beauty in a compact form that fits perfectly within the artistry of bonsai.
Decoding the Myth: Can You Bonsai a Palm Tree?
Bonsai is typically done with woody plants; palms have a different growth pattern, making traditional bonsai techniques challenging. However, some enthusiasts experiment with miniature palms in containers for a similar effect. Success may vary based on the palm species and care provided.
Essential Features of Bonsai Palm Trees
Bonsai palm trees possess unique features that make them ideal for bonsai cultivation. Some of these features include:
Feathery fronds: The elegant and delicate foliage of palm trees adds a touch of grace and beauty to the bonsai composition.
Distinctive trunks: Palm tree trunks, with their unique textures and patterns, create visual interest and contribute to the overall aesthetic appeal of the bonsai.
Vertical growth habits: The upright growth of many palm tree species makes them well-suited for the desired form and style of bonsai trees.
Ability to withstand pruning: Palm trees have the remarkable ability to tolerate and recover from pruning, allowing for shaping and styling to create the desired bonsai silhouette.
Now that we have gained an understanding of the fascination with miniature palm bonsai and debunked the myth surrounding Palm tree bonsai, let’s dive deeper into the specific palm tree varieties that are suitable for bonsai cultivation in the next section.
Bonsai Palm Tree Varieties Suitable for Bonsai Cultivation
When it comes to bonsai palm trees, there are two popular varieties that are suitable for cultivation: the Ponytail Palm and the Sago Palm. Both of these palm trees offer unique characteristics and make stunning additions to any bonsai collection.
Ponytail Palm: A Succulent Disguised as a Palm
The Ponytail Palm, scientifically known as Beaucarnea recurvata, is a fascinating bonsai palm variety disguised as a palm tree due to its long, slender fronds that resemble palm leaves. However, it is not a true palm but actually a succulent. Its unique appearance and ability to store water in its swollen trunk make it a resilient and low-maintenance choice for bonsai enthusiasts.
The Ponytail Palm is known for its distinctive bulbous base, which stores water and nutrients, allowing it to withstand periods of drought. This feature adds an interesting flair to the bonsai’s overall aesthetic. The long, arching leaves cascade from the top, creating an elegant display. Pruning and styling techniques can be employed to accentuate its asymmetrical beauty and emphasize its natural form.
To ensure the health and vitality of the Ponytail Palm bonsai, it is essential to provide well-draining soil, moderate sunlight, and infrequent watering. This variety thrives in warm and dry environments and is well-suited to indoor bonsai cultivation.
Sago Palm Bonsai: A Prehistoric Touch to Modern Bonsai
The Sago Palm, scientifically referred to as Cycas revoluta, is another captivating bonsai palm variety that adds a prehistoric touch to modern bonsai collections. The Sago Palm bonsai is not a true palm tree but belongs to a primitive group of plants called cycads. Its unique appearance, resembling a palm tree with fern-like leaves, makes it a popular choice among bonsai enthusiasts.
Sago Palm bonsai have a rugged and textured trunk with layers of fronds that grow in a circular pattern at the ends. This distinctive feature creates a visually striking and dynamic display, especially when styled and pruned to enhance the trunk’s gnarled appearance. Its slow growth rate allows for intricate and precise shaping techniques to achieve a bonsai masterpiece.
For optimal growth and health, the Sago Palm requires a well-draining soil mix and a balance of bright indirect sunlight. As a tropical plant, it thrives in warm temperatures but can adapt to slightly cooler conditions. Care should be taken to protect the Sago Palm bonsai from frost and extreme temperatures.
Bonsai Palm Variety
Scientific Name
Characteristics
Care Requirements
Ponytail Palm
Beaucarnea recurvata
– Resembles a palm, but is a succulent – Bulbous base for water storage – Long, arching leaves – Pruning and styling to accentuate natural form
– Resembles a palm with fern-like leaves – Rugged and textured trunk – Circular frond growth – Gnarlable trunk for shaping
– Well-draining soil mix – Bright indirect sunlight – Protection from frost and extreme temperatures
Selecting the Right Palm Tree Species for Bonsai
When it comes to creating a stunning bonsai palm tree, selecting the right palm tree species is crucial. Each species has its own unique characteristics that can contribute to the overall beauty and aesthetic appeal of your bonsai. In this section, we will explore two popular palm tree species that are perfect for bonsai cultivation: the ponytail palm and the sago palm.
Characteristics of the Ponytail Palm for Bonsai
The ponytail palm (Beaucarnea recurvata) is a striking palm tree that is known for its distinctive, bulbous trunk and long, slender leaves that cascade gracefully. This palm tree species is native to Mexico but has become popular among bonsai enthusiasts worldwide. Its unique appearance adds a touch of elegance and sophistication to any bonsai collection.
The ponytail palm is well-suited for bonsai cultivation due to its resilience and ability to thrive in a wide range of growing conditions. It can tolerate both bright sunlight and low light environments, making it a versatile choice for bonsai enthusiasts. Additionally, this palm tree species has a slow growth rate, allowing you to easily manage its size and shape.
Adapting the Sago Palm to the Bonsai Art Form
The sago palm (Cycas revoluta) is another palm tree species that can be adapted to the bonsai art form. Native to Japan, this prehistoric-looking palm tree features a unique crown of dark green, feather-like leaves and a sturdy trunk. Its timeless beauty and ability to withstand various growing conditions make it an excellent choice for bonsai enthusiasts.
When adapting the sago palm to the bonsai art form, it is important to consider its specific care requirements. This palm tree species prefers bright, indirect sunlight and well-draining soil. Regular watering is necessary to keep the soil moist but not overly saturated. Additionally, the sago palm bonsai requires occasional fertilization to ensure optimal growth and health.
By carefully selecting the right palm tree species for your bonsai, such as the ponytail palm and the sago palm, you can create captivating and unique bonsai trees that will stand out in any collection.
Ideal Conditions for Growing Bonsai Palm Trees
Creating the perfect growing environment is crucial to the success of your bonsai palm trees. To ensure their health and vitality, you need to understand the ideal conditions they require. Let’s explore the key factors that contribute to the optimal growth of Palm tree bonsai.
Lighting Requirements
Proper lighting is essential for the photosynthesis process, which is crucial for the growth and development of your bonsai palm trees. Most palm species thrive in bright, indirect sunlight.
Place your bonsai palm tree in a location where it can receive at least 4-6 hours of bright, filtered sunlight each day. If you’re growing your Palm tree bonsai indoors, consider using artificial grow lights to supplement the natural light.
Temperature Preferences
Bonsai palm trees typically prefer warm and tropical climates. They thrive in temperatures ranging from 65°F to 85°F (18°C to 29°C) during the day, and slightly cooler temperatures around 55°F to 65°F (13°C to 18°C) at night.
It’s important to protect your bonsai palm tree from extreme temperature fluctuations and frost. If you live in a colder climate, consider bringing your Palm tree bonsai indoors during the winter months or providing additional insulation to prevent damage.
Humidity Levels
Bonsai palm trees thrive in environments with high humidity levels. To create the ideal humidity, place a humidity tray filled with water near your palm tree bonsai or use a humidifier to maintain a humidity level of around 50% to 70%.
Pro Tip: Mist the leaves of your bonsai palm tree regularly using a spray bottle to increase humidity and prevent them from drying out.
Lighting Requirements
Temperature Preferences
Humidity Levels
Bright, indirect sunlight for 4-6 hours per day
Daytime temperature: 65°F to 85°F (18°C to 29°C) Nighttime temperature: 55°F to 65°F (13°C to 18°C)
Humidity level: 50% to 70%
By providing the ideal conditions of lighting, temperature, and humidity for your bonsai palm trees, you can ensure their overall health and promote their growth and development. Remember to regularly monitor and adjust these factors to create a thriving environment for your beloved bonsai palm trees.
Bonsai Palm Tree Care Fundamentals
Proper care is essential for the health and well-being of your bonsai palm tree. In this section, we will explore the fundamental practices that are crucial for maintaining a thriving Palm tree bonsai. From watering and feeding to pruning and avoiding overwatering, these care fundamentals will help you ensure the longevity and beauty of your bonsai palm tree.
Watering Bonsai Palm Trees: How Much and How Often
Watering is a critical aspect of bonsai palm tree care. It is important to strike a balance between keeping the tree hydrated and avoiding overwatering, which can lead to root rot. As a general rule, water your bonsai palm tree when the top inch of the soil feels slightly dry. Use a watering can or a gentle spray to moisten the entire root ball, making sure not to leave any dry spots.
Feeding Your Bonsai: Fertilizer Preferences of Palm Species
Fertilizing your bonsai palm tree is essential for providing it with the nutrients it needs to grow and thrive. Different palm species have specific fertilizer preferences, so it is important to choose a fertilizer that is suitable for your particular Palm tree bonsai. Generally, opt for a balanced organic fertilizer with a ratio of 10-10-10 or a palm-specific fertilizer. During the growing season, fertilize your bonsai palm tree every two to three weeks, following the instructions on the fertilizer packaging.
Pruning Techniques for Shaping a Bonsai Palm Tree
Pruning plays a crucial role in shaping and maintaining the desired form of your bonsai palm tree. Start by removing any dead, damaged, or overcrowded branches. Use sharp pruning shears to make clean cuts at the base of the branch or at a bud or leaf node. To enhance the bonsai aesthetic, selectively prune branches to create an open and balanced canopy. Regular pruning will help promote growth and maintain the tree’s desired shape.
Avoiding Overwatering: Crucial for Palm Tree Health
Overwatering is one of the most common mistakes in bonsai palm tree care. Excessive moisture can lead to root rot, compromising the health and overall well-being of the palm tree. To avoid overwatering, make sure the bonsai pot has proper drainage holes to allow excess water to escape. Additionally, carefully monitor the moisture level of the soil and adjust your watering frequency accordingly. Remember, it’s better to slightly underwater than to overwater your bonsai palm tree.
Watering Guidelines
Fertilizer Preferences
Pruning Techniques
Avoiding Overwatering
Water when the top inch is slightly dry
Choose balanced organic fertilizer or palm-specific fertilizer
Remove dead or damaged branches, selectively prune for shape
Fertilize every two to three weeks during the growing season
Use sharp pruning shears for clean cuts
Slightly underwater rather than overwater
Styling and Pruning Bonsai Palm Trees
When it comes to bonsai palm trees, styling and pruning are essential techniques that allow you to shape and maintain the desired aesthetic. By harnessing these practices, you can create stunning bonsai palm trees that captivate with their elegance and beauty.
Styling bonsai palm trees involves guiding the growth of the tree to achieve a specific shape or form. This can be done through wiring, trimming, and careful manipulation of the branches and foliage. By utilizing these techniques, you can create unique and artistic compositions that showcase the palm tree’s natural beauty in a miniature form.
Pruning, on the other hand, is crucial for maintaining the health and overall structure of the bonsai palm tree. Regular pruning helps eliminate unwanted or excess growth, allowing the tree to allocate its resources more efficiently. It also helps maintain the desired size and proportions, preventing the tree from becoming overgrown.
When pruning bonsai palm trees, it’s vital to consider the tree’s growth patterns, as different palm species may require specific pruning approaches. By understanding the unique characteristics of each palm species, you can effectively shape and prune the tree to enhance its visual appeal.
“Styling and pruning are essential techniques that allow you to shape and maintain the desired aesthetic of bonsai palm trees.”
Whether you’re a beginner or an experienced bonsai enthusiast, it’s essential to approach styling and pruning with care and patience. Always consider the natural growth patterns of the palm tree and aim to create a harmonious balance between its artistic form and its overall health.
By mastering the art of styling and pruning, you can transform your Palm tree bonsai into living works of art that showcase the elegance and beauty of nature in miniature form.
Benefits of Styling and Pruning Bonsai Palm Trees
Techniques
Enhances the visual appeal of the bonsai palm tree
Wiring
Maintains the overall health and structure of the tree
Trimming
Creates a harmonious balance between artistry and nature
Branch manipulation
Repotting and Transplanting Your Bonsai Palm Tree
As your bonsai palm tree grows, it will eventually outgrow its current pot or require a fresh soil mix. Repotting is an essential step in maintaining the health and vitality of your palm bonsai. It allows for proper root growth, prevents overcrowding, and ensures optimal nutrient absorption.
When should you repot your bonsai palm tree? Generally, it is recommended to repot every two to three years or when you notice the roots becoming tightly packed. The best time to perform this procedure is during early spring when the tree is entering its active growth phase.
To repot your bonsai palm tree, start by gently removing it from its current pot. Carefully untangle the roots and trim any extra-long or damaged ones. Prepare a new pot with fresh, well-draining soil, specifically formulated for bonsai trees. Position the tree in the center of the pot, ensuring that the nebari (root flare) is visible. Fill the pot with soil, compacting it gently around the roots. Water the tree thoroughly and place it in a shaded area for a few weeks to allow for root recovery.
Transplanting a bonsai palm tree, on the other hand, involves a more significant move, such as changing it to a larger pot or planting it in the ground. This should be done sparingly and only when necessary. When transplanting, make sure to carefully retain as much of the root system as possible, as this will minimize transplant shock. Follow the same steps as repotting, but make accommodations for the larger size of the new container or the ground, ensuring proper spacing and healthy soil conditions.
Karen Phillips, Bonsai expert and blogger. Read more about me here
If you are an avid bonsai enthusiast, you’ve probably heard of akadama soil. This unique soil has gained popularity among bonsai growers for its exceptional qualities that make it the ideal choice for nurturing bonsai trees. Regardless of whether you’re a beginner or an experienced bonsai gardener, understanding the benefits and properties of akadama soil is essential for successful bonsai cultivation.
Akadama soil, also known as bonsai soil, is renowned for its ability to provide the optimal environment for bonsai tree growth. Its composition and texture contribute to excellent water retention and drainage, creating the perfect balance for root development of growing bonsai. This natural Japanese clay soil is highly sought after by bonsai enthusiasts around the world for its superior qualities and compatibility with bonsai trees.
In the following sections, we will delve deeper into what akadama soil is, its uses in bonsai cultivation, and explore whether it is the right choice for your bonsai plants. So let’s discover why akadama soil is the popular soil for bonsai and why it should be a crucial component of your bonsai-growing journey.
What is Akadama?
Akadama is a type of clay soil that is specifically produced for bonsai purposes. It is a key component of bonsai soil mixes and is commonly used in Japan and around the world for cultivating bonsai trees.
Akadama soil is derived from volcanic ash and is known for its unique properties that make it highly suitable for bonsai cultivation. It is sourced from the ancient volcanic region of Akadama in Japan, which gives it its name.
Akadama has excellent water retention capabilities, allowing it to absorb and retain moisture without becoming waterlogged. This allows bonsai trees to receive a steady supply of water, promoting healthy root development and preventing issues such as root rot.
In addition to its water retention properties, akadama soil also provides exceptional drainage. It has a porous structure that allows excess water to drain away efficiently, preventing waterlogging and maintaining optimal oxygen levels in the root zone.
The unique particle size and texture of akadama soil allow for proper aeration, ensuring that the roots receive essential oxygen. This promotes root development, leading to the overall health and vigor of bonsai trees.
Akadama is also rich in essential minerals, providing important nutrients to bonsai trees. Its composition includes a balance of macronutrients and micronutrients that support healthy growth and development.
Overall, akadama is valued for its ability to create an ideal growing environment for bonsai trees. Its unique properties make it an integral component of bonsai soil mixes, providing the necessary water retention, drainage, and aeration for successful bonsai cultivation.
What is Akadama Soil Used for?
Akadama soil is a versatile plant substrate widely used in bonsai cultivation for its exceptional qualities and benefits. Its unique combination of water retention and excellent drainage makes it the preferred choice for bonsai enthusiasts. Let’s explore the various uses of akadama soil in bonsai cultivation.
1. Repotting: When it comes to repotting bonsai trees, akadama soil is the go-to choice for many growers. The porous nature of akadama allows for proper root aeration while retaining essential moisture, promoting healthy root growth and preventing root rot.
2. Root Development: Akadama soil provides an ideal environment for the development of strong and healthy roots. Its excellent drainage ensures that the roots receive adequate oxygen, while its water retention properties prevent them from drying out. This promotes vigorous root growth and enhances overall tree health and vitality.
3. Soil Amendment: Akadama soil acts as an excellent soil amendment for bonsai cultivation. When mixed with other organic or inorganic components, it helps create a balanced soil composition that promotes optimal nutrient uptake and aids in maintaining the pH level suitable for bonsai trees.
To better understand the uses of akadama soil, let’s take a look at the following table:
– Enhances oxygen supply to the roots – Prevents dehydration – Stimulates vigorous root growth
Soil Amendment
– Improves nutrient uptake – Maintains suitable pH levels – Enhances overall tree health
As you can see, akadama soil plays a crucial role in the successful cultivation of bonsai trees. Its unique properties make it an indispensable component of bonsai soil mixes. Whether you’re repotting your bonsai, encouraging root development, or amending the soil, akadama soil provides the perfect foundation for healthy and thriving bonsai trees.
What is a substitute for akadama?
While akadama soil is highly regarded in the bonsai community, it may not be readily available or affordable for some growers. If you’re unable to find akadama or are looking for alternative options, there are other types of soil that can be used as substitutes for bonsai cultivation. Here are a few alternatives to consider:
Other types of clay soil: Clay soils with similar properties to akadama can be used as substitutes. Look for clay soils that have good drainage and water retention capabilities, as these are crucial for maintaining the health of bonsai trees. Examples include Kanuma soil from Japan and Turface, a type of calcined clay soil often used in sports field construction.
Volcanic soil: Volcanic soil, such as pumice or lava rock, can be used as a component in bonsai soil mixes. These types of soil offer excellent drainage and aeration, which are important for maintaining healthy root systems in bonsai trees.
Commercial bonsai soil mixes: Many companies offer pre-mixed bonsai soils that are designed to provide the necessary balance of drainage and water retention. These commercial mixes often include a combination of organic and inorganic components to promote optimal growth and development of bonsai trees. Some popular brands include Fujiyama Bonsai Soil, Akadama Bonsai Soil Mix, and NAPA Bonsai Soil Mix.
It’s important to note that while these alternatives can be used as substitutes for akadama, they may have slightly different properties and may require adjustments in watering and fertilization routines. Experimentation and careful observation of your bonsai trees’ response to different soils will help you determine the best substitute for your specific requirements.
Although akadama soil is primarily known for its usage in bonsai cultivation, it has proven to be beneficial for a wide range of plants, making it a versatile plant substrate option. Whether you have potted plants, indoor plants, or engage in container gardening, akadama soil offers advantages that can promote healthy plant growth.
Akadama soil’s unique characteristics contribute to its compatibility with various plant species. Its excellent water retention properties help to maintain optimal soil moisture levels, preventing under or over watering. The porous nature of the soil allows for proper aeration and root development, which is crucial for the overall health of plants.
One of the key benefits of using akadama soil is its ability to provide a stable and well-draining environment, allowing plants to thrive. This is particularly important for plants that require adequate drainage to prevent waterlogged roots. Akadama soil’s ability to retain moisture while simultaneously allowing excess water to drain away makes it a suitable choice for plants that are sensitive to water-related issues.
Additionally, akadama soil’s mineral composition provides essential nutrients for plant growth. The natural porosity of the soil allows roots to access nutrients more efficiently, promoting healthier and more robust plants. This can be especially advantageous for plants that have specific nutrient requirements.
When using akadama soil for plants other than bonsai trees, some considerations should be taken into account. As akadama soil is primarily designed for use in bonsai cultivation, it may not be readily available in large quantities for larger-scale gardening projects. The cost of using akadama soil for a significant number of plants can also be a factor to consider.
Overall, while akadama soil is most commonly associated with bonsai trees, its unique qualities make it a viable option for a wide range of plant species. Its water retention, drainage, and nutrient-providing properties can contribute to the overall health and vitality of plants, whether they are potted, indoor, or container-grown.
“Akadama soil’s unique characteristics make it a versatile plant substrate that can benefit a wide range of plants, providing optimal moisture retention, excellent drainage, and essential nutrients.”
Is Akadama Acidic or Alkaline?
The pH level of soil is a critical factor in the growth and health of plants. When it comes to akadama soil, understanding its pH characteristics is essential for selecting appropriate plants and maintaining optimal growing conditions.
Akadama soil is known for its neutral pH, making it a versatile choice for a wide range of plants. Unlike other types of soil that can be either acidic or alkaline, akadama soil offers a balanced pH level that promotes healthy root development and nutrient absorption.
Its neutral pH level also allows for greater control over the growing environment, as it can be easily adjusted to meet the specific needs of different plant species. Whether you’re growing acid-loving plants or those that thrive in alkaline conditions, akadama soil provides a neutral base that can be tailored to suit their requirements.
By maintaining a neutral pH, akadama soil creates an ideal foundation for plants to thrive. It strikes a balance between soil acidity and alkalinity, ensuring optimal conditions for root health, nutrient availability, and overall plant vigor.
Is Akadama inorganic?
The composition of bonsai soil plays a crucial role in the health and development of bonsai trees. When it comes to akadama soil, there is often a question of whether it is considered organic or inorganic. Let’s explore the nature of akadama soil and its implications for bonsai cultivation.
Akadama soil is derived from a specific type of clay found in Japan. It is known for its unique characteristics that make it ideal for growing bonsai trees. The soil is formed through a natural weathering process and is sifted to remove impurities, resulting in a consistent texture and particle size.
The mineral composition of akadama soil consists primarily of clay minerals, including montmorillonite and kaolinite. It also contains varying amounts of other minerals, such as quartz, feldspar, and iron oxides. These mineral components contribute to the soil’s ability to retain water while providing excellent drainage.
In terms of its classification, akadama soil is considered to be inorganic due to its mineral composition. Unlike organic soil, which is derived from decomposed plant and animal matter, akadama soil does not contain organic matter. This characteristic gives it a distinct advantage in bonsai cultivation.
One of the benefits of using inorganic soil like akadama is its long-lasting properties. Organic soil tends to break down over time, losing its structure and nutrient content. In contrast, akadama soil maintains its stability and drainage capabilities for a longer period, promoting healthy root development and reducing the risk of waterlogged or compacted soil.
It’s important to note that while akadama soil is inorganic, it can still support a thriving bonsai ecosystem. Bonsai trees rely on a well-structured soil mix that provides a balance of water retention and drainage. Akadama soil, when combined with other components such as pumice and lava rock, creates an ideal growing medium for bonsai trees.
Akadama soil’s inorganic nature and unique composition make it an excellent choice for bonsai enthusiasts. Its mineral properties contribute to enhanced drainage and water retention, crucial elements for maintaining optimal root health and overall tree development.
How do you water Akadama?
Proper watering is crucial for maintaining the health and vitality of bonsai trees. When it comes to watering akadama soil, it’s important to implement strategies that promote optimal moisture retention while preventing over or under watering. Follow these guidelines and tips to ensure your bonsai trees thrive:
Observe the soil moisture: Check the soil moisture level regularly by using your finger or a moisture meter. Aim to maintain a balance where the soil is moist but not saturated.
Water thoroughly: When it’s time to water, pour water evenly across the surface of the soil until it starts to drain out of the drainage holes at the bottom of the pot. This ensures that the water reaches the roots and allows for adequate drainage.
Establish a watering routine: Bonsai trees require consistent watering, but the frequency can vary based on factors such as temperature, humidity, and the size of the pot. Monitor the moisture level regularly and adjust the watering schedule accordingly.
Avoid standing water: Avoid leaving your bonsai tree in standing water as it can lead to root rot. Ensure that excess water drains out completely from the pot.
Consider humidity: Bonsai trees thrive in environments with moderate humidity. You can increase humidity by misting the leaves occasionally or placing a tray of water near the tree to allow for evaporation.
Remember that maintaining the right balance of moisture is key. Overwatering can suffocate the roots and cause root rot, while underwatering can lead to dehydration and nutrient deficiencies. By following these watering techniques and keeping a close eye on your bonsai’s soil moisture levels, you can ensure your Akadama soil provides optimal conditions for your bonsai tree’s growth and overall health.
What is the Difference Between Akadama and Aqua Soil?
If you’re an avid gardener or bonsai enthusiast, you may be familiar with both akadama soil and aqua soil. While they are both substrates used in plant cultivation, they have distinct differences that set them apart. Let’s explore the characteristics of each and how they differ from one another.
Akadama soil is a Japanese clay soil that has gained popularity in the world of bonsai. It is known for its excellent drainage properties, which allow for optimal root health and development. Akadama soil also has good water retention capabilities, ensuring that your bonsai trees receive adequate moisture without becoming waterlogged.
Aqua soil, on the other hand, is specifically designed for aquatic plant cultivation. It is a specialized substrate that provides essential nutrients for healthy plant growth in aquariums. Aqua soil typically contains a blend of volcanic ash, peat, and other organic matter to support the unique needs of aquatic plants.
One key difference between akadama soil and aqua soil is their composition. Akadama soil is primarily made up of clay particles, while aqua soil contains a mixture of volcanic ash, peat, and other organic materials. This variation in composition reflects their different applications – akadama soil for bonsai trees and aqua soil for aquatic plants.
When it comes to choosing between akadama soil and aqua soil, it’s important to consider the specific needs of your plants. Akadama soil is ideal for bonsai trees and other plants that require well-draining soil with good moisture retention. Aqua soil, on the other hand, is tailored for aquatic plants and provides the necessary nutrients for healthy growth in water-based environments.
In summary, akadama soil and aqua soil are two distinct substrates with different properties and applications. Akadama soil is popular among bonsai enthusiasts for its excellent drainage and water retention capabilities, while aqua soil is specifically designed for aquatic plant cultivation. Consider your plant’s requirements and choose the substrate that best suits their needs.
Karen Phillips, Bonsai expert and blogger. Read more about me here
Are you interested in growing beautiful and unique bonsai trees? Look no further than spruce bonsai! These miniature trees are known for their distinctive features and are a great choice for both beginners and experienced enthusiasts. In this comprehensive guide, we will explore the four main types of spruce bonsai – Picea abies (Norway Spruce), Picea glauca (White Spruce), Picea pungens (Colorado Blue Spruce), and Picea omorika (Serbian Spruce). We will discuss the differences between these varieties and provide you with essential care tips to ensure the health and vitality of your spruce bonsai.
When it comes to spruce bonsai care, each variety has its own specific requirements. From watering and pruning to styling and fertilization, understanding the needs of your spruce bonsai is crucial for its success. Whether you are a novice or an experienced bonsai grower, this guide will provide you with all the information you need to grow and maintain your spruce bonsai with confidence.
Spruce Bonsai: Understanding the Basics
Spruce Bonsai Characteristics:
Spruce bonsai are coniferous trees that belong to the genus Picea.
They have needle-like leaves that vary in color, ranging from green to blue-green.
Spruce bonsai typically have compact growth habits, making them well-suited for bonsai cultivation.
These bonsai trees can exhibit a range of shapes and forms, from upright and slender to more compact and rounded.
Growth Habits:
Spruce bonsai have relatively slow growth rates compared to other bonsai species.
They prefer cool climates and tolerate cold temperatures, making them suitable for outdoor cultivation in temperate regions.
These trees require a period of winter dormancy, during which they should be protected from frost.
General Care Guidelines:
Spruce bonsai thrive in well-draining soil that retains some moisture but does not become waterlogged.
They prefer bright, indirect sunlight, but excessive heat and direct sunlight should be avoided.
Regular watering is necessary to maintain proper moisture levels in the soil. The specific watering needs may vary depending on factors such as climate and pot size, so it’s important to monitor the soil moisture carefully.
Pruning and shaping are essential for maintaining the desired shape and aesthetic appeal of spruce bonsai.
Applying a balanced bonsai fertilizer in the growing season promotes healthy growth and foliage coloration.
Regular inspection for pests and diseases is crucial to ensure the health and vitality of spruce bonsai.
By familiarizing yourself with the fundamentals of spruce bonsai care, you’ll be well-prepared to nurture and maintain these unique and beautiful miniature trees.
Norway Spruce Bonsai: Picea Abies
Norway spruce (Picea Abies) is a popular choice for bonsai enthusiasts due to its strong, sturdy branches and beautiful foliage. This variety of spruce bonsai offers a unique and captivating presence that can enhance any bonsai collection.
The Ideal Environment for Picea Abies
Creating the ideal environment for your Norway spruce bonsai is essential for its overall health and growth. Here are some key factors to consider:
Light requirements:Norway spruce bonsai prefers bright, indirect sunlight. Place your bonsai in a location where it can receive at least 4-6 hours of filtered or dappled sunlight per day.
Temperature ranges: Picea Abies thrives in cool to cold climates, with temperatures ranging between 40°F (4°C) and 60°F (15°C). Ensure that your bonsai is protected from extreme heat or frosty conditions.
Humidity levels:Norway spruce bonsai enjoys higher humidity levels. Consider using humidity trays, misting the foliage, or placing the bonsai near a humidifier to create a suitable microclimate.
By providing the right combination of light, temperature, and humidity, you can create an environment that fosters the optimal growth and development of your Picea Abies bonsai.
Specific Watering Needs of Norway Spruce Bonsai
Proper watering is crucial for the health and vitality of your Norway spruce bonsai. Maintaining the correct moisture levels helps prevent both overwatering and underwatering. Here are some tips to ensure effective watering:
Checking moisture levels: Regularly monitor the moisture levels of the soil by lightly poking your finger into the soil up to the first knuckle. If it feels slightly moist, water your bonsai. If it feels dry, it’s time to water.
Watering frequency: Norway spruce bonsai typically requires watering every 2-3 days during the growing season and less frequently during winter dormancy. However, it’s important to adjust the frequency depending on climate, humidity, and pot size.
Watering technique: Water your bonsai thoroughly, allowing the water to penetrate the entire root system. Ensure that excess water drains out of the drainage holes at the bottom of the pot.
Remember, maintaining proper moisture levels is crucial to avoid root rot or drying out. Regularly check your Norway spruce bonsai’s watering needs and adjust as necessary to keep it healthy and flourishing.
White Spruce: Picea Glauca
White spruce (Picea Glauca) is a distinctive variety of spruce bonsai known for its attractive blue-green foliage and compact growth habit. This unique bonsai variety stands out among other types of spruce due to its exceptional features and characteristics. Understanding the distinctive qualities of white spruce bonsai will enable you to appreciate and care for this beautiful tree.
What Makes It Stand Out?
White spruce bonsai has several unique features that set it apart from other spruce varieties. Here are some key aspects to keep in mind:
Coloration:White spruce bonsai showcases an elegant blue-green hue in its foliage, adding a touch of visual interest to any collection. The striking coloration is one of the distinguishing factors of this bonsai variety.
Needle Length: The needles of white spruce bonsai are relatively short compared to other spruce varieties. This characteristic contributes to the overall compactness and refined appearance of the tree.
Overall Shape: White spruce bonsai typically exhibits a dense and conical shape, mirroring the distinct growth habit of its larger counterparts in nature. The well-defined silhouette enhances the tree’s aesthetics and makes it a captivating addition to any bonsai collection.
The image above showcases the unique beauty of white spruce bonsai, emphasizing its blue-green foliage, compact growth habit, and elegant shape.
By understanding these unique features, you can effectively care for your white spruce bonsai, ensuring it thrives and remains a standout highlight in your bonsai collection.
Colorado Blue Spruce Bonsai: Picea pungens
Colorado blue spruce (Picea pungens) is a stunning variety of spruce bonsai known for its vibrant blue-colored foliage. The unique coloration of the needles sets it apart from other types of spruce bonsai, making it a sought-after choice among bonsai enthusiasts. The striking blue hue adds a touch of elegance and visual interest to any bonsai collection.
Colorful Foliage and Seasonal Care for Picea Pungens
The colorful foliage of Picea pungens requires proper care throughout the seasons to maintain its vibrant appearance. Here are some essential care tips for Colorado blue spruce bonsai:
Sunlight Exposure:Colorado blue spruce bonsai prefers full sun and should be placed in a location where it receives at least 6 hours of direct sunlight each day.
Watering Needs: Ensure that the soil is consistently moist, but not waterlogged. Avoid letting the soil dry out completely between waterings. Regularly monitor the moisture level and adjust watering accordingly.
Temperature Preferences: Picea pungens thrives in cool climates and can tolerate cold temperatures. However, it may need protection from extreme heat and should be placed in a well-ventilated area during the hot summer months.
To enhance the colorful foliage of Colorado blue spruce bonsai, you can supplement its nutrition with a balanced bonsai fertilizer. Providing the right nutrients will promote healthy growth and maintain the vibrant blue coloration of the needles. Additionally, regular pruning and shaping will help maintain the desired form and highlight the unique characteristics of this exquisite bonsai variety.
Serbian Spruce Bonsai: Picea omorika
Serbian spruce (Picea omorika) is a graceful bonsai variety known for its slender form and delicate branches. With its elegant and striking appearance, the Serbian spruce bonsai is a favorite among bonsai enthusiasts. To ensure optimal growth and development, it is important to provide the right balance of sunlight and shade for this beautiful tree.
As a general guideline, Serbian spruce bonsai thrives in bright, indirect sunlight. Place your bonsai in an area with filtered light or partial shade to protect it from direct sunlight, especially during the hot summer months. While Serbian spruce can tolerate some direct sunlight, it is best to avoid excessive exposure as it can cause leaf burn and damage.
Proper shading is crucial for maintaining the health and vitality of your Serbian spruce bonsai.
Consider using a shade cloth or strategically placing your bonsai where it can benefit from the shade provided by taller plants or structures. This will help create a more suitable environment for your Serbian spruce bonsai to thrive.
Providing the right balance of sunlight and shade will ensure that your Serbian spruce bonsai maintains its elegant appearance
In addition to shade, it is important to maintain proper humidity levels for your Serbian spruce bonsai. This can be achieved by misting the foliage regularly or placing a humidity tray filled with water near the bonsai. Proper moisture levels will help prevent the drying out of the delicate branches and ensure the overall health of the tree.
By carefully managing the sunlight and shade for your Serbian spruce bonsai, you can create the ideal growing conditions for this graceful and enchanting bonsai variety. Remember to monitor the tree closely and make adjustments as needed to ensure its continued success.
Leaves and Needle Care
The leaves and needles of spruce bonsai are crucial for their overall beauty and health. Proper care and attention are essential to maintain healthy and vibrant foliage. Here are some strategies to help you navigate the longevity of spruce bonsai foliage:
Navigating the Longevity of Spruce Bonsai Foliage
To ensure healthy foliage, it is important to follow these care techniques:
Provide adequate sunlight: Spruce bonsai thrive in full sun or partial shade. Ensure they receive at least 6 hours of direct sunlight daily.
Monitor watering: Maintain a balanced watering routine to prevent overwatering or underwatering. The soil should be slightly damp, but not saturated.
Avoid excessive fertilizer: While fertilization is necessary, avoid excessive amounts as it can lead to foliage burn.
Monitor temperature and humidity: Spruce bonsai prefer cool climates with moderate humidity. Avoid exposure to extreme temperatures or dry air.
By following these practices, you can promote healthy foliage and maintain the overall vitality of your spruce bonsai tree.
Seasonal Needle Shedding and Health Monitoring
It is normal for spruce bonsai to shed their needles seasonally. During fall and winter, they may shed older needles to make way for new growth. However, excessive needle shedding may indicate health issues such as dehydration or pest infestation.
Regularly monitor your bonsai tree for signs of poor health, such as yellowing or browning needles. Inspect the branches and needles for pests like aphids or spider mites. Promptly address any issues to prevent further damage to the foliage.
Enhancing Color and Texture Through Nutrition
Nutrition plays a vital role in enhancing the color and texture of spruce bonsai foliage. Providing the right nutrients can help promote vibrant green colors and ensure healthy growth. Consider the following tips:
Use a balanced bonsai fertilizer: Choose a fertilizer specifically formulated for evergreen trees, such as spruce bonsai. Look for a balanced ratio of nitrogen (N), phosphorus (P), and potassium (K).
Apply fertilizer during the growing season: In early spring and late summer, when your spruce bonsai is actively growing, apply a slow-release fertilizer according to the package instructions.
Monitor for nutrient deficiencies: Keep an eye out for signs of nutrient deficiencies, such as yellowing or stunted growth. Adjust the fertilizer dosage or consult a bonsai expert if necessary.
Through proper nutrition, you can enhance the color and texture of your spruce bonsai foliage, creating a visually stunning and healthy tree.
Remember, caring for the leaves and needles of your spruce bonsai is crucial for maintaining its overall health and beauty. By following these care techniques, monitoring seasonal needle shedding, and providing the right nutrition, you can ensure the longevity and vibrancy of your spruce bonsai foliage.
Spruce Bonsai Pruning and Styling Techniques
Pruning and styling are crucial aspects of spruce bonsai care to create visually appealing shapes and forms. By using selective trimming techniques, you can create a visual impact that enhances the beauty of your bonsai tree. Knowing when and how to remove branches or foliage is essential for achieving the desired shape and contour.
Creating a Visual Impact with Selective Trimming
When pruning your spruce bonsai, focus on selectively trimming branches to create a visually pleasing composition. Remove any overcrowded branches or those that disrupt the overall balance of the tree. This selective trimming technique allows you to highlight the tree’s unique features and create an aesthetically pleasing bonsai.
The Do’s and Don’ts When Wiring Spruce Branches
Wiring is a common technique used in bonsai styling to shape and position branches. When wiring spruce bonsai branches, it’s important to follow a few do’s and don’ts. Do wrap the wire gently around the branch to avoid damaging the bark. Don’t leave the wire on for too long, as it may cut into the branch. Carefully monitor the growth of your bonsai to prevent wire scars.
Achieving Desired Shapes and Contours
To achieve the desired shapes and contours for your spruce bonsai, you can utilize a variety of techniques. Choose from classic bonsai styles such as formal upright or informal upright, or explore more creative options like cascade or windswept. Experiment with bending branches or pruning foliage to create the desired effect. The key is to maintain a balance between the aesthetics and the health of the tree.
Pruning Techniques
Styling Techniques
Selective trimming for visual impact
Creating desired shapes and contours
Removing overcrowded branches
Utilizing classic bonsai styles
Bending branches for desired effect
Spruce Bonsai Watering Practices
Proper watering is essential for the health and vitality of spruce bonsai. Maintaining a moisture balance throughout the seasons is crucial to ensure optimal growth and longevity. Each species of spruce bonsai has specific watering needs that must be met to support its unique characteristics. By mastering effective watering techniques, you can provide the right amount of water at the right time, promoting a healthy and thriving bonsai tree.
Maintaining Moisture Balance Throughout the Seasons
One of the key aspects of spruce bonsai watering is to maintain a moisture balance that suits the needs of the tree during different seasons. The watering frequency and amount will vary depending on factors such as temperature, humidity, and light exposure.
During the growing season, typically spring and summer, spruce bonsai require more frequent watering as they actively absorb water and nutrients. Check the moisture level of the soil regularly by gently poking your finger into the soil up to the first knuckle. If it feels slightly moist, the tree is adequately hydrated. If it feels dry, it’s time to water.
In winter, when the tree is in dormancy, watering should be reduced to avoid overwatering and potential root rot. Allow the soil to dry out slightly between waterings, but make sure it doesn’t completely dry out.
Remember, watering needs may vary depending on factors such as the size of the bonsai pot, the climate of your region, and the specific species of spruce bonsai. Observe your bonsai closely and adjust your watering routine accordingly.
Identification of Overwatering and Underwatering Symptoms
To ensure proper watering, it’s crucial to identify the symptoms of both overwatering and underwatering in spruce bonsai.
Overwatering: Overwatering can lead to root rot and damage to the bonsai. Signs of overwatering include yellowing leaves, mushy and slimy roots, and a foul odor. If you notice these symptoms, reduce watering frequency and allow the soil to dry out between waterings.
Underwatering: Underwatering can cause wilting, dry and crispy leaves, and overall poor health of the bonsai. If you notice these signs, increase the frequency of watering and ensure the tree receives sufficient water to stay hydrated.
Regularly inspect your spruce bonsai for any signs of overwatering or underwatering and adjust your watering practices accordingly to maintain the ideal moisture balance.
Effective Watering Techniques for Various Spruce Species
While the basic principles of watering apply to all spruce bonsai, different species may have slightly different watering needs. Here are some effective watering techniques for various spruce species:
Spruce Species
Watering Technique
Norway Spruce (Picea abies)
Deep watering, allowing the water to fully penetrate the soil and reach the roots. Ensure good drainage to prevent waterlogging.
White Spruce (Picea glauca)
Regular watering with slightly higher frequency during the heat of summer. Maintain evenly moist soil.
Colorado Blue Spruce (Picea pungens)
Water moderately, avoiding excessive watering or prolonged dryness. Aim for consistently moist soil.
Serbian Spruce (Picea omorika)
Keep the soil consistently moist, but not waterlogged. Provide adequate drainage to prevent standing water.
Remember to always water gently and avoid wetting the foliage to prevent disease and fungal issues. Watering should be done evenly to ensure all parts of the root system receive sufficient moisture.
By following these effective watering practices and adjusting them based on the specific needs of your spruce bonsai species, you can provide the ideal moisture balance for your tree’s growth and well-being.
Timing Is Everything: The Repotting Cycle of Spruce Bonsai
Repotting plays a crucial role in the care of spruce bonsai trees. It provides the necessary space for root development and ensures the overall health and vitality of the tree. Understanding the timing for repotting spruce bonsai is essential to promote strong root growth and maintain optimal conditions.
Knowing when to repot your spruce bonsai depends on several factors, including the age, size, and specific needs of the tree. As a general guideline, younger bonsai trees typically require more frequent repotting, while older and more established trees can be repotted every 2-3 years.
Table: Repotting Schedule for Different Types of Spruce Bonsai
Type of Spruce Bonsai
Recommended Repotting Frequency
Picea abies (Norway Spruce)
Every 1-2 years for young trees Every 2-3 years for mature trees
Picea glauca (White Spruce)
Every 1-3 years, depending on growth rate
Picea pungens (Colorado Blue Spruce)
Every 2-3 years, depending on growth rate
Picea omorika (Serbian Spruce)
Every 2-3 years for young trees Every 3-5 years for mature trees
When repotting your spruce bonsai, it’s crucial to use the right timing and techniques. The best time to repot is typically in early spring before new growth begins. This allows the tree to recover quickly and establish new roots. However, it’s essential to evaluate the health of your bonsai and adapt the repotting schedule accordingly.
During the repotting process, it’s vital to prune and trim the roots to maintain a balanced root-to-foliage ratio. Gently remove the tree from its current container, trim excess roots, and reposition it in a clean pot using well-draining soil. Take care not to disturb the tree too much, as this can cause stress and inhibit growth.
After repotting, ensure that your spruce bonsai receives adequate water and is placed in an appropriate environment that meets its specific needs. Monitor the tree closely for any signs of stress or adjustment and make adjustments as necessary.
By understanding the repotting cycle and following proper techniques, you can provide the best conditions for your spruce bonsai’s root growth and overall health.
Boosting Spruce Bonsai Growth with Proper Fertilization
Fertilization plays a crucial role in ensuring the healthy growth and development of spruce bonsai. By providing the necessary nutrients, you can promote robust growth and vibrant foliage in your spruce bonsai trees. To achieve optimal results, it is important to understand the key aspects of fertilization, including selecting the right fertilizer composition, determining the frequency and quantity of application, and making seasonal adjustments in fertilizing regimens.
Selecting the Right Fertilizer Composition
When it comes to fertilizing spruce bonsai, it is essential to choose the right fertilizer composition to meet their specific nutritional needs. Look for a balanced fertilizer that contains essential macro and micronutrients, such as nitrogen (N), phosphorus (P), potassium (K), as well as other important elements like calcium, magnesium, and iron. Opt for a slow-release fertilizer that provides a steady supply of nutrients over time. Additionally, consider using organic fertilizers to promote overall soil health and microbial activity.
Understanding the Frequency and Quantity of Application
The frequency and quantity of fertilizer application depend on various factors, including the type of spruce bonsai, its current growth stage, and the condition of the soil. As a general guideline, apply fertilizer every 4-6 weeks during the growing season, which typically starts in early spring and ends in late summer. However, be cautious not to overfertilize, as excessive nutrient intake can lead to burning or damaging the bonsai tree. Follow the instructions provided by the fertilizer manufacturer and monitor your bonsai tree’s response to adjust the frequency and quantity accordingly.
Seasonal Adjustments in Fertilizing Regimens
It is crucial to make seasonal adjustments in fertilizing regimens to address the changing nutritional needs throughout the year. During the active growing season in spring and summer, increase the frequency of fertilizer application to support the tree’s vigorous growth. In fall, reduce the frequency as the tree prepares for dormancy. During the dormant period in winter, withhold fertilizer application completely since the tree’s metabolic activity is minimal. Adjusting the fertilizing regimen according to seasonal variations will help ensure optimal nutrient absorption and utilization by the bonsai tree.
Proper fertilization is integral to the successful cultivation. By selecting the right fertilizer composition, understanding the frequency and quantity of application, and making seasonal adjustments in fertilizing regimens, you can provide your plants with the essential nutrients they need for vigorous growth and stunning foliage.
Fungal Diseases and Pests in Spruce Bonsai
Just like any other plant, spruce bonsai trees are susceptible to fungal diseases and pests. These issues can significantly impact the health and appearance of your beloved trees if left unchecked. Therefore, it is essential to be aware of the common fungal diseases and pests that can affect your plant and take proactive measures to prevent and treat them.
When it comes to fungal diseases, spruce bonsai are most commonly affected by problems such as needle cast, root rot, and powdery mildew. Needle cast is characterized by the browning and shedding of needles, while root rot can cause wilting, poor growth, and root decay. Powdery mildew presents as a white powdery coating on the foliage. To prevent fungal diseases, ensure proper ventilation, avoid overwatering, and promptly remove any affected foliage. Fungicides specifically formulated for bonsai can be used for treatment.
As for pests, these sweethearts can fall victim to insects like aphids, spider mites, and scale insects. These pests can cause stunted growth, distorted foliage, and sap-sucking damage. Regularly inspect your bonsai for any signs of infestation, such as small insects, webbing, or sticky residue. To combat pests, you can use insecticidal soaps or horticultural oils, which are effective and safe for bonsai trees.
By being vigilant and proactive in recognizing and addressing fungal diseases and pesky pests, you can ensure the long-term health and vitality of your bonsai collection. Regular inspection, proper care, and timely treatment are the keys to keeping your bonsai thriving and beautiful.
Karen Phillips, Bonsai expert and blogger. Read more about me here
Welcome to our comprehensive Bougainvillea Bonsai Tree Care Guide, where we will unlock the secrets to nurturing and flourishing this magnificent miniature tree. With its vibrant bracts and delicate flowers, the bougainvillea bonsai is a captivating addition to any bonsai enthusiast’s collection. In this guide, we will provide valuable insights on caring for your bougainvillea bonsai, from pruning techniques and training tips to selecting the right soil and fertilizer. Discover the unique beauty and requirements of bougainvillea bonsai and become a master in its art of cultivation.
With its show-stopping colors and exquisite form, Bougainvillea bonsai offers a unique experience. The vivid bracts surrounding its small cream-colored flowers come in an array of dazzling hues, including red, pink, orange, yellow, white, and even double bracts. These bracts provide long-lasting color, making your bougainvillea bonsai a stunning focal point in any setting.
It’s essential to understand the historic origins of the bougainvillea bonsai. This miniature tree pays tribute to the French explorer Louis-Antoine de Bougainville, who discovered and lent his name to this beautiful plant. Today, the bougainvillea bonsai carries on that legacy, captivating bonsai enthusiasts with its artistic appeal.
To ensure the optimal growth and health of your bougainvillea bonsai, we will guide you through its care requirements step by step. From providing the ideal environmental conditions, including temperature and sunlight, to mastering the art of watering and fertilization, we leave no stone unturned in your journey towards a thriving bougainvillea bonsai.
Pruning is crucial for maintaining the shape and health of your bougainvillea bonsai. We will share expert tips on when and how to prune your bonsai, ensuring abundant budding and flowering. Additionally, we will explore the delicate process of repotting, offering insights into when and how to repot your bonsai while keeping its delicate root system intact.
Your bougainvillea bonsai’s well-being is our top priority, and we will equip you with the knowledge to protect it from potential pests and diseases. We will discuss common threats and provide effective pest control measures, from identifying and treating pests to implementing preventive strategies.
Prepare for an enriching experience as you embark on your bougainvillea bonsai journey. Discover the secrets to its care and maintenance, and watch as your miniature tree thrives under your expert care and attention. Join us as we delve into the world of bougainvillea bonsai and unlock the art of creating a vibrant and flourishing mini tree that will be the envy of every bonsai enthusiast.
Understanding the Unique Beauty of Bougainvillea Bonsai
Bougainvillea bonsai trees are an absolute delight to behold, enchanting enthusiasts with their unique features and beauty. In this section, we will delve into the captivating elements that make bougainvillea bonsai truly special. From their vivid bracts and delicate flowers to their artistic appeal and historic origins, let us explore the magic of these miniature wonders.
Exploring the Vivid Bracts and Delicate Flowers
The vibrant bracts of bougainvillea bonsai are a sight to behold. These modified leaves surround the small, cream-colored flowers, creating a stunning display of color and texture. Bougainvillea bonsai bracts come in a wide range of hues, including red, pink, orange, yellow, white, and even double bracts. Their long-lasting color adds a touch of elegance to any bonsai collection.
To showcase the beauty of bougainvillea bonsai bracts, creating special areas of fullness can accentuate their vibrant appeal. This can be achieved through careful pruning and training techniques, allowing the bracts to flourish and become the focal point of the tree’s aesthetic.
The Artistic Appeal: A Fusion of Color and Form
Bougainvillea bonsai trees are true masterpieces of artistic appeal. The fusion of color and form in these miniature trees creates a visual spectacle that captivates the eye. The intricate branches, carefully crafted by skilled bonsai enthusiasts, reveal the tree’s grace and elegance.
Every bougainvillea bonsai tree is a unique work of art, allowing enthusiasts to express their creativity through shaping the tree’s overall form and structure. The variety in bougainvillea bonsai tree shapes, from cascading styles to formal uprights, ensures endless possibilities for artistic exploration.
Historic Origins: A Tribute to Explorer Louis-Antoine de Bougainville
The origin of the bougainvillea bonsai can be traced back to explorer Louis-Antoine de Bougainville, who discovered these enchanting plants during his world travels in the 18th century. In honor of his discoveries, the bougainvillea plant was named after him, establishing a lasting legacy.
Today, bougainvillea bonsai trees pay homage to the historical significance of Louis-Antoine de Bougainville’s expeditions. These living tributes allow enthusiasts to connect with the rich heritage of exploration and bring a piece of history into their bonsai collections.
Bougainvillea Bonsai Features
Description
Vibrant Bracts
Modified leaves that surround the small, cream-colored flowers, providing long-lasting color in various hues.
Delicate Flowers
Small, cream-colored flowers nestled within the bracts, adding an extra layer of visual beauty.
Artistic Appeal
Combining form and color to create visually captivating bonsai trees, each a unique work of art.
Historic Origins
A tribute to Louis-Antoine de Bougainville’s explorations, connecting bucolic bougainvillea bonsai with a rich history.
Ideal Environmental Conditions for Thriving Bougainvillea Bonsai
To ensure the thriving growth of your bougainvillea bonsai, it is crucial to provide it with the ideal environmental conditions. The success of your bonsai depends on creating a suitable microclimate that mimics its natural habitat. Let’s explore the key factors that contribute to the optimal health and vitality of your bougainvillea bonsai:
Temperature
Bougainvillea bonsai thrive in warm climates, with temperatures ranging between 60°F (15°C) and 75°F (24°C). It is important to protect your bonsai from frost and freezing temperatures, which can be detrimental to its growth. If you live in a region with colder winters, consider overwintering your bougainvillea bonsai indoors or providing sufficient frost protection.
Sunlight
Bougainvillea bonsai are sun-loving plants that require at least six hours of direct sunlight per day. Place your bonsai in a location that receives ample sunlight, such as a south-facing window or outdoors in a sunny spot. If you choose to keep your bonsai indoors, ensure that it is exposed to bright, indirect light throughout the day.
Humidity
Bougainvillea bonsai prefer moderate to high humidity levels. Mist the foliage regularly or place your bonsai on a humidity tray filled with water and pebbles to increase the humidity around the tree. Avoid placing your bonsai in areas with low humidity, such as near heating or air conditioning vents.
Air Circulation
Good air circulation is essential for the health of your bougainvillea bonsai. Avoid placing your bonsai in stagnant air or areas with poor ventilation. If you keep your bonsai indoors, make sure there is adequate air movement in the room. Outdoors, ensure that the surrounding environment allows for proper airflow.
By providing your bougainvillea bonsai with the ideal environmental conditions of the right temperature, sufficient sunlight, appropriate humidity levels, and proper air circulation, you can create the perfect growing environment for your miniature tree to flourish.
The Essentials of Watering Your Bougainvillea Bonsai
Proper watering is crucial for the health and vitality of your bougainvillea bonsai. By understanding the essentials of watering, you can ensure that your bonsai receives the appropriate amount of water and maintains optimal soil moisture levels. Here, we will discuss when and how much to water your bougainvillea bonsai and provide valuable tips for preventing over-watering and root rot.
1. Watering Frequency: Bougainvillea bonsai should be watered when the top inch of the soil feels slightly dry to the touch. Avoid frequent watering as it may lead to waterlogging and root rot. A good practice is to check the soil moisture level using a moisture meter or by inserting your finger into the soil.
2. Watering Techniques: When watering your bougainvillea bonsai, use a gentle and fine mist watering can or spray bottle. This helps distribute the water evenly without disturbing the soil or damaging the delicate roots. Water the soil surface thoroughly, ensuring that the water reaches the entire root zone.
3. Soil Moisture Levels: Maintaining proper soil moisture levels is crucial for the health of your bougainvillea bonsai. The soil should be moist but not soggy. Overwatering can lead to root rot, while underwatering can cause wilting and nutrient deficiencies. It’s important to strike a balance and provide adequate water without excess.
4. Watering Seasonal Variations: The watering requirements of bougainvillea bonsai may vary depending on the season. During the warmer months, when bougainvillea bonsai are actively growing, they may require more frequent watering. In contrast, during the dormant period or winter months, reduce the watering frequency while still ensuring the soil does not completely dry out.
5. Creating a Watering Schedule: To establish a proper watering routine for your bougainvillea bonsai, it’s beneficial to develop a watering schedule. Consider factors such as the climate, humidity levels, and the bonsai’s specific water needs. Monitor the soil moisture levels regularly and adjust your watering schedule accordingly.
By mastering the art of watering your bougainvillea bonsai, you can provide it with the ideal amount of water to thrive and flourish. Remember to always observe your bonsai closely and respond to its watering needs accordingly, ensuring a healthy and vibrant mini tree.
The Importance of Fertilization in Bougainvillea Bonsai Growth
Fertilization is a crucial aspect of caring for your bougainvillea bonsai and ensuring its healthy growth and vibrant appearance. Proper nourishment with the right nutrients is essential for promoting vigorous foliage, robust flowering, and overall bonsai vitality.
When it comes to fertilizing your bougainvillea bonsai, there are several important factors to consider. Let’s explore the significance of fertilization in bougainvillea bonsai care and learn how to provide your bonsai tree with the necessary nutrients it needs to thrive.
The Importance of Providing Nutrients:
Just like any other plant, bougainvillea bonsai requires a balanced supply of essential nutrients for optimal growth. These nutrients include nitrogen (N), phosphorus (P), and potassium (K), as well as trace elements like iron (Fe), manganese (Mn), and zinc (Zn).
Types of Fertilizers for Bougainvillea Bonsai:
There are various types of fertilizers available for bougainvillea bonsai, including slow-release granular fertilizers, liquid fertilizers, and organic options. Slow-release fertilizers provide a continuous supply of nutrients over an extended period, while liquid fertilizers offer quick absorption for immediate nourishment. Organic fertilizers, such as compost or worm castings, provide natural and slow-release nutrients for long-term bonsai health.
Proper Application Methods and Schedules:
It’s essential to apply fertilizers correctly to ensure your bougainvillea bonsai receives an appropriate amount of nutrients without causing harm. When applying granular fertilizers, it’s advisable to sprinkle them evenly around the base of the tree, avoiding direct contact with the trunk or leaves. Liquid fertilizers can be applied by diluting them in water according to the product instructions and then watering the bonsai with the solution.
As for the fertilizing schedule, bougainvillea bonsai generally benefit from regular feeding during the growing season, which is typically spring and summer. However, it’s important to follow the specific fertilization guidelines for your particular bonsai tree, as individual requirements may vary.
Choosing the Right Fertilizer Formulation:
When selecting a fertilizer for your bougainvillea bonsai, consider its specific nutritional needs. Look for a well-balanced formulation designed for flowering plants or bonsai trees, with an emphasis on phosphorus to promote robust blooming. Additionally, be mindful of the nitrogen-to-phosphorus-to-potassium (N-P-K) ratio, ensuring a suitable balance for your bonsai’s growth stage and development.
Understanding Nutritional Needs During Growth Stages:
As your bougainvillea bonsai progresses through different growth stages, its nutritional requirements may change. Young bonsai trees may benefit from higher nitrogen levels to encourage foliage growth, while more mature bonsai trees may benefit from increased phosphorus levels to enhance flowering. Understanding these nutritional needs will help you provide the appropriate fertilization for your bonsai tree at every stage of its growth.
By paying attention to the fertilization needs of your bougainvillea bonsai and providing it with the proper nutrients throughout its growth cycle, you can ensure the health, vigor, and visual appeal of your miniature tree. Incorporate fertilization into your bonsai care routine, and watch your bougainvillea bonsai thrive and flourish under your expert care.
Mastering Pruning Techniques and Timing for Bougainvillea Bonsai
Pruning is an essential aspect of maintaining the desired shape and promoting the overall health of your bougainvillea bonsai. By carefully pruning and shaping your bonsai, you can create a masterpiece that showcases its unique beauty and vibrant colors.
There are several pruning techniques that you can utilize to enhance the appearance of your bougainvillea bonsai:
Branch Pruning: Trim back overgrown branches to maintain the desired structure and prevent overcrowding.
Leaf Pruning: Remove excessive foliage to improve air circulation and stimulate new growth.
Root Pruning: Periodically trim and prune the roots to control their growth and prevent them from becoming root-bound.
Timing is crucial when it comes to pruning your bougainvillea bonsai. You should aim to prune your bonsai during its active growth phase, which typically occurs in spring or early summer. Avoid pruning during the dormant period, as it may hinder the bonsai’s ability to recover and produce new growth.
To help promote budding and flowering, strategically prune your bougainvillea bonsai by removing old, spent flowers and pruning back branches that have already bloomed. This will redirect the plant’s energy towards producing new buds and vibrant flowers.
Remember to use clean and sharp tools when pruning your bonsai to minimize any damage and maintain the overall health of the plant. After pruning, ensure proper care and provide adequate water, sunlight, and nutrients to support the bonsai’s recovery and encourage robust growth.
Repotting Your Bougainvillea Bonsai Tree: A Delicate Process
Repotting is a crucial aspect of maintaining the health and vitality of your bougainvillea bonsai. It allows for root system rejuvenation and ensures that your bonsai has enough space to grow and thrive. Follow these steps to successfully repot your bougainvillea bonsai:
Timing: The best time to repot your bougainvillea bonsai is in early spring, just before the active growth period begins. This allows the tree to recover quickly and establish new roots before the growing season.
Pot selection: Choose a pot that is slightly larger than the current one, providing enough space for root expansion. Make sure the pot has drainage holes to prevent waterlogging, which can lead to root rot.
Soil mixture: Use a well-draining soil mixture specifically designed for bonsai trees. You can create a mixture by combining equal parts of coarse sand, organic compost, and bonsai soil. This mixture promotes proper drainage and aeration for healthy root development.
Preparing for repotting: Gently remove the tree from its current pot, being careful not to damage the roots. Use a root rake or chopstick to loosen the soil around the root ball and remove any excess soil or dead roots.
Pruning: Trim back any long or damaged roots to encourage new growth. Also, prune any overgrown branches to maintain the desired shape and balance of your bonsai.
Repotting: Place a layer of the prepared soil mixture at the bottom of the new pot. Position the tree in the center of the pot and spread out the roots evenly. Fill the remaining space with the soil mixture, ensuring that it reaches all the gaps between the roots. Gently press the soil to eliminate any air pockets.
Watering: After repotting, thoroughly water the bonsai to help settle the soil. Ensure that water drains freely from the pot, as standing water can damage the roots. Place the bonsai in a shaded area for a few weeks to allow it to recover from the repotting process.
Care after repotting: During the first few weeks after repotting, it is essential to minimize stress on the bonsai. Avoid heavy pruning or major styling during this time. Instead, focus on maintaining proper watering and providing the necessary light and temperature conditions for optimal recovery.
Remember, repotting is not an annual necessity for bougainvillea bonsai. It is typically done every 2-3 years to ensure healthy root growth and prevent the tree from becoming root-bound. By following the repotting process and providing the right care, you can help your bougainvillea bonsai thrive and continue to bring vibrant beauty to your bonsai collection.
Protecting Bougainvillea Bonsai from Pests and Diseases
Pests and diseases can pose a serious threat to the health and vitality of your beloved bougainvillea bonsai. To ensure the longevity of your mini tree, it is essential to be aware of common pests and diseases that can afflict it. Some of the most common ones include powdery mildew, aphids, scale, mealybugs, whiteflies, and caterpillars.
Identifying these pests and diseases early on is crucial for effective control and prevention. Keep a close eye on the leaves, stems, and flowers of your bougainvillea bonsai for any signs of infestation or damage. Look out for tell-tale signs such as white powdery coating, sticky residue, wilted or curling leaves, and holes in the foliage.
Implementing a robust pest control strategy is paramount for the health of your bougainvillea bonsai. There are various effective pest control measures you can employ, including using horticultural oil sprays, insecticidal soaps, neem oil, or organic pesticides like pyrethrum. Regularly inspect your bonsai and administer treatment as soon as you spot any pests or signs of disease.
If you prefer a more natural and environmentally friendly approach, there are several remedies you can try. For example, you can introduce beneficial insects like ladybugs or lacewings, or consider using homemade sprays made from ingredients like garlic, vinegar, or peppermint. These organic pest control options can be just as effective while minimizing the use of chemicals.
Karen Phillips, Bonsai expert and blogger. Read more about me here
Welcome to our comprehensive guide on growing and caring for Boxwood Bonsai (Buxus harlandii). If you’re looking to cultivate a visually stunning bonsai tree with unique features and distinctive characteristics, you’ve come to the right place. In this guide, we’ll provide you with all the essential information you need to know to ensure the long-term health and vigor of your Boxwood Bonsai.
Boxwood Bonsai, also known as Buxus harlandii, is a captivating and popular choice among bonsai enthusiasts. Its intricate foliage structure, compact size, fast growth, and ability to be styled in various ways make it a highly sought-after bonsai tree.
Throughout this guide, you’ll learn how to select the right Boxwood Bonsai for your needs, master the art of pruning and styling, understand the ideal lighting and soil conditions for healthy growth, and discover the diverse varieties available in the bonsai world. We’ll also provide tips on where to find reputable sellers and nurseries if you’re interested in purchasing a Boxwood Bonsai.
Discover the World of Boxwood Bonsai: An Introduction
Welcome to the captivating world of Boxwood Bonsai. In this section, we will embark on a journey to explore the origins, history, and cultural significance of this exquisite art form. Boxwood Bonsai, also known as Buxus harlandii, has gained immense popularity among bonsai enthusiasts for its unique features and timeless beauty.
Boxwood Bonsai trees, with their lush green foliage and intriguing twisted trunks, bring a touch of nature’s elegance into any garden or indoor space. These miniature trees have been cherished and cultivated for centuries, originating from East Asia’s ancient tradition of bonsai cultivation.
Throughout history, Boxwood Bonsai has been revered for its symbolic meaning and aesthetic appeal. It represents harmony, longevity, and the balance between nature and human intervention. As bonsai enthusiasts, we create and cultivate these living works of art, fostering a deep connection with nature and the tranquility it brings.
Boxwood Bonsai trees offer a remarkable range of possibilities for expression and creativity. From its distinctive foliage to its beautifully shaped trunk and branches, every detail of a Boxwood Bonsai tells a story and evokes a sense of wonder. As you delve into the art of Boxwood Bonsai, you will discover the joy of nurturing and shaping these miniature trees, transforming them into living masterpieces.
By the end of this section, you will have gained a better understanding of the rich cultural heritage and aesthetic allure that Boxwood Bonsai brings. Let us dive deeper into the world of Boxwood Bonsai, filled with beauty, creativity, and a sense of Zen.
Unveiling the Unique Features of Boxwood Bonsai
Boxwood Bonsai, or Buxus harlandii, possesses a set of unique features and distinctive characteristics that set it apart from other bonsai varieties. Understanding these characteristics is crucial for providing the appropriate care and maintenance for your Boxwood Bonsai. In this section, we will delve into the specific traits of Buxus harlandii and explore why Boxwood Bonsai stands out in the bonsai world.
Boxwood Bonsai, with its evergreen foliage and fine-textured leaves, offers a timeless beauty that enhances any setting. The small and compact nature of its growth makes it an ideal choice for bonsai enthusiasts who appreciate its delicate appearance. Additionally, Boxwood Bonsai has the remarkable ability to withstand extensive pruning and shaping, allowing you to create intricate and captivating designs.
One unique feature of Boxwood Bonsai is its dense growth habit, which contributes to its bushy and full appearance. The intricately patterned bark and gnarled trunks add character and interest to this miniature tree, making it a focal point in any bonsai collection. Furthermore, Buxus harlandii is known for its slow growth rate, allowing you to enjoy the art of bonsai cultivation without the need for frequent trimming.
Why Boxwood Bonsai Stands Out Among Other Bonsai Varieties
Boxwood Bonsai stands out among other bonsai varieties for its versatility and adaptability. Whether you prefer a formal upright style, cascade style, or informal group planting, Boxwood Bonsai can be shaped and styled to suit various design preferences. Its small leaves and tight foliage create a sense of proportion and balance, resulting in a visually pleasing bonsai tree.
Another reason why Boxwood Bonsai stands out is its resilience and ability to thrive in different conditions. It can tolerate both sun and shade, although it prefers partial shade in hot climates. Additionally, Boxwood Bonsai is known for its resistance to pests and diseases, making it a low-maintenance choice for bonsai enthusiasts.
Distinctive Characteristics of Boxwood Bonsai
Reasons for Standing Out
Evergreen foliage and fine-textured leaves
Timeless beauty and delicate appearance
Dense growth habit and intricate bark
Bushy and full appearance, adds character
Slow growth rate
Low maintenance, less frequent trimming
Versatility in shaping and styling
Suitable for various bonsai design preferences
Resilience and adaptability
Thrives in different conditions, resistant to pests and diseases
By understanding the unique features and characteristics of Boxwood Bonsai, you can create a captivating bonsai tree that truly stands out. The next section will guide you in choosing the perfect Boxwood Bonsai for your collection, ensuring a harmonious blend of aesthetics and care requirements.
Choosing Your Boxwood Bonsai: Selection Tips and Advice
Selecting the right Boxwood Bonsai is crucial for ensuring its long-term success and your satisfaction as an owner. When choosing a Boxwood Bonsai, there are several important factors to consider. These include the age of the bonsai, the thickness of its trunk, the health of its root system, and its overall condition. By taking these factors into account, you can find a Boxwood Bonsai that meets your specific preferences and requirements.
Age: The age of a Boxwood Bonsai plays a significant role in its appearance and potential for future growth. Younger bonsai trees offer more flexibility in terms of training and styling, allowing you to shape them according to your desired vision. On the other hand, older bonsai trees tend to have more refined and developed characteristics, offering a sense of maturity and elegance.
Trunk Thickness: The thickness of the trunk is another critical aspect to consider when selecting a Boxwood Bonsai. A thick trunk signifies the age and maturity of the bonsai, while a thinner trunk indicates a younger tree. The thickness of the trunk can contribute to the overall aesthetic appeal and balance of the bonsai, so choose according to your preferred style.
Root System: The health and vitality of the root system are essential for the long-term viability of a Boxwood Bonsai. Inspect the roots carefully to ensure they are well-developed, free from rot or damage, and firmly anchored within the soil. A healthy root system will provide the necessary support and nutrients for the bonsai tree to thrive.
Overall Condition: It is essential to thoroughly assess the overall condition of the Boxwood Bonsai before making a purchase. Look for signs of good health, such as vibrant foliage, sturdy branches, and no evidence of pests or diseases. Avoid bonsai trees that show signs of stress, such as yellowing leaves, wilting, or weak growth.
Where to Find Reputable Sellers: When looking for a Boxwood Bonsai for sale, it is crucial to find reputable sellers or nurseries that offer high-quality bonsai trees. Seek out trusted bonsai dealers who have a strong reputation for providing healthy and well-cared-for bonsai. Online marketplaces and dedicated bonsai nurseries can be excellent sources for finding a wide variety of Boxwood Bonsai options.
By considering these selection tips and advice, you can choose a Boxwood Bonsai that meets your expectations in terms of aesthetics, age, and health. Remember that each Boxwood Bonsai is unique, so take the time to find the one that resonates with your personal style and brings you joy as you embark on this rewarding bonsai journey.
Boxwood Bonsai Care Essentials
Proper care is essential for the health and vitality of your Boxwood Bonsai. In this section, we will cover the key elements of caring for your bonsai, including the right lighting environments, irrigation techniques to ensure proper hydration, and the nutritional needs of your Boxwood Bonsai. We will also discuss the importance of pruning for maintaining the desired shape and size of your bonsai tree.
The Right Lighting Environments for Healthy Growth
Boxwood Bonsai thrives in bright, indirect sunlight. Place your bonsai in a location where it can receive at least 4-6 hours of sunlight each day. However, avoid exposing your Boxwood Bonsai to intense, direct sunlight, as it can cause leaf burn and affect the overall health of the tree. If you’re growing your bonsai indoors, consider placing it near a south-facing window or using artificial grow lights to provide adequate light.
Irrigation Techniques to Keep Your Bonsai Thriving
Proper watering is crucial for the well-being of your Boxwood Bonsai. The key is to maintain a consistent level of moisture in the soil without overwatering. Check the moisture level by inserting your finger about an inch into the soil. If it feels dry, it’s time to water. Use a watering can with a fine rose attachment to distribute water evenly throughout the soil. Be mindful not to let the bonsai sit in stagnant water, as it can lead to root rot. Adjust your watering frequency based on the season, as bonsai may require more water during hotter months.
Nutrition Needs: Fertilizing Your Boxwood Bonsai
Regular fertilization is essential to provide the necessary nutrients for the healthy growth of your Boxwood Bonsai. Use a balanced, slow-release bonsai fertilizer that is specifically formulated for acid-loving plants. Apply the fertilizer according to the manufacturer’s instructions, typically during the growing season from spring to early fall. Avoid overfertilizing, as it can lead to nutrient burn and damage the roots. Monitor the health and growth of your bonsai, and adjust your fertilization schedule as needed.
Pruning plays a vital role in shaping and maintaining the desired appearance of your Boxwood Bonsai. It helps control the size, remove unwanted branches, and encourages the development of a dense foliage canopy. To prune your bonsai, use sharp and clean bonsai pruning scissors to make precise cuts. Start by removing any dead or diseased branches. Then, selectively prune branches to maintain the desired shape and overall balance of the tree. Regular pruning will enhance the aesthetic appeal and health of your Boxwood Bonsai.
Planting Your Bonsai: The Importance of Boxwood Bonsai Soil
The choice of soil is crucial for the healthy growth and development of your Boxwood Bonsai. Boxwood bonsai trees have specific soil requirements that must be met to ensure their optimal health and vitality. In this section, we will explore the importance of proper soil composition, drainage, and aeration for your bonsai tree.
When it comes to boxwood bonsai soil, there are a few key factors to consider:
Soil Composition: Boxwood bonsai trees thrive in well-draining soil that retains just enough moisture. A suitable soil mixture for boxwood bonsai should be a blend of organic matter, such as compost or peat moss, and inorganic materials like perlite or grit. This combination promotes root development and irrigation efficiency.
Drainage: Good drainage is essential to prevent waterlogging, which can lead to root rot and other diseases. Ensure that your bonsai pot has drainage holes to allow excess water to escape. Additionally, incorporating coarse sand or gravel into the soil mixture improves drainage.
Aeration: Boxwood bonsai requires adequate oxygen around their roots. To enhance aeration, vermiculite or pumice can be added to the soil mix. These materials improve air circulation within the soil and prevent compaction.
Now that you understand the importance of soil composition, drainage, and aeration, let’s take a closer look at the step-by-step process of planting your Boxwood Bonsai:
Select a suitable bonsai pot that provides enough space for your boxwood tree’s root system to grow. Ensure that the pot has drainage holes.
Prepare the soil mixture by combining the organic and inorganic materials in the appropriate proportions. Thoroughly mix the components to achieve a balanced blend.
Gently remove the boxwood bonsai from its nursery container, taking care not to damage the roots.
Place a layer of the prepared soil mixture at the bottom of the bonsai pot.
Position the bonsai tree in the center of the pot, ensuring that it is upright and balanced.
Gradually fill the remaining space in the pot with the soil mixture, gently pressing it around the roots to provide stability and remove any air pockets.
Water the bonsai thoroughly to settle the soil and hydrate the roots. Allow excess water to drain out through the drainage holes.
By following these planting instructions and using the appropriate soil mixture, you are setting the foundation for your Boxwood Bonsai’s healthy growth and development. Remember to monitor the moisture levels and adjust your watering routine accordingly. With proper soil and planting techniques, your Boxwood Bonsai will thrive and bring you years of beauty and enjoyment.
Mastering the Art of Boxwood Bonsai Pruning
Pruning is a crucial skill to master when cultivating boxwood bonsai. By understanding the proper techniques, tools, and timing involved, you can ensure the health and aesthetic appeal of your bonsai tree. Pruning not only helps maintain the desired shape and size of your bonsai but also promotes new growth, strengthens the branch structure, and enhances overall vitality.
The purpose of pruning is to remove unwanted or excessive branches, leaves, and shoots. It also encourages ramification, which refers to the development of a dense network of branches and foliage. Through pruning, you can create a balanced and visually pleasing bonsai tree that reflects your artistic vision.
When it comes to boxwood bonsai pruning, there are a few key guidelines to follow:
Timing: The optimal time to prune boxwood bonsai is during the late winter or early spring, just before the new growth emerges. Pruning during this period allows the bonsai to recover and heal before the growing season begins. However, light pruning and maintenance trimming can be done throughout the year as needed.
Techniques: Two primary pruning techniques are commonly used for boxwood bonsai. The first is maintenance pruning, which involves the removal of excess growth to maintain the desired shape. The second is structural pruning, which focuses on enhancing the overall structure and branch arrangement of the bonsai tree. Different tools, such as pruning shears and concave cutters, may be used depending on the size and thickness of the branches.
Branch selection: When pruning boxwood bonsai, it’s important to select which branches to keep and which to remove. Ideally, you should choose branches that contribute to the overall design and flow of the bonsai tree. Branches that grow straight outward or cross each other can be removed to create a more harmonious structure.
Remember to always sterilize your pruning tools before and after each use to prevent the spread of diseases or pests. Additionally, observe the growth patterns and reactions of your boxwood bonsai after pruning to assess its health and adjust future pruning practices accordingly.
Styling Your Boxwood Bonsai: Techniques and Inspirations
Styling your Boxwood Bonsai is a delightful opportunity to unleash your artistic vision and infuse your unique creativity into your bonsai tree. By carefully shaping and manipulating its branches, you can create a visually striking masterpiece that reflects your personal style. In this section, we will explore various techniques for styling your Boxwood Bonsai, as well as provide inspirational ideas for different bonsai styles.
One of the key techniques for styling boxwood bonsai is wiring. By gently wrapping aluminum or copper wire around the branches, you can guide their growth and create elegant curves or dramatic twists. It’s important to choose the right wire thickness and apply it with precision to avoid damaging the delicate branches.
Branch manipulation is another technique that can help you achieve the desired shape and structure for your Boxwood Bonsai. By carefully pruning and training the branches, you can create a sense of balance and harmony in your bonsai design. Remember to use sharp and clean pruning tools to ensure a clean cut and minimize the risk of infection.
When it comes to styling your Boxwood Bonsai, the possibilities are endless. You can opt for a classic and formal design, characterized by balanced symmetry and meticulous pruning. This style exudes elegance and refinement, making it a popular choice among bonsai enthusiasts.
If you prefer a more natural and informal look, you can go for an informal upright style or a slanting style. These styles mimic the appearance of trees growing in nature, with branches that bend and sway in a graceful manner. These designs exude a sense of freedom and evoke a serene and tranquil atmosphere in any space.
To give you further inspiration, here’s an image showcasing the captivating art of boxwood bonsai styling:
Through thoughtful styling, you can bring out the inherent beauty of your Boxwood Bonsai and create a bonsai tree that truly reflects your artistic expression. Let your imagination soar as you explore different techniques and embrace the art of boxwood bonsai styling.
Exploring the Diversity of Boxwood Bonsai Varieties
Boxwood Bonsai offers a diverse range of varieties, each with its unique characteristics and growth patterns. From compact shrub-like varieties to more upright and majestic ones, the world of Boxwood Bonsai presents a wealth of options for bonsai enthusiasts to explore. Let’s take a closer look at some popular Boxwood Bonsai varieties and discover their distinct features.
1. Green Gem: This variety is known for its dense and compact growth habit, making it an excellent choice for creating formal bonsai designs. Its small leaves and branches are highly responsive to pruning and shaping, allowing you to achieve precise and intricate styles.
2. Green Velvet: With its lush dark green foliage, the Green Velvet variety adds a touch of elegance to any bonsai collection. Its leaves are slightly larger than other varieties, providing a visually appealing contrast when styled in a more informal design.
3. Fastigiata: Also known as English Boxwood, this variety features an upright and columnar growth habit. Its narrow leaves and compact form make it ideal for creating bonsai with a distinctive vertical aesthetic. The Fastigiata variety is highly adaptable and tolerant of various pruning and styling techniques.
4. Graham Blandy: This variety is prized for its striking columnar shape and vibrant green foliage. Its slender branches and dense growth make it a popular choice for creating bonsai with a more contemporary and architectural style.
5. Rotundifolia: The Rotundifolia variety is characterized by its rounded leaves and dense foliage. It is well-suited for informal and naturalistic bonsai designs, where its lush greenery can be showcased in a more relaxed and organic form.
When caring for Boxwood Bonsai, it’s important to consider the specific needs of each variety. While the general care guidelines remain the same, factors such as growth rates, pruning requirements, and light preferences may vary between different Boxwood Bonsai varieties. By understanding the distinct features of each variety and tailoring your care approach accordingly, you can ensure the health and vitality of your Boxwood Bonsai collection.
Finding Boxwood Bonsai for Sale: Purchasing and Transport Tips
If you are looking to add a Boxwood Bonsai to your collection, it is essential to know where and how to find reputable sellers and nurseries. Purchasing a boxwood bonsai requires careful consideration and evaluation to ensure you are getting a healthy and high-quality tree. Here are some tips and advice to help you make the right choices:
Research reputable sellers: Start your search by looking for established and reputable sellers or nurseries specializing in bonsai. Read reviews and customer feedback to gauge their quality and customer service. Look for sellers who have a wide selection of boxwood bonsai for sale.
Attend bonsai exhibitions and shows: Bonsai exhibitions and shows often attract reputable sellers and bonsai enthusiasts. Visiting these events can give you the opportunity to see a variety of boxwood bonsai trees and meet knowledgeable sellers who can provide guidance on selecting the right tree for you.
Consider online marketplaces: Online marketplaces can be a convenient way to find boxwood bonsai for sale. However, exercise caution and research the seller’s reputation and shipping practices before making a purchase.
Evaluate the tree’s health: When buying a boxwood bonsai, carefully inspect the tree for any signs of pest infestation, disease, or poor health. Look for vibrant green leaves, healthy bark, and an overall well-maintained appearance.
Ask questions: Don’t hesitate to ask the seller questions about the bonsai’s history, care requirements, and any specific concerns you may have. A knowledgeable seller will be happy to provide you with detailed information.
Transporting your bonsai: Once you have purchased your boxwood bonsai, it is crucial to transport it safely to your home. Here are some tips to ensure a smooth transportation process:
Transportation Tips:
Secure the bonsai in a sturdy box or container to prevent movement and damage during transport.
Place a protective layer of newspaper or bubble wrap around the tree to cushion it and protect the branches and foliage.
Ensure that the bonsai is kept in an upright position to maintain its shape and prevent any bending or breaking of branches.
Avoid exposing the bonsai to extreme temperatures during transportation.
If transporting the bonsai in a vehicle, secure it in a well-ventilated area to prevent damage from sudden movements or vibrations.
By following these tips, you can find a reputable seller and safely transport your boxwood bonsai to its new home. Remember, purchasing a boxwood bonsai is an investment that requires careful consideration, so take your time to find the perfect tree that will bring you joy and beauty for years to come.
Long-term Health and Vigor: Maintaining Your Boxwood Bonsai
Maintaining the long-term health and vigor of your Boxwood Bonsai requires ongoing care and attention. By following a few essential maintenance tasks, you can ensure the longevity and vitality of your bonsai tree.
Regular watering: Boxwood Bonsai thrives in moist but well-draining soil. It’s crucial to water your bonsai tree consistently to keep the root system hydrated. Check the soil moisture regularly and water accordingly, avoiding both underwatering and overwatering.
Fertilizing: Providing adequate nutrition is essential for the health of your Boxwood Bonsai. Use a balanced bonsai fertilizer formulated specifically for boxwood bonsai to ensure proper growth and foliage development. Follow the manufacturer’s instructions for application rates and frequency.
Pest control: Keeping pests at bay is crucial to safeguarding the health of your Boxwood Bonsai. Regularly inspect your bonsai tree for common pests such as aphids, spider mites, and scale insects. If you spot any signs of infestation, take immediate action using appropriate organic or chemical pest control methods.
Seasonal care: Boxwood Bonsai has different care requirements throughout the year. During the growing season, typically spring and summer, your bonsai may require more frequent watering and fertilizing. In contrast, during the dormant season, usually fall and winter, reduce watering and suspend fertilization to allow the tree to rest.
Common troubleshooting techniques: Despite your best efforts, your Boxwood Bonsai may encounter some challenges. Monitor your bonsai tree closely for any signs of stress or disease, such as yellowing leaves or fungal growth. Address issues promptly by adjusting watering, providing appropriate treatment, or consulting a bonsai expert if needed.
By prioritizing the long-term health and vigor of your Boxwood Bonsai through consistent care and attention, you can enjoy the beauty and serenity of this miniature tree for years to come.
Propagating Boxwood Bonsai: Multiplying Your Miniature Trees
Are you fascinated by the beauty of Boxwood Bonsai and want to expand your collection? Propagating these miniature trees is an excellent way to multiply your Boxwood Bonsai while sharing their elegance with others. In this section, we will explore different methods of propagation to help you successfully grow new Boxwood Bonsai trees.
One method of propagating Boxwood Bonsai is through seed propagation. Collect mature seeds from the tree and sow them in a well-draining soil mixture. Keep the soil moist and place the container in a warm and bright location, such as a greenhouse or sunny windowsill. With patience and care, the seeds will germinate, and you can nurture the young seedlings into thriving bonsai trees.
Another popular propagation technique for Boxwood Bonsai is cutting propagation. Select healthy branches from the parent tree and make clean cuts just below a node. Remove any foliage from the lower portion of the cutting and dip the cut end in a rooting hormone. Plant the cutting in a well-draining soil mixture and provide it with sufficient moisture and indirect light. Over time, the cutting will develop roots and grow into a new Boxwood Bonsai.
Air layering is a more advanced method of propagation that involves creating a new root system on a branch while it is still connected to the parent tree. Make a small incision on the branch and apply rooting hormone to the exposed area. Wrap the incised portion with moist sphagnum moss, cover it with plastic wrap, and secure it in place. Keep the moss consistently moist and monitor the development of roots. Once a substantial root system has formed, detach the newly rooted section from the parent tree and pot it in a suitable bonsai pot.
Karen Phillips, Bonsai expert and blogger. Read more about me here
Welcome to the comprehensive guide on growing and caring for Desert Rose Bonsai (Adenium obesum). Whether you’re a bonsai enthusiast or a beginner looking to embark on a new gardening journey, this guide will provide you with all the information you need to create a captivating miniature landscape with your Desert Rose Bonsai. From understanding the unique characteristics of the Adenium obesum species to optimal placement, watering, fertilizing, pruning, repotting, propagation, and common issues, you’ll discover the key secrets to success in bonsai care.
Desert Rose Bonsai, scientifically known as Adenium obesum, is an enchanting plant native to Africa, the Middle East, and Madagascar. With its thick succulent trunk, delicate leaves, and mesmerizing trumpet-shaped flowers, the Desert Rose Bonsai is a beloved species in the world of bonsai. Its ornamental value lies in the vibrant and colorful flowers that bloom in shades of red, pink, and deep purple, creating a striking contrast against its thick trunk and delicate foliage.
Optimal placement is crucial for the thriving growth of your Desert Rose Bonsai. Understanding its sunlight and temperature requirements is essential. While Desert Rose Bonsais thrive in warm climates and can be kept outside year-round in suitable regions, they require protection from extreme heat and cold. Additionally, proper watering techniques, avoiding overwatering, and providing the necessary nutrients through fertilizing play a significant role in maintaining the health and beauty of your Desert Rose Bonsai.
To enhance the aesthetic appeal of your Desert Rose Bonsai, pruning and wiring techniques are vital. Pruning stimulates ramification and encourages more flower buds to develop, while wiring helps shape the branches for a desired aesthetic. Additionally, repotting is necessary to ensure the continued health and growth of your bonsai. By following proper repotting techniques and using well-draining soil, you can ensure a healthy root system and prevent issues such as root rot.
Propagation methods, common pests, and issues that may arise in Desert Rose Bonsai are also important aspects to consider. Whether you choose to propagate through seeds, cuttings, or grafting, understanding these methods will enable you to expand your bonsai collection. By staying vigilant against common pests and promptly addressing issues such as overwatering, heat stress, and leaf drop, you can maintain the overall health and vitality of your Desert Rose Bonsai.
Stay tuned for the upcoming sections of this guide, where we will delve deeper into each aspect of Desert Rose Bonsai care. So, gather your gardening tools and get ready to embark on a journey full of grace and beauty as you discover the world of Desert Rose Bonsai cultivation.
An Introduction to Desert Rose Bonsai
Desert Rose Bonsai, scientifically known as Adenium obesum, is a captivating and unique species native to Africa, the Middle East, and Madagascar. Its distinctive features, including a thick succulent trunk, delicate leaves, and stunning trumpet-shaped flowers, make it an excellent candidate for bonsai cultivation.
Understanding the Unique Adenium Obesum Species
Adenium obesum, commonly referred to as Desert Rose, is a remarkable plant with a rich history. It has evolved to thrive in arid and dry conditions, making it highly resilient and adaptable to harsh environments. The plant stores water in its succulent trunk and can survive extended periods of drought, making it an ideal choice for bonsai enthusiasts looking for an interesting and low-maintenance species.
Popularity and Ornamental Value of Desert Rose
The Desert Rose Bonsai has gained enormous popularity as an ornamental plant, particularly in countries like Thailand, where it is revered for its striking beauty. It is admired for its vibrant and showy flowers that bloom in an array of colors, including shades of red, pink, and deep purple. The contrast between the thick trunk and the delicate foliage enhances the overall visual appeal of the Desert Rose Bonsai, making it a favorite among bonsai enthusiasts worldwide.
The Aesthetic Appeal of Desert Rose Bonsai
The Desert Rose Bonsai possesses a unique aesthetic appeal that sets it apart from other bonsai trees. Its thick succulent trunk, resembling an ancient tree shaped by harsh desert conditions, adds a sense of time and character to the bonsai. The delicate leaves and stunning trumpet-shaped flowers provide a beautiful contrast, enhancing the overall beauty and elegance of the Desert Rose Bonsai. With its captivating aesthetics, a Desert Rose Bonsai can transform any space into a miniature oasis of natural wonder.
Desert Rose Bonsai
Scientific Name
Adenium obesum
Common Name
Desert Rose
Native To
Africa, the Middle East, Madagascar
Description
A unique species well-suited for bonsai cultivation. Features a thick succulent trunk, delicate leaves, and vibrant trumpet-shaped flowers.
Ornamental Value
Highly popular as an ornamental plant. Appreciated for its vibrant colors and contrasting foliage.
Aesthetic Appeal
The distinctive trunk and delicate leaves create a visually captivating bonsai tree, adding a touch of natural wonder to any space.
Optimal Placement for Thriving Desert Rose Bonsais
To ensure the thriving growth of your Desert Rose Bonsai, it is important to consider its optimal placement. Desert Rose Bonsais require specific sunlight and temperature conditions for their optimal development.
Desert Rose Bonsais thrive in warm climates and can be kept outside year-round in regions with a suitable climate. In temperate climates, it is best to place them outside in a sunny position or semi-shade from May to September. This allows the bonsai to receive the necessary sunlight while protecting it from extreme heat.
During autumn to spring, when the temperature drops, the Desert Rose Bonsai should be kept in a warm place indoors or in a greenhouse with ample light. It is important to ensure that the temperature does not go below 5°C/40°F to prevent damage to the plant.
Proper sunlight exposure is crucial for the Desert Rose Bonsai’s growth and development. It is recommended to place the bonsai in an area where it can receive at least 6 to 8 hours of direct sunlight per day. This will promote healthy foliage and vibrant blooms.
Note: Avoid exposing the Desert Rose Bonsai to extreme heat or cold, as it can be detrimental to its overall health.
Optimal Placement
Sunlight Requirements
Temperature Requirements
Warm, sunny position or semi-shade
At least 6 to 8 hours of direct sunlight per day
Avoid temperatures below 5°C/40°F
Indoors or greenhouse with ample light
Protect from extreme heat or cold
Watering & How to Prevent Overwatering your Desert Rose Plant
The Desert Rose Bonsai, being a succulent plant, possesses remarkable water-storing abilities. As a result, it does not demand excessive watering. To prevent overwatering and maintain the optimal health of your Desert Rose Bonsai, it is crucial to follow the appropriate watering technique and frequency.
Watering your Desert Rose Bonsai every 7 to 10 days allows the soil to dry out between waterings, preventing any possibility of root rot and other associated problems. A good practice is to ensure that the soil has completely dried out before watering. When watering, moisten the soil thoroughly and permit any excess water to drain out from the bottom of the pot.
Monitoring the moisture level of the soil on a regular basis will enable you to determine the appropriate watering frequency for your Desert Rose Bonsai. It is essential to adjust the watering schedule according to the prevailing climate and season, reducing the amount of water during the dormant winter period.
Fertilizing Your Desert Rose Bonsai for Best Results
Proper fertilization is essential to provide your Desert Rose Bonsai with the necessary nutrients for healthy growth and vibrant blooms. By understanding the nutrient requirements of your bonsai and choosing the right fertilizer, you can ensure that your Desert Rose Bonsai thrives in its miniature landscape.
From spring to autumn, it is recommended to use a liquid fertilizer specifically formulated for bonsai at half the recommended strength. Apply the liquid fertilizer once a month to supply the required nutrients for optimal growth. Liquid fertilizers are easily absorbed by the bonsai’s roots, promoting healthy foliage and flower production.
In winter, the Desert Rose Bonsai does not require regular fertilization unless it is actively growing new shoots. During this dormant period, you can enrich the soil with a solid organic fertilizer. Solid organic fertilizers release nutrients gradually, providing a sustained source of nourishment for your bonsai.
Always follow the recommended dosage and instructions provided by the fertilizer manufacturer. Over-fertilizing your Desert Rose Bonsai can lead to nutrient imbalances and harm the plant’s overall health. By fertilizing your bonsai appropriately, you can support its growth and enjoy its stunning beauty for years to come.
Fertilizer Type
Application Period
Dosage
Bonsai Stage
Liquid Fertilizer
Spring to Autumn
Half the recommended strength
All stages of growth
Solid Organic Fertilizer
Winter (if actively growing)
Follow manufacturer’s instructions
Active growth stage
Desert Rose Bonsai Care: Pruning and Wiring Techniques
Pruning and wiring are essential techniques to maintain the shape and aesthetic appeal of your Desert Rose Bonsai. By regularly pruning and utilizing proper wiring, you can ensure the health and beauty of your bonsai tree.
Pruning is a year-round practice that stimulates ramification, encourages flower bud development, and maintains the overall shape of the Desert Rose Bonsai. To prune your bonsai tree, trim back long shoots and remove any damaged parts. Make clean cuts just above a leaf node or junction to promote healthy growth.
When wiring the branches of your Desert Rose Bonsai, take care not to wind the wire too tightly. Tightly applied wire can cause wire marks and scarring on the branches, which the bonsai tree is susceptible to. Proper wiring allows you to shape the branches and guide their growth, creating the desired aesthetic form for your bonsai.
Timing is crucial when it comes to pruning and wiring. It is best to coincide these practices with the growth and flowering patterns of the Desert Rose Bonsai. By understanding the natural rhythms of your bonsai tree, you can achieve the desired shape, promote overall health, and enhance flower bud development.
How to Repot Desert Rose Bonsai for Continued Health
Repotting is a crucial aspect of maintaining the health and growth of your Desert Rose Bonsai. By repotting every two or three years in late spring, you can ensure that your bonsai has ample space for root development and access to fresh nutrients.
To successfully repot your Desert Rose Bonsai, follow these steps:
Choose the right time: Late spring is the ideal time to repot your bonsai when the plant is actively growing. This period provides the best conditions for the root system to recover quickly.
Prepare the tools: Gather the necessary tools, including a bonsai rake, root pruning shears, and a suitable bonsai pot.
Root pruning: Carefully remove your Desert Rose Bonsai from its current pot. Inspect the roots and prune any dead or damaged ones using root pruning shears. This process encourages new root growth and improves the overall health of the plant.
Choose the right soil: Use a well-draining soil mix specifically formulated for succulents, ensuring that excess moisture doesn’t accumulate in the pot. This helps prevent root rot, a common issue for Desert Rose Bonsais.
Repositioning: Place a layer of soil at the bottom of the new pot and position your Desert Rose Bonsai, ensuring that it sits slightly higher than the previous level. Gently add soil around the roots, pressing it down to eliminate air pockets.
Watering and aftercare: After repotting, water your Desert Rose Bonsai thoroughly to settle the soil and promote root establishment. However, avoid watering for a few days to allow the plant to recover from the stress of repotting.
It’s important to monitor the growth rate of your Desert Rose Bonsai and the size of the pot to determine when repotting is necessary. Observe the root system and choose a pot that allows for adequate space for future growth. Remember, repotting frequency may vary for each individual plant.
Propagation, Pests, and Common Issues in Desert Rose Bonsai
Now that you have learned how to grow and care for your Desert Rose Bonsai, let’s explore propagation, pests, and common issues that you may encounter along the way.
When it comes to propagating your Desert Rose Bonsai, you have several options. You can start from seeds, take cuttings, or opt for grafting. Grafting is a popular method, particularly in large Southeast Asian nurseries, and it allows you to combine different varieties for unique and stunning results.
Like any plant, Desert Rose Bonsais can be susceptible to pests. Common culprits include aphids, mealybugs, and spider mites. However, with regular care and ideal growing conditions, you can help prevent infestations. If necessary, there are appropriate pest control measures available to combat these unwelcome visitors.
While the Desert Rose Bonsai is generally a resilient plant, it can face some common issues. Overwatering can lead to root rot, so it is important to maintain proper watering practices. Additionally, leaf yellowing may occur due to heat or sun stress, requiring you to adjust the plant’s placement accordingly. Finally, leaf drop during winter is a natural response to seasonal changes. By promptly addressing these issues, you can ensure the overall health and vitality of your Desert Rose Bonsai.
Karen Phillips, Bonsai expert and blogger. Read more about me here
If you’re captivated by the beauty of cherry blossoms and want to incorporate them into your own miniature garden, then cherry blossom bonsai trees are the perfect choice for you. These enchanting trees not only add a touch of elegance to any space but also provide a sense of tranquility and serenity.
One of the most alluring aspects of cherry blossom bonsai trees is their delicate and vibrant blooms. When properly cared for, these trees can transform your garden or indoor space into a breathtaking display of colors. From the classic pink hues of the Yoshino cherry variety to the stunning white petals of the Kanzan variety, there are numerous cherry blossom bonsai varieties to choose from, each with its own unique beauty.
But it’s not just about the aesthetics. Cherry blossom bonsai care goes beyond maintaining the visual appeal of these trees. It also involves nurturing their overall health and well-being. Proper watering, soil composition, pruning, and pest prevention are just a few of the important factors to consider when cultivating these miniature marvels.
In this guide, we will discuss the intricacies of cherry blossom bonsai care and provide you with valuable tips and insights. Whether you’re looking to purchase your first cherry blossom bonsai or have already embarked on your bonsai journey, our aim is to help you create and maintain vibrant and healthy cherry blossom bonsai trees that bloom with grace.
Understanding the Cherry Blossom Bonsai
In this section, we will discuss the enchanting world of cherry blossom bonsai trees and explore their captivating allure. From their deep-rooted significance in Japanese culture to the popular varieties used to capture the beauty of cherry blossoms in miniature form, cherry blossom bonsai trees are a true masterpiece of nature.
The Significance of Sakura in Japanese Culture
Sakura, the Japanese term for cherry blossoms, holds profound cultural significance in Japan. These delicate and ephemeral blooms represent the beauty and fragility of life, reminding us of its fleeting nature. The arrival of cherry blossoms in spring is celebrated nationwide through the centuries-old tradition of hanami or flower viewing. During this time, people gather under cherry blossom trees, enjoying the beauty of the blossoms and reflecting on the impermanence of life.
Popular Varieties for Capturing Cherry Blossom Beauty in Miniature
There are several popular cherry blossom varieties that are commonly used for bonsai, allowing enthusiasts to recreate the beauty of cherry blossoms in miniature form. Some of the most admired varieties include:
Prunus serrulata: Also known as the Japanese cherry blossom or sakura tree, this variety boasts stunning pink and white blossoms, symbolizing renewal and the fleeting nature of life.
Prunus incisa: Known as the Fuji cherry, this variety showcases delicate white blossoms and is cherished for its graceful and compact growth habit.
Prunus subhirtella: Commonly referred to as the weeping cherry, this variety features cascading branches adorned with mesmerizing pink blossoms, creating a picturesque and serene ambiance.
Cherry Blossom Bonsai Ideal Placement and Sunlight Requirements
Proper placement and sunlight exposure are crucial for the optimal growth of cherry blossom bonsai trees. Understanding the ideal placement and sunlight requirements will help ensure that your cherry blossom bonsai thrives and produces vibrant blooms.
Do you know Cherry blossom bonsai can be grown on rocks as well? Click here to learn more
Sunlight Exposure for Optimal Growth
Cherry blossom bonsai trees require adequate sunlight exposure to thrive. The right amount of sunlight stimulates photosynthesis, which is crucial for the tree’s growth and overall health. Ideally, cherry blossom bonsai trees should be placed in an area that receives full sun for at least four to six hours a day. This direct exposure to sunlight will provide the necessary energy for the tree to develop strong branches and vibrant blooms.
When selecting a spot for your cherry blossom bonsai, consider placing it near a south-facing window or in an outdoor area that receives ample sunlight. If growing your bonsai indoors, ensure that the area provides sufficient natural light or consider using artificial grow lights to supplement the sunlight.
Finding the Balance Between Light and Shade
While cherry blossom bonsai trees require sunlight for optimal growth, finding the right balance between light and shade is also essential. Excessive exposure to intense sunlight can cause sunburn on the tree’s leaves and damage the delicate blossoms. To avoid this, it is crucial to provide some shade during the hottest parts of the day, especially during the summer months.
Avoid placing your cherry blossom bonsai tree in direct sunlight during the hottest hours, typically between 11 am and 3 pm. Instead, provide shade using a sheer curtain or place the bonsai under a tree that offers filtered sunlight. This will protect the tree from excessive heat and ensure its delicate blossoms remain intact.
By understanding the sunlight requirements and finding the right balance between light and shade, you can create an ideal environment for your cherry blossom bonsai tree to thrive. With proper placement and sunlight exposure, your bonsai will develop strong branches, lush foliage, and abundant blooms, allowing you to enjoy the enchanting beauty of cherry blossoms in miniature form.
Watering Tactics for a Thriving Cherry Blossom Bonsai
Proper watering is essential for maintaining the health and vitality of your cherry blossom bonsai trees. In this section, we will explore effective watering tactics that will help your bonsai thrive and produce beautiful blossoms. It’s crucial to strike the right balance between providing adequate moisture and avoiding overwatering, as both can negatively impact the health of your bonsai.
Maintaining Soil Moisture For Healthy Blossoms
The soil moisture level is a critical factor in promoting healthy blossoms in your cherry blossom bonsai. It’s important to understand that different stages of growth may require varying levels of moisture. Generally, you should aim to keep the soil consistently moist, but not soggy. Overly wet soil can lead to root rot and other issues, while excessively dry soil can stress the bonsai and impact its overall health.
To maintain appropriate soil moisture, consider the following tactics:
Regular watering: Water your cherry blossom bonsai regularly, ensuring that the soil is evenly moist. Take care not to waterlog the soil, as it can deprive the roots of oxygen and promote rot.
Monitor soil moisture: Use your finger or a moisture meter to check the moisture level of the soil. Insert your finger into the soil up to the second knuckle – if it feels slightly moist, it’s usually an indication that watering is not needed yet. If it feels dry, it’s time to water your bonsai.
Watering frequency: Adjust the frequency of watering based on the specific needs of your cherry blossom bonsai. Factors such as temperature, humidity, and the bonsai’s location can affect how quickly the soil dries out. Monitor the soil regularly and water accordingly.
The Impact of Water Quality on Cherry Bonsai’s Health
The quality of water you use to irrigate your cherry blossom bonsai can significantly impact its health and overall growth. It’s important to be mindful of certain aspects when it comes to water quality:
Use clean, non-chlorinated water: Chlorinated water can be harmful to the roots of your bonsai. It’s best to collect rainwater or use filtered water that is free from chemicals.
Avoid hard water: Hard water is high in mineral content, which can lead to mineral buildup in the soil, affecting the pH balance and nutrient absorption. If you have no access to soft water, allow tap water to sit out overnight to allow some of the minerals to settle before watering.
Avoid extreme temperature water: Using water that is too hot or too cold can shock the bonsai’s roots. Let tap water reach room temperature before using it on your cherry blossom bonsai.
By paying attention to soil moisture and water quality, you can provide the optimal conditions for your cherry blossom bonsai to thrive and produce stunning blossoms.
Watering Tactics
Benefits
Regular watering
Ensures consistent soil moisture, promoting healthy growth and blossoms
Monitoring soil moisture
Prevents overwatering or underwatering, keeping the soil at an optimal moisture level
Watering frequency
Allows adjustment of watering based on environmental conditions and the specific needs of the bonsai
The Fundamentals of Cherry Blossom Bonsai Soil
When it comes to growing healthy and vibrant cherry blossom bonsai trees, understanding the fundamentals of soil composition and pH levels is essential. The right soil provides the necessary nutrients and moisture for your bonsai to thrive and produce beautiful blossoms. In this section, we will explore the key factors you need to consider when it comes to cherry blossom bonsai soil.
Soil Composition and Drainage
The composition of the soil plays a crucial role in the overall health of your cherry blossom bonsai. The ideal soil should be well-draining to prevent waterlogging and ensure proper oxygenation of the roots. It should also retain enough moisture to keep the roots hydrated without becoming soggy. A balanced mix of organic matter, such as pine bark, peat moss, and perlite or pumice, provides the perfect soil structure for cherry blossom bonsai trees.
Organic matter improves the soil’s ability to retain moisture and nutrients while promoting healthy root development. The addition of inorganic particles, like perlite or pumice, aids in creating air pockets within the soil, enhancing drainage and preventing compaction.
pH Levels: Ensuring the Right Acidity for Cherry Blossom
The pH level of the soil is another essential factor in cherry blossom bonsai care. The ideal pH range for cherry blossom bonsai is slightly acidic, between 5.5 and 6.5. This acidity level provides the optimal environment for the roots to absorb nutrients effectively.
To determine the pH level of your soil, you can use a soil testing kit or consult with a professional. If the pH is too low (acidic), you can raise it by adding powdered limestone to the soil. On the other hand, if the pH is too high (alkaline), you can lower it by incorporating organic matter, such as pine needles or compost. Regular monitoring and adjustment of the soil pH will help maintain a balanced and healthy growing environment for your cherry blossom bonsai.
Now that you understand the fundamentals of cherry blossom bonsai soil, you can create the ideal growing conditions for your bonsai tree. The right soil composition and pH levels will contribute to the overall health and beauty of your cherry blossom bonsai, ensuring vigorous growth and abundant blooms.
Mastering the Art of Pruning Cherry Blossom Bonsai
Pruning is a fundamental aspect of bonsai care, and mastering the art of pruning is essential for shaping and maintaining the aesthetics of cherry blossom bonsai trees. By implementing proper pruning techniques, you can create beautiful and well-maintained cherry blossom bonsai trees that exhibit the unique charm of these exquisite plants.
When it comes to pruning cherry blossom bonsai, timing is crucial. The ideal time for pruning is during the dormant season, typically in late winter or early spring, before the tree starts to actively grow. Pruning during this time allows you to shape the tree and encourage new growth in the desired direction.
One of the primary pruning techniques for cherry blossom bonsai is selective pruning. This involves carefully removing specific branches and shoots to enhance the overall shape and balance of the tree. By selectively pruning branches that are growing in unwanted directions or crossing over each other, you can create a harmonious and visually appealing bonsai.
Pro Tip: When pruning cherry blossom bonsai, always use sharp and sterile pruning tools to minimize the risk of introducing infections or diseases. It’s also essential to have a clear vision of the desired shape and plan the pruning cuts accordingly.
In addition to selective pruning, it’s crucial to practice proper pruning techniques such as branch reduction, branch thinning, and bud pruning. Branch reduction involves shortening long branches to maintain the tree’s proportions and prevent them from overshadowing other parts of the bonsai. Branch thinning helps improve airflow and light penetration within the tree, promoting healthy growth and preventing diseases.
Another important aspect of pruning cherry blossom bonsai is bud pruning. This technique involves removing unwanted buds to direct the tree’s energy towards desired areas, such as promoting the growth of new branches or redirecting growth to specific regions of the tree.
Remember that each bonsai tree is unique and requires a customized pruning approach based on its growth pattern and aesthetic goals. Regular pruning sessions throughout the year can help maintain the desired shape and size of your cherry blossom bonsai.
By mastering the art of pruning and understanding the specific pruning techniques for cherry blossom bonsai, you can create stunning bonsai trees that capture the essence and beauty of these delicate blossoms. Pruning allows you to shape and sculpt your bonsai, while also promoting healthy growth and enhancing the overall aesthetics of your cherry blossom bonsai.
Cherry Blossom Bonsai Fertilization Strategies
Fertilization is a crucial aspect of cherry blossom bonsai care that directly impacts the overall health and growth of your trees. By implementing effective fertilization strategies, you can promote vigorous growth and vibrant blooms in your cherry blossom bonsai trees.
When it comes to fertilizing your cherry blossom bonsai, it’s essential to choose the right type of fertilizer that provides the necessary nutrients for optimal growth. Look for a balanced fertilizer specifically formulated for bonsai, which contains essential elements like nitrogen (N), phosphorus (P), and potassium (K).
It’s recommended to apply fertilizer during the growing season of spring and summer, when your cherry blossom bonsai is actively producing new foliage and blooms. Start fertilizing once the tree has fully leafed out and continue every two to four weeks, following the package instructions for the recommended dosage.
While fertilizing your cherry blossom bonsai, it’s crucial to maintain a balance and avoid over-fertilization. Too much fertilizer can lead to excessive growth and weak branches, making your bonsai more susceptible to pests and diseases. Therefore, it’s essential to carefully measure and apply the recommended amount of fertilizer.
Another key factor in fertilization is balanced nutrition. Your cherry blossom bonsai requires a combination of macro and micronutrients for healthy growth. In addition to the NPK elements, it’s beneficial to include trace elements like iron (Fe), manganese (Mn), and zinc (Zn) in your fertilizer. These micronutrients play a vital role in maintaining optimal health and promoting vibrant blooms.
To ensure that your cherry blossom bonsai receives a balanced diet, you can consider using slow-release fertilizers or organic options like fish emulsion or seaweed extract. These natural fertilizers not only provide essential nutrients but also improve the overall soil fertility.
Remember to monitor the growth and health of your cherry blossom bonsai closely. If you notice any signs of nutrient deficiency or excessive growth, adjust your fertilization strategy accordingly. Regularly inspecting your bonsai and making necessary adjustments will help maintain a healthy and thriving cherry blossom bonsai tree.
How to Repot Cherry Blossom Bonsai Trees
Repotting is an essential aspect of bonsai care, ensuring the long-term health and vitality of your cherry blossom bonsai trees. By understanding the repotting process and following these key tips, you can provide the best environment for your bonsai to thrive.
When to Repot: Cherry blossom bonsai trees should be repotted every 2-3 years to prevent root congestion and maintain optimal growth. The best time to repot is during the dormant season in early spring or late winter, just before buds start to swell.
How to Repot: Follow these steps for successful cherry blossom bonsai repotting:
Carefully remove the tree from its current pot. To do this, use a root hook or chopstick to loosen the roots from the pot’s edges and gently lift the tree out.
Inspect the roots and prune them if necessary. Trim any damaged or overgrown roots, ensuring to retain the tree’s original structure.
Select a new pot with adequate drainage holes. The new pot should be slightly larger than the previous one, allowing room for growth.
Prepare the new pot by covering the drainage holes with mesh or screen to prevent soil from escaping.
Place a layer of fresh bonsai soil in the bottom of the pot.
Position the tree in the new pot, ensuring that it sits upright and centered.
Fill the remaining space around the roots with bonsai soil, gently firming it in place to eliminate air pockets.
Water the repotted tree thoroughly to settle the soil and hydrate the roots.
The Right Pot and Soil: Choose a pot that complements the size and style of your cherry blossom bonsai. Opt for a pot made of ceramic or clay, as these materials provide stability and help regulate moisture levels. When it comes to soil, use well-draining bonsai soil or a mix of Akadama, pumice, and lava rock for optimal water retention and aeration.
Aftercare: After repotting, place your cherry blossom bonsai in a shaded area to recover for a few weeks. Avoid direct sunlight and excessive watering during this period. Gradually reintroduce your bonsai to its regular care routine, including proper watering, sunlight exposure, and fertilization.
By following these repotting tips, you can ensure that your cherry blossom bonsai trees have ample space for root growth, allowing them to thrive and beautify your space for years to come.
Pest and Disease Prevention in Cherry Blossom Bonsai Care
Maintaining the health and vitality of your cherry blossom bonsai trees requires effective pest and disease prevention. By implementing the following techniques, you can keep these threats at bay and ensure the longevity of your cherished bonsai.
1) Regular Inspection: To prevent pest infestations and identify potential disease issues, it is essential to inspect your cherry blossom bonsai regularly. Carefully examine the leaves, branches, and trunk for any signs of pests or infections. Early detection is key to prompt treatment.
2) Proper Sanitation: Keeping your bonsai environment clean is crucial in preventing the spread of pests and diseases. Remove any fallen leaves or debris that may harbor harmful organisms. Additionally, sterilize your tools, such as pruners and scissors, before and after each use to minimize the risk of contamination.
3) Adequate Air Circulation: Providing sufficient airflow around your cherry blossom bonsai helps prevent the buildup of humidity, which can contribute to disease development. Avoid placing your bonsai in areas with stagnant air or overcrowding it with other plants.
4) Selecting Resistant Varieties: Some cherry blossom bonsai varieties are naturally more resistant to pests and diseases. Prioritize these resistant varieties when selecting new bonsai trees to add to your collection. Researching and choosing the right varieties can significantly reduce the risk of infestations and infections.
5) Organic Pest Control: Consider using organic pest control methods, such as neem oil or insecticidal soap, to combat common pests like aphids or spider mites. These natural options are less harmful to the environment and can effectively manage pest populations without endangering your bonsai’s health.
6) Consultation with Experts: If you encounter persistent pest or disease issues despite your prevention efforts, don’t hesitate to seek advice from bonsai experts or horticulturists. They can provide valuable insights and recommend specific treatments tailored to your cherry blossom bonsai’s needs.
By incorporating these pest and disease prevention techniques into your cherry blossom bonsai care routine, you can safeguard your trees from harm and enjoy their beauty for years to come.
Karen Phillips, Bonsai expert and blogger. Read more about me here
Japanese Maple Bonsai, also known as Acer palmatum bonsai, is a captivating species that adds a touch of elegance to any collection. These miniature trees are renowned for their unique and stunning foliage, vibrant colors, and cultural significance. In this guide, we will delve into the specific care requirements for Japanese Maple Bonsai, including pruning, fertilization, propagation, and pest management.
Japanese Maple Bonsai showcases its breathtaking beauty through its delicate leaves and intricate branches and it is one of the fastest growing bonsai as well. Its small stature and meticulous growth make it an ideal choice for bonsai gardening. With proper care and dedication, you can create a masterpiece that emulates the grace and serenity of a full-sized Japanese maple tree.
Understanding the Japanese Maple Bonsai
A Botanical Snapshot: Acer Palmatum Bonsai
Japanese Maple (Acer palmatum) is a highly sought-after species for bonsai cultivation. Known for its delicate and intricate foliage, the Acer palmatum bonsai offers a captivating display of color, texture, and form. This small deciduous tree belongs to the Aceraceae family and is native to Japan, Korea, and China. Its graceful branches and vibrant leaves make it a popular choice among bonsai enthusiasts worldwide.
Cultural Significance and Aesthetic Appeal
The Japanese Maple Bonsai holds great cultural significance in Japan. It is deeply rooted in Japanese culture and symbolizes beauty, grace, and harmony. The art of cultivating bonsai, including the Japanese Maple Bonsai, has been practiced in Japan for centuries and is considered a meditative and spiritual endeavor.
One of the main attractions of the Japanese Maple Bonsai is its aesthetic appeal. The intricate foliage, vibrant colors, and delicate branching structure create a visual masterpiece in the form of a miniature tree. The miniature size of the bonsai enhances its beauty and allows for easy display in gardens, patios, or indoor spaces.
Diverse Varieties Suitable for Bonsai Cultivation
There is an incredible diversity of Japanese Maple varieties suitable for bonsai cultivation, each with its own unique characteristics and foliage. Some popular Japanese Maple bonsai varieties include:
Red-leaf varieties: These varieties have striking red foliage, such as Acer palmatum ‘Atropurpureum’ and Acer palmatum ‘Bloodgood’.
Green-leaf varieties: These varieties have vibrant green foliage and include Acer palmatum ‘Seiryu’ and Acer palmatum ‘Shishigashira’.
Variegated varieties: These varieties have leaves with variegated patterns of different colors, such as Acer palmatum ‘Butterfly’ and Acer palmatum ‘Ukigumo’.
The diverse varieties of Japanese Maple offer a wide range of leaf shapes, colors, and growth habits, allowing bonsai enthusiasts to choose according to their personal preferences and desired aesthetics. Whether you prefer bold reds, vibrant greens, or intriguing variegation, there is a Japanese Maple bonsai variety that will captivate your imagination.
Japanese Maple Bonsai Varieties
Variety
Description
Acer palmatum ‘Atropurpureum’
Striking red foliage
Acer palmatum ‘Bloodgood’
Deep red leaves with excellent autumn color
Acer palmatum ‘Seiryu’
Upright, fern-like green leaves that turn fiery red in the fall
Acer palmatum ‘Shishigashira’
Compact growth habit with densely packed green foliage
Acer palmatum ‘Butterfly’
Variegated leaves with cream and pink patterns
Acer palmatum ‘Ukigumo’
White and pink variegated leaves with exquisite beauty
Optimal Placement for Growth and Aesthetics
Proper placement of your Japanese Maple Bonsai is crucial for its overall health and aesthetics. By considering its sunlight requirements, temperature preferences, and protection from extreme weather conditions, you can ensure the optimal conditions for your bonsai’s growth.
When determining the placement of your Japanese Maple Bonsai, it’s important to keep in mind the following factors:
Sunlight requirements: Japanese Maple Bonsai thrive in bright but indirect sunlight. Place your bonsai in a location that receives morning sun and afternoon shade to prevent leaf scorching. If you’re growing your bonsai indoors, choose a spot near a window that receives filtered light.
Temperature requirements: Japanese Maple Bonsai prefer cooler temperatures. They thrive in a climate with temperatures between 50°F and 75°F (10°C and 24°C). Avoid exposing your bonsai to extreme heat or cold, as it can adversely affect its health.
Protection from harsh weather: Japanese Maple Bonsai are sensitive to strong winds, heavy rain, and frost. Consider placing your bonsai in a sheltered area or using protective measures, such as a windbreak or a frost cover, to shield it from these elements.
By providing the right balance of sunlight and shade, maintaining optimal temperatures, and protecting your Japanese Maple Bonsai from harsh weather conditions, you can create an environment that promotes healthy growth and maintains the beautiful form of your bonsai.
The Essentials of Watering Your Japanese Maple Bonsai
Proper watering is essential for the health and vitality of your Japanese Maple Bonsai. Understanding the watering techniques and seasonal adjustments is crucial to maintain the optimal moisture level for your bonsai tree. Additionally, the pH balance of the water used for watering plays a significant role in the overall well-being of your bonsai.
Daily Watering Techniques for Vigorous Health
Watering your Japanese Maple Bonsai on a daily basis is key to promoting vigorous growth and preventing the soil from drying out completely. Consistency is crucial in maintaining the right moisture level for your bonsai. To ensure proper watering, follow these techniques:
Use a watering can with a fine nozzle to ensure gentle water flow.
Water your bonsai thoroughly until the water drains from the drainage holes at the bottom of the pot.
Check the moisture level of the soil daily by inserting your finger about an inch into the soil. If it feels dry, it’s time to water your bonsai.
Avoid overwatering, as it can lead to root rot. It’s better to water your bonsai slightly less than risk overwatering.
By following these daily watering techniques, you’ll ensure that your Japanese Maple Bonsai receives the right amount of water for healthy growth and vitality.
Seasonal Adjustments to Watering Schedules
As the seasons change, the watering needs of your Japanese Maple Bonsai will also vary. Adapting your watering schedule to the season is crucial to maintain a healthy and thriving bonsai. Consider the following seasonal adjustments:
During the summer months, when temperatures are higher, your bonsai may require more frequent watering to prevent dehydration. Monitor the soil moisture level and water accordingly.
In cooler months, such as fall and winter, when the growth rate slows down, reduce the frequency of watering. Ensure that the soil is moist but not excessively wet.
Monitor your bonsai closely during periods of heavy rainfall, as excessive moisture can lead to root rot. Adjust your watering schedule accordingly to prevent waterlogged soil.
By making seasonal adjustments to your watering schedule, you’ll ensure that your Japanese Maple Bonsai receives the appropriate amount of water throughout the year.
The pH balance of the water used for watering your Japanese Maple Bonsai can significantly impact its health and growth. The pH scale measures the acidity or alkalinity of water, and different bonsai species have specific pH preferences. Here are some considerations:
Most Japanese Maple Bonsai thrive in slightly acidic soil with a pH range between 5.5 and 6.5.
To maintain the ideal pH level for your bonsai, test the pH of your tap water using a pH testing kit. If needed, adjust the pH by using additives or filtered water.
Regularly monitor the pH level of the soil in your bonsai pot to ensure it remains within the optimal range.
By paying attention to the pH balance of the water used for watering, you’ll provide your Japanese Maple Bonsai with the ideal environment for healthy growth and development.
Fertilization Strategies for a Thriving Bonsai
Fertilizing your Japanese Maple Bonsai is essential to provide it with the necessary nutrients for healthy growth. By implementing effective fertilization strategies and techniques, you can support the development of strong roots, vibrant foliage, and overall vigor in your bonsai.
When it comes to bonsai fertilization, there are several factors to consider, including the type of fertilizer and the frequency of application. One popular approach is to use organic fertilizers, which provide a slow-release source of nutrients and improve the soil structure. Organic fertilizers promote long-term health and well-being for your Japanese Maple Bonsai, ensuring sustainable growth.
Proper fertilization enhances the beauty, vitality, and resilience of your bonsai, allowing it to thrive in its miniature form.
Organic fertilizers for bonsai include options such as compost, well-aged manure, or specially formulated organic bonsai fertilizers available in the market. These fertilizers are rich in essential elements like nitrogen, phosphorus, and potassium, providing a balanced nutrient profile that encourages robust growth.
Applying fertilizers to your Japanese Maple Bonsai requires careful consideration of the dosage and timing. It is essential to follow the recommended guidelines provided by the fertilizer manufacturer. Overfertilizing can lead to salt build-up in the soil, causing root burn and detrimental effects on the health of your bonsai.
It’s best to fertilize your Japanese Maple Bonsai during the growing season, which is typically spring and summer. During this period, your bonsai’s nutrient requirements are higher, supporting its active growth and development. As the bonsai enters a dormant phase in fall and winter, fertilization should be reduced or stopped to prevent excessive nutrient uptake.
Remember, each bonsai is unique, and its fertilization requirements may vary based on factors such as age, size, and environmental conditions. Regular observation and adjustment of your fertilization strategy will help maintain the optimal health and beauty of your Japanese Maple Bonsai.
To summarize, providing the right fertilization for your Japanese Maple Bonsai is crucial for its overall well-being. Organic fertilizers offer a sustainable and effective approach, ensuring the continuous supply of essential nutrients. By following proper techniques and guidelines, you can optimize the growth, foliage color, and overall vigor of your bonsai, creating a thriving masterpiece.
Japanese Maple Bonsai: Mastering the Art of Pruning
Pruning is a crucial skill that every bonsai enthusiast must master, especially when it comes to Japanese Maple Bonsai. Proper pruning techniques not only help shape and maintain the desired form of your bonsai, but they also promote optimal aesthetics and overall health.
When pruning your Japanese Maple Bonsai, focus on:
Trimming shoots and twigs: Regularly trimming small shoots and twigs helps maintain the bonsai’s desired shape and size. It also encourages new growth and enhances the overall structure.
Pruning thick branches: As your Japanese Maple Bonsai matures, you may need to prune thick branches to maintain a balanced appearance and prevent excessive growth. Use sharp bonsai scissors or shears to make clean, precise cuts.
Shaping the bonsai tree: Pruning can be used to shape and refine the branches of your Japanese Maple Bonsai. By selectively removing branches or foliage, you can create elegant and artistic designs that showcase the unique beauty of the tree.
Remember to prune your Japanese Maple Bonsai during the appropriate season to minimize stress on the tree. Generally, spring and early summer are ideal times for pruning, as the tree is actively growing. However, avoid pruning during times of extreme heat or frost to prevent damage to the bonsai.
Mastering the art of pruning is crucial for maintaining the health and beauty of your Japanese Maple Bonsai. With practice and proper technique, you can create a stunning bonsai tree that reflects your artistic vision.
Bonsai Repotting: Timing, Techniques, and Soil Mixtures
Repotting plays a vital role in the care and maintenance of Japanese Maple Bonsai. It is necessary to repot your bonsai at the right time to ensure healthy root growth and maintain the ideal soil composition. In this section, we will guide you through the process of repotting your Japanese Maple Bonsai, including the appropriate timing, techniques, and soil mixtures.
When it comes to repotting, timing is crucial. The best time to repot your Japanese Maple Bonsai is during the late winter or early spring, before the tree starts to actively grow. This allows the bonsai to recover from the stress of repotting and establish new roots before the growing season. It’s important to repot your bonsai every 1 to 3 years, depending on its growth rate and the health of the root system.
When repotting your Japanese Maple Bonsai, the first step is to carefully remove the tree from its current pot. Gently tap the pot to loosen the soil, and then lift the bonsai out, taking care not to damage the roots. Once the tree is out of the pot, carefully comb out the roots using a root rake or your fingers, removing any dead or tangled roots. This will promote healthy root growth and prevent root rot.
Next, it’s time to choose the right soil mixture for your Japanese Maple Bonsai. The soil should be well-draining to prevent waterlogged roots and promote airflow. A common soil mixture for bonsai includes akadama, pumice, and lava rock in equal parts. Akadama retains moisture and nutrients, while pumice and lava rock provide good drainage. Make sure to sieve the soil mixture to remove any fine particles before repotting.
After preparing the soil mixture, place a layer of it in the bottom of the new pot. Then, position the bonsai in the center of the pot and gently spread out the roots. Gradually add more soil around the roots, making sure to fill in all the gaps. Use a chopstick or a root hook to gently press the soil and remove any air pockets. Finally, water the bonsai thoroughly to settle the soil and promote root establishment.
Remember, repotting should be done with care and precision to avoid damaging the delicate root system of your Japanese Maple Bonsai. It is a crucial step in maintaining the health and vitality of your bonsai tree. By following the proper timing, techniques, and using the right soil mixtures, you can ensure the successful repotting of your Japanese Maple Bonsai and support its long-term growth and beauty.
Propagating Your Own Japanese Maple Bonsai
Propagating your own Japanese Maple Bonsai can be a rewarding and cost-effective way to expand your collection. By propagating your bonsai, you can ensure the continuation of its unique characteristics and aesthetic appeal. In this section, you will learn different techniques for bonsai propagation, including planting seeds, taking cuttings, and air layering.
Planting Seeds: One method of propagating Japanese Maple Bonsai is through planting seeds. Collect ripe seeds from a mature Japanese Maple tree, and then sow them in a well-draining bonsai soil mix. Proper care, including regular watering and adequate sunlight, will help the seeds germinate and grow into young bonsai trees.
Taking Cuttings: Another propagation technique is taking cuttings from an existing Japanese Maple Bonsai. Select a healthy branch and cut it at a slight angle, making sure the cutting is about 6 inches long. Remove the lower leaves, leaving only a couple of leaves at the tip. Insert the cutting into a pot or container filled with a suitable rooting medium, such as perlite or vermiculite. Keep the cutting moist and provide indirect sunlight until it roots and can be transplanted into a bonsai pot.
Air Layering: Air layering is a more advanced propagation technique, but it can be highly effective for Japanese Maple Bonsai. Select a healthy branch and make a ring-shaped incision around it, removing the bark and exposing the cambium layer. Apply rooting hormone to the exposed area and cover it with moist sphagnum moss. Wrap the moss in plastic to create a humid environment and secure it with twine. Over time, roots will develop within the moss, and once they are well-established, you can separate the air layer and plant it in a bonsai pot.
Experimenting with different propagation techniques can help you achieve success in expanding your bonsai collection. Enjoy the process of propagating your own Japanese Maple Bonsai, and witness the growth and beauty of these unique trees.
Japanese Maple Bonsai Pests and Diseases Vigilance
Vigilance against pests and diseases is crucial for the health and survival of your Japanese Maple Bonsai. In your efforts to maintain the beauty and vitality of your bonsai, you must be aware of the common pests that can affect Japanese maple bonsai and the fungal diseases that can pose a threat. By staying proactive and taking necessary precautions, you can keep your bonsai thriving for years to come.
Common Pests of Japanese Maple Bonsai:
Aphids: These small insects feed on the sap of the bonsai, causing leaf damage and stunting growth.
Scale Insects: Scale insects attach themselves to the trunk and branches, sucking the sap and weakening the bonsai.
Spider Mites: These tiny pests create webs on the leaves, causing discoloration and deformation.
Fungal Diseases in Bonsai:
Verticillium Wilt: This fungal disease affects the vascular system of the bonsai, interfering with its ability to absorb water and nutrients.
Root Rot: Excessive moisture or poor drainage can lead to root rot, causing the roots to decay and negatively impacting the overall health of the bonsai.
Leaf Spot: Fungal infections can cause unsightly leaf spots, affecting the aesthetics of the bonsai.
To effectively treat and prevent these pests and diseases, take the following measures:
Inspect your bonsai regularly: Monitor your bonsai for any signs of pest infestations or fungal diseases. Early detection can help prevent the problem from worsening.
Remove affected leaves and branches: If you notice any signs of pests or diseases, promptly remove affected leaves or branches to prevent further spread.
Use appropriate treatments: Treat pests with insecticides specifically formulated for bonsai. For fungal diseases, use fungicides recommended for the specific disease.
Maintain proper bonsai care practices: Providing optimal growing conditions, such as adequate sunlight, appropriate watering, and well-drained soil, can help prevent stress and make the bonsai less susceptible to pests and diseases.
Remember, an ounce of prevention is worth a pound of cure when it comes to bonsai pests and diseases. Stay vigilant, follow proper care practices, and enjoy the beauty of your Japanese Maple Bonsai for years to come.
Joy of Bonsai Techniques: Wiring and Styling
Wiring and styling are integral aspects of bonsai cultivation, allowing you to shape and guide the branches of your Japanese Maple Bonsai to create and maintain the desired aesthetic form. The artistry and creativity involved in bonsai wiring and styling can be a source of joy and satisfaction for bonsai enthusiasts.
Bonsai wiring involves using aluminum or copper wires to gently bend and position the branches and trunks of your bonsai tree. This technique allows you to create beautiful curves and angles, mimicking the natural growth patterns of mature trees. The process requires precision and patience, as you carefully wrap the wire around the branches and adjust their position over time.
When wiring your Japanese Maple Bonsai, it’s important to consider the thickness and flexibility of the branches. Thicker branches may require thicker wires, while more delicate branches may need finer wires. Avoid applying excessive pressure or bending beyond the tree’s natural limits, as this can cause damage.
Styling your Japanese Maple Bonsai involves shaping the branches and foliage to create a balanced and visually pleasing composition. You can achieve different styles, such as formal upright, informal upright, slanting, cascading, or windswept, depending on your artistic vision and the unique characteristics of your bonsai tree.
Consider the natural growth pattern of your Japanese Maple Bonsai when styling it. By trimming and sculpting the branches, you can emphasize certain features and create a harmonious overall shape. Pruning techniques, such as branch selection, directional pruning, and leaf pruning, can help refine the appearance of your bonsai and enhance its aesthetic appeal.
Remember that bonsai styling is an ongoing process. As your Japanese Maple Bonsai tree continues to grow, regular maintenance will be required to maintain its desired shape and form. Wiring and styling techniques can be combined with other bonsai care practices, such as pruning and repotting, to achieve optimal results for the long-term health and beauty of your bonsai tree.
Japanese Maple Bonsai Fertilization for Enhanced Beauty and Vigor
Fertilization is a critical aspect of caring for your Japanese Maple Bonsai and plays a vital role in enhancing its beauty and vigor. By providing the right nutrients, you can optimize the growth, foliage color, and overall health of your bonsai. In this section, we will explore specific fertilization techniques and strategies tailored to Japanese Maple Bonsai.
“Proper fertilization techniques are key to unlocking the full potential of your Japanese Maple Bonsai, intensifying its captivating beauty and ensuring robust growth.”
When fertilizing your Japanese Maple Bonsai, it is essential to consider the specific nutrient requirements of these trees. They benefit from a balanced fertilizer that contains a variety of macro and micronutrients. Look for fertilizers specifically formulated for bonsai cultivation, ensuring they have the necessary components for promoting healthy growth and foliage color.
Timing is crucial when it comes to fertilizing your bonsai. It is recommended to fertilize Japanese Maple Bonsai during the growing season, which is typically from spring to early autumn. Applying fertilizer during this period will provide the tree with the necessary nutrients to fuel its growth.
When applying fertilizer, follow the recommended dosage instructions provided by the manufacturer. It is important not to over-fertilize, as this can result in nutrient burn and damage the roots of your bonsai. Always err on the side of caution and start with a smaller dosage, gradually increasing it if necessary.
In addition to traditional chemical fertilizers, organic fertilizers can also be beneficial for Japanese Maple Bonsai. Organic options include compost, worm castings, and natural liquid fertilizers. These organic fertilizers provide a slow-release of nutrients, promoting long-term health and vitality.
Remember to monitor the overall health and growth of your Japanese Maple Bonsai regularly. Keep an eye out for any signs of nutrient deficiencies or excesses, such as yellowing leaves or stunted growth. Adjust the fertilization regimen accordingly to address any issues that may arise.
By implementing proper fertilization techniques, you can enhance the beauty and vigor of your Japanese Maple Bonsai. With the right balance of nutrients, your bonsai will thrive, displaying vibrant foliage and captivating charm.
Japanese Maple Bonsai: The Importance of Proper Placement
When it comes to cultivating a Japanese Maple Bonsai, the right placement is essential for its overall beauty and well-being. By carefully considering where to position your bonsai, you can create an environment that supports its growth and enhances its aesthetic appeal.
Optimal placement considers factors such as sunlight exposure, temperature, and protection from harsh weather conditions. Japanese Maple Bonsai thrives in partial shade, requiring protection from direct sunlight during the hottest parts of the day. Place your bonsai in a location that provides filtered or dappled sunlight, such as under a tree canopy or in the shade of a patio.
Temperature is another crucial consideration. Japanese Maple Bonsai prefers cool to moderate temperatures, thriving in regions with mild summers and cold winters. Ensure your bonsai is placed in an environment that experiences these temperature ranges, avoiding areas that are prone to extreme heat or frost.
Lastly, protect your bonsai from harsh weather conditions such as strong winds, heavy rain, or frost. These can damage the delicate foliage and compromise the health of your bonsai. Consider using windbreaks or providing additional cover during inclement weather to shield your Japanese Maple Bonsai from potential harm.
Karen Phillips, Bonsai expert and blogger. Read more about me here
Discover the captivating world of redwood bonsai trees and unlock the secrets to nurturing these miniature masterpieces. Redwood bonsai trees are a true marvel of nature, combining the majesty of redwood trees with the delicate artistry of bonsai gardening. Whether you’re an experienced bonsai enthusiast or just starting your bonsai journey, this comprehensive guide will equip you with the knowledge and techniques needed to cultivate and care for your very own redwood bonsai tree.
Redwood bonsai trees possess unique qualities that make them stand out in any bonsai collection. Their tall upright trunks, distinct foliage, and enchanting appeal create a sense of awe and admire. Within this guide, we will delve into the unique qualities of redwood bonsai trees and explore how these characteristics contribute to their beauty and potential as stunning tree art.
There are two main species of redwood trees used for bonsai: the majestic coast redwoods and the historical dawn redwoods. Each species brings its own charm and growth habits, and we will discuss them in detail to help you make informed choices as you cultivate your redwood bonsai tree.
Understanding the environmental conditions required for your redwood bonsai tree is crucial for its well-being and long-term health. We will guide you through the optimal placement and sunlight needs of redwood bonsai trees, as well as how to protect them from extreme temperatures.
Proper watering techniques are essential for the health and vitality of your redwood bonsai tree. Our guide will teach you how to achieve the right balance and maintain optimal soil moisture to ensure the well-being of your redwood bonsai.
Fertilization is a key aspect of bonsai care, and redwood bonsai trees have specific timing and nutrient requirements. We will explore the right fertilizers, prevent overgrowth, and guide you in providing the nutrients your redwood bonsai tree needs for vigorous growth.
The artful practice of pruning and shaping in bonsai gardening allows you to create unique tree forms. We will delve into the techniques, timing, and tools required to prune and shape your redwood bonsai tree, empowering you to create your own masterpiece of tree art.
Repotting is important for maintaining the health and strong growth of your redwood bonsai tree. We will provide step-by-step instructions for repotting, including the frequency and timing, selection of the right soil mix, and tips for avoiding root rot.
Expanding your redwood bonsai collection through propagation techniques is an exciting prospect. We will guide you in starting new trees from cuttings and advancing growth with air-layering, allowing you to indulge in the art of bonsai gardening and increase the beauty of your bonsai nursery.
Embark on a journey of discovery and creativity as you explore the world of redwood bonsai trees. Let this comprehensive guide be your companion and resource as you cultivate and care for your redwood bonsai tree, transforming it into a living work of art that brings joy and tranquility to your indoor space.
Understanding the Unique Qualities of the Redwood Bonsai Tree
Redwood bonsai trees are unlike any other bonsai tree species. They possess distinct characteristics that make them truly captivating and ideal for bonsai gardening and tree art. Let’s explore the unique qualities that set redwood bonsai trees apart.
“Redwood bonsai trees stand tall and majestic, showcasing their grandeur in miniature form.”
One of their most striking features is their tall upright trunks. Redwood bonsai trees emulate the towering height of their full-sized counterparts, creating a sense of awe and admiration. The miniature redwood recreates the majesty of the full-sized tree, allowing enthusiasts to appreciate their beauty in a compact and manageable form.
“The distinct foliage of redwood bonsai trees adds an artistic touch to their overall appeal.”
The foliage of redwood bonsai trees is highly unique. With flattened sprays of vibrant green leaves, they add texture and depth to the bonsai composition. The delicate yet resilient foliage enhances the artistic potential of the redwood bonsai, offering endless possibilities for shaping and styling.
Redwood bonsai trees serve as a testament to the creativity and skill of bonsai artists. Their unique qualities make them an excellent choice for anyone looking to cultivate a bonsai collection that truly stands out. So, let your imagination soar as you explore the artistic potential of the redwood bonsai tree.
Redwood Bonsai Tree Species
The Majestic Coast Redwoods
The coast redwood (Sequoia sempervirens) is one of the most iconic species used for redwood bonsai trees. Known for its incredible height and strong growth, the coast redwood is a majestic and impressive tree. In the wild, these trees can reach heights of over 300 feet, making them the tallest trees on Earth.
Coast redwoods have thick, reddish-brown bark that becomes fibrous with age, adding to their unique aesthetic appeal. Their foliage consists of feathery needles that are green on top and bluish-green beneath, creating a stunning contrast.
When cultivated as bonsai, coast redwoods can exhibit the same awe-inspiring beauty and grandeur as their full-sized counterparts. With proper care and attention, these miniature versions of the coast redwood can thrive and become captivating pieces of tree art.
The Historical Dawn Redwoods
The dawn redwood (Metasequoia glyptostroboides) is an intriguing species that is often referred to as a “living fossil.” This ancient tree species was thought to be extinct until it was discovered based on fossil evidence in the 1940s. Since then, dawn redwoods have become popular choices for bonsai gardening.
Dawn redwoods have a unique growth pattern, with a slender trunk and delicate branches that create a graceful appearance. Their foliage consists of soft, fern-like leaves that turn a beautiful golden-orange color in the fall, adding to their appeal as bonsai trees.
Cultivating dawn redwood bonsai trees allows bonsai enthusiasts to connect with the history and evolution of trees. These living fossils provide a captivating glimpse into the past while offering endless possibilities for artistic expression in the present.
The Essential Environmental Conditions for Your Redwood Bonsai Tree
Optimal Placement and Sunlight Needs
Proper placement is crucial for the health and growth of your redwood bonsai tree. These trees require a location that provides them with the right amount of sunlight and protection from extreme temperatures. Here are some important considerations for optimal placement:
Sunlight: Redwood bonsai trees thrive in bright, indirect sunlight. Place your tree in an area where it can receive at least 4-6 hours of sunlight each day. However, be cautious of excessive direct sunlight, especially during the hot summer months, as it can lead to sunburn and leaf damage.
Indoor vs. Outdoor: Redwood bonsai trees can be grown both indoors and outdoors. If you choose to keep your tree indoors, place it near a south-facing window where it can receive ample sunlight. Outdoor placement should be in a location with partial shade, especially during the hottest parts of the day.
Shelter: Protect your redwood bonsai tree from strong winds and heavy rain. Placing it near a wall or under the cover of a taller plant can help provide the necessary protection.
Protecting Your Redwood Bonsai from Extreme Temperatures
Redwood bonsai trees are sensitive to extreme temperature fluctuations. Here are some tips to safeguard your tree from temperature-related stress:
Cold weather: Redwood bonsai trees can tolerate cooler temperatures down to around 20°F (-6°C). However, it’s essential to protect them from freezing temperatures by bringing them indoors or placing them in a sheltered location during winter.
Hot weather: Redwood bonsai trees prefer mild to moderately warm temperatures. If you live in an area with scorching summers, consider shading your tree during the hottest part of the day or relocating it to a cooler spot. Adequate airflow and regular misting can also help prevent heat stress.
By understanding and providing the essential environmental conditions for your redwood bonsai tree, you can ensure its optimal growth and well-being. Remember to find the right balance of sunlight, protection, and temperature control to create a thriving environment for your redwood bonsai.
Mastering Watering Techniques for a Healthy Redwood Bonsai
Proper watering is crucial for the health and vitality of redwood bonsai trees. These unique trees have specific watering requirements that must be met to ensure their well-being. In this section, we will explore different watering techniques and strategies to help you master the art of watering your redwood bonsai.
1. Understanding the Watering Needs
Redwood bonsai trees prefer consistently moist soil, but it is essential to avoid overwatering, as it can lead to root rot and other issues. Before watering, always check the moisture levels of the soil to determine if watering is necessary. A good technique is to insert a wooden skewer into the soil; if it comes out slightly damp, your bonsai has sufficient moisture.
2. Watering Frequency and Amount
Redwood bonsai trees typically require more frequent watering compared to other bonsai species. As a general rule, water your redwood bonsai when the soil starts to feel slightly dry to the touch. However, avoid frequent shallow watering as it can lead to poor root development. Instead, water deeply, allowing the water to penetrate the entire root system.
3. Watering Techniques
There are several effective watering techniques that can help ensure your redwood bonsai receives the right amount of moisture:
Submerging: Place your redwood bonsai pot in a basin of water and allow it to soak until the soil is thoroughly and evenly moistened.
Top Watering: Gently pour water onto the soil surface, ensuring the water reaches all areas of the pot. Take care not to disturb the soil or foliage.
Misting: Mist the leaves of your redwood bonsai tree regularly to increase humidity and prevent dehydration.
4. Avoiding Common Watering Mistakes
To ensure the health of your redwood bonsai, be mindful of these common watering mistakes:
Overwatering: Avoid the temptation to water your redwood bonsai excessively, as it can lead to root rot and other problems.
Underwatering: Redwood bonsai trees need consistent moisture, so do not let the soil dry out completely between waterings.
Watering on a Schedule: Instead of watering on a rigid schedule, observe your redwood bonsai’s specific needs and adjust accordingly.
5. Maintaining Proper Soil Moisture
Consistently monitoring and maintaining the proper soil moisture is essential for the health of your redwood bonsai tree. Some tips to help you achieve this:
Well-Draining Soil: Ensure that your redwood bonsai is planted in a well-draining soil mix that retains moisture without becoming waterlogged.
Use a Humidity Tray: Placing your redwood bonsai pot on a humidity tray filled with water can help increase humidity levels around the tree, preventing the soil from drying out too quickly.
Protect from Direct Sunlight: Redwood bonsai trees can be sensitive to intense sunlight, which can quickly dry out the soil. Shield your bonsai from direct sunlight during the hottest parts of the day.
By mastering watering techniques and understanding the unique watering needs of redwood bonsai trees, you can ensure the health and vitality of your miniature masterpiece. Proper watering contributes to the overall beauty and longevity of your redwood bonsai, allowing you to enjoy its captivating presence for years to come.
Fertilizing Your Redwood Bonsai: Timing and Nutrient Requirements
Fertilization is essential for the growth and development of your redwood bonsai tree. Proper timing and nutrient requirements play a crucial role in ensuring its health and vitality. In this section, we will explore the best practices for fertilizing your redwood bonsai and provide guidance on choosing the right fertilizer to meet its specific needs.
Choosing the Right Fertilizer
When it comes to fertilizing your redwood bonsai, selecting the appropriate fertilizer is paramount. Consider the following factors to make an informed decision:
Nutrient Content: Opt for a well-balanced fertilizer with a higher nitrogen (N) content to promote healthy foliage growth and overall vigor.
Slow-Release or Liquid: Choose between slow-release pellets or liquid fertilizers, depending on your preference and the specific needs of your redwood bonsai.
Organic or Synthetic: Both organic and synthetic fertilizers can be effective. Organic options provide slow and steady nutrient release, while synthetic fertilizers offer a more immediate boost.
By considering these factors, you can select a fertilizer that meets the nutrient requirements of your redwood bonsai tree and promotes its overall well-being.
Preventing Overgrowth Through Controlled Fertilization
While fertilization is crucial for the health of your redwood bonsai, it’s essential to prevent overgrowth by implementing controlled fertilization practices. Here are some tips to ensure optimal growth without causing excessive and unruly foliage:
Timing: Fertilize your redwood bonsai during the growing season, typically from early spring to early autumn. This helps maintain a balance between growth and controlled development.
Dilution: Dilute the fertilizer to half or quarter strength to avoid overwhelming your bonsai with excessive nutrients.
Frequency: Apply fertilizer sparingly and consistently at regular intervals, rather than in large quantities all at once.
Monitoring: Regularly observe the growth patterns of your redwood bonsai and adjust the fertilization regimen accordingly to prevent excessive growth and maintain its desired form.
By implementing these controlled fertilization techniques, you can prevent overgrowth and maintain the aesthetic appeal of your redwood bonsai tree.
Pruning and Shaping: The Artful Practice in Bonsai Gardening
Pruning and shaping are integral aspects of bonsai gardening that allow you to create stunning and visually captivating tree forms. When it comes to redwood bonsai trees, the art of pruning and shaping takes on a whole new level of importance. Redwood bonsai trees are known for their unique qualities and majestic nature, making them the perfect canvas for your artistic expression.
When it comes to pruning and shaping your redwood bonsai tree, it’s important to understand the techniques, timing, and tools required to achieve the desired shapes and styles. Pruning involves selectively removing branches and foliage to enhance the tree’s overall form and balance. Shaping, on the other hand, involves guiding the tree’s growth by wiring branches and trunk to create artistic and harmonious tree silhouettes.
Here are some key considerations to keep in mind when pruning and shaping your redwood bonsai tree:
Start with a plan: Before you begin pruning and shaping, envision the desired shape and style for your redwood bonsai tree. This will serve as your guide throughout the process.
Timing is everything: Prune and shape your redwood bonsai tree during its dormant period, typically in late winter or early spring. This allows the tree to heal and recover before entering its growth phase.
Use the right tools: Invest in high-quality bonsai pruning shears, concave cutters, and wire cutters. These tools will help you make precise cuts and manipulate branches with accuracy.
Start small: Begin by pruning and shaping small branches and foliage. Gradually work your way up to larger branches, always keeping the tree’s overall design in mind.
Be patient: Pruning and shaping a redwood bonsai tree is a gradual process that takes time. Don’t rush the process and allow the tree to respond and grow in its own time.
Remember, the art of pruning and shaping is about finding a balance between nature and your artistic vision. Take inspiration from the natural growth patterns of the redwood tree and use them as a guide to create a harmonious and aesthetically pleasing bonsai masterpiece.
Pruning and Shaping Tips for Redwood Bonsai Trees
Start with a clear plan and vision
Prune and shape during the tree’s dormant period
Invest in quality bonsai pruning tools
Begin with small branches and gradually work your way up
Be patient and allow the tree to respond and grow
By honing your pruning and shaping skills, you can unlock the true artistic potential of your redwood bonsai tree. Let your creativity and love for bonsai gardening guide you as you transform your tree into a living masterpiece that showcases the beauty of nature and the artistry of your care.
Repotting Your Redwood Bonsai: Encouraging Vigorous Growth While Avoiding Root Rot
Repotting is an essential practice in maintaining the health and vigorous growth of your redwood bonsai tree. By repotting, you provide fresh nutrients and optimize the root system, ensuring its overall well-being. In this section, we will explore the frequency and timing of repotting your redwood bonsai, as well as the importance of selecting the right soil mix to balance moisture and drainage. Additionally, we will provide step-by-step instructions on how to repot your redwood bonsai tree and offer tips for avoiding root rot.
The Frequency and Timing of Repotting
Knowing the right time to repot your redwood bonsai tree is crucial. As a general rule, repotting should occur every 2-3 years, allowing the tree’s roots to remain healthy and promote new growth. However, consider the following factors to determine the best timing for repotting:
The age of your bonsai tree: Younger trees require more frequent repotting, typically every 1-2 years, to encourage their root systems to develop properly.
The health of the tree: If your redwood bonsai shows signs of root congestion or if the existing soil has degraded, it is advisable to repot regardless of the time frame.
The growth rate: Redwood bonsai trees with fast growth rates may need more frequent repotting than those with slower growth.
The Soil Mix – Balancing Moisture and Drainage
The choice of soil mix is crucial in maintaining the proper moisture and drainage levels for your redwood bonsai tree. It should provide the necessary nutrients while allowing excess water to drain effectively. Here are some key points to consider when selecting a soil mix:
The redwood bonsai tree’s natural habitat: Redwood trees thrive in well-draining soil with a slightly acidic pH. Mimic their natural environment by using a soil mix that consists of a combination of organic and inorganic components.
Organic components: Include organic materials such as peat moss, pine bark, or coconut coir to retain moisture and provide nutrients to the tree.
Inorganic components: Incorporate inorganic components like pumice, lava rock, or perlite to ensure proper drainage and prevent the soil from becoming overly compacted.
The water-retaining capacity: Strike a balance by adjusting the ratio of organic to inorganic components in your soil mix, taking into account the specific moisture needs of your redwood bonsai tree.
By finding the right balance, you can create an optimal soil mix that promotes healthy root growth and prevents waterlogged conditions.
Favored Components
Drainage Level
Moisture Retention
Peat moss
Low
High
Pine bark
Moderate
Moderate
Coconut coir
High
High
Pumice
High
Low
Lava rock
High
Low
Perlite
High
Low
Table: Components for Redwood Bonsai Soil Mix
Use this table as a guide to create a suitable soil mix for your redwood bonsai tree, adjusting the ratios based on the desired drainage level and moisture retention.
Now that you understand the importance of repotting your redwood bonsai tree and the factors to consider, let’s move on to the step-by-step repotting process.
Propagation Techniques for Expanding Your Redwood Bonsai Collection
If you’re looking to expand your redwood bonsai collection and create new trees, propagation is an exciting and rewarding technique to explore. By utilizing two effective propagation techniques – starting new trees from cuttings and advancing growth with air-layering – you can unlock endless possibilities in the art of bonsai gardening.
Starting New Trees from Cuttings
Starting new redwood bonsai trees from cuttings is a popular propagation method that allows you to reproduce the unique characteristics of your existing trees. To begin, select a healthy branch with young and vigorous growth. With a clean and sharp bonsai pruning shear, make a clean diagonal cut just below a leaf node, ensuring a length of approximately 4-6 inches.
Remove any foliage from the bottom third of the cutting, and dip the cut end in a rooting hormone to encourage root development. Plant the cutting in a well-draining bonsai soil mix, and place it in a warm and humid environment. Mist the cutting regularly to maintain moisture levels, and provide indirect sunlight for optimal growth.
Advancing Growth with Air-Layering
Air-layering is another effective propagation technique that allows you to create new redwood bonsai trees while retaining the natural charm of the parent tree. Select a healthy branch and identify a section where you want the roots to develop. With a sharp knife, make a vertical cut through the bark, followed by a horizontal cut to create a ring around the branch.
Apply rooting hormone to the exposed area, and wrap it with moist sphagnum moss. Secure the moss with plastic wrap, making sure to seal the ends tightly. Over time, the branch will develop roots within the moss layer. Once the roots have formed, carefully remove the air-layered section, and plant it in a suitable bonsai pot with well-draining soil.
By utilizing these propagation techniques, you can expand your redwood bonsai collection and nurture new trees with unique characteristics. Whether you choose to start new trees from cuttings or advance growth through air-layering, the art of bonsai gardening will be further enriched as you witness the beauty and growth of your own propagated redwood bonsai trees.
This page contains some affiliate links. Please check out our affiliate disclaimer for more information
Karen Phillips, Bonsai expert and blogger. Read more about me here
Black Pine Bonsai, or Pinus thunbergii, is prized for its unique features and adaptability. It is also a one of the fastest growing bonsai. We’ll cover pruning, sunlight, watering, fertilizing, and tree selection.
With our guidance, you’ll master black pine bonsai care and create a stunning addition to your indoor or outdoor space. Let’s dive in and explore the art of nurturing these beautiful trees.
Understanding the Unique Features of Black Pine Bonsai
Black Pine Bonsai (Pinus thunbergii) possesses distinctive features that make it stand out among other bonsai tree types. To fully appreciate this captivating plant, it is essential to delve into its unique characteristics, including its growth patterns and adaptation to its natural habitat.
One Flush and Two Flush Growth in Pinus
One of the fascinating aspects of Black Pine Bonsai is its growth pattern. Some varieties of Pinus exhibit one flush of growth per year, while others display two flushes. Understanding this growth behavior is crucial for properly caring for your Black Pine Bonsai.
The one flush growth style in Pinus is characterized by a single, vigorous burst of growth in spring, which is then maintained throughout the year. This pattern is common in younger trees or varieties that have been recently pruned or repotted. On the other hand, the two flush growth style involves a more gradual and balanced growth, with a second flush occurring in summer. This growth pattern is generally observed in more mature Black Pine Bonsai and provides a unique aesthetic appeal.
Adaptation and Significance of the Black Pine’s Natural Habitat
Black Pine Bonsai is native to coastal regions of Japan and is known for its ability to adapt to various climates and soil conditions. In its natural habitat, this resilient tree thrives in sandy and rocky coastal areas, where it withstands strong winds and salt spray.
The significance of understanding the Black Pine’s natural habitat lies in replicating these conditions as closely as possible in bonsai cultivation. By mimicking the coastal environment, you can help your Black Pine Bonsai thrive and maintain its vigor, resilience, and distinctive characteristics.
Identifying Vendor-Grafted Japanese White Pines on Black Pine Rootstocks
In the bonsai market, it is essential to be able to identify vendor-grafted Japanese White Pines on Black Pine rootstocks. Japanese White Pine (Pinus parviflora) is often used as an understock for grafting Black Pine Bonsai. This grafting technique combines the desirable characteristics of the Black Pine foliage and the Japanese White Pine rootstock.
When identifying vendor-grafted Japanese White Pines, look for characteristics such as longer needles and a different color tone on the foliage. These variations can help differentiate between Black Pine Bonsai and vendor-grafted Japanese White Pines on Black Pine rootstocks, ensuring that you select the right tree for your collection.
Unique Features of Black Pine Bonsai
Growth Patterns
One flush growth and two flush growth in Pinus
Adaptation
Thrives in sandy and rocky coastal areas
Significance
Mimicking coastal environment for optimal growth
Identification
Vendor-grafted Japanese White Pines on Black Pine rootstocks
Optimal Bonsai Plant Care for Black Pine Bonsai
Providing optimal care for your Black Pine Bonsai is essential for its health and vitality. To ensure that your Black Pine Bonsai thrives and remains beautiful for years to come, it is important to follow these key aspects of bonsai plant care specific to Black Pine Bonsai:
Proper watering practices: Black Pine Bonsai prefers a consistent level of moisture. Watering should be done when the top layer of soil starts to dry out, avoiding both overwatering and underwatering. It is important to water thoroughly, ensuring that the entire root ball receives sufficient moisture.
Sunlight requirements: Black Pine Bonsai thrives in full sun to partial shade. It is ideal to place your bonsai in a location where it receives at least 6 hours of direct sunlight each day. If indoor cultivation is preferred, providing supplemental lighting can help meet the sunlight requirements.
Fertilization techniques: Regular fertilization is crucial for the health and growth of your Black Pine Bonsai. Use a balanced, slow-release fertilizer or a specially formulated bonsai fertilizer during the growing season. Follow the dosage instructions provided by the manufacturer, and adjust the frequency and strength based on the specific needs of your tree.
General maintenance tips: Black Pine Bonsai requires regular maintenance to ensure its shape and health. This includes regular pruning to maintain its desired form, removing any dead or unhealthy branches, and periodic repotting to refresh the soil and promote proper root growth.
To visualize the optimal care for Black Pine Bonsai, refer to the table below:
Aspect of Care
Recommendation
Watering
Water thoroughly when the top layer of soil begins to dry out. Avoid overwatering and underwatering.
Sunlight
Place in a spot with at least 6 hours of direct sunlight per day. Supplemental lighting may be necessary for indoor cultivation.
Fertilization
Use a balanced, slow-release fertilizer or bonsai-specific fertilizer during the growing season. Adjust frequency and strength according to your tree’s needs.
Maintenance
Regularly prune to maintain shape, remove dead or unhealthy branches, and repot periodically to refresh the soil and promote root growth.
Placement and Sunlight Requirements for Bonsai Care
Proper placement and sunlight requirements play a crucial role in the care of your Black Pine Bonsai. The placement of your bonsai can significantly impact its growth and overall health. Whether you choose to display your bonsai indoors or outdoors, it is important to provide the ideal conditions for its development and rapid growth.
When placing your Black Pine Bonsai indoors, select a location that receives ample natural light. Ideally, choose a spot near a south-facing window where the bonsai can receive at least 6 hours of sunlight each day. If natural light is limited, you can supplement it with artificial grow lights to ensure your bonsai gets the necessary light it needs.
When choosing an outdoor placement for your Black Pine Bonsai, consider the climate and weather conditions in your area. Black Pine Bonsai thrives in full sun or partial shade, depending on the specific variety. Make sure to protect your bonsai from extreme temperatures, strong winds, and frost during winter months.
Remember to rotate your bonsai regularly to ensure even sunlight exposure and prevent the tree from leaning towards one side. By monitoring the placement and sunlight requirements of your Black Pine Bonsai, you can create an optimal environment for its growth and enjoy a healthy and vibrant bonsai tree.
Watering Practices for a Thriving Bonsai Plant
Proper watering practices are crucial for the health and vitality of your Black Pine Bonsai. To ensure your tree receives the appropriate amount of water and maintains optimal moisture levels, follow these guidelines:
Observe the soil moisture: Stick your finger about an inch deep into the soil. If it feels dry, it’s time to water your Bonsai. If it still feels moist, wait a little longer.
Watering frequency: Black Pine Bonsai prefers to be watered thoroughly but less frequently. Watering every 4-5 days during the growing season is typically sufficient, adjusting based on the specific needs of your climate and tree.
Watering technique: Gently water the soil surface, allowing the water to evenly penetrate the entire root system. Avoid using strong jets of water, as they can disturb the soil and damage the delicate roots.
Drainage: Ensure your Bonsai pot has proper drainage holes to prevent waterlogging. Excess water should be able to freely drain out.
Expert tip: Never let your Black Pine Bonsai completely dry out, as it can lead to stress and potential damage. On the other hand, overwatering can cause root rot and other issues. Find the right balance by monitoring soil moisture and adjusting your watering schedule accordingly.
Remember, the specific watering needs of your Black Pine Bonsai may vary based on factors such as climate, pot size, and tree age. Regularly observe and assess your tree’s moisture levels to provide the optimal watering it requires for healthy growth.
Fertilizing Your Black Pine Bonsai: Best Practices and Timing
Fertilization plays a vital role in providing your Black Pine Bonsai with the necessary nutrients for healthy growth. By adopting proper fertilizing practices, you can ensure that your bonsai thrives and displays vibrant foliage. In this section, we will delve into the best practices and timing for fertilizing your Black Pine Bonsai, including the types of fertilizers to use, application techniques, and the importance of seasonal timing.
Types of Fertilizers:
When it comes to fertilizing your Black Pine Bonsai, it is important to choose the right type of fertilizer. Organic fertilizers such as fish emulsion, seaweed extract, and compost are great choices as they provide slow-release nutrients and help improve the overall soil health. Inorganic fertilizers, on the other hand, provide a quick nutrient boost but must be used with caution to avoid burning the roots of your bonsai.
Application Techniques:
Applying fertilizer correctly is crucial to maximize its effectiveness without causing harm to your Black Pine Bonsai. To ensure proper distribution, it is recommended to use a balanced fertilizer with a 10-10-10 NPK ratio. Apply the fertilizer evenly across the soil surface, avoiding direct contact with the trunk or foliage. Always follow the manufacturer’s instructions for application rates and frequency.
Seasonal Timing:
The timing of fertilization is a critical factor in promoting healthy growth and vitality in your Black Pine Bonsai. During the growing season, which typically occurs in spring and summer, it is best to apply a balanced fertilizer every two to four weeks. As the winter season approaches, reduce or stop fertilizing to allow your bonsai to enter its dormant phase. This allows the tree to rest and prepare for the upcoming growing season.
Fertilizing your Black Pine Bonsai is a fundamental aspect of bonsai care that should not be overlooked. By following the best practices and timing guidelines discussed in this section, you can ensure that your bonsai receives the necessary nutrients for optimal growth and maintenance. Remember to always consider the specific needs of your Black Pine Bonsai and adjust your fertilization routine accordingly.
Pruning Bonsai Trees: Techniques for Black Pines
Pruning is an essential technique for maintaining the shape and aesthetics of your Black Pine Bonsai. By utilizing proper pruning techniques, you can ensure that your bonsai remains visually appealing and healthy. In this section, we will explore the specific pruning techniques for Black Pines, including branch pruning, candle pruning, and needle plucking.
Branch pruning involves selectively removing branches to create the desired shape and balance of your Black Pine Bonsai. It is crucial to prune during the appropriate times, such as in late winter or early spring before new growth emerges. This allows the tree to recover quickly and promotes vigorous regrowth.
Candle pruning is a technique specifically used for Black Pines to encourage compact growth. It involves removing the elongated candle-like shoots during spring before they fully extend. By doing so, the tree’s energy is redirected towards lateral growth, resulting in a denser and more appealing foliage structure.
Needle plucking is a method to remove old or damaged needles from your Black Pine Bonsai. It not only improves the tree’s overall appearance but also enhances its health. By selectively plucking the needles, you allow better air circulation and sunlight penetration, reducing the risk of disease and encouraging new bud development.
Remember to always use sharp and clean pruning tools to minimize damage and prevent the spread of diseases. When pruning your Black Pine Bonsai, take care to maintain its natural form and avoid excessive pruning, as this can weaken the tree.
Mastering the art of bonsai pruning takes practice and experience. With time, you will develop an eye for shaping your Black Pine Bonsai and maintaining its health. Embrace the process and enjoy the rewarding journey of crafting a beautiful and harmonious bonsai tree.
Black Pine Bonsai for Sale: Selecting and Purchasing the Right Tree
If you’re enthusiastic about adding a Black Pine Bonsai to your collection, it’s important to know how to select and purchase the right tree. By considering key factors such as tree age, health, and aesthetics, you can ensure that you make an informed decision and find a Black Pine Bonsai that meets your preferences and requirements.
When selecting a Black Pine Bonsai for sale, start by looking for a tree with a desirable age. Younger trees offer more flexibility in shaping and styling, allowing you to develop a bonsai that reflects your artistic vision. On the other hand, older trees may already possess a well-established form and require less time for maturity.
Tree health is another crucial consideration. Look for Black Pine Bonsai trees that exhibit vibrant foliage, healthy bark, and no signs of pests or diseases. Inspect the root system as well, ensuring it’s well-developed and not overly pot-bound.
Aesthetics play a significant role in the selection process. Take your time to find a Black Pine Bonsai with a pleasing trunk shape and balanced branching structure. Keep in mind that bonsai trees are living artworks, so finding one that resonates with your personal taste is essential.
Karen Phillips, Bonsai expert and blogger. Read more about me here
Welcome to our comprehensive guide on caring for your swamp cypress bonsai. Throughout this guide, we will explore the unique characteristics of the swamp cypress bonsai and provide you with valuable tips on bonsai tree care. From understanding its history and origin to mastering pruning, watering, fertilizing, and re-potting techniques, you’ll discover everything you need to know to nurture your bonsai.
So, whether you have a passion for bonsai or simply want to add a touch of nature and tranquility to your home, this guide is the perfect companion to help you cultivate and nurture your very own swamp cypress bonsai trees.
Understanding Your Swamp Cypress Bonsai
In this section, we will delve into the rich history and origin of the swamp cypress bonsai tree, also known as Taxodium distichum. We will explore its unique identifying characteristics, such as its bark, leaves, and cypress knees. Additionally, we will compare the swamp cypress with other popular bonsai tree species to understand its distinct qualities.
The Rich History and Origin of Taxodium distichum
The swamp cypress bonsai tree, scientifically known as Taxodium distichum, has a fascinating history and origin. It is native to the southeastern United States and is often found in wetland areas such as swamps and marshes. The tree has been cultivated for centuries, with its bonsai form dating back to ancient Japan. The swamp cypress bonsai is highly regarded for its beauty and distinctive features.
Identifying Characteristics: Bark, Leaves, and Cypress Knees
One of the unique characteristics of the swamp cypress bonsai is its bark. The bark starts out reddish-brown and turns grayish-brown as the tree matures. It has a fibrous texture that adds visual interest to the bonsai’s overall appearance.
The leaves of the swamp cypress bonsai are needle-like and typically emerge in a bright green color. As the seasons change, the leaves transition to an attractive bronze or reddish-brown hue before falling in the winter. This seasonal color change creates a stunning display.
Another notable feature of the swamp cypress bonsai is the presence of cypress knees. These are unique structures that protrude from the roots and can add a sense of character and depth to the bonsai’s design. Cypress knees are believed to aid in the tree’s stability and water intake.
Comparing Swamp Cypress with Other Bonsai Species
The swamp cypress bonsai is a distinct species within the realm of bonsai trees. While it shares some characteristics with other bonsai species, such as the need for proper care and attention, it possesses its own unique qualities. When compared to other bonsai tree species, the swamp cypress stands out for its:
Adaptability to wetland environments
Seasonal color changes
Fibrous and interesting bark
Possession of cypress knees
These qualities make the swamp cypress bonsai a desirable choice for bonsai enthusiasts looking to cultivate a tree with distinctive features.
Where to Place Your Bonsai for Optimal Growth
Proper placement is essential for the optimal growth of your swamp cypress bonsai tree. To ensure your bonsai thrives, it’s important to consider its sunlight requirements, protection from extreme weather conditions, and the appropriate level of humidity.
When choosing a location for your bonsai, keep the following tips in mind:
Place your bonsai tree in an area that receives ample sunlight. Most bonsai trees, including the swamp cypress, thrive in bright, indirect light. Avoid placing your bonsai in areas with prolonged exposure to direct sunlight, as it can lead to leaf burn.
Protect your bonsai from extreme weather conditions, such as strong winds and frost. Consider placing it near a wall, under a shade tree, or in a sheltered area to shield it from harsh elements.
Maintain the right level of humidity for your bonsai. The ideal humidity range for most bonsai trees, including swamp cypress, is between 40% and 60%. You can increase humidity by placing a humidity tray filled with water near your bonsai or by using a humidifier in dry environments.
By carefully selecting the placement of your bonsai, you can provide it with the optimal conditions for growth and ensure its long-term health and vitality.
Watering Cypress Bonsai Trees
Proper watering is crucial for the health and vitality of your swamp cypress bonsai tree. In this section, we will provide you with essential guidelines on how to effectively water your bonsai and maintain the right moisture level for optimal growth.
Watering frequency depends on various factors such as climate, humidity, and the size of your bonsai pot. As a general rule, it is recommended to water your swamp cypress bonsai regularly, allowing the soil to slightly dry out between waterings. This will ensure that the roots receive adequate hydration without becoming overly saturated.
When watering your bonsai, it is essential to use the right technique. Instead of pouring water directly onto the foliage, gently water the base of the tree, allowing the water to seep into the soil and reach the roots. This will promote deep root growth and prevent unnecessary foliage damage.
Avoid overwatering your swamp cypress bonsai as it can lead to root rot and other detrimental conditions. It is better to slightly underwater than to overwater. Remember, roots need both water and oxygen to thrive.
To determine when to water your bonsai, it is helpful to check the moisture level of the soil. You can do this by inserting a wooden chopstick or your finger into the soil. If it comes out slightly damp, it is an indication that your bonsai does not require immediate watering. However, if it comes out dry, it is time to water your tree.
As a beginner, it is recommended to keep a watering schedule and monitor the moisture level regularly. This will help you establish a watering routine that suits your specific bonsai tree.
Remember, each bonsai tree is unique, and its water requirements may vary. Pay attention to the specific needs of your swamp cypress bonsai and adjust your watering routine accordingly.
Nourishing Your Bonsai: Fertilizing Techniques
Fertilizing is crucial for providing essential nutrients to your swamp cypress bonsai tree. By nourishing your bonsai tree with the right fertilizing techniques, you can promote its overall health and growth.
When it comes to fertilizing your bonsai tree, it’s important to choose the right type of fertilizer that suits the specific needs of your swamp cypress. Look for a well-balanced, slow-release fertilizer that contains the necessary nutrients, such as nitrogen, phosphorus, and potassium.
To ensure optimal growth, fertilize your bonsai tree during the growing season, which typically starts in early spring and ends in late summer or early fall. This is when your bonsai tree requires the most nutrients to support its vigorous growth and development.
When applying fertilizer to your bonsai tree, follow the instructions provided on the fertilizer packaging. It’s essential to apply the correct amount of fertilizer to prevent overfertilization, which can harm your tree. Remember to water your bonsai tree thoroughly before and after fertilizing to help the nutrients penetrate the soil.
Tip: Consider using organic fertilizers to nourish your bonsai tree. These fertilizers are derived from natural sources and help enhance the overall soil quality, promoting the well-being of your swamp cypress bonsai.
In conclusion, fertilizing your bonsai tree is an essential aspect of its care. By choosing the right type of fertilizer, timing your fertilization correctly, and applying the fertilizer properly, you can provide your swamp cypress bonsai with the necessary nutrients for healthy growth and vibrant foliage.
Fertilizing Techniques for Swamp Cypress Bonsai
Choose a well-balanced, slow-release fertilizer
Fertilize during the growing season (early spring to late summer/early fall)
Consider using organic fertilizers for improved soil quality
Maintaining Shape and Health: Pruning and Wiring
Pruning and wiring are essential techniques for maintaining the shape and health of your swamp cypress bonsai tree. By carefully pruning and wiring your bonsai, you can create beautiful and harmonious designs that enhance the aesthetic appeal of your tree.
When it comes to bonsai tree pruning, timing is key. Prune your tree during its dormant period, typically in late winter or early spring. Begin by removing any dead or damaged branches to promote healthy growth. Use sharp, clean pruners to make precise cuts, ensuring smooth edges that heal quickly.
Next, analyze your tree’s structure and envision the desired shape. Carefully prune back branches to maintain the tree’s overall form and proportions. Remember to consider the future growth of each branch, ensuring an open and well-balanced canopy. Regular pruning will prevent overcrowding and allow sunlight to reach the inner branches for optimal growth.
After pruning, it’s important to take into account the health of your tree. Applying a wound sealant, such as cut paste or pruning seal, can protect the tree from infections and promote healing. However, for swamp cypress bonsai trees, which have excellent healing capabilities, sealants may not be necessary.
Wiring is another technique used to shape and style your bonsai tree. Select flexible bonsai wire that matches the thickness of the branch you intend to wire. Gently wrap the wire around the branch, starting from the base and moving upward. Make sure the wire is snug but not too tight, allowing room for growth.
Avoid crossing wires and position them at an angle that creates natural movement. Wiring allows you to create curves, bends, and twists, guiding the branches in the desired direction. However, be mindful not to leave the wire on for too long, as it may leave marks or cut into the bark.
Mastering the Re-potting of the Bald Cypress Bonsai
Re-potting is an essential process to ensure the continued health and growth of your bald cypress bonsai tree. By providing your bonsai with fresh soil and adequate space for root development, you can create optimal conditions for its long-term well-being.
When re-potting your bald cypress bonsai, there are several important steps to follow:
Selecting the right time: Re-potting is typically done every 2-3 years, ideally during early spring before new growth begins. This allows the roots to establish in the new pot before entering their active growth phase.
Preparing the tree: Carefully remove the bonsai tree from its current pot, gently teasing out the roots to untangle any densely packed areas. Trim any damaged or excessively long roots, ensuring a balanced root system.
Choosing the right soil: Bald cypress bonsai trees thrive in well-draining soil. Use a mix of Akadama, pumice, and lava rock, which promotes healthy root growth and prevents waterlogging. The soil should be slightly acidic.
Repotting the tree: Place a layer of soil in the new pot, ensuring it covers the drainage holes. Position the bonsai tree in the center of the pot, spreading out the roots evenly. Fill the remaining space with soil, gently working it around the roots to eliminate air pockets. Leave a small gap at the top to allow for watering.
Watering and aftercare: After re-potting, thoroughly water the bonsai to settle the soil and remove any excess air. Place the bonsai in a shaded location for about two weeks to minimize stress. Gradually reintroduce it to sunlight, monitoring its water needs closely during this recovery period.
Mastering the re-potting process is crucial for the long-term vitality of your bald cypress bonsai. By following these steps and providing your bonsai with the right care, you can ensure its continued growth and beauty.
Propagating Your Swamp Cypress Bonsai
Propagating your swamp cypress bonsai tree is an exciting way to expand your collection or share the beauty of bonsai with others. In this section, we will explore two methods of propagating your bonsai: using seeds and cuttings.
To propagate your swamp cypress bonsai tree from seeds, follow these steps:
Harvest seeds from mature cones of the parent tree.
Clean the seeds to remove any debris.
Soak the seeds in water for 24 hours to enhance germination.
Prepare a seed tray or small pots with a well-draining soil mixture.
Plant the seeds about 1/4 inch deep in the soil.
Place the tray or pots in a shaded area with indirect sunlight.
Keep the soil consistently moist but not waterlogged.
Germination usually takes several weeks to a few months.
Once the seedlings have developed into small trees, carefully transplant them into individual bonsai pots.
Alternatively, you can propagate your swamp cypress bonsai tree through cuttings:
Select a healthy branch for cutting, preferably from the parent tree.
Using sharp and clean pruners, cut a 4-6 inch section of the branch just below a leaf node.
Remove the lower leaves, leaving only a few at the top.
Dip the cut end in a rooting hormone powder to encourage root development.
Prepare a rooting medium of well-draining soil or a mix of perlite and peat moss.
Insert the cutting about an inch deep into the rooting medium.
Place the pot or tray in a warm and humid environment with indirect sunlight.
Keep the soil slightly moist, not overly wet.
Roots should start developing in a few weeks to a couple of months.
Once the cuttings have established a good root system, transplant them into individual bonsai pots.
By following these propagation techniques, you can successfully create new swamp cypress bonsai trees and continue to enjoy the art of bonsai.
Pest and Disease Prevention
Protecting your swamp cypress bonsai tree from pests and diseases is vital to its overall health and long-term survival. In this section, we will explore the common pests and diseases that can pose a threat to your bonsai tree and provide effective preventive measures to ensure its continued thriving.
Pest Prevention:
Common pests that can infest your bonsai tree include aphids, spider mites, and scale insects. To prevent infestations, regularly inspect your tree for any signs of pests, such as distorted leaves, sticky residue, or tiny insects. If you spot any pests, take immediate action by manually removing them or using an organic insecticidal soap. Additionally, promoting a healthy growing environment by maintaining proper watering, fertilizing, and sunlight conditions will strengthen your bonsai tree’s natural defenses against pests.
Disease Prevention:
Bonsai tree diseases, such as root rot and fungal infections, can be detrimental to your swamp cypress’s health. To prevent diseases, ensure proper drainage by using well-draining soil and avoiding overwatering. Additionally, sanitize your tools before each use to prevent the spread of pathogens. If you notice any signs of disease, such as yellowing leaves, wilting, or unusual spots, take prompt action by pruning away the affected parts and applying a suitable fungicide, following the product’s instructions carefully.
By prioritizing pest and disease prevention, you can safeguard the long-term beauty and vitality of your swamp cypress bonsai tree. Regular monitoring, proper care practices, and swift action when needed will contribute to a healthy and thriving bonsai tree that brings you joy and admiration for years to come.
Karen Phillips, Bonsai expert and blogger. Read more about me here
If you’re fascinated by the beauty and artistry of bonsai and want to explore the world of crepe myrtle bonsai, you’ve come to the right place. In this guide, we will provide you with all the essential information you need to grow and care for your crepe myrtle bonsai tree.
Crepe myrtle bonsai is a stunning miniature version of the crepe myrtle tree, known for its beautiful flowers and unique features. It is a popular choice among bonsai enthusiasts, offering a captivating combination of delicate foliage, exquisite flowers, and an elegant trunk.
Throughout this guide, we will cover various aspects of crepe myrtle bonsai care, including optimal placement, watering techniques, fertilizing tips, pruning and shaping techniques, repotting essentials, propagation methods, dealing with pests and diseases, and seasonal care tips.
The Unique Features of Crepe myrtle Bonsai
Crepe myrtle bonsai showcases several distinct features that have made it a popular choice among bonsai enthusiasts. Its exquisite flowers, dappled bark, and vibrant autumn foliage make it a visually striking addition to any bonsai collection.
Flowers: One of the standout features of crepe myrtle bonsai is its stunning flowers. These petite trees produce clusters of delicate pink, white, or purple flowers with crinkled petals. The vibrant blossoms add a touch of elegance and charm to the bonsai display.
Bark: The smooth beige dappled bark is another unique characteristic of crepe myrtle bonsai. As the tree matures, the bark gradually peels, revealing a complex texture that adds visual interest to the trunk. The peeling bark creates an intriguing element of natural beauty in the bonsai composition.
Foliage: The oval-shaped leaves of crepe myrtle bonsai add to its overall appeal. During autumn, the leaves undergo a breathtaking transformation, turning vibrant shades of yellow and orange-red. This display of seasonal color adds depth and warmth to the bonsai arrangement.
There are various crepe myrtle varieties available, each with its own unique features and characteristics. Whether you prefer a compact bonsai with smaller flowers or a tree with a more dramatic bark texture, there is a crepe myrtle variety to suit your aesthetic preferences.
Optimal Placement for Your Crepe Myrtle Bonsai
Proper placement is crucial for the health and growth of your crepe myrtle bonsai. By providing the right conditions, you can ensure that your bonsai thrives and flourishes. Here are some considerations for optimal placement:
Benefits of Full Sun Exposure
Your crepe myrtle bonsai thrives in full sun exposure. This means placing it in a location where it receives direct sunlight for at least six to eight hours a day. Full sun exposure encourages abundant flowering and helps prevent common fungal diseases and insect infestations. It also promotes overall tree vigor and healthy growth. Consider placing your bonsai in a spot that receives ample sunlight throughout the day.
Handling Temperate Climates
In temperate climates, it is essential to protect your crepe myrtle bonsai from freezing temperatures during winter. If you live in an area with cold winters, it is recommended to transfer your bonsai to a cool but frost-free location, such as an unheated garage or a greenhouse. This will prevent damage to the tree and ensure its survival during the colder months. Before transferring, make sure to water the bonsai thoroughly and position it in a suitable spot with adequate light.
Winter Care and Positioning
During the winter months, your crepe myrtle bonsai requires specific care to endure the colder conditions. Position it in a place where it will receive sufficient light, such as a south-facing window or under grow lights. Be mindful to avoid cold drafts and extreme temperature fluctuations. Additionally, adjust your watering routine to avoid overwatering, as the bonsai’s water needs decrease during its dormancy period. Regularly check the soil moisture and water only when necessary to prevent root rot.
By considering the benefits of full sun exposure, handling temperate climates, and providing proper winter care and positioning, you can ensure the optimal placement for your crepe myrtle bonsai. These considerations will promote its health and longevity, allowing you to enjoy the beauty of your bonsai for years to come.
The Art of Watering a Crepe myrtle Bonsai
Proper watering is vital for the health and vigor of your crepe myrtle bonsai. By understanding the watering needs and using appropriate techniques, you can maintain the optimal moisture level and ensure the success of your bonsai tree.
During the growth period, crepe myrtle bonsai requires frequent watering to prevent drying out. The soil should be kept consistently moist, but be careful not to overwater and make it waterlogged.
In winter, when the tree is dormant, reduce watering to avoid over-watering. It is important to strike a balance and provide the right amount of water during different seasons.
To effectively water your crepe myrtle bonsai, follow these watering techniques:
Before watering, check the moisture level of the soil by inserting your finger about an inch deep. If it feels dry, it’s time to water your bonsai.
Water your crepe myrtle bonsai thoroughly until water comes out of the drainage holes at the bottom of the pot.
Avoid splashing water on the foliage to prevent fungal diseases.
Consider using a watering can with a narrow spout or a spray bottle to control the amount of water and target the root zone effectively.
By following these watering techniques and paying attention to the moisture needs of your crepe myrtle bonsai, you can help ensure its healthy growth and longevity.
Fertilizing Your Crepe myrtle Bonsai Tree
Proper fertilization is essential to ensure the healthy growth and development of crepe myrtle bonsai. By providing the necessary nutrients, you can support your bonsai’s overall health and vitality. Here are some fertilizing tips to keep your crepe myrtle bonsai thriving:
Use a balanced liquid fertilizer: During the growing season, apply a balanced liquid fertilizer every two weeks. This will provide your bonsai with the essential nutrients it needs for healthy growth. Be sure to follow the manufacturer’s instructions for proper dilution ratios.
Consider using solid organic fertilizer: In addition to liquid fertilizer, you can also use a solid organic fertilizer to promote healthy growth. Apply the organic fertilizer according to the instructions provided, taking care not to over-fertilize.
Understand the fertilizing needs: It is important to understand the specific fertilizing needs of crepe myrtle bonsai. Different bonsai varieties may have slightly different requirements, so it’s essential to research and follow the recommended guidelines for your specific tree.
Remember to fertilize your crepe myrtle bonsai consistently and in moderation. Over-fertilization can lead to nutrient burn and other issues. By following these fertilizing tips, you can provide your bonsai with the necessary nutrients for healthy growth and beautiful blooms.
Pruning and Shaping Techniques for Crepe myrtle Bonsai
Pruning and shaping are essential techniques for maintaining the desired form and aesthetic appeal of your crepe myrtle bonsai. By carefully applying these techniques, you can create a visually appealing bonsai tree that captures the essence of the crepe myrtle species.
Pruning should be performed at the end of the summer season to encourage bud production for the following year. It involves selectively removing branches and foliage to refine the overall shape of the tree and maintain its miniature size. However, it is crucial to exercise caution and avoid damaging the beautiful bark of the crepe myrtle bonsai while pruning.
For shaping purposes, wiring can be used to guide the growth of the tree and create the desired artistic form. The wire is carefully wrapped around the branches and trunk, gently bending them into the desired shape. However, it is important to take precautions and avoid applying too much pressure or leaving the wire on for an extended period, as it can cause injury to the tree.
If you prefer an alternative approach to wiring, guy-wires can be utilized to shape the crepe myrtle bonsai. These wires are attached to the branches and trunk, gently pulling them in the desired direction. Guy-wires provide a more flexible and less intrusive method of shaping the bonsai tree.
Understanding the proper pruning and shaping techniques is crucial for achieving a visually appealing crepe myrtle bonsai. By practicing these techniques with care and precision, you can transform your bonsai tree into a miniature masterpiece that reflects the natural beauty of its larger counterpart.
Repotting Essentials for a Healthy Crepe myrtle Bonsai
Repotting plays a crucial role in maintaining the health and vitality of your crepe myrtle bonsai. It is recommended to repot your bonsai every two to three years to ensure optimal growth and development. Repotting provides an opportunity to refresh the soil, remove any excess roots, and promote root development in a suitable container.
When repotting your crepe myrtle bonsai, it is important to use a well-draining soil mix that includes organic ingredients. This helps provide the necessary nutrients and promotes healthy growth. Consider using a mixture of Akadama, pumice, and organic compost to create an ideal growing medium.
To begin the repotting process, gently remove the bonsai from its current container. Carefully prune any circling or compacted roots, ensuring that the root ball is not excessively disturbed. Trim any roots that are too long or damaged, and ensure there is enough space for new root growth.
Prepare the new pot by adding a layer of fresh soil at the bottom, creating a mound in the center to support the bonsai’s root system. Place the bonsai on the mound, spreading out the roots evenly. Fill the pot with the prepared soil mix, ensuring that the roots are covered and held securely in place.
After repotting, water the bonsai thoroughly to settle the soil and eliminate air pockets. Place the bonsai in a sheltered area where it can recover from the repotting process. Protect it from direct sunlight and monitor its watering needs closely during this period.
Remember to mark the date of repotting on your calendar to keep track of when the next repotting should occur. This will help ensure that your crepe myrtle bonsai stays healthy and continues to thrive.
Methods of Propagating Crepe myrtle Bonsai
Propagating crepe myrtle bonsai is an exciting and rewarding process that allows you to grow new trees and expand your collection. There are two primary methods of propagation: starting from seeds and growing from cuttings. Each method has its own advantages and requirements, so let’s explore them in detail:
Starting From Seeds
If you have patience and enjoy watching the growth process from the very beginning, starting crepe myrtle bonsai from seeds is a great option. Here’s a step-by-step guide to help you get started:
Collect ripe seeds from a healthy crepe myrtle tree.
Remove the seeds from their protective capsules.
Soak the seeds in water overnight to break their dormancy and improve germination.
Fill a seed starting tray with a well-draining soil mix.
Plant the seeds about 1/4 inch deep in the soil.
Keep the soil consistently moist, but avoid overwatering.
Place the tray in a warm and brightly lit area, preferably with temperatures around 70-75°F (21-24°C).
Germination can take anywhere from a few weeks to a few months. Be patient and provide the necessary care.
Once the seedlings have developed a few pairs of true leaves, you can transplant them into individual pots.
Continue caring for the seedlings as they grow, providing adequate sunlight, watering, and fertilization.
Over time, your seedlings will mature into beautiful crepe myrtle bonsai trees.
Growing From Cuttings
If you prefer a faster and more reliable method of propagation, growing crepe myrtle bonsai from cuttings is the way to go. Here’s how you can do it:
Take a cutting from a healthy crepe myrtle tree in late spring or early summer.
Choose a stem that is about 4-6 inches long and has several leaf nodes.
Remove the lower leaves, leaving only a few at the top.
Dip the cut end of the cutting in a rooting hormone to promote root development.
Prepare a well-draining soil mix in a small pot or container.
Make a hole in the soil and insert the cutting, ensuring that at least two leaf nodes are buried in the soil.
Water the cutting thoroughly and place it in a warm and bright location.
Maintain high humidity around the cutting by covering it with a plastic bag or using a misting system.
Roots should start developing within a few weeks.
Once the cutting has developed a strong root system, it can be transplanted into a larger pot or bonsai container.
Continue caring for the young plant, providing appropriate watering, sunlight, and fertilization.
With time and proper care, your cutting will transform into a magnificent crepe myrtle bonsai.
Propagation is a fascinating aspect of bonsai cultivation, allowing you to create new trees while enjoying the nurturing process. Whether you choose to start from seeds or grow from cuttings, understanding the propagation methods and following the recommended steps will increase your chances of success. So, roll up your sleeves, get your hands dirty, and embark on the journey of propagating your own crepe myrtle bonsai!
Propagation Method
Advantages
Starting From Seeds
Opportunity to witness the entire growth processPotential for unique variations in new seedlingsCost-effective compared to purchasing mature bonsai
Growing From Cuttings
Quicker method with higher success ratesAbility to replicate the characteristics of the parent treeGreater control over the bonsai’s form and style
Pests and Diseases Affecting Crepe myrtle Bonsai
Crepe myrtle bonsai, like any other plant, can be vulnerable to pests and diseases. Taking prompt action and implementing preventive measures can help keep your crepe myrtle bonsai healthy and thriving. Common pests that may affect crepe myrtle bonsai include aphids, scale, mealybugs, and whiteflies. These pests can cause damage to the leaves, stems, and flowers of your bonsai tree.
You can control these pests using appropriate insecticides or physical methods. Regularly inspect your bonsai tree for any signs of infestation and take necessary steps to eliminate the pests. In case of severe infestations, consult with a professional or an experienced bonsai enthusiast for guidance.
Mildew is a potential disease that can affect crepe myrtle bonsai. It is a type of fungal infection that can cause white powdery patches on the leaves and stems. To address mildew, you can use specific fungicides that are suitable for crepe myrtle bonsai. Always follow the instructions provided on the fungicide label and apply it as directed.
Prevention is key when it comes to pests and diseases in crepe myrtle bonsai. Maintain good bonsai tree hygiene by regularly removing any fallen leaves or debris that can harbor pests or fungal spores. Ensure proper air circulation around the bonsai tree and avoid overwatering, as excess moisture can create conditions favorable for pests and diseases.
By understanding and being proactive in dealing with common pests and diseases, you can protect the health and beauty of your crepe myrtle bonsai. Regular monitoring, prompt action, and practicing good bonsai care techniques will contribute to the long-term success of your crepe myrtle bonsai.
“Taking prompt action and implementing preventive measures can help keep your crepe myrtle bonsai healthy and thriving.”
Crepe myrtle Bonsai Seasonal Care Tips
Proper seasonal care is crucial for the optimal health and growth of your crepe myrtle bonsai tree. By adjusting watering frequency, fertilizing schedules, pruning techniques, and positioning according to the specific needs of each season, you can ensure that your bonsai thrives and flourishes. Here are some valuable seasonal care tips to help you provide the best care and support for your crepe myrtle bonsai.
Spring: As the warmer months approach, increase your watering frequency to keep the soil consistently moist. This is a crucial time for growth, and providing adequate water will promote the development of vibrant flowers and lush foliage. Additionally, consider applying a balanced liquid fertilizer to provide the necessary nutrients for healthy growth and blooming.
Summer: During the hot summer months, it’s important to protect your crepe myrtle bonsai from intense sunlight and high temperatures. Provide partial shade to prevent leaf scorch and ensure the tree’s well-being. Keep a close eye on soil moisture levels and adjust your watering routine accordingly, taking care not to overwater.
Fall and Winter: As the weather starts to cool down, gradually reduce the frequency of watering to avoid over-saturating the soil. This will help prepare your bonsai for dormancy during the winter months. Pruning can be done during fall to shape the tree and remove any dead or damaged branches. If you live in a region with freezing temperatures, it’s important to transfer your bonsai to a protected area or use suitable insulation to shield it from cold winds and frost.
By following these seasonal care tips for your crepe myrtle bonsai, you’ll create optimal growing conditions and ensure the long-term health and beauty of your tree. Remember to always observe the unique requirements of each season and make adjustments accordingly. Your dedication and attention to detail will be rewarded with a thriving and stunning crepe myrtle bonsai.
Karen Phillips, Bonsai expert and blogger. Read more about me here
Welcome to your complete guide to bonsai trees. Whether you’re a beginner or an experienced enthusiast, this comprehensive guide will provide you with all the knowledge you need to care for and grow your own bonsai trees. From understanding the different types of bonsai trees to mastering the techniques for pruning and watering, this guide has got you covered.
Bonsai trees are a unique and artistic hobby that involves cultivating trees and plants in containers to create stunning miniature landscapes. Originating in China over 2,300 years ago, this ancient practice was later embraced by Zen Buddhists in Japan as a form of meditation. Bonsai trees are not a specific species, but rather any tree that is carefully cultivated to stay small through meticulous pruning and root control.
In this guide, you will discover the various types of trees suitable for bonsai, learn about their characteristics and traits, and explore the history and cultural significance of bonsai. You will also dive into the techniques and care required, including the ideal soil, watering routines, pruning and wiring methods, and the importance of repotting. Plus, we’ll cover the special requirements for bonsai trees, the difference between indoor and outdoor bonsai trees, and the various bonsai styles to choose from.
Throughout this journey, we want to equip you with the right tools and knowledge to tackle any challenges you may encounter while growing your bonsai trees. We’ll highlight common mistakes to avoid and provide helpful tips to overcome obstacles. So get ready to embark on a rewarding and artistic journey with your bonsai trees.
What is Bonsai
Bonsai is an ancient art form that involves cultivating and pruning trees and plants in containers, creating intricate miniature landscapes. Originating in China over 2,300 years ago, bonsai later gained popularity in Japan among Zen Buddhists as a mindful practice. The word “bonsai” itself means “tray planting” in Japanese, reflecting the unique approach of growing trees in shallow pots to maintain their small size.
Bonsai trees are characterized by their distinct small size and meticulously pruned branches and roots. Through careful training and wiring, bonsai artists shape these trees to resemble their larger counterparts while capturing the essence of their natural forms. The miniature size of bonsai offers a unique perspective on the beauty and resilience of nature, making it a captivating art form.
Characteristics and Traits
The art of bonsai requires careful attention to its unique characteristics and traits. Some key features of bonsai include:
Small size: Bonsai trees are intentionally kept small through continuous pruning and root control. This creates a sense of harmony and balance with nature.
Elegance: Bonsai trees exude an air of elegance and sophistication, capturing the serene beauty of mature trees in a compact form.
Patience and discipline: Growing and maintaining bonsai requires patience, discipline, and a deep understanding of horticulture. It is a practice that encourages mindfulness and a connection with nature.
Aging and maturity: Bonsai trees, like their larger counterparts, exhibit signs of aging and maturity such as gnarled trunks, weathered bark, and twisted branches. These characteristics add to the charm and authenticity of the miniature tree.
Types of Trees Suitable for Bonsai
Various tree species are suitable for bonsai cultivation, each offering its own unique characteristics and requirements. Some popular types of trees used for bonsai include:
Tree Species
Characteristics
Suitable Climate
Junipers
Evergreen foliage, resilient and adaptable.
Moderate to cool climates.
Maples
Colorful foliage, beautiful branching patterns.
Temperate climates.
Pines
Long needles, rugged appearance.
Various climates and species-dependent.
Cherry and Plum
Fruit-bearing, fragrant blossoms.
Moderate to warm climates.
History and Origin of Bonsai
The practice of growing bonsai trees has a rich history that dates back over 2,300 years. Its roots can be traced back to ancient China, where it was known as “pun-jai” and was primarily practiced by aristocrats. These intricately cultivated miniature trees were considered a symbol of prestige and wealth.
However, it was in Japan where bonsai truly flourished as an art form. During the Edo period, Zen Buddhists adopted bonsai and incorporated it into their meditative practices. The meticulous care and attention given to these miniature trees were believed to inspire tranquility and contemplation.
As the art of bonsai evolved in Japan, it became popular among commoners as well. Bonsai culture expanded with the publication of scholarly books on growing techniques and the staging of large-scale bonsai exhibitions, captivating audiences with the beauty and artistry of these miniature natural wonders.
Today, bonsai is deeply ingrained in Japanese culture and is considered an intricate part of the country’s artistic tradition. It has gained international recognition as a symbol of Japanese aesthetics and has inspired countless enthusiasts around the world to explore the art of growing and shaping these living sculptures.
In the next section, we will delve into the cultural significance of bonsai and explore its role in Japanese society.
Cultural Significance of Bonsai
Bonsai holds great cultural significance in Japanese society. It is seen as an expression of the Japanese aesthetic and their respect for nature. Bonsai is not just a hobby, but also an art form that requires patience, skill, and an understanding of nature.
Bonsai trees are often displayed in special tokonoma alcoves in Japanese homes, where they are admired for their beauty and symbolism. The meticulous craftsmanship that goes into shaping and maintaining a bonsai tree reflects the attention to detail and discipline that are deeply valued in Japanese culture.
Bonsai carries a spiritual essence as well, symbolizing harmony, balance, and the fleeting beauty of life. The meditative practice of caring for bonsai trees encourages mindfulness and a connection with nature.
Bonsai has not only captivated the Japanese but has also gained international recognition as a symbol of Japanese culture and artistry. Bonsai exhibitions draw enthusiasts from around the world, showcasing the intricate designs and mastery of bonsai techniques.
“The art of bonsai is more than simply cultivating trees; it is about capturing the essence of nature and creating a harmonious balance between the tree and its surroundings.”
Through the cultural significance of bonsai, the art form has transcended national borders, inspiring people to appreciate the beauty of nature and the artistry involved in creating living sculptures.
Bonsai Techniques and Care
Proper care and techniques are essential for the health and growth of bonsai trees. In this section, we will explore the key aspects of bonsai care, including soil, watering, pruning and wiring, and repotting.
Soil Used for Bonsai
The soil used for bonsai plays a crucial role in providing the necessary nutrients and aeration for the tree’s roots. Bonsai soil should be well-draining to prevent waterlogged roots, but it should also retain enough moisture to keep the tree hydrated. A common bonsai soil mixture consists of a combination of Akadama (a type of clay), organic matter like compost or peat moss, and inorganic substances like pumice or lava rock. This mixture provides optimal drainage while retaining the necessary moisture.
Watering
Proper watering is essential for the health of bonsai trees. The frequency of watering depends on various factors such as the species of the tree, the size of the container, the climate, and the time of year. Generally, bonsai trees should be watered when the top layer of soil feels slightly dry. It is important to water thoroughly, ensuring that the entire root system receives moisture, but avoid overwatering, as it can lead to root rot. Monitoring the moisture level of the soil and adjusting the watering schedule accordingly is key to maintaining optimal hydration for bonsai trees.
Pruning and Wiring
Pruning and wiring are two important techniques used to shape and maintain the desired form of bonsai trees. Pruning involves cutting back branches and foliage to promote growth in specific areas and create a balanced aesthetic. Wiring is done by wrapping aluminum or copper wire around the branches and trunk of the bonsai to guide their growth and create desired shapes. These techniques require precision and finesse to avoid damaging the tree. Proper tools, such as bonsai shears and wire cutters, should be used for pruning and wiring to ensure clean cuts and minimize harm to the tree.
Repotting
Repotting is necessary for bonsai trees every few years to refresh the soil, prevent the tree from becoming root-bound, and promote healthy growth. The timing of repotting depends on the species and the condition of the tree’s roots. It is typically done during early spring when the tree is dormant or in late winter before new growth begins. During repotting, the bonsai tree is carefully removed from its container, the roots are pruned and spread out, and the tree is placed in fresh bonsai soil. Repotting allows for the renewal of nutrients and promotes a healthy root system, which is crucial for the overall health and vigor of the bonsai tree.
Bonsai Care Technique
Description
Soil Used for Bonsai
Well-draining soil that retains moisture
Watering
Proper hydration depending on tree species and environment
Pruning and Wiring
Shaping and maintaining the desired form of the bonsai
Repotting
Refreshing soil and promoting healthy root growth
Special Requirements for Bonsai Trees
Bonsai trees are unique in their needs and require specific conditions to thrive. By understanding and meeting these special requirements, you can ensure the health and longevity of your bonsai trees. Key factors to consider include sunlight, temperature, humidity, fertilization, and pest control.
Sunlight: Bonsai trees need a balance of sunlight and shade. Some species prefer full sun, while others require partial shade. It is important to know the sunlight requirements of your specific tree species to provide the optimal lighting conditions for its growth.
Temperature: Different bonsai tree species have different temperature preferences. Some species thrive in warmer climates, while others prefer cooler environments. It is crucial to provide the appropriate temperature range for your bonsai tree to ensure its well-being.
Humidity: Bonsai trees have varying humidity requirements. Some species prefer higher humidity levels, while others can tolerate drier conditions. Understanding the humidity needs of your bonsai tree will help you create the ideal environment for its growth.
Fertilization: Regular fertilization is essential to provide the necessary nutrients for your bonsai tree’s healthy growth. Choose a balanced fertilizer specifically formulated for bonsai trees and follow the recommended application guidelines.
Pest Control: Bonsai trees, like any other plants, are susceptible to pests and diseases. Regularly inspect your bonsai tree for any signs of pests or diseases and take appropriate measures to prevent or treat infestations. Maintaining good hygiene practices and providing proper care will help keep your bonsai tree free from harmful pests and diseases.
By paying attention to these special requirements for bonsai trees, you can create an optimal environment for their growth and ensure their health and vitality. Proper sunlight, temperature, humidity, fertilization, and pest control will contribute to the beauty and longevity of your bonsai trees.
Indoor vs. Outdoor Bonsai Trees
Bonsai trees can be kept both indoors and outdoors, but they have different requirements based on their placement. Understanding the differences between indoor and outdoor bonsai trees is important for their care and survival.
Indoor bonsai trees should be placed near a window with sufficient sunlight or supplemented with grow lights. This allows them to receive the necessary light for photosynthesis, which is crucial for their growth and overall health. It’s important to note that different tree species have varying light requirements, so it’s essential to research and choose the right tree for your indoor environment.
Indoor bonsai trees also require higher humidity levels compared to their outdoor counterparts. This can be achieved by placing a tray with water near the tree or using a humidifier in the room. Maintaining the right humidity level helps prevent the tree from drying out and promotes healthy foliage growth.
Protection from extreme temperatures is another consideration for indoor bonsai trees. Avoid placing them near drafty windows or areas with fluctuating temperatures. Ensuring a stable temperature range will help maintain the bonsai’s health and reduce stress on the tree.
On the other hand, outdoor bonsai trees should be chosen based on the local climate and placed in well-lit areas with appropriate sun exposure. Some species thrive in full sun, while others prefer partial shade. It’s crucial to consider the climate and weather conditions of your region to select bonsai trees that can withstand the outdoor environment.
Outdoor bonsai trees benefit from natural airflow, which helps strengthen their branches and prevents the development of fungal diseases. Positioning them in locations with good air circulation is essential for their overall well-being.
In summary, when it comes to choosing the placement of your bonsai trees, understanding whether they will be kept indoors or outdoors is crucial. Indoor bonsai trees require adequate sunlight or supplemental grow lights, higher humidity levels, and protection from extreme temperatures. Outdoor bonsai trees should be selected based on the local climate and placed in well-lit areas with appropriate sun exposure. By considering these factors, you can ensure the proper care and survival of your bonsai trees.
Bonsai Styles
Bonsai trees offer endless possibilities in terms of artistic expression and personal preference. There are two main categories of bonsai styles: traditional styles and modern styles. These styles showcase the diverse techniques and interpretations that bonsai enthusiasts can embrace to create their own unique miniature landscapes.
Traditional Styles
The traditional bonsai styles are rooted in centuries-old Japanese aesthetics and aim to recreate the natural growth patterns of trees in miniature form. These styles include:
Chokkan (Formal Upright): This style features a straight, upright trunk with branches that gradually decrease in size as they ascend.
Shakan (Slanting): In this style, the trunk has a distinct slant, often giving the impression of a tree growing on a hillside.
Moyogi (Informal Upright): Moyogi trees have sinuous, curving trunks that add a sense of movement and elegance to the composition.
Fukinagashi (Windblown): This style portrays the effect of strong winds on a tree, with branches and foliage leaning to one side.
Kengai (Cascade): Kengai bonsai have a cascading trunk that creates a dramatic effect, resembling a tree growing on a cliff or over a waterfall.
These traditional styles require meticulous care and precise pruning to maintain their intended form and capture the essence of nature in miniature.
Modern Styles
Modern bonsai styles, on the other hand, offer a departure from strict adherence to natural growth patterns and embrace more abstract and artistic interpretations. This experimental approach allows bonsai enthusiasts to push the boundaries of tradition and create truly unique and unconventional compositions.
The modern styles may include:
Ikadabuki (Layered Branching): This style emphasizes layering of branches and foliage, creating a visually striking and complex composition.
Bunjin (Literati): Bunjin bonsai exhibit an unconventional, windswept appearance with an emphasis on elegant and elongated trunks.
Neagari (Exposed Roots): Neagari bonsai showcase intricate root systems, with exposed roots adding a captivating and dynamic element to the composition.
Shitate (Raft): Shitate bonsai depict a tree growing horizontally, often resembling a fallen tree or driftwood.
Kubinagashi (Literally, “head hanging”): Kubinagashi bonsai feature a distinct trunk bend, creating a sense of movement and individuality.
These modern styles allow bonsai artists to experiment with innovative techniques and express their artistic vision through unique interpretations of nature.
Common Mistakes and Challenges While Growing a Bonsai
Growing bonsai trees can be a rewarding but challenging endeavor, especially for beginners. To help you avoid common pitfalls and ensure the health and longevity of your bonsai tree, it is important to be aware of the potential mistakes and challenges you may encounter along the way.
One of the most common mistakes in bonsai tree care is over or under watering. Finding the right balance is crucial, as both excessive and insufficient watering can harm the tree. Remember to water your bonsai regularly, allowing the soil to slightly dry out between watering sessions.
Improper pruning is another mistake that can affect the growth and form of your bonsai tree. It is essential to understand the specific pruning techniques for your tree species and to prune at the right time to encourage healthy growth. Additionally, using the wrong soil can impede root development and lead to poor tree health. Ensure you use well-draining soil specifically formulated for bonsai trees.
While caring for your bonsai, you may encounter various challenges such as pests, diseases, and root issues. Vigilance is key in identifying and addressing these problems promptly. Regularly inspect your tree for any signs of pests or diseases, and take preventive measures such as using insecticidal soap or consulting with a professional if needed. Additionally, monitor the condition of the roots to prevent issues like root rot, which can be caused by overwatering or poor drainage.
By being proactive and attentive to the needs of your bonsai tree, you can avoid common mistakes and overcome challenges. Remember to provide proper care, including regular watering, appropriate pruning, and using the right soil. Stay vigilant in monitoring your tree’s health and take prompt action if any issues arise. With patience and dedication, you can enjoy the beauty and tranquility of growing your own bonsai tree.
Karen Phillips, Bonsai expert and blogger. Read more about me here
Welcome to our comprehensive guide on growing and caring for Schefflera arboricola bonsai, your ultimate source of information on this captivating indoor bonsai tree. Whether you’re a beginner bonsai enthusiast or an experienced gardener looking to add a tropical touch to your collection, this guide has everything you need to ensure the success and beauty of your schefflera bonsai tree.
Plant care is the foundation of a thriving bonsai, and we’ll walk you through every aspect. From pruning techniques and bonsai styling to creating the ideal environment and choosing the perfect bonsai soil mix, we’ve got you covered. Our guide provides expert tips, practical advice, and step-by-step instructions tailored to both beginners and seasoned bonsai enthusiasts.
Discover the unique charm of Schefflera arboricola, also known as the dwarf umbrella tree, and learn how this humble houseplant has become a beloved bonsai species admired for its delicate foliage and graceful appearance. Unlock the secrets to proper watering techniques, feeding requirements, and essential pruning practices for your schefflera bonsai. We’ll also guide you through the propagation and repotting process, as well as how to protect your tree from pesky pests and diseases.
Whether you’re an aspiring bonsai artist or simply seeking the tranquility and beauty of indoor nature, our Schefflera arboricola bonsai guide will empower you to create a stunning tropical oasis right in your own home. Let’s embark on this bonsai journey together, and watch your schefflera bonsai thrive and flourish under your expert care!
Introduction to Schefflera Arboricola Bonsai
Schefflera arboricola, also known as the dwarf umbrella tree, is a popular choice for indoor bonsai enthusiasts. Bonsai trees are miniature versions of larger trees that are trained and shaped to create stunning works of living art. With its compact size and elegant foliage, Schefflera arboricola is an ideal candidate for bonsai cultivation.
The origins of Schefflera arboricola can be traced back to the tropical rainforests of Taiwan, where it grows as a shrub or small tree. Its lush green foliage and delicate leaflets give it a distinctive tropical appeal. As an indoor bonsai, Schefflera arboricola offers the opportunity to bring a touch of natural beauty and tranquility into your living space.
When caring for Schefflera arboricola bonsai, it is important to provide the right conditions to ensure its health and well-being. In the following sections, we will explore the care requirements, techniques, and tips that will help you cultivate a thriving and visually stunning schefflera arboricola bonsai.
The Unique Charm of Schefflera Arboricola as an Indoor Bonsai
Defining the Dwarf Umbrella Tree
The dwarf umbrella tree, Schefflera arboricola, is a compact and visually captivating bonsai tree. It features slender trunks and branches, giving it an elegant appearance. The leaves of this bonsai species are arranged in a radial pattern, creating a beautiful symmetrical effect.
From Humble Beginnings to Bonsai Beauty
What began as a humble plant has transformed into a bonsai beauty. Schefflera arboricola bonsai showcases grace and delicacy through its intricate foliage and refined form. This indoor bonsai tree effortlessly brings a touch of nature and serenity to any space, making it a favorite among bonsai enthusiasts.
The unique characteristics of Schefflera arboricola bonsai, including its compact size, slender trunks, and radially arranged leaves, contribute to its aesthetic appeal. The delicate foliage and visually pleasing form make it a delightful addition to any indoor bonsai collection.
Creating the Ideal Environment for Your Schefflera Arboricola Bonsai
In order for your Schefflera arboricola bonsai to thrive, it is essential to create the perfect environment that meets its specific needs. By understanding the light requirements, as well as the temperature and humidity levels, you can ensure the health, growth, and vitality of your indoor tropical bonsai tree.
Light Requirements for Vigorous Growth
Light is one of the most important factors for the growth and development of your Schefflera arboricola bonsai. This tropical bonsai tree requires bright, indirect light to thrive. Placing it near a window that receives filtered sunlight is ideal. Avoid direct sunlight, as it can scorch the leaves and cause damage to the plant.
If you’re growing your bonsai indoors and don’t have access to sufficient natural light, you can supplement it with artificial grow lights. LED grow lights are a popular choice as they emit the right spectrum of light for healthy bonsai growth.
Temperature and Humidity: Striking the Right Balance
Schefflera arboricola bonsai is native to tropical regions, so it thrives in warm and humid conditions. It is important to maintain a temperature range of 65-85°F (18-29°C) for your indoor bonsai. Avoid exposing it to extreme temperatures, drafts, or sudden temperature changes, as they can cause stress and affect its overall health.
In terms of humidity, Schefflera arboricola bonsai prefers higher levels. You can increase humidity around your bonsai by placing it on a tray filled with water and pebbles. As the water evaporates, it creates a humid microclimate around the bonsai. Alternatively, you can use a humidifier to maintain the desired humidity level.
Temperature
Humidity
65-85°F (18-29°C)
Higher levels
By providing the right environment with the proper light, temperature, and humidity, you can ensure the well-being and thriving growth of your Schefflera arboricola bonsai. Remember to monitor these factors regularly and make any necessary adjustments to maintain the optimal conditions for your bonsai’s health and beauty.
Schefflera Arboricola Bonsai Watering Techniques
Proper watering is crucial for the health and survival of your Schefflera arboricola bonsai. By understanding the specific watering techniques for this bonsai tree, you can ensure its optimal growth and vitality.
When watering your Schefflera arboricola bonsai, it’s important to strike the right balance between moist soil and avoiding waterlogging. Overwatering can lead to root rot and other issues, while underwatering can cause the tree to become dehydrated and wilt.
The frequency of watering depends on the season and the specific watering requirements for the environmental conditions. In general, during the warmer months, your bonsai may require more frequent watering due to increased evaporation. However, during the colder months, the watering frequency should be reduced.
To determine when to water your Schefflera arboricola bonsai, observe the soil moisture levels and the appearance of the foliage. The soil should be slightly damp but not overly saturated. If the soil feels dry to the touch, it’s time to water your bonsai.
When watering, thoroughly wet the entire root ball until water starts to drain from the bottom of the pot. This ensures that the roots receive adequate hydration. Avoid using cold or chlorinated water, as they can negatively affect the health of your bonsai. It’s recommended to use room temperature water or let tap water sit for 24 hours to allow chlorine to evaporate.
Remember that different environmental conditions, such as temperature and humidity, can affect the watering needs of your Schefflera arboricola bonsai. Adjust your watering schedule as necessary to meet the specific requirements of your bonsai tree.
Feeding Your Schefflera Bonsai: A Guide to Fertilizing
Proper fertilizing is essential to provide the necessary nutrients for your Schefflera arboricola bonsai’s growth and health. Without adequate fertilization, your bonsai may struggle to develop vibrant foliage and maintain its overall vitality.
When it comes to fertilizing your Schefflera arboricola bonsai, it’s crucial to understand the different types of fertilizers that are suitable for its specific needs. A balanced, slow-release fertilizer formulated for indoor bonsai trees is a recommended choice. This type of fertilizer provides a steady supply of nutrients over time, ensuring sustained growth and preventing the risk of nutrient burn.
The dosing instructions for fertilizing your Schefflera bonsai will vary based on the season. During the active growing season, which typically ranges from spring to early fall, you can fertilize your bonsai every two to four weeks. However, during the winter dormant period, it is best to reduce the frequency to once every two months.
To avoid excessive fertilization that can harm your bonsai, always carefully follow the recommended dosage instructions provided by the manufacturer. Overfertilizing can lead to nutrient imbalances, which can negatively impact the health of your bonsai tree.
Creating an optimal feeding schedule is essential to ensure the proper development of your Schefflera arboricola bonsai. It is recommended to fertilize your bonsai after watering, ensuring that the soil is moist but not waterlogged. This will help the nutrients in the fertilizer reach the roots effectively and prevent the risk of root damage.
When fertilizing your Schefflera bonsai, it’s important to avoid common fertilizing mistakes. These include using too much fertilizer, fertilizing during the dormant period, or neglecting to fertilize altogether. By being mindful of these mistakes, you can provide your bonsai with the necessary nutrients it needs for optimal growth and health.
Feeding your Schefflera arboricola bonsai with the right fertilization techniques will result in lush foliage and vibrant growth. By following the guidelines outlined in this section, you can ensure that your bonsai tree thrives and remains a stunning focal point in your indoor garden.
Pruning Techniques and Styling Tips for Schefflera Arboricola Bonsai
Understanding Pruning Basics
Pruning is a vital practice when it comes to maintaining the shape, health, and aesthetics of your Schefflera arboricola bonsai. By selectively removing certain branches and foliage, you can shape your bonsai tree into a visually appealing work of art. Understanding the basics of pruning is essential to achieve optimal results.
When it comes to pruning your Schefflera arboricola bonsai, it’s important to know when and how to make cuts. Start by identifying the branches that need to be removed or trimmed in order to improve the overall structure and balance of the tree. Use clean and sharp pruning tools to make precise cuts, ensuring the health of the tree is not compromised.
By removing overcrowded or crossing branches, you can improve the airflow and light penetration within the canopy. This helps prevent the build-up of moisture and reduces the risk of pest and disease infestation. Pruning also promotes the development of new buds and encourages a more compact growth habit.
Whether you want to create a formal upright style or go for a more informal cascade, pruning plays a crucial role in shaping your Schefflera arboricola bonsai. By selectively removing branches and foliage, you can guide the growth and create a visually pleasing bonsai tree.
Guidelines for Effective Bonsai Styling
Bonsai styling is an art form that takes your Schefflera arboricola bonsai to the next level. Through careful manipulation of branches, foliage, and trunk, you can create a visually appealing and well-balanced bonsai tree.
When styling your bonsai, take into consideration the natural growth patterns and characteristics of the Schefflera arboricola. Aim for asymmetrical balance, capturing the essence of a mature tree while maintaining a miniature size.
Start by analyzing the structure and form of your bonsai tree. Identify the key branches that will form the main structure, and remove any unnecessary or weak branches. Use wiring techniques to shape the branches and create movement and depth within the tree.
Consider the overall composition and ensure that the canopy is balanced and proportionate to the trunk and root system. Prune foliage to create open spaces and allow light to penetrate the inner branches, resulting in a more realistic and natural appearance.
Don’t be afraid to experiment and explore different bonsai styling techniques such as cascade, windswept, or formal upright. Each style can bring a unique charm to your Schefflera arboricola bonsai.
Pruning and styling your Schefflera arboricola bonsai require patience, skill, and an artistic eye. With practice and knowledge of the basics, you can transform your bonsai tree into a stunning masterpiece that captivates and inspires.
Bonsai Soil Mix Essentials for Schefflera Arboricola
The choice of soil mix is crucial for the health and development of your Schefflera arboricola bonsai. To ensure optimal growth and provide your bonsai tree with the necessary nutrients, it is essential to create the ideal bonsai soil mix.
When creating a bonsai soil mix for your Schefflera arboricola, it is important to prioritize good drainage to prevent waterlogging and root rot. The right blend of components will also promote healthy root growth and nutrient uptake. Here are the key essentials for a balanced bonsai soil mix:
Organic matter: Incorporate organic materials like peat moss or compost to improve soil fertility and water retention.
Inorganic components: Add components such as grit, perlite, or pumice to enhance drainage and prevent compaction.
Bonsai-specific soil mix: Consider using a pre-made bonsai soil mix that is specifically formulated for tropical bonsai trees like Schefflera arboricola.
It is essential to find the right balance between water retention and drainage. A well-draining bonsai soil mix allows excess water to escape easily, preventing waterlogged roots. At the same time, it should retain enough moisture to keep the roots hydrated.
Preparing and maintaining the bonsai soil mix also requires periodic attention. Regularly check the moisture levels and adjust watering frequency accordingly. It is recommended to repot your Schefflera arboricola bonsai every two to three years to refresh the soil and ensure optimum root health.
By providing your Schefflera arboricola bonsai with a well-balanced bonsai soil mix, you are setting the foundation for its overall health and growth.
Propagating and Repotting Your Schefflera Bonsai
Schefflera Bonsai Propagation Techniques
If you want to expand your collection of Schefflera arboricola bonsai, propagation techniques provide an excellent way to do so. There are two common methods of propagating your bonsai: seed propagation and cuttings. Seed propagation involves sowing seeds and nurturing them until they develop into saplings. Cuttings, on the other hand, involve taking a stem or leaf cutting from an existing bonsai and encouraging it to form roots.
To propagate bonsai from seed, follow these steps:
Soak the seeds in warm water for 12-24 hours to improve germination.
Fill a seed tray or small pots with a well-draining bonsai soil mix.
Plant the seeds and cover them with a thin layer of soil.
Keep the soil consistently moist and place the tray or pots in a warm, humid environment.
Once the seedlings have developed a strong root system, they can be transplanted into individual bonsai pots.
When propagating bonsai from cuttings, follow these steps:
Select a healthy stem or leaf cutting from your Schefflera arboricola bonsai.
Prepare a pot with well-draining bonsai soil.
Dip the cut end of the stem or leaf into rooting hormone powder to encourage root development.
Insert the cutting into the soil, making sure it is secured in an upright position.
Place the pot in a warm and humid location with indirect sunlight.
Maintain the soil moisture and mist the cutting regularly to maintain humidity.
After a few weeks, you should start to see root development. At this point, you can transplant the cutting into a bonsai pot.
Best Practices for Repotting
As your Schefflera arboricola bonsai grows, it will eventually need to be repotted to provide fresh soil and promote healthy root growth. Here are some best practices to follow when repotting your bonsai:
Timing: The best time to repot your Schefflera arboricola bonsai is in early spring, before the growth season begins.
Choosing the right pot: Select a pot that is slightly larger than the current one, ensuring there is enough room for root development.
Removing the bonsai from the pot: Carefully remove the bonsai from its current pot, gently loosening the roots to prevent damage.
Trimming the roots: Trim any excessively long or tangled roots, focusing on maintaining a healthy root system.
Applying a fresh soil mix: Fill the new pot with a well-draining bonsai soil mix, ensuring the roots are evenly distributed.
Positioning the bonsai: Place the bonsai in the center of the pot, making sure it is upright and stable.
Watering and aftercare: After repotting, water the bonsai thoroughly and place it in a shaded location for a few weeks to allow the roots to recover.
Repotting your Schefflera arboricola bonsai at the right time and in the correct manner will ensure its continued growth and health, providing it with a fresh start and the best conditions for thriving.
Protecting Schefflera Arboricola Bonsai from Pests and Diseases
As a proud owner of a Schefflera arboricola bonsai, it’s important to protect your precious tree from pests and diseases. Just like any other plant, bonsai trees are vulnerable to various pests and diseases that can compromise their health and beauty. By understanding the common issues and taking proactive measures, you can ensure the long-term well-being of your indoor tropical bonsai.
One of the key steps in pest and disease prevention is being vigilant of the signs and symptoms. Keep an eye out for any unusual discoloration, wilting, or distortion in the leaves, as these can indicate the presence of pests or diseases. Common pests that may affect your Schefflera arboricola bonsai include spider mites, aphids, and scale insects. Additionally, fungal diseases like root rot and powdery mildew can be problematic.
If you notice any signs of pests or diseases, it’s important to take immediate action. There are various treatment options available, including organic insecticides, horticultural oils, and fungicides. Before applying any treatment, carefully read and follow the instructions on the product label to ensure its safe and effective use. Regularly inspect your bonsai tree and address any issues promptly to prevent the spread and escalation of pests or diseases.
To further protect your Schefflera arboricola bonsai, practice good bonsai hygiene. Clean and sterilize your tools after each use to prevent the transmission of pathogens. Avoid overwatering, as excessive moisture can create an environment conducive to fungal growth. Properly position your bonsai tree to optimize air circulation and reduce the risk of humidity-related issues.
Karen Phillips, Bonsai expert and blogger. Read more about me here
If you’re fascinated by the unique beauty and allure of these miniature trees, you’ve come to the right place. In this guide, we will take you on a journey through every aspect of cultivating Mangrove Bonsai Trees, from understanding their distinctive features to providing the essential care they need.
But why choose a Mangrove Bonsai Tree? Well, these trees offer a captivating aesthetic that stands out in the world of bonsai. With their intricate root systems and delicate foliage, they create a serene oasis wherever they are placed. Not only that, but they also bring a sense of tranquility and harmony to your space, making them a perfect addition to your home or office.
Throughout this guide, we will provide you with step-by-step instructions on how to grow and care for your Mangrove Bonsai Tree, ensuring its health and longevity. We will cover everything from selecting the right species and varieties to finding the ideal soil composition and potting requirements. We will also guide you through watering techniques, maintaining the right balance of light and temperature, and even pruning and maintenance tips to shape your bonsai mangrove just the way you desire.
Introduction to Bonsai Mangroves
In this section, we will provide an introduction to Bonsai Mangroves. Explore the ancient art of bonsai and learn how mangroves can be transformed into miniature living sculptures. Discover the history and symbolism behind bonsai mangroves and gain an appreciation for their unique aesthetic.
“Bonsai is not just about growing trees in pots; it is an art form that allows us to connect with nature on a profound level.”
Bonsai is a traditional Japanese art form that involves cultivating and shaping miniature trees. The word “bonsai” translates to “tray planting,” and the practice dates back over a thousand years. In bonsai, trees are carefully trained and pruned to mimic their full-sized counterparts, resulting in stunning miniature landscapes.
Bonsai mangroves are an exquisite variation of traditional bonsai trees. They capture the beauty and essence of mangroves, creating mesmerizing natural scenes in miniature form. These living sculptures bring the serenity and allure of mangrove forests into your space, allowing you to appreciate their unique charm up close.
The art of bonsai holds deep symbolism, representing harmony, balance, and the transience of life. By cultivating a bonsai mangrove tree, you engage in a meditative process that fosters patience, mindfulness, and a deep connection with nature.
Through the ancient practice of bonsai, you can create a serene oasis in your home or garden, immersing yourself in the beauty and tranquility of these captivating miniature trees. As we delve deeper into the world of bonsai mangroves, you will discover the secrets to their cultivation and care, allowing you to embark on a rewarding journey of artistic expression and natural harmony.
Understanding the Unique Features of Mangrove Bonsai Trees
In this section, we will delve into the unique features of Mangrove Bonsai Trees. These captivating miniature trees possess a distinctive aesthetic that sets them apart from other bonsai varieties. Let’s explore their charm and discover the ecological importance and environmental benefits they offer.
Defining the Mangrove Bonsai Aesthetic
Mangrove Bonsai Trees are known for their intriguing appearance. With their intricate root systems and small, delicate leaves, they create a sense of tranquility and serenity. The delicate balance between the miniature size and the complex structure of the tree invokes a feeling of awe and wonder.
When cultivating a Mangrove Bonsai Tree, attention to detail is crucial. Each branch, root, and leaf contributes to the overall aesthetic of the tree. The meticulous shaping and pruning process allows you to create unique forms and styles, bringing out the artistic aspect of bonsai cultivation. Whether you prefer a windswept look or a cascading design, the possibilities are endless.
Ecological Importance and Environmental Benefits
Aside from their aesthetic appeal, Mangrove Bonsai Trees play a vital role in the ecosystem. These trees have several environmental benefits that make them a valuable addition to any space:
Improved Air Quality: Mangrove Bonsai Trees act as natural air purifiers by absorbing carbon dioxide and releasing oxygen. This process helps to improve air quality, creating a healthier environment for you and those around you.
Shoreline Stabilization: The extensive and dense root systems of Mangrove Bonsai Trees provide natural protection against coastal erosion. Their roots help stabilize shorelines, preventing soil erosion and protecting coastal communities.
Habitat for Various Species: Mangrove Bonsai Trees serve as critical habitats for numerous species of birds, insects, and marine life. The dense foliage and intricate root systems provide shelter and nesting grounds, promoting a diverse ecosystem.
As you can see, Mangrove Bonsai Trees offer not only visual beauty but also environmental benefits. By cultivating these miniature trees, you contribute to the well-being of the planet while creating a captivating oasis in your space.
Selecting Your Mangrove Bonsai Tree: Species and Varieties
Choosing the right species and variety of Mangrove Bonsai Tree is crucial for successful cultivation. Each species has its own unique characteristics and requirements, so it’s important to consider these factors before making a selection. Here are some popular species of mangrove bonsai trees:
Rhizophora mangle: Commonly known as the Red Mangrove, this species features distinctive prop roots that provide stability and support.
Avicennia germinans: Also called the Black Mangrove, this species has pencil-like pneumatophores that allow it to absorb oxygen in waterlogged environments.
Laguncularia racemosa: The White Mangrove, known for its smooth white bark, thrives in brackish or saltwater habitats.
Bruguiera spp.: This genus includes species like Bruguiera cylindrica and Bruguiera gymnorrhiza. These mangrove bonsai trees have visually striking aerial roots and intricate branching patterns.
When selecting a mangrove bonsai tree, it’s essential to choose a healthy individual that shows no signs of disease or distress. Look for trees with vibrant green leaves, strong root systems, and a well-structured trunk. Avoid trees with yellowing or wilted leaves, weak roots, or any signs of pests or disease.
To ensure the quality of the mangrove bonsai tree you purchase, it’s recommended to buy from reputable sellers who specialize in bonsai trees. These sellers often have a wide selection of mangrove bonsai trees for sale, allowing you to choose the perfect specimen for your collection.
Creating a serene oasis in your space with a mangrove bonsai tree starts with selecting the right species and variety. Take the time to research and choose wisely, and soon you’ll have a captivating miniature tree that brings beauty and tranquility to your home or garden.
Mangrove Bonsai Tree Care Essentials
Proper care is essential for the health and vitality of your Mangrove Bonsai Tree. Follow these guidelines to ensure your Mangrove Bonsai Tree thrives.
Optimum Soil Composition and Potting Requirements
The soil composition plays a crucial role in the growth and development of your Mangrove Bonsai Tree. It is recommended to use a well-draining soil mix that allows for proper air circulation and moisture retention. Consider a mixture of organic-rich soil, such as peat moss or compost, with coarse sand or perlite to improve drainage. Additionally, ensure that your pot has adequate drainage holes to prevent waterlogging.
Watering Techniques for Healthy Growth
Proper watering is vital for maintaining the health of your Mangrove Bonsai Tree. As a general rule, water your bonsai when the top inch of the soil feels slightly dry to the touch. Avoid overwatering, as it can lead to root rot and other problems. When watering, thoroughly soak the soil, allowing the excess water to drain out completely. Remember to adjust the watering frequency based on environmental factors such as humidity and season.
Light and Temperature: Finding the Right Balance
Mangrove Bonsai Trees thrive in bright, indirect light. Place your bonsai near a window where it can receive ample sunlight, but avoid exposing it to direct sunlight, as it can scorch the leaves. If natural light is limited, supplement it with artificial grow lights. Temperature-wise, Mangrove Bonsai Trees prefer warm and tropical conditions. Aim for a temperature range of 70-85°F (21-29°C) during the day and 60-70°F (15-21°C) at night. Avoid placing your bonsai near drafts or extreme temperature fluctuations.
How to Grow Mangrove Bonsai Tree: A Step-by-Step Process
Embark on the journey of growing your very own Mangrove Bonsai Tree with our comprehensive step-by-step process. Whether you’re an experienced bonsai enthusiast or a beginner looking to try your hand at cultivating these unique trees, this guide will provide you with the knowledge and guidance needed for success.
1. Germination and Seedling Care: Start by selecting high-quality mangrove bonsai tree seeds. Soak the seeds in water for 24 hours to encourage germination. Plant the seeds in a well-draining bonsai soil mix, ensuring they are barely covered. Maintain a consistently moist environment by misting the soil regularly. Place the pot in a warm location, ideally around 80°F (27°C), and provide indirect sunlight.
2. Nurturing the Seedlings: Once the seedlings emerge, continue to provide them with proper care. Keep the soil moist, but avoid overwatering, as excessive moisture can lead to root rot. Place the seedlings in a location that receives bright, indirect sunlight for approximately 12-16 hours a day. Maintain a warm temperature range of 70-85°F (21-29°C) to promote healthy growth.
3. Pruning and Training: As the seedlings develop, prune and shape them to achieve the desired bonsai aesthetic. Use sharp bonsai pruning shears to carefully remove unwanted branches or leaves. Additionally, use wire to gently guide the growth and create the desired form. Regular pruning and training will help cultivate a well-formed and balanced Mangrove Bonsai Tree.
4. Watering and Fertilizing: Ensure that the soil remains slightly moist but not waterlogged. Water the bonsai thoroughly, allowing excess water to drain away. Avoid letting the soil dry out completely, as this can be detrimental to the health of the tree. Apply a balanced bonsai fertilizer at half-strength every two weeks during the growing season to provide essential nutrients.
5. Light and Temperature: Mangrove Bonsai Trees thrive in bright, indirect sunlight. Find a location where your bonsai receives at least 6-8 hours of sunlight each day. Protect the tree from extreme temperature fluctuations, as the ideal range for growth is between 70-85°F (21-29°C).
6. Potting and Repotting: Repot your Mangrove Bonsai Tree every 1-2 years to provide fresh soil and promote root health. Choose a bonsai pot that allows for proper drainage and provides enough space for the roots to grow. During repotting, trim any excessively long or tangled roots and adjust the position of the tree as needed.
By following these step-by-step instructions, you’ll be well on your way to cultivating a flourishing and beautiful Mangrove Bonsai Tree. Remember to observe and respond to the specific needs of your bonsai as it develops, ensuring it receives the proper care, attention, and love it deserves.
Pruning and Maintenance: Shaping Your Mangrove Bonsai
Pruning and maintenance are essential for shaping and maintaining the desired form of your Mangrove Bonsai Tree. Proper pruning techniques allow you to achieve the desired shape and style while promoting healthy growth. Additionally, regular maintenance ensures the overall well-being of the bonsai. In this section, we will explore when and how to prune your bonsai mangroves and provide valuable tips for preventing pests and diseases that may affect their health.
When and How to Prune Your Bonsai Mangroves
Pruning is a vital aspect of bonsai care that helps shape and refine the tree’s form. The timing and technique of pruning can greatly influence the tree’s health and appearance. When pruning your Mangrove Bonsai Tree, consider the following guidelines:
Timing: Prune your bonsai mangroves during the tree’s dormant period, typically in the early spring or late winter. This allows the tree to recover quickly and stimulates new growth.
Branch Selection: Identify and remove any undesirable branches that disrupt the overall form or compromise the tree’s health. Leave only the branches that contribute to the desired shape.
Pruning Technique: Use sharp, clean bonsai shears to make precise cuts. Trim branches just above a leaf node or bud to encourage new growth in the desired direction.
Thinning: To enhance the tree’s aesthetic, thin out overcrowded areas by removing excess branches or foliage. This allows better light and air circulation, promoting overall health.
Preventing Pests and Diseases in Mangrove Bonsai
Just like any other plant, Mangrove Bonsai Trees are susceptible to pests and diseases. However, with proper preventive measures, you can protect your bonsai from these potential threats. Here are some essential tips:
Cleanliness: Maintain a clean environment for your bonsai by removing fallen leaves, dead branches, and debris that may harbor pests or diseases.
Monitoring: Regularly inspect your bonsai for signs of pests, such as visible insects, webs, or leaf damage. Also, be vigilant for symptoms of diseases, such as discoloration, wilting, or unusual growth patterns.
Quarantine: If you suspect any infestation or disease, isolate the affected bonsai to prevent spreading to other plants in your collection.
Natural Control: Utilize natural control methods, such as introducing beneficial insects or using organic pest control products, to manage pests without harming the tree.
Proper Watering: Avoid overwatering, as excessive moisture can create a favorable environment for fungal diseases. Water your bonsai only when the topsoil feels slightly dry.
By following these pruning techniques and taking preventive measures against pests and diseases, you can ensure the health and beauty of your Mangrove Bonsai Tree. Now, let’s move on to the next section to explore where to buy quality Mangrove Bonsai Trees and how to identify reputable sellers.
The Joy of Cultivating Mangrove Bonsai Trees: Long-Term Benefits
Experience the immense joy and satisfaction that comes with cultivating and caring for your very own Mangrove Bonsai Trees. These captivating miniature trees offer a plethora of long-term benefits that will enhance your life in numerous ways.
First and foremost, tending to your Mangrove Bonsai Tree is an incredibly meditative practice. As you carefully prune, shape, and nurture your tree, you’ll find yourself immersed in a peaceful state of mind. The act of bonsai care allows you to connect with nature, providing a therapeutic escape from the stresses of everyday life. It is a calming ritual that helps you find balance and tranquility.
Furthermore, Mangrove Bonsai Trees bring an undeniable aesthetic beauty to any space. Their intricate foliage, delicate branches, and stunning root systems create miniature landscapes that add a touch of natural elegance to your home or office. Whether placed on a windowsill, desk, or mantelpiece, these bonsai trees become living art pieces that inspire and uplift.
Lastly, the long-term benefits of cultivating Mangrove Bonsai Trees extend beyond personal fulfillment. These trees play a vital role in the environment, offering numerous ecological advantages. They improve air quality by absorbing carbon dioxide and releasing oxygen, contribute to shoreline stabilization, and provide habitats for various wildlife species. By nurturing a Mangrove Bonsai Tree, you are contributing to a healthier planet.
Karen Phillips, Bonsai expert and blogger. Read more about me here
If you’re looking for a unique addition to your indoor garden that’s both beautiful and easy to care for, look no further than the Asparagus Fern Bonsai. This delicate plant is not your typical bonsai variety, but it’s gaining popularity among plant enthusiasts due to its unique characteristics and low maintenance requirements.
Its wispy foliage and delicate fronds will add a touch of elegance to any indoor setting. Whether you’re a seasoned bonsai grower or a beginner, the Asparagus Fern Bonsai is a great choice.
What is Asparagus Fern Bonsai?
Asparagus Fern, scientifically known as Asparagus setaceus, is a delicate and elegant variety of bonsai tree originating in South Africa. This bonsai species features lush, green foliage with small, needle-like leaves that grow in a feather-like pattern. It is popular among bonsai enthusiasts due to its unique appearance and easy-to-care-for nature.
This bonsai species is well-suited for indoor gardens as it prefers moderate temperatures and humidity levels. Its charming, cascading branches make it a lovely addition to hanging baskets or on display in a decorative pot.
Notably, Asparagus Fern is not a true fern but rather a cousin of the Asparagus plant. Its unique appearance and growth habits make it a beautiful and interesting choice for any bonsai collection.
“Asparagus Fern Bonsai is a perfect example of how nature can create intricate and fascinating creations. Its lace-like foliage and cascading branches make it a delightful addition to any indoor garden.”
Growing Asparagus Fern Bonsai Indoors
It is a delicate, yet resilient plant that is easy to care for, making it the perfect addition to any indoor garden. To ensure its health and vitality, it is crucial to provide the right growing conditions.
Lighting
It prefers bright but indirect light, making it an excellent choice for rooms that receive plenty of natural light. However, it can also tolerate lower light conditions. Consider using a grow lamp if natural light is insufficient.
Temperature and Humidity
It thrives in temperatures between 60 to 75 degrees Fahrenheit and humidity levels between 40% to 60%. To maintain optimal humidity levels, mist the plant regularly with a spray bottle.
Watering
It requires moist soil but can’t tolerate standing water, which can lead to root rot. Water the plant when the soil feels slightly dry to the touch, and make sure to drain excess water from the pot.
Soil
It prefers well-draining soil. You can either use a commercial potting mix made specifically for bonsai or make your own by mixing equal parts of peat moss, perlite, and coarse sand.
Repotting
It needs to be repotted every two to three years to refresh the soil and promote healthy growth. Choose a slightly larger pot when repotting and trim any damaged or overgrown roots before placing the plant in fresh soil.
Pruning
Prune Asparagus Fern Bonsai regularly to maintain its shape and promote healthy growth. Use sharp, clean scissors to trim back any dead or overgrown branches, and pinch back new growth to encourage branching.
Root Pruning:
Asparagus Fern Bonsai has a delicate root system and can benefit from root pruning every few years. Gently remove the plant from its container and trim away any dead or damaged roots. Prune up to one-third of the total root mass, being careful not to disturb the rest of the soil. This will help to maintain the plant’s health and vitality.
Fertilizing
While it does not require frequent fertilization, it benefits from occasional feedings during the growing season. Apply a balanced, water-soluble fertilizer every four to six weeks, following the package instructions carefully.
Seasonal Considerations:
Asparagus Fern Bonsai is a tender plant that prefers temperatures between 60-75°F. During winter months, ensure that the plant is protected from cold drafts and extreme temperature changes. Additionally, it benefits from increased humidity, especially during dry winter months. Misting the plant with water or placing a humidity tray nearby can help to maintain adequate moisture levels.
With these tips, you can easily care for and grow Asparagus Fern Bonsai in your indoor garden, adding stunning beauty with minimal effort.
Choosing the Right Container for Asparagus Fern Bonsai
When it comes to the container for your Asparagus Fern Bonsai, size is crucial. A container that’s too small can hinder the plant’s growth, while one that’s too big can lead to overwatering and root rot.
In addition to size, consider the material of the container. Terra cotta pots are porous, allowing for better air circulation but also absorb water quickly, requiring more frequent watering. Plastic pots, on the other hand, retain moisture but offer less aeration.
Proper drainage is also a critical factor. Trapped water can lead to root rot and other health issues. Choose a container with drainage holes, and consider lining the bottom with stones or gravel to ensure proper drainage.
Container Size Guide for Asparagus Fern Bonsai
Bonsai Age
Container Size
6 months – 1 year
2-3 inches
1-2 years
4-6 inches
2-3 years
8-10 inches
Choosing the right container for your plant is essential for its health and aesthetic appeal. Take into account its growth rate, material, and drainage to ensure your plant thrives in its new home.
Pruning and Shaping Asparagus Fern Bonsai
Pruning and shaping are essential practices for maintaining the desired form and promoting healthy growth of your plant. Regular pruning keeps the plant compact and aesthetically pleasing, while shaping allows for creating unique and artistic designs. Follow these steps to get perfect results:
Choose the right tools: For pruning, use sharp and sterilized scissors or shears. For shaping, use wire or string to tie the branches to the desired position.
Select the branches to prune: Identify the branches that are overgrown, diseased, or damaged, and trim them close to the central stalk. For shaping, select the branches that need adjusting and tie them with wire or string.
Identify the growth points: Look for the growth points on each branch, which are the small leaves that indicate new growth. Prune above these leaves to encourage branching.
Trim carefully: When trimming branches, be sure to avoid cutting into the central stalk. This can damage the plant and impact its overall health. For shaping, adjust the wire/string regularly and prune or remove any unnecessary parts.
Check for symmetry: After pruning or shaping, check to ensure that the bonsai is symmetrical. This is essential for maintaining a balanced appearance.
Monitor the plant: Check the plant regularly for new growth, and prune or trim as needed to maintain its desired shape and size. Sensitive plants may require more frequent pruning, but always take care not to over-prune.
With regular pruning and shaping, your Asparagus Fern Bonsai will maintain its unique form and remain healthy for years to come.
Feeding and Fertilizing Asparagus Fern Bonsai
Asparagus Fern Bonsai is a delicate plant that requires proper feeding and fertilizing to ensure its vitality and longevity. Using the right fertilizer and applying it at the correct frequency can make a significant difference in the overall health and growth of your bonsai plant.
When selecting a suitable fertilizer for your Asparagus Fern Bonsai, make sure to choose one that is specifically formulated for bonsai plants. Look for options that contain essential nutrients such as nitrogen, phosphorus, and potassium, which will help promote healthy root growth and stimulate flowering. Fertilize your bonsai during the growing season, which typically spans from spring to fall.
It’s important not to overfeed your Asparagus Fern Bonsai as this can lead to root burn, which can damage or even kill the plant. Follow the instructions on the fertilizer package and stick to the recommended dosage. Generally, you should fertilize your bonsai every two to four weeks during the growing season.
In addition to using suitable fertilizers, cultivating nutrient-rich soil is crucial for ensuring the health of your Asparagus Fern Bonsai. Use a well-draining bonsai soil mix containing a combination of organic and inorganic materials such as peat moss, sand, and perlite. This will help to regulate moisture levels and provide your plant’s roots with the necessary nutrients and oxygen.
With proper feeding and fertilization, your Asparagus Fern Bonsai will thrive, producing healthy foliage and a beautiful display of delicate foliage.
Asparagus Fern Bonsai: Pests and Diseases
As with any plant, Asparagus Fern Bonsai is susceptible to certain pests and diseases that can impact its health and longevity. By taking the necessary precautions, it is possible to prevent and identify these issues early on, ensuring your bonsai remains in optimal condition.
Pests
Common pests that can affect Asparagus Fern Bonsai include spider mites, mealybugs, and whiteflies. Spider mites are tiny insects that can create unsightly webs and cause leaf discoloration and premature leaf loss. Mealybugs are small, cotton-like insects that feed on plant sap, causing yellowing and distortion of the leaves. Whiteflies are small, moth-like insects that can cause extensive damage to foliage and significant leaf drop.
To prevent and control pest infestations, regularly inspect your Asparagus Fern Bonsai leaves and stem for signs of insects. Remove any pests you find immediately, either by hand or with a gentle stream of water. Consider using natural remedies, such as neem oil or insecticidal soap, to control pest populations.
Diseases
Asparagus Fern Bonsai is generally resistant to most diseases, but it can sometimes become vulnerable to root rot and fungal infections. Root rot results from overwatering or poor drainage, and it can cause decay and death of the roots and leaves. Fungal infections can cause black spots, mold, and mildew on the leaves and stem, leading to leaf drop and reduced plant vigor.
To prevent root rot, ensure your bonsai is planted in well-draining soil and that excess water can escape through the drainage holes in the container. Avoid overwatering and allow the soil to dry out slightly between watering sessions. To control fungal infections, regularly prune off any damaged or infected foliage and ensure proper air circulation by avoiding overcrowding your plants.
With proper care and attention, you can reduce the risk of pests and diseases impacting your Asparagus Fern Bonsai. Regular monitoring and taking swift action as needed can help maintain the health and beauty of your bonsai for years to come.
Displaying Asparagus Fern Bonsai in Your Home
Asparagus fern bonsai is a unique and delicate addition to any indoor garden. With its flowing fronds and delicate foliage, displaying these bonsai trees can be an elegant way to elevate your décor. Here are some creative ideas and tips for showcasing your Asparagus Fern Bonsai in your home:
Location, Location, Location
When choosing a location to display your Asparagus Fern Bonsai, consider areas with bright, filtered light and ample humidity. These plants thrive in warm, humid environments, making them ideal for bathrooms or kitchens. They also look great in a windowsill or on a plant stand in a living room or bedroom.
Complementary Décor
To make your Asparagus Fern Bonsai truly shine, choose complementary décor that accents its unique beauty. Consider placing your bonsai in a decorative pot or planter that matches your color scheme. You can also pair your plant with other indoor plants, such as ferns or spider plants, to create an eye-catching display.
Artistic Arrangements
Asparagus Fern Bonsai can be arranged in many creative ways to enhance their aesthetic appeal. You can use them as a centerpiece on a dining room table, or grouped together to create a lush green display. You can also prune your bonsai to create unique shapes and forms that draw the eye and reflect your personal style.
When it comes to displaying your Asparagus Fern Bonsai, the possibilities are endless. With a little imagination and creativity, you can create a truly striking addition to your indoor garden.
Asparagus Fern Bonsai: Benefits and Symbolism
Asparagus Fern Bonsai’s delicate beauty goes beyond aesthetics, offering numerous benefits to indoor garden enthusiasts. One of its most distinctive qualities is its air-purifying power, making it an excellent addition to any living space. The Asparagus Fern Bonsai absorbs harmful toxins emitted from household items, providing clean air for improved health and overall well-being.
Studies have shown that incorporating plants like Asparagus Fern Bonsai into your home can have a positive impact on your mental health, reducing stress and promoting relaxation. This is especially beneficial for city dwellers, who often lack easy access to green spaces.
Culturally, Asparagus Fern Bonsai holds significance as a symbol of endurance and resilience. Its delicate fronds symbolize longevity and growth, making it a popular gift for those embarking on a new journey or going through a challenging phase of life.
Benefit
Description
Air-purifying
Removes harmful toxins from the air, improving health and well-being
Stress-reducing
Promotes relaxation and mental wellness, lowering stress levels
Symbolism
Represents resilience, endurance, longevity, and growth
Incorporating it into your indoor garden not only enhances its aesthetic appeal but also offers numerous benefits and cultural significance that go beyond its delicate beauty.
Conclusion
As we conclude our discussion on Asparagus Fern Bonsai, we hope you have gained valuable insights on this unique and beautiful plant variety. Whether you are an experienced bonsai enthusiast or just starting, Asparagus Fern Bonsai is an excellent choice for your indoor garden. Its delicate beauty, easy care, and air-purifying qualities make it a perfect addition to any living space.
Remember to follow the tips we’ve shared on growing, pruning, feeding, and displaying your plant to ensure its health and longevity. With proper care, your bonsai will thrive and bring joy to your home for years to come.
Thank you for taking the time to learn about Asparagus Fern Bonsai with us. We encourage you to explore this plant variety further and discover its many benefits and symbolism. Consider adding it to your indoor garden and experience its unique charm for yourself.
FAQ
What is Asparagus Fern Bonsai?
Asparagus Fern Bonsai is a miniature version of the Asparagus Fern, also known as Asparagus aethiopicus. It is a popular choice among bonsai enthusiasts due to its delicate foliage and unique appearance.
How do I grow Asparagus Fern Bonsai indoors?
Growing Asparagus Fern Bonsai indoors is relatively easy. It thrives in bright but indirect light and prefers temperatures between 55 to 75 degrees Fahrenheit (13 to 24 degrees Celsius). It requires high humidity, so misting the leaves regularly or placing a tray of water nearby can help create the ideal environment. When it comes to watering, make sure the soil is evenly moist but not waterlogged.
What should I consider when choosing a container for Asparagus Fern Bonsai?
When selecting a container for your Asparagus Fern Bonsai, consider its size and material. Choose a pot that is proportional to the size of your bonsai, allowing enough room for the roots to grow. Additionally, ensure that the container has proper drainage holes to prevent water buildup, which can lead to root rot.
How do I prune and shape my Asparagus Fern Bonsai?
Pruning and shaping your Asparagus Fern Bonsai is essential to maintain its desired form and promote healthy growth. Use sharp, clean pruning shears to remove dead or overgrown branches. To shape your bonsai, selectively trim branches to create the desired silhouette. Regular pruning will help maintain its compact form.
How often should I feed and fertilize my Asparagus Fern Bonsai?
Asparagus Fern Bonsai benefits from regular feeding and fertilization. During the growing season (spring and summer), apply a balanced liquid fertilizer every two weeks. In fall and winter, reduce the frequency to every four to six weeks. Always follow the manufacturer’s instructions for proper dilution and application.
How can I prevent and treat pests and diseases in my Asparagus Fern Bonsai?
Common pests that can affect Asparagus Fern Bonsai include spider mites and mealybugs. Regularly inspect your bonsai for any signs of infestation, such as discolored leaves or webs. Treat pests by gently washing the foliage with soapy water or applying an appropriate insecticidal spray. As for diseases, maintaining proper humidity levels and avoiding overwatering can help prevent fungal infections.
How can I display my Asparagus Fern Bonsai in my home?
Asparagus Fern Bonsai can be displayed in various ways to enhance its aesthetic appeal. Consider placing it on a decorative stand or display it on a shelf to showcase its unique form. You can also incorporate it into an indoor garden with other complementary plants to create an appealing green space.
What are the benefits and symbolism associated with Asparagus Fern Bonsai?
Asparagus Fern Bonsai is not only a beautiful plant but also offers several benefits. It helps purify the air by removing toxins and adds a touch of tranquility to indoor spaces, contributing to stress reduction. In terms of symbolism, it is often associated with resilience and endurance, making it a meaningful gift for loved ones.
Any tips for the long-term care of Asparagus Fern Bonsai?
To ensure the long-term health of your Asparagus Fern Bonsai, consider repotting it every two to three years to refresh the soil and promote healthy root growth. Additionally, perform root pruning to prevent root-bound growth. Adjust your care routine according to the changing seasons, providing appropriate lighting, humidity, and temperature conditions.
Karen Phillips, Bonsai expert and blogger. Read more about me here
Welcome to the world of Ginkgo Biloba Bonsai Trees! If you’re looking to cultivate a unique and ancient species as a bonsai tree, the Ginkgo Biloba should be at the top of your list. Its rich history and special care requirements make it a captivating addition to any bonsai collection. In this comprehensive guide, we will walk you through everything you need to know about growing and caring for a Ginkgo Biloba Bonsai Tree.
The Ginkgo Biloba Bonsai Tree has been around for centuries, boasting a remarkable reputation. Its distinctive fan-shaped leaves and vibrant yellow color during the fall season are just a couple of the tree’s many attractive features. However, nurturing a Ginkgo Biloba Bonsai Tree requires attention to detail and a deep understanding of its specific needs.
Our guide will cover all aspects of caring for your Ginkgo Biloba Bonsai, including its historical significance, positioning tips, sunlight requirements, watering and humidity needs, fertilizing techniques, pruning methods, repotting guidelines, and pest management. By following these instructions, you’ll be able to create a serene and beautiful space with your very own Ginkgo Biloba Bonsai Tree.
So, let’s embark on this journey together and discover the art of growing and caring for a Ginkgo Biloba Bonsai Tree. Are you ready?
Understanding the Historical Significance of Ginkgo Biloba Bonsai
The Ginkgo BilobaBonsai Tree has a fascinating historical significance rooted in its ancestral origins and long-lasting existence. This section will delve into the ancestral roots of the Ginkgo Biloba species, its survival for over 250 million years, and its cultural symbolism and status in Eastern cultures.
The Ancestral Roots of Ginkgo Biloba
The Ginkgo Biloba species has ancient ancestral roots dating back millions of years. Fossil records indicate that Ginkgo trees were abundant during the Jurassic period and coexisted with dinosaurs. These trees have survived many geological and climatic changes throughout history, making them living witnesses of the Earth’s evolution.
Ginkgo Biloba’s unique characteristics, such as its fan-shaped leaves and resilient nature, have remained unchanged for millions of years. Understanding the ancestral roots of the Ginkgo Biloba Bonsai Tree connects you to the fascinating history of this ancient species.
Celebrating Over 250 Million Years: The Ginkgo Biloba Tree
The Ginkgo Biloba Bonsai Tree is part of the larger Ginkgo Biloba tree family, which has thrived on Earth for over 250 million years. This remarkable longevity sets the Ginkgo Biloba apart from many other tree species and showcases its exceptional adaptability and resilience.
The Ginkgo Biloba’s ability to withstand various environmental conditions, including pollution and pests, has made it a true survivor. It is a living testament to the power of nature and its ability to sustain life throughout the ages.
Symbolism and Status in Eastern Cultures
“The Ginkgo leaf is a symbol of unity, long life, and vitality in Eastern cultures. Its beauty, resilience, and longevity have made it an iconic emblem of strength and hope.” – Ancient Eastern Proverb
In Eastern cultures, the Ginkgo Biloba tree holds profound symbolism and cultural significance. It is highly revered as a symbol of unity, longevity, and vitality. The fan-shaped leaves of the Ginkgo tree are often associated with harmony and balance. Its ability to withstand harsh conditions and retain its beauty represents resilience and strength.
Throughout history, the Ginkgo Biloba tree has been regarded as a sacred and auspicious tree. It is planted near temples, shrines, and other significant landmarks as a symbol of protection, good fortune, and spiritual enlightenment.
Understanding the symbolism and status of the Ginkgo Biloba Bonsai Tree in Eastern cultures adds a deeper appreciation for this remarkable species. It embodies the rich cultural heritage and spiritual essence that Eastern traditions hold dear.
Essential Tips for Positioning Your Ginkgo Biloba Bonsai
Proper positioning is crucial for the health and development of your Ginkgo Biloba Bonsai Tree. By selecting the right location, you can create an optimal environment for its growth and overall well-being. Here are some essential tips to help you position your bonsai tree effectively:
Find the right amount of sunlight: Ginkgo Biloba Bonsai Trees thrive in bright, indirect sunlight. Place your tree in a location where it can receive at least 4-6 hours of sunlight per day. Avoid exposing it to intense midday sun, as it can damage the foliage.
Consider the temperature: Ginkgo Biloba Bonsai Trees prefer moderate temperatures between 60-75°F (15-24°C). Avoid extreme temperature fluctuations and protect your tree from frost during the winter months.
Protect from harsh elements: Position your bonsai tree in an area where it is sheltered from strong winds, as they can damage the delicate foliage and branches. If necessary, use barriers or place your tree near a wall or hedge to provide additional protection.
By following these positioning tips, you can ensure that your Ginkgo Biloba Bonsai Tree has the best chance of thriving and becoming a beautiful centerpiece in your space.
The Ginkgo Biloba Bonsai Tree’s Unique Needs for Sunlight
The Ginkgo Biloba Bonsai Tree requires specific sunlight requirements to thrive and display its vibrant color. Providing the optimal lighting conditions is essential to ensure the health and beauty of your bonsai tree.
Best Lighting Conditions for Vibrant Color
To achieve the most vibrant foliage color in your Ginkgo Biloba Bonsai Tree, it is crucial to provide the right lighting conditions. Place your bonsai tree in a location that receives bright, indirect sunlight. This will help the leaves develop their characteristic golden-yellow color, especially during the fall season. Avoid exposing your bonsai tree to intense, direct sunlight, as it can cause sunburn and scorch the leaves.
Remember, Ginkgo Biloba Bonsai Trees are deciduous, which means they shed their leaves during the winter months. During this period, it is advisable to place your bonsai tree in a well-lit area with reduced sunlight. This will ensure the tree maintains its overall health and vigor.
Protecting Younger Trees from Harsh Sunlight
Younger Ginkgo Biloba Bonsai Trees are more susceptible to damage from harsh sunlight. They have delicate foliage that can get scorched if exposed to prolonged periods of direct sunlight. To protect younger trees, consider providing them with partial shade or using shade cloth to filter the intense sunlight. This will prevent leaf burn and promote healthy growth.
As your bonsai tree matures and develops a stronger canopy, it will become more tolerant of direct sunlight. However, it is still important to monitor the amount of sunlight it receives and make adjustments as necessary to avoid excessive exposure.
Mastering Watering and Humidity for Your Bonsai
Proper watering and humidity levels are crucial for the overall health and vitality of your Ginkgo Biloba Bonsai Tree. Providing the right amount of water and maintaining appropriate humidity levels will ensure that your bonsai thrives in its environment.
Watering: It is essential to water your Ginkgo Biloba Bonsai Tree correctly. You should water the tree thoroughly, making sure to moisten the entire root ball. Avoid overwatering, as excessive moisture can lead to root rot and other issues. To determine whether your bonsai needs watering, check the moisture level by inserting a wooden skewer into the soil. If it comes out dry, it’s time to water. On the other hand, if it comes out damp, wait a little longer before watering again. Remember, the watering frequency may vary depending on the season, humidity, and soil composition.
Humidity: Ginkgo Biloba Bonsai Trees prefer moderate to high humidity levels, as they mimic their natural habitat. To increase humidity, you can place a humidity tray filled with water near your bonsai or use a room humidifier. Mist the leaves occasionally to provide additional moisture. It’s important to note that excessive humidity can lead to fungal diseases, so you should strike a balance and avoid creating an overly damp environment.
To maintain the ideal moisture balance, regularly monitor the soil’s moisture level and adjust your watering routine accordingly. Similarly, ensure that the humidity level is within the optimal range for the health of your Ginkgo Biloba Bonsai Tree.
Watering Dos
Watering Don’ts
Water thoroughly, moistening the entire root ball. Check the soil moisture level before watering. Adjust watering frequency based on season and environmental conditions. Use a well-draining soil mix to avoid waterlogged roots.
Avoid overwatering; excessive moisture can lead to root rot. Don’t water on a rigid schedule; adapt to the tree’s needs. Avoid underwatering, as it can cause stress and nutrient deficiencies. Avoid using chlorinated water; let it sit for 24 hours to dissipate chemicals.
Detailed Guide to Feeding and Fertilizing Your Bonsai
Feeding and fertilizing are essential aspects of maintaining the growth and well-being of your Ginkgo Biloba Bonsai Tree. By providing the right nutrients, you can ensure that your bonsai thrives and displays its full potential. In this section, we will provide you with a detailed guide on feeding and fertilizing techniques, including tips on selecting the correct fertilizer composition for optimal growth and understanding the seasonal requirements for fertilizing your Ginkgo Biloba Bonsai Tree.
Selecting the Right Fertilizer Composition
Finding the right fertilizer composition is crucial for the health and development of your Ginkgo Biloba Bonsai Tree. When choosing a fertilizer, consider the specific needs of your bonsai tree and the growth stage it is in. Look for a balanced fertilizer that contains essential nutrients like nitrogen, phosphorus, and potassium. Nitrogen promotes leaf and stem growth, phosphorus enhances root development, and potassium aids in overall plant health and disease resistance. Additionally, consider using a slow-release fertilizer to provide a gradual and consistent nutrient supply to your bonsai tree.
Understanding Seasonal Fertilizing Requirements
Understanding the seasonal fertilizing requirements of your Ginkgo Biloba Bonsai Tree is vital for its optimal growth and health. During the active growing season, typically from spring to early fall, your bonsai tree will require more frequent fertilization. Apply a balanced fertilizer at half the recommended strength every two to four weeks to provide a steady supply of nutrients. As the colder months approach and your bonsai tree enters dormancy, reduce or stop fertilizing altogether to allow the tree to rest and prepare for the next growing season.
Meticulous Pruning Techniques for Ginkgo Biloba Bonsai Tree
How to Prune Without Causing Damage
Pruning plays a crucial role in maintaining the shape and structure of your Ginkgo Biloba Bonsai Tree. However, it’s important to approach pruning with care to avoid causing damage. Here are some techniques to prune your bonsai tree without compromising its health:
Start by assessing the branches and foliage of your Ginkgo Biloba Bonsai Tree. Identify any dead, diseased, or damaged branches that need to be removed.
Use clean, sharp pruning shears or bonsai scissors to make precise cuts. Make sure to sterilize your tools before and after pruning to prevent the spread of any potential diseases.
When making cuts, follow the natural shape and flow of the tree’s branches. Avoid making harsh or unnatural cuts that may take away from the overall aesthetics.
Prune back overgrown branches to maintain the desired size and shape of your Ginkgo Biloba Bonsai Tree. Always cut back to a branch or bud to encourage new growth and prevent stubs.
Regularly inspect your bonsai tree and perform maintenance pruning to remove any unwanted growth or branches that may compromise the overall balance and appearance.
Reshaping Your Bonsai: The Importance of Selective Trimming
In addition to maintaining the existing shape of your Ginkgo Biloba Bonsai Tree, selective trimming allows you to reshape your bonsai and achieve the desired aesthetic. Here’s why selective trimming is essential:
Selective trimming helps you guide the growth of your bonsai tree in a way that aligns with your vision. It allows you to enhance certain features or create a unique design.
By removing excess foliage or branches, selective trimming can improve the overall balance and proportions of your Ginkgo Biloba Bonsai Tree.
Keep in mind the natural growth patterns of the Ginkgo Biloba species while selectively trimming. This will help you maintain the tree’s unique characteristics while reshaping it.
Regularly evaluate your bonsai tree and make selective trimming a part of your maintenance routine. This will ensure that your Ginkgo Biloba Bonsai Tree continues to develop into a beautiful and well-balanced masterpiece.
Repotting Your Bonsai: When and How
Repotting is an essential process for the healthy growth and development of your Ginkgo Biloba Bonsai Tree. It allows for proper root maintenance, nutrient replenishment, and ensures the longevity of your tree. Understanding when and how to repot your bonsai is crucial for maintaining its vitality.
“Repotting is like giving your bonsai tree a fresh start, providing it with the necessary space and nutrients to thrive.”
So, when is the right time to repot your Ginkgo Biloba Bonsai Tree? Generally, it is recommended to repot every 2-3 years during early spring, before new growth begins. However, it is important to consider the unique needs of your bonsai and observe its root system for signs of overcrowding or decline.
When repotting, follow these steps for optimal results:
Carefully remove your bonsai tree from its current pot, gently loosening the soil around the roots.
Inspect the roots for any signs of damage, disease, or overcrowding. Trim away any dead or unhealthy roots.
Prepare a new pot with fresh bonsai soil, ensuring it has good drainage properties. Choose a pot that is slightly larger than the previous one to allow for root growth.
Position your bonsai tree in the new pot, carefully spreading out its roots and adding fresh soil around them. Avoid compacting the soil too tightly.
Gently water the newly repotted bonsai, ensuring the soil is evenly moistened. Avoid overwatering, as it can lead to root rot.
Remember, repotting your Ginkgo Biloba Bonsai Tree should be done with care and precision. By following these guidelines, you can provide your bonsai with the space, nutrients, and optimal growing conditions it needs to flourish for years to come.
Combating Pests and Maintaining Health in Ginkgo Biloba Bonsai Trees
Ginkgo Biloba Bonsai Trees, like any other living organism, are vulnerable to pests and diseases that can significantly impact their health and lifespan. To ensure the longevity of your beautiful bonsai tree, it is crucial to understand how to identify common pests and implement effective prevention strategies. By taking proactive measures and harnessing the natural resistance of Ginkgo Biloba, you can maintain the health and vitality of your bonsai tree.
Identifying Common Pests and Prevention
Common pests that can affect Ginkgo Biloba Bonsai Trees include aphids, scale insects, and spider mites. These tiny intruders can weaken your bonsai tree and compromise its overall well-being. To identify these pests, meticulously inspect your tree, paying close attention to the leaves, branches, and trunk. Look for signs such as discoloration, distorted growth, or the presence of sticky residue.
To effectively prevent infestations, establish a regular inspection routine and promptly address any signs of pest activity. Mechanical methods, such as gently wiping affected areas with a soft cloth or using a blast of water, can help remove pests. Additionally, consider attracting beneficial insects, like ladybugs, which feed on these pests, creating a natural balance within your bonsai’s ecosystem.
Using Nature’s Resistance: Health Benefits of Ginkgo Biloba
Ginkgo Biloba possesses natural defenses that can contribute to the overall health of your bonsai tree. This ancient species has been known to exhibit resistance against certain pests and diseases. The presence of ginkgolides and bilobalides, chemical compounds found in Ginkgo Biloba leaves, can act as natural deterrents to insects.
Moreover, Ginkgo Biloba offers health benefits that transcend its protective qualities. It has been recognized for its antioxidant properties, which can help combat oxidative stress and support the immune system of your bonsai tree. By harnessing the health benefits of Ginkgo Biloba, you can create an environment that promotes the overall well-being and longevity of your Ginkgo Biloba Bonsai Tree.
By following these strategies to combat pests and maintain the health of your Ginkgo Biloba Bonsai Tree, you can ensure its longevity and enjoy the serene beauty it brings to your space. Remember to remain vigilant, take preventive measures, and tap into the natural resistance and health benefits of Ginkgo Biloba. With proper care, your bonsai tree will thrive and become a cherished part of your botanical collection.
Karen Phillips, Bonsai expert and blogger. Read more about me here
If you’re a bonsai enthusiast or simply looking to add some greenery to your home or garden, you’ll be delighted to know that there are bonsai trees that grow faster than others.
Some of the fastest Growing Bonsai Trees are Japanese Black Pine, Chinese Elm, and Ficus sp.
In this article we will discuss the fastest growing bonsai and a brief care guide for each of them and other bonsai plants. Let’s get started!
1. Japanese Black Pine (Pinus thunbergii)
The Japanese Black Pine, or Pinus thunbergii, holds a revered status among bonsai enthusiasts for its exceptional growth rate and suitability for bonsai cultivation. Renowned for its resilience and adaptability, this species boasts a remarkable ability to thrive in various conditions which makes it one of the fastest growing bonsai. Its rapid growth is a boon for bonsai artists, as it allows for quicker development and styling.
The tree’s distinctive small, dark-green needles and rugged, flaky bark not only evoke a sense of natural beauty but also contribute to its appeal as a bonsai subject. Its responsiveness to pruning, wiring, and shaping techniques makes it an ideal candidate for creating intricate, miniature landscapes within a relatively short time frame compared to many other tree species used in bonsai. With proper care and cultivation, the Japanese Black Pine exemplifies the artistry and patience inherent in the bonsai tradition.
Another one of the fastest growing bonsai is Chinese Elm (Ulmus parvifolia). Renowned for its adaptability and resilience, this species boasts small leaves and delicate branching, ideal for bonsai artistry. Its agility in responding to pruning and training is unparalleled, allowing enthusiasts to swiftly sculpt intricate designs and shapes.
What sets the Chinese Elm apart is its ability to thrive in diverse environments, accommodating varied conditions without compromising its growth or health. This adaptability, combined with its quick response to pruning, grants practitioners the opportunity to witness significant transformation in a relatively short period, making it an attractive choice for bonsai enthusiasts seeking both beauty and a dynamic growth process. Whether embraced by beginners or seasoned experts, the Chinese Elm’s swift evolution into the bonsai form remains an enduring allure.
Ficus trees, embraced in the world of bonsai, stand out as swift growers due to their remarkable adaptability and resilience. This genus encompasses a diverse range of species, including the Ficus Retusa, Ficus Microcarpa, and Ficus Benjamina, all prized for their suitability in bonsai cultivation. Their vigor and ability to acclimatize swiftly to various environmental conditions contribute significantly to their rapid growth. Ficus bonsai possess robust root systems that efficiently absorb nutrients, fueling their accelerated development.
Moreover, their small, glossy leaves and intricate branch formations make them favored choices among bonsai enthusiasts. This combination of adaptability, efficient nutrient uptake, and aesthetically pleasing features allows Ficus bonsai to progress quickly, facilitating intricate shaping and artistic expression within a relatively short timeframe in the art of bonsai.
The Trident Maple (Acer buergerianum) earns its reputation as one of the fastest growing bonsai through its remarkable adaptability and swift growth rate, captivating bonsai enthusiasts worldwide. Renowned for its vigor and resilience, this species thrives in diverse climates, allowing it to flourish in various environments. Characterized by its small, three-lobed leaves and stunning autumnal foliage, the Trident Maple possesses inherent aesthetic appeal.
Its rapid growth is a boon for bonsai enthusiasts, as it facilitates quick development of quintessential bonsai features like a well-defined trunk and branching structure. Through meticulous care, regular pruning, and skilled cultivation techniques, this species rapidly transforms into a captivating miniature masterpiece, solidifying its position as one of the most coveted and fastest growing bonsai trees in the world of horticulture and artistry.
The Japanese Maple, scientifically known as Acer palmatum, is a prized gem in the world of bonsai. Its allure lies not only in its vibrant foliage but also in its adaptability to bonsai cultivation. This mesmerizing tree is revered for its ability to grow rapidly when meticulously cared for, earning its place as one of the fastest growing bonsai.
The intricate, delicate leaves and its graceful branching pattern make it a favorite among enthusiasts. Its adaptability to various climates and soil types makes it an ideal candidate for bonsai shaping.
With proper pruning and nurturing, this tree swiftly transforms into a miniature masterpiece, showcasing its brilliant colors in shades of red, green, and gold. Its fast-growing nature allows artists to witness and partake in the evolution of a majestic tree in a confined and exquisite form, making the Japanese Maple a beloved choice for bonsai enthusiasts.
Boxwood (Buxus spp.) stands out as an exceptional choice for bonsai enthusiasts due to its remarkable qualities. This resilient evergreen possesses a natural ability to adapt to different climates and environments, making it a favorite for bonsai cultivation. Its small leaves and intricate branching patterns lend themselves perfectly to the art of bonsai. The Boxwood’s fast growth rate, especially when compared to other bonsai varieties, ensures quicker development and shaping of the miniature tree.
This accelerated growth doesn’t compromise its durability; rather, it allows enthusiasts to witness significant progress in their bonsai projects within a shorter timeframe. Additionally, its tolerance to frequent pruning and shaping makes it an ideal candidate for those seeking a visually stunning and intricately designed bonsai. With its unique blend of adaptability and rapid growth, Boxwood emerges as the fastest growing bonsai, offering enthusiasts an exciting and rewarding journey in the art of bonsai cultivation.
Jade, scientifically known as Crassula ovata, is a captivating succulent that has earned its place as one of the fastest-growing bonsai trees. Its rapid growth rate is a testament to its resilience and adaptability. This hardy plant thrives in various conditions, making it an ideal choice for bonsai enthusiasts. Jade’s efficient water storage system in its fleshy leaves allows it to withstand periods of drought, ensuring steady growth. Its sturdy trunk and branches are easily shaped and pruned, perfect for bonsai cultivation.
Moreover, the jade’s ability to root easily from cuttings accelerates the process of developing a bonsai. Its lush, green leaves and charming appearance further enhance its appeal as a bonsai specimen. In the realm of bonsai cultivation, the Jade stands out as one of the fastest-growing bonsai trees, offering enthusiasts a rewarding and swift journey in nurturing a beautiful miniature tree.
Juniper, part of the Juniperus species, stands tall as a prime choice for bonsai enthusiasts seeking swift growth and elegant beauty in their miniature trees. This resilient evergreen species boasts qualities that make it the fastest growing bonsai marvel. Its adaptability to various climates and soil types accelerates its growth, allowing enthusiasts to witness significant progress in shaping and styling their bonsai.
Junipers are vigorous, responding well to pruning and wiring, key techniques in bonsai cultivation. Their swift growth rate doesn’t compromise the tree’s graceful appearance; it enhances the bonsai’s ability to develop intricate foliage and textured bark swiftly. Their year-round greenery adds enduring charm to any bonsai collection, making Juniper a top choice for beginners and seasoned practitioners aiming for a thriving and fast-growing bonsai masterpiece.
The Pomegranate (Punica granatum) is a captivating choice for bonsai enthusiasts, and it’s no wonder why it’s considered one of the fastest growing bonsai trees. Its rapid growth rate allows for quick development of the miniature tree, offering a swift transformation from sapling to stunning bonsai. The Pomegranate’s vibrant green leaves and striking scarlet flowers add an exquisite charm to any bonsai collection. Its adaptability to various climates and soil conditions makes it an ideal choice for both seasoned growers and beginners alike.
Beyond its speedy growth, the Pomegranate’s ability to endure harsh conditions while maintaining its elegance is truly remarkable. With proper care, pruning, and attention to its needs, the Pomegranate bonsai rewards cultivators with a stunning display of beauty and symbolism—a testament to nature’s resilience and grace.
The Chinese Sweet Plum, scientifically known as Sageretia theezans, stands out as an exceptional choice for bonsai enthusiasts, largely owing to its reputation as one of the fastest growing bonsai trees available. Its rapid growth rate enables enthusiasts to witness significant progress in a shorter span, making it an ideal candidate for those seeking quicker results in their bonsai journey.
This species boasts small, vibrant green leaves and an intricate, gnarled bark, offering a picturesque display in miniature form. Its adaptability to various climates and ease of maintenance further contribute to its popularity among beginners and seasoned practitioners alike.
With proper care and pruning, the Chinese Sweet Plum transforms into a stunning bonsai, embodying grace, resilience, and the allure of nature, making it a top choice among enthusiasts seeking the thrill of nurturing one of the fastest growing bonsai.
Jasmine or (Jasminum nudiflorum), with its delicate beauty and enchanting fragrance, is a popular choice for indoor bonsai enthusiasts. In this guide, we will explore the art of nurturing a thriving Jasmine Bonsai tree, from understanding its unique aesthetics to providing optimal placement and implementing effective watering techniques.
By the end of this guide, you’ll have the confidence to care for your Jasmine Bonsai and enjoy its stunning beauty in your home or garden. Let’s dive in and discover the wonders of jasmine bonsai trees together!
Jasmine Bonsai Aesthetics
In this section, we will delve into the aesthetics of Jasmine Bonsai and explore what makes it truly captivating. From the unique charm of Winter Jasmine to the enchanting fragrance profile, we will uncover the beauty and allure of this exquisite bonsai tree species.
The Unique Charm of Winter Jasmine Bonsai
Winter Jasmine Bonsai (Jasminum nudiflorum) is a species that stands out with its delicate yet captivating features. One of its most remarkable characteristics is the ability to bloom during the winter season, when most other plants lie dormant. Its vibrant yellow flowers bring warmth and joy during the colder months, making it a treasured addition to any bonsai collection.
This bonsai variety also showcases slender, green stems that create an elegant and graceful appearance. The intertwined branches and foliage display a sense of harmony and balance, further enhancing the overall visual appeal.
The Fragrance
Beyond its visual appeal, Jasmine Bonsai offers a fragrant experience that is truly serene. The delicate scent emitted by the blossoms permeates the surroundings, creating a calming and peaceful atmosphere. The fragrance profile of Jasminum nudiflorum is known for its sweet and subtle notes, evoking a sense of tranquility and relaxation.
Why Jasminum nudiflorum Captures Hearts
Winter Jasmine captures the hearts of bonsai enthusiasts worldwide for several reasons. Its unique ability to bloom during the winter months brings a ray of sunshine and hope, adding vibrancy to the season. The exquisite yellow flowers and slender green stems create a visual spectacle that is both captivating and soothing.
Furthermore, the fragrance of Winter Jasmine adds an extra layer of appeal, filling the air with an aura of serenity and joy. With its delicate charm and enchanting qualities, Jasminum nudiflorum has become a beloved choice among bonsai enthusiasts who seek to bring beauty and tranquility into their lives.
Optimal Placement for a Thriving Jasmine Bonsai Tree
Optimal placement is crucial for the health and growth of your Jasmine Bonsai tree. To ensure that your bonsai thrives and flourishes, it is important to consider the following factors:
Amount of Sunlight: Jasmine Bonsai trees thrive in bright, indirect sunlight. Place your bonsai near a window or in a location that receives at least 4-6 hours of sunlight per day.
Protection from Harsh Winds: Strong winds can damage the delicate branches and leaves of your bonsai. It is recommended to place your plant in a sheltered area or use a windbreak to protect it from gusts.
Proper Ventilation: Good airflow is essential for the health of your bonsai. Avoid placing your plant in a completely enclosed space, as it can lead to poor ventilation and promote the growth of fungi or pests.
By carefully considering these placement requirements, you can create an environment that supports the optimal growth and development of your Bonsai tree.
Watering Techniques for a Healthy Indoor Jasmine Bonsai
Proper watering is crucial for ensuring the health and vitality of your indoor jasmine bonsai. Understanding the soil moisture balance and implementing the best watering practices will help your bonsai thrive. Overwatering or underwatering can be detrimental to the growth and well-being of your plant, so it is essential to find the right watering frequency.
Understanding Soil Moisture Balance
The soil moisture balance plays a significant role in determining the watering needs of your jasmine bonsai. It is crucial to strike a balance between providing enough water for the plant’s growth and preventing waterlogged soil. Too much moisture can lead to root rot and other issues, while too little water can cause the plant to wilt and suffer.
To assess the soil moisture, use your finger or a moisture meter to check the moisture content in the soil. Insert your finger or the meter into the soil up to the knuckle or the recommended depth, depending on the size of your bonsai.
If the soil feels moist to the touch or the moisture meter indicates high moisture content, refrain from watering. Conversely, if the soil feels dry, it’s an indication that your bonsai needs watering. Striking the right balance is key to maintaining optimal soil moisture for your plant.
Best Practices for Watering Frequency
The frequency of watering your jasmine bonsai depends on various factors, such as the climate, humidity levels, pot size, and the overall health of the plant. As a general guideline:
During warmer months, when the bonsai is actively growing, you may need to water more frequently.
In colder months or during dormancy, when growth slows down, watering should be reduced.
Observe the leaves and soil regularly. If the leaves start to wilt or the soil feels excessively dry, it’s a sign that your bonsai needs watering.
Avoid following a strict watering schedule and instead adjust based on the condition of your jasmine bonsai.
When watering your bonsai, use a gentle watering can or a misting spray bottle to avoid disrupting the soil structure or damaging the delicate roots. Water thoroughly until the water drains out from the drainage holes at the bottom of the pot, ensuring proper hydration.
Remember, every plant is unique, and it may require slight adjustments to the watering techniques and frequency based on its specific needs. By understanding the soil moisture balance and implementing best practices for watering, you can maintain a healthy and thriving plant
The Art of Pruning Jasmine Bonsai
Pruning is an essential aspect of bonsai care and plays a significant role in shaping and maintaining the aesthetics of your Jasmine Bonsai. Mastering the art of pruning is vital for promoting healthy growth and creating a beautifully balanced bonsai tree.
When it comes to pruning your plant, timing is key. It is best to prune during the dormant season, which is typically late winter to early spring. Pruning during this time allows the tree to recover and heal before the active growth period begins.
To start the pruning process, begin by removing any dead, diseased, or damaged branches. This helps maintain the overall health of the tree and prevents the spread of infections or pests. Use clean and sharp pruning shears to make clean cuts, ensuring minimal damage to the plant.
When shaping the branches, it is important to maintain a natural and aesthetically pleasing form. Start by identifying the branches that need shaping or reducing in size. Carefully trim them back, always keeping in mind the overall balance and proportion of the tree. Regularly stepping back to assess the tree’s appearance will help you achieve the desired shape.
Another technique used in pruning is pinching. Pinching involves removing the soft tips of new growth to encourage back-budding and promote ramification, resulting in a denser and more elegant canopy. This technique helps maintain the compact and refined appearance of your Jasmine Bonsai.
Throughout the pruning process, remember to step back and evaluate the tree’s overall balance and form. Take your time to ensure that each cut enhances the natural beauty of the bonsai. Over time, with practice and experience, you will develop a keen eye for shaping and maintaining your Bonsai.
In conclusion, pruning is a crucial skill to master when caring for your plant. By carefully pruning and shaping your bonsai tree, you can create a visually stunning masterpiece that reflects your dedication and skill as a bonsai enthusiast.
Jasmine Bonsai Care Tips: Fertilizing and Humidity
Fertilizing and maintaining proper humidity levels are essential for the care of your Jasmine Bonsai. In this section, we will provide you with valuable care tips to ensure the health and vitality of your bonsai tree.
“Fertilizing and maintaining proper humidity levels are essential for the care of your Jasmine Bonsai.”
Fertilizing Your Jasmine Bonsai
When it comes to fertilizing your Jasmine Bonsai, choosing the ideal type of fertilizer and determining the frequency of application are crucial factors. A balanced, slow-release fertilizer with a lower nitrogen content is recommended for Jasmine Bonsai to promote healthy growth and prevent excessive foliage.
Choose a fertilizer specifically formulated for bonsai trees, ensuring it contains the necessary nutrients for optimal growth.
Follow the manufacturer’s instructions for the correct dosage and application method.
During the active growing season, typically from spring to early autumn, fertilize your plant every two to four weeks.
Reduce the frequency of fertilization during the dormant season by applying fertilizer once every six to eight weeks.
Maintaining Suitable Humidity Levels
Proper humidity levels are vital for the health and well-being of your Jasmine Bonsai. Here are some strategies to help you maintain suitable moisture levels for your bonsai:
Place your bonsai on a humidity tray filled with water and pebbles. The evaporation of water from the tray will increase the humidity around the bonsai.
Mist the foliage of your Jasmine Bonsai regularly using a spray bottle filled with water. This will provide additional moisture to the leaves and maintain humidity.
Avoid placing your bonsai near sources of dry heat, such as radiators or air vents, as they can dry out the foliage and decrease humidity levels.
By following these care tips, you can ensure that your Jasmine Bonsai receives the necessary nutrients and humidity for healthy growth and a thriving bonsai tree.
Repotting Strategies for Jasmine Bonsai
Repotting is a crucial aspect of bonsai care, ensuring the health and vitality of your Jasmine Bonsai. Knowing when and how to repot your bonsai is essential for its overall well-being. In this section, we will discuss the signs that indicate your bonsai needs a new home and provide you with a step-by-step guide to repotting.
Signs Your Bonsai Needs a New Home
Recognizing the signs that your Jasmine Bonsai requires repotting is vital for its continued growth and health. Here are some common indicators that your bonsai needs a new pot:
The roots are circling the edge of the pot
Excessive water runoff or poor drainage
The soil is compacted and no longer retains moisture
Stunted growth or lack of new foliage
If you notice any of these signs, it’s time to consider repotting your Jasmine Bonsai to provide it with a fresh and suitable environment.
Step-by-Step Guide to Repotting
Follow these step-by-step instructions to repot your Jasmine Bonsai:
Prepare the new pot: Select a pot that is slightly larger than the current one, ensuring it has proper drainage holes.
Remove the bonsai from its current pot: Gently tap the pot’s sides and bottom to loosen the root ball. Carefully lift the bonsai from the pot, being mindful not to damage the roots.
Prune the roots: Trim away any dead or excessively long roots, promoting healthy growth and preventing rootbound conditions.
Snip the wire: If your bonsai has wire, carefully cut it off to avoid causing damage during repotting.
Add fresh soil: Fill the new pot with a suitable bonsai soil mix, ensuring proper drainage and aeration.
Position your bonsai: Place the bonsai in the center of the new pot, ensuring it is at the desired angle and position.
Backfill with soil: Gently fill the remaining space in the pot with soil, ensuring it is evenly distributed around the roots.
Water your bonsai: Thoroughly water the bonsai to settle the soil and eliminate any air pockets.
Place in a suitable location: After repotting, find a suitable spot for your Jasmine Bonsai, considering its light and temperature requirements.
Following this step-by-step guide will help ensure a successful repotting process for your Jasmine Bonsai, promoting its health and overall well-being.
Selecting the Best Soil for Jasmine Bonsai
The soil you choose for your Jasmine Bonsai is a critical factor in its overall health and growth. An ideal bonsai soil mix consists of specific components that provide proper drainage and aeration for your bonsai tree.
Components of an Ideal Bonsai Soil Mix
An ideal bonsai soil mix typically includes a combination of organic and inorganic materials. Organic components, such as peat moss or compost, provide nutrients and help retain moisture. Inorganic components, such as clay or gravel, promote drainage and prevent waterlogging. A good bonsai soil mix should strike a balance between water retention and drainage, allowing the roots to breathe while still providing adequate moisture.
Adjusting Soil Conditions for Different Climates
The soil requirements for Jasmine Bonsai can vary depending on the climate in which you live. In hot and arid climates, where the soil tends to dry out quickly, you may need to increase the proportion of organic materials in your soil mix to improve moisture retention. Conversely, in humid or rainy climates, where the soil can become waterlogged, adding more inorganic materials can enhance drainage. By adjusting the soil conditions according to your climate, you can create the optimal growing environment for your plant.
Remember to regularly check the moisture level of the soil to ensure it is neither too dry nor too wet. Over time, you may need to repot your plant and refresh the soil to maintain its health and vitality.
This page contains some affiliate links. Please check out our affiliate disclaimer for more information
Karen Phillips, Bonsai expert and blogger. Read more about me here
With their succulent leaves, jade plant bonsai trees are known for their unique beauty and vibrant energy and fast growth. In this guide, we will take you through every aspect of its care and cultivation, starting from understanding the distinctive features of Crassula ovata to mastering bonsai pruning and styling techniques.
By the end of this guide, you will have the knowledge and skills to nurture a thriving and visually stunning jade bonsai. Let’s dive into the world of jade bonsai and unlock the secrets of successful bonsai cultivation.
In this section, we will delve into the fundamentals of Jade plant (Crassula ovata). You will learn about the origin and distinctive features of Crassula ovata, including its native habitat and growth habit. We will also compare Crassula ovata with Portulacaria afra to understand their similarities and differences. Additionally, we will explore why Jade is an ideal choice for indoor plant enthusiasts, highlighting its low-maintenance nature and unique beauty.
The Origin and Distinctive Features of Crassula ovata
Jade Bonsai, scientifically known as Crassula ovata, is native to South Africa. It is commonly referred to as the “Jade Plant” or “Money Tree” and has gained popularity among indoor plant enthusiasts due to its attractive appearance and ease of care.
Crassula ovata is characterized by its thick, fleshy, oval-shaped leaves that resemble the shape of jade coins. The leaves can range in color from deep green to a striking jade hue, further enhancing its association with wealth and prosperity. The plant has a natural bonsai-like growth habit, with a thick trunk that develops an aged appearance over time.
One of the distinctive features of Crassula ovata is its ability to store water in its leaves, making it a succulent plant. This adaptive trait allows the Jade Bonsai to withstand periods of drought, making it a resilient and low-maintenance choice for bonsai enthusiasts. Additionally, Crassula ovata produces small, star-shaped pink or white flowers, adding a touch of beauty to its already captivating presence.
Crassula ovata vs. Portulacaria afra: A Comparison
While both Crassula ovata and Portulacaria afra are popular choices for bonsai enthusiasts, there are notable differences between the two species.
Crassula ovata (Jade Bonsai)
Portulacaria afra
Native to South Africa
Native to South Africa and Mozambique
Oval-shaped, fleshy leaves
Small, round leaves
Thicker trunk, giving it a more “tree-like” appearance
Finer, branching stems, resulting in a more “bush-like” growth habit
Leaves vary in color from deep green to jade
Leaves range from bright green to burgundy
Slightly more drought-tolerant
More tolerant of regular watering
While both species have their unique beauty and characteristics, Crassula ovata’s more robust trunk and varied leaf colors make it a preferred choice for bonsai artists seeking a visually striking and versatile specimen.
Why Jade Bonsai is an Ideal Choice for Indoor Plant Enthusiasts
Jade Bonsai holds a special place in the hearts of indoor plant enthusiasts due to its numerous benefits and characteristics. Here’s why Jade Bonsai is an ideal choice:
Low Maintenance: Jade Bonsai is a hardy plant that requires minimal care, making it perfect for those with busy lifestyles or beginner bonsai enthusiasts.
Adaptability: Crassula ovata can thrive in a wide range of indoor conditions, including moderate to bright indirect light, average room temperatures, and moderate humidity. This adaptability makes it suitable for various living spaces.
Aesthetics: The beautiful, oval-shaped leaves and lush green color of Jade Bonsai provide a visually pleasing addition to any indoor setting. Its ability to develop an aged appearance over time adds character and charm to the plant.
Air Purification: Like other plants, Jade Bonsai helps improve indoor air quality by eliminating toxins and releasing oxygen. This can contribute to a healthier living environment.
Spiritual Significance: Jade Bonsai is associated with positive energy, prosperity, and good luck in many cultures. Keeping a Jade Bonsai as part of your indoor plant collection can bring a sense of harmony and positivity to your space.
Whether you’re a seasoned bonsai enthusiast looking to expand your collection or a beginner looking for a beautiful and low-maintenance indoor plant, Jade Bonsai (Crassula ovata) offers a captivating choice with its unique characteristics and adaptability.
Cultivating Jade Bonsai: Ideal Varieties for Bonsai Art
When it comes to cultivating Jade Bonsai, selecting the right varieties is essential for bonsai art. Two ideal varieties to consider are Dwarf Jade and Standard Jade. Each variety has its own unique characteristics that contribute to the beauty and appeal of your bonsai collection.
Characteristics of Dwarf Jade vs. Standard Jade Bonsai Varieties
Dwarf Jade (Crassula ovata “Hobbit” or “Gollum”) is a compact variety known for its small, tubular leaves that resemble jade beads. It has a distinctive bonsai appearance with curving branches and a gnarled trunk. The Dwarf Jade Bonsai is a popular choice for beginners due to its adaptability and forgiving nature, making it easier to care for compared to other varieties.
On the other hand, Standard Jade (Crassula ovata “Jade”) is a larger variety with traditional jade plant characteristics. It features round, fleshy leaves and develops a thick, woody trunk over time. The Standard Jade Bonsai offers a more classic bonsai aesthetic, making it a favorite among experienced bonsai enthusiasts.
Selecting the Right Jade Bonsai Specimen for Your Collection
When selecting the right Jade Bonsai specimen for your collection, consider your preferences and goals as a bonsai enthusiast. Assess the desired aesthetic appeal, size, and growth habit of the bonsai tree. Additionally, look for a specimen with a sturdy trunk and well-positioned branches that allow for future styling possibilities.
It is recommended to visit a reputable bonsai nursery or consult with experienced bonsai practitioners who can guide you in choosing the ideal Jade Bonsai specimen based on your specific needs. Remember, selecting the right specimen is crucial for long-term satisfaction and successful cultivation of your bonsai art.
Seasonal Care for Jade Bonsai: Tips for Every Season
Providing seasonal care is essential for the overall health and development of your Jade Bonsai. To ensure the long-term success of your bonsai tree, it’s important to adapt your care routine to the changing seasons. In this section, we will guide you on specific tips to follow for each season, including adjustments needed for lighting, watering, fertilizing, pruning, and other important aspects of care.
As the seasons change, the needs of your Jade Bonsai will vary. By understanding and addressing these needs, you can create an optimal environment for your bonsai tree to thrive. Below, we provide a comprehensive guide to seasonal care for Jade Bonsai…
“To ensure the long-term success of your Jade Bonsai, it’s important to adapt your care routine to the changing seasons.”
Spring: In spring, your Jade Bonsai will come out of dormancy and start actively growing. Increase the frequency of watering to meet the increased demands of the growing season. Provide adequate sunlight, but avoid exposing your bonsai tree to direct midday sun to prevent leaf burn. Begin fertilizing with a balanced, slow-release fertilizer to promote healthy growth.
Summer: During the summer, Jade Bonsai requires more frequent watering due to increased evaporation. Check the moisture level of the soil regularly and water when the top inch feels dry. Protect your bonsai tree from extreme heat by providing shade during the hottest parts of the day. Continue fertilizing with a balanced fertilizer to sustain growth.
Fall: As the weather cools down, reduce the frequency of watering to prevent overwatering. Gradually reduce fertilization to prepare your Jade Bonsai for dormancy. Protect your bonsai tree from frost by moving it indoors or providing proper insulation. Trim back any overgrown branches to maintain a neat and compact shape.
Winter: During the winter, your Jade Bonsai will enter a period of dormancy. Reduce watering significantly to prevent root rot. Place your bonsai tree in a cool location where the temperature remains above freezing. Protect your Jade Bonsai from freezing temperatures and drafty areas. Limit pruning during this time, as the tree’s energy is focused on survival.
In addition to these seasonal care tips, remember to regularly check for pests and diseases, and address any issues promptly. Monitor the overall health and appearance of your Jade Bonsai throughout the year, making adjustments to your care routine as needed.
By following these seasonal care tips for your Jade Bonsai, you can help ensure the continued growth and beauty of your bonsai tree throughout the year.
Styling Jade Bonsai: Techniques and Inspirations
Creating a visually stunning Jade Bonsai is not just about its health and care, it’s also an opportunity to express your creativity and artistic vision. Styling a Jade Bonsai involves shaping and refining its aesthetics to create a unique and captivating display. In this final section, we will explore various techniques and provide you with inspirations to elevate the beauty of your bonsai tree.
One of the key aspects of styling Jade Bonsai is understanding different bonsai styles. Whether you prefer the formal upright style, the slanting style, or the cascading style, each technique brings its own visual impact. Consider the natural characteristics of your Jade Bonsai, such as its trunk thickness, branch distribution, and leaf size, to determine which style suits it best. Experiment with different styles to find the one that resonates with your personal aesthetic.
Wiring techniques play a crucial role in shaping your Jade Bonsai into desired forms. Use high-quality bonsai wire to gently bend and position branches, creating elegant curves and dynamic silhouettes. Be mindful not to apply excessive pressure or stress to delicate branches to avoid damage. Regularly monitor the wire and remove it promptly once the branch holds its new shape. Take your time and enjoy the process of sculpting your Jade Bonsai into a living work of art.
While exploring styling options and techniques, it’s essential to embrace the unique beauty of your Jade Bonsai. Consider its natural characteristics, such as its thick trunk, glossy leaves, and distinctive branches, when deciding on the styling. Incorporating these features into your design will highlight the inherent elegance of the Jade Bonsai. Remember, your bonsai tree is a living representation of nature’s art, and by enhancing its natural charm, you can create an awe-inspiring display.
The Art of Pruning and Wiring Your Jade Plant Bonsai
Pruning and wiring are crucial techniques for shaping and styling your Jade Bonsai tree. In this section, we will explore the art of pruning to enhance the aesthetic appeal of your bonsai. We will discuss different pruning techniques and when to apply them to achieve the desired look for your Jade Bonsai.
Techniques for Pruning to Enhance Aesthetic Appeal
When it comes to pruning your Jade Bonsai, there are several techniques you can use to enhance its aesthetic appeal. These techniques include:
Branch Pruning: Trimming unwanted branches to improve the overall structure and balance of your Jade Bonsai.
Leaf Pruning: Removing excessive leaves to create a more refined and elegant look.
Apical Pruning: Trimming the topmost part of the tree to encourage lateral growth and create a fuller canopy.
Thinning: Removing overcrowded foliage to improve airflow and prevent the risk of disease.
By employing these pruning techniques, you can shape your Jade Bonsai to reflect your desired aesthetic vision while maintaining its health and vigour.
Best Practices for Safely Wiring Delicate Jade Bonsai Branches
Wiring is another essential technique in shaping and styling your Jade Bonsai. When wiring delicate branches, it is important to follow some best practices to ensure the safety and well-being of your bonsai tree:
Use Appropriate Wire: Select a wire that is strong enough to hold the branch in the desired position without causing damage. Copper or aluminum wire is commonly used for Jade Bonsai.
Protect the Branch: Place a protective barrier, such as a strip of raffia or bonsai tape, between the wire and the branch to prevent wire scarring or damage.
Bend and Position Carefully: Gently bend the branch to the desired shape, taking care not to exert excessive pressure. Position the branch in a natural and visually appealing way.
Regularly Check and Adjust: Regularly inspect the wired branches to ensure they are not becoming too tight or causing any discomfort to the tree. Make adjustments as needed.
Remove the Wire at the Right Time: Once the branch has set in the desired position, remove the wire carefully to avoid any damage to the branch.
By following these best practices, you can safely wire delicate branches of your Jade Bonsai, allowing you to create intricate and breathtaking designs.
Pruning Techniques
Benefits
Branch Pruning
Improves structure and balance
Leaf Pruning
Creates a refined and elegant look
Apical Pruning
Encourages lateral growth and a fuller canopy
Thinning
Improves airflow and prevents disease
Optimal Placement for Thriving Jade Bonsai
Creating the perfect environment is essential for the thriving growth of your Jade Bonsai. Proper placement plays a crucial role in ensuring the health and beauty of your bonsai tree. Consider the following guidelines to optimize the placement of your Jade Bonsai:
Lighting conditions: Place your Jade Bonsai in a location that receives bright, indirect sunlight. Avoid direct sunlight, as it can scorch the leaves.
Temperature requirements: Jade Bonsai prefers moderate temperatures between 65°F and 75°F (18°C – 24°C). Protect your bonsai from extreme temperature fluctuations.
Humidity levels: Maintain a moderate level of humidity around your Jade Bonsai. You can use a humidity tray or mist the leaves regularly to increase the humidity.
By providing optimal lighting, temperature, and humidity, you can create a favorable environment that promotes the vigorous growth and overall well-being of your Jade Bonsai.
Caring For Jade Bonsai: Watering Dos and Don’ts
Watering is a crucial aspect of caring for Jade Bonsai. Proper watering techniques ensure the optimal health and growth of your bonsai tree. In this section, we will provide you with essential dos and don’ts for watering your Jade Bonsai.
Jade Bonsai has unique water requirements that differ from other plants. Understanding these requirements is key to maintaining a thriving bonsai. Here are some dos and don’ts to keep in mind:
Dos:
Water your Jade Bonsai when the top inch of the soil feels dry. Insert your finger into the soil to check the moisture level.
Use room temperature water to avoid shocking the roots.
Water deeply until the water drains out of the drainage holes, ensuring proper hydration for the entire root system.
Ensure adequate drainage by using a well-draining bonsai soil mix and a pot with drainage holes. Excess water should freely flow out, preventing waterlogged roots.
Don’ts:
Overwater your Jade Bonsai. Excess water can lead to root rot and other related problems. It’s important to strike a balance between keeping the soil moist and avoiding waterlogging.
Water your bonsai on a strict schedule. Factors such as temperature, humidity, and seasonal variations can affect the water requirements of your Jade Bonsai. Adapt your watering routine accordingly.
Allow your bonsai tree to sit in standing water. This can suffocate the roots and cause irreversible damage.
Remember, the key to successful watering is to observe your Jade Bonsai’s specific needs. Pay attention to the signs of overwatering or underwatering, such as yellowing leaves or wilting. Adjust your watering routine accordingly to ensure your bonsai thrives.
Fertilizing Your Jade Bonsai: A Growth Promoting Practice
Fertilizing is an essential practice for promoting the growth and health of Jade Bonsai. By providing your bonsai tree with the necessary nutrients, you can ensure its overall well-being. In this section, we will guide you on how and when to fertilize your plant to maximize its growth potential.
When it comes to fertilizing Jade Bonsai, it is important to choose the right type of fertilizer. Opt for a balanced fertilizer specifically formulated for bonsai trees, as it will provide the necessary nutrients in the correct proportions.
“Proper fertilizing practices are essential in maintaining the overall health and vigor of your Jade Bonsai.”
The frequency of fertilizer application depends on the specific fertilizer and the needs of your plant. Generally, it is recommended to fertilize every 4-6 weeks during the growing season, which typically extends from spring to early fall. However, be cautious not to over-fertilize, as excessive nutrients can cause root burn and other health issues.
Balance is key when it comes to fertilizing Jade Bonsai. Ensure that your bonsai tree receives a balanced combination of nitrogen (N), phosphorus (P), and potassium (K) to support healthy growth. Nitrogen promotes foliage development, phosphorus enhances root growth and flowering, and potassium improves overall vigor and disease resistance.
Nutrient
Function
Recommended Ratio
Nitrogen (N)
Foliage development
1
Phosphorus (P)
Root growth and flowering
1/2
Potassium (K)
Vigor and disease resistance
1/2
Remember to follow the instructions provided with the fertilizer to ensure proper application and dosage. Apply the fertilizer evenly across the soil surface, taking care not to concentrate it near the trunk or roots.
In conclusion, fertilizing your Jade Bonsai is a crucial practice that promotes its growth and overall health. By selecting the right fertilizer, applying it at the appropriate frequency, and providing a balanced combination of nutrients, you can ensure your bonsai tree thrives and continues to delight with its beauty.
When and How to Repot Your Jade Bonsai Effectively
Repotting is an essential task for maintaining the health and growth of your Jade Bonsai. It provides an opportunity to refresh the soil, promote root development, and ensure the availability of essential nutrients. In this section, we will guide you on when and how to repot your bonsai tree effectively to keep it thriving.
Knowing when to repot your plant is crucial. Look for the following signs to determine if it’s time for repotting:
Roots circling the pot
Slow growth or stunted appearance
Water draining too quickly or not at all
Signs of nutrient deficiencies
Once you’ve identified the need for repotting, choose the appropriate timing. Spring is generally the best time for repotting your Jade Bonsai, as it allows the tree to recover during the growing season. Avoid repotting during extreme weather conditions or when your bonsai is weak or stressed.
When repotting your Jade Bonsai, follow these guidelines:
Carefully remove the bonsai from its current pot.
Gently comb out the roots to remove old soil and identify any dead or damaged roots.
Trim back approximately one-third of the root mass, focusing on thicker roots and any circling roots.
Prepare a well-draining, bonsai-specific soil mix with optimal moisture retention.
Place a layer of fresh soil in the bottom of the new pot and position the bonsai on top, ensuring it is centered.
Fill the rest of the pot with soil, gradually working it around and between the roots to eliminate air pockets.
Water thoroughly until water drains from the bottom of the pot.
After repotting, provide your Jade Bonsai with proper care and monitor its progress. Avoid excessive watering and direct sunlight during the recovery period.
You can refer to the image below for a visual representation of the repotting process:
By following these effective repotting guidelines, you can ensure the continued health and vitality of your Bonsai, allowing it to flourish and thrive in its new pot.
Propagating Jade Bonsai Through Cuttings
Propagating Jade Bonsai through cuttings is a rewarding way to expand your bonsai collection. By following a step-by-step guide to successful propagation, you can unlock the potential of creating new bonsai trees from your existing Jade Bonsai. One key aspect of propagating Jade Bonsai is encouraging healthy root development, which plays a vital role in the growth and longevity of the tree.
Step-by-Step Guide to Successful Jade Bonsai Propagation
Start by selecting a healthy branch from the Jade Bonsai tree that is suitable for cutting. Ideally, choose a branch that is young and vigorous.
Using clean and sharp bonsai shears, make a clean diagonal cut just below a leaf node. This will provide the best chance of successful rooting.
Remove the lower leaves from the cutting, leaving only a few at the top to aid photosynthesis.
Prepare a well-draining rooting medium, such as a mix of perlite and peat moss, and moisten it slightly.
Plant the cutting in the rooting medium, burying it about an inch deep. Make sure to keep the medium consistently moist without overwatering.
Place the cutting in a warm and well-lit location, preferably under indirect sunlight. Avoid exposing the cutting to harsh direct sunlight.
Maintain a consistent level of humidity around the cutting by covering it with a plastic bag or using a mini greenhouse.
Monitor the cutting regularly, checking for signs of growth and rooting. Be patient, as it may take several weeks or even months for roots to develop.
Once the cutting has developed a healthy root system, carefully transplant it into a small bonsai pot, using well-draining bonsai soil.
Continue caring for the newly propagated Jade Bonsai as you would with any mature bonsai, following the appropriate watering, fertilizing, and pruning guidelines.
With dedication and patience, you can propagate Jade Bonsai through cuttings and witness the growth of new bonsai trees that carry the charm and beauty of their parent plant.
Tips for Encouraging Healthy Root Development
Encouraging healthy root development is essential for the success of propagated Jade Bonsai. Here are some tips to ensure optimal root growth:
Provide a suitable rooting medium that offers excellent drainage and aeration.
Maintain consistent moisture levels in the rooting medium without overwatering, as excessive moisture can lead to root rot.
Place the cutting in a warm and well-lit environment, as higher temperatures encourage root growth.
Consider using rooting hormone or natural alternatives to stimulate root formation.
Protect the cutting from extreme weather conditions, such as frost or excessive heat, which can stress the roots.
By implementing these tips, you can create a conducive environment for healthy root development, ensuring the future success of your propagated Jade Bonsai.
Identifying and Addressing Pests and Diseases
Pests and diseases can pose a significant threat to the health and vitality of your Jade Bonsai. By understanding the common pests and diseases that can affect bonsai trees, including Jade Bonsai, you can take proactive measures to identify and address any issues that may arise.
When it comes to pests, some of the common ones that can target your Jade Bonsai include aphids, spider mites, scale insects, and mealybugs. These pests can cause damage to the leaves, stems, and overall structure of your bonsai tree. Keep a close eye on your Jade Bonsai and look out for signs of infestation, such as discolored or deformed leaves, webs, or the presence of small insects.
To address pest infestations, you can try removing the pests manually by gently wiping them off with a soft cloth or cotton swab. Alternatively, you can use insecticidal soaps or horticultural oils that are specifically formulated for treating pests on bonsai trees. Follow the instructions on the product label and apply the treatment as directed.
When it comes to diseases, root rot and fungal infections are some of the common issues that can affect Jade Bonsai. Overwatering or poor drainage can lead to root rot, while high humidity or improper ventilation can create a favorable environment for fungal infections. Look out for signs of root rot, such as wilting leaves, yellowing or browning of the foliage, and soft or mushy roots. Fungal infections may appear as discolored spots, powdery growth, or lesions on the leaves or stem.
If you suspect that your Jade Bonsai is experiencing root rot, carefully remove it from its pot and examine the roots. Trim away any affected or rotten roots using sterile bonsai tools and repot the tree in fresh, well-draining soil. To address fungal infections, you can apply fungicides specifically formulated for bonsai trees. Follow the instructions on the product label and treat the affected areas accordingly.
Prevention is always key when it comes to maintaining the health of your Jade Bonsai. Regularly inspect your bonsai tree for signs of pests or diseases, and take immediate action if any issues are detected. Additionally, practicing good bonsai care techniques, such as proper watering, adequate ventilation, and maintaining a clean environment, can help prevent the onset of pests and diseases.
By being vigilant and proactive in identifying and addressing pests and diseases, you can ensure the long-term health and vitality of your Jade Bonsai, allowing it to thrive and bring beauty to your bonsai collection,
This page contains some affiliate links. Please check out our affiliate disclaimer for more information
Karen Phillips, Bonsai expert and blogger. Read more about me here
Welcome to the fascinating world of Yamadori Bonsai! If you have a passion for bonsai trees and are looking to take your collection to the next level, yamadori bonsai is an art form that you simply cannot ignore. In this comprehensive guide, we will explore the beauty and intricacies of yamadori bonsai and provide you with essential insights and techniques to help you grow and care for your own stunning bonsai collection.
Yamadori bonsai is more than just a hobby – it’s an expression of art and a connection to nature. By collecting trees from the wild, you have the opportunity to transform them into living works of art that embody the essence of their origins. With its rich history and aesthetic appeal, yamadori bonsai is a captivating art form that is cherished by bonsai enthusiasts around the world.
In this guide, you will discover where to find opportunities for yamadori collecting, the essential steps for successful collection, and how to care for your newly collected trees. We will also delve into the unique allure of yamadori bonsai, with a focus on the age, character, and stories behind these magnificent trees. Embracing imperfections and showcasing the beauty of nature’s flaws is a hallmark of yamadori bonsai.
Whether you are a seasoned bonsai enthusiast or just starting out, this guide is your key to unlocking the world of yamadori bonsai. We will guide you through the entire journey – from finding the perfect tree to shaping, potting, and caring for your bonsai. By the end of this guide, you will have the knowledge and confidence to create your own remarkable yamadori bonsai collection.
So, let’s embark on this enchanting bonsai adventure together. Get ready to explore the art, techniques, and joy of yamadori bonsai. Your journey starts here!
The Unique Allure of Yamadori Bonsai
Yamadori Bonsai is more than just a hobby or art form; it is a connection to nature and a celebration of the unique qualities that only wild-grown trees possess. Understanding the origins of yamadori bonsai and the techniques used to transform them into living art is essential to appreciating the allure of these bonsai trees.
Understanding Yamadori: From Wild Origins to Bonsai Art
Yamadori bonsai originated in Japan and refers to the practice of collecting trees from the wild and training them into miniature masterpieces. The process begins with carefully selecting a suitable tree with desirable bonsai characteristics such as interesting bark, compact foliage, and a well-developed trunk. This connection with nature and the act of nurturing these trees bring a sense of harmony and tranquility to bonsai enthusiasts.
Why Yamadori Bonsai Stand Apart: Age, Character, and Story
Yamadori bonsai trees stand apart from nursery-grown bonsai due to their age and the unique character they exhibit. These trees have endured the elements of nature for years, resulting in a distinct charm and maturity. Each tree has its own story, which becomes a part of the bonsai art. Whether it’s the bend of a branch or the twist of the trunk, these imperfections tell a story and add depth and authenticity to the bonsai collection.
The Appeal of Imperfection: Embracing Nature’s Flaws
Imperfections in yamadori bonsai are not considered defects but rather reflections of the natural world. Bonsai artists embrace these imperfections, as they add a sense of authenticity and a connection to the untamed beauty of nature. The irregularities in the trunk, the unique branching patterns, and the weathered appearance all contribute to the allure of yamadori bonsai. Embracing these imperfections is an integral part of the art form and enhances the overall aesthetic appeal.
Where to Find Yamadori Bonsai Opportunities
If you’re ready to embark on the adventure of collecting yamadori bonsai, you’re in for an exciting journey of discovering wild trees and transforming them into living works of art. Finding yamadori bonsai opportunities requires exploring various sources and locations. Let’s explore some of the best places where you can find these breathtaking wild bonsai trees.
1. Wilderness Areas and Forests: Start your search for yamadori bonsai in natural habitats such as national parks, forests, and wilderness areas. These untouched landscapes offer a wealth of opportunities to find unique and ancient trees ready to be shaped into stunning bonsai specimens.
2. Urban Landscapes: Surprisingly, you can find yamadori bonsai even in urban environments. Old and neglected city parks, abandoned lots, and forgotten corners of urban settings can harbor hidden gems waiting to be discovered and given new life as bonsai trees.
3. Private Property: With proper permission, private properties can be a fantastic source for yamadori bonsai. Some landowners may allow bonsai enthusiasts to collect wild trees from their land, especially if it benefits the health of the environment or contributes to the preservation of the landscape. Always seek permission and respect the landowner’s guidelines.
To ensure a responsible and sustainable approach to collecting yamadori bonsai, it is crucial to obtain proper permission before collecting from any location. Respect the natural environment and adhere to local regulations to preserve the beauty and health of these wild trees for future generations.
Essential Steps for Collecting Yamadori Bonsai
Collecting yamadori bonsai requires careful planning and execution to ensure the health and survival of the trees. In this section, we will cover the essential steps for successful yamadori bonsai collection. This includes securing permission to collect from the landowner, acquiring the necessary tools for digging and transporting, and employing techniques to preserve the tree during excavation and transport. By following these steps, you can minimize the stress on the tree and increase its chances of thriving in its new environment.
Securing Permission: Legal Aspects of Harvesting Yamadori
Before embarking on your yamadori bonsai collecting journey, it is crucial to understand and adhere to the legal aspects of harvesting yamadori. Depending on your location, regulations may vary regarding the collection of plants from public lands or private property. Prior to collecting, always seek permission from the landowner or appropriate governing authorities to ensure you are operating within the bounds of the law.
Tools of the Trade: What You Need for Successful Collecting
The right tools are essential for a successful yamadori bonsai collection. Here are some tools you should have in your arsenal:
Bonsai Digging Spade: This specialized spade is designed to dig around the root ball of a tree without damaging the delicate roots.
Bonsai Pruning Shears: These sharp cutting tools are used to trim branches and roots during collection and maintenance.
Bonsai Wire Cutters: Wire cutters are necessary for removing any wire that may have been used to shape or secure the tree.
Bonsai Training Wire: This wire is essential for shaping and styling the branches of your yamadori bonsai.
Bonsai Root Rake: A root rake helps to gently untangle and separate the roots during the collection process.
Having these tools readily available will ensure that you can safely and effectively collect yamadori bonsai.
Preserving the Tree: Techniques for Safe Excavation and Transport
Preserving the tree during excavation and transport is crucial for its survival. Here are some techniques to help minimize stress and increase the chances of success:
Plan Ahead: Before starting the collection process, thoroughly research and understand the specific needs of the tree you are collecting, including its preferred soil conditions and exposure to light.
Prepare the Tree: Trim back excess foliage and remove any dead or damaged branches. This will reduce the tree’s overall weight and stress during transport.
Excavate Carefully: When digging up the tree, ensure you excavate a root ball large enough to preserve the majority of the tree’s feeder roots. Use the bonsai digging spade to carefully loosen the soil around the root ball.
Wrap and Secure: Once the tree is excavated, wrap the root ball in damp burlap or a similar material to retain moisture. Secure the wrapped root ball with twine or a bungee cord to prevent it from shifting during transport.
Transport with Care: Place the wrapped root ball in a sturdy container or specialized bonsai transport box, ensuring that it is secure and well-supported. Avoid exposing the tree to extreme temperatures or excessive vibrations during transport.
By employing these techniques, you can increase the chances of successfully transplanting your yamadori bonsai while minimizing stress and ensuring its long-term preservation.
Yamadori Bonsai: Setting the Stage for Growth
Once you have successfully collected a yamadori bonsai, it is essential to set the stage for its growth and development. This section will cover important considerations such as choosing the right time to collect bonsai, initiating the bonsai journey by potting the tree, and selecting the appropriate soil and composition for optimal growth. Creating the right environment is crucial for ensuring the health and vitality of your newly collected yamadori bonsai.
Choosing the Right Time: When to Collect Bonsai
Timing is crucial when collecting bonsai, including yamadori bonsai. It is important to consider the specific characteristics of the tree you are collecting and the climatic conditions of your region. Generally, the best time to collect yamadori bonsai is during the dormant season, either in late winter or early spring. This is when the tree is more resilient to the stress of transplantation and has minimal leaf growth. By choosing the right time to collect your bonsai, you will maximize its chances of successful establishment and growth.
The First Pot: Initiating the Bonsai Journey at Home
After collecting your yamadori bonsai, the next step is to initiate its journey as a bonsai by potting it. Selecting the appropriate pot is essential for the tree’s growth and aesthetics. Consider the size and shape of the tree, ensuring that the pot provides enough stability and space for root growth. Additionally, choose a pot that complements the tree’s character and suits its overall design. Potting your yamadori bonsai properly will give it a solid foundation to thrive and continue its transformation into a living artwork.
Soil Selection and Composition: Creating the Optimal Environment
Selecting the right soil composition is crucial for creating an optimal environment for the growth and health of your yamadori bonsai. Bonsai soil should have good drainage to prevent excess moisture that can lead to root rot. It should also provide adequate moisture retention to ensure the tree receives the necessary water and nutrients. A common soil mixture for yamadori bonsai includes a combination of inorganic components like Akadama, pumice, and lava rock. Finding the right balance of these components will promote healthy root development and overall growth of your yamadori bonsai.
By following these guidelines for setting the stage for growth, you will provide your Yamadori bonsai with the ideal conditions to thrive and flourish. Remember, successful Yamadori bonsai cultivation requires patience, attention to detail, and a deep appreciation for the beauty and artistry of these unique trees.
Caring for Your Newly Collected Yamadori Bonsai
Proper care and maintenance are essential for the long-term health and thriving of your newly collected Yamadori bonsai. As you embark on this exciting bonsai journey, it’s important to understand the key aspects of caring for your bonsai tree.
First and foremost, watering your Yamadori bonsai correctly is crucial. Bonsai trees have unique watering needs, and finding the right balance is essential. Be sure to water your bonsai regularly, checking the moisture level of the soil to avoid over or under watering. Consistency is key to ensuring your bonsai receives the proper hydration it needs.
Another important aspect of bonsai care is pruning. Regular pruning helps maintain the desired shape and size of your Yamadori bonsai, encouraging healthy growth and preventing overcrowding. Trim back any excess foliage and branches, keeping your bonsai’s overall aesthetic in mind. Remember, pruning is an ongoing process that requires attention and precision.
In addition to watering and pruning, fertilizing your Yamadori bonsai is essential for its health and vitality. Bonsai trees require nutrients to thrive, and a balanced fertilizer specifically formulated for bonsai is recommended. Follow the instructions on the fertilizer packaging to determine the appropriate frequency and amount of application.
By understanding the unique needs of Yamadori bonsai and providing the necessary care and attention, you can ensure the continued growth and beauty of your bonsai collection. With the right care, your Yamadori bonsai will flourish and bring you joy for many years to come.
This page contains some affiliate links. Please check out our affiliate disclaimer for more information
Karen Phillips, Bonsai expert and blogger. Read more about me here
Azalea Bonsai is a captivating and delicate variety of bonsai that requires specific attention and care. From selecting the right variety for your collection to understanding the proper pruning techniques, we will cover everything you need to know.
Discover the fascinating history and artistry behind Azalea Bonsai, and explore its rich cultural significance. We will introduce you to the different varieties available, such as the vibrant Satsuki Azalea and the resilient Kurume Azalea.
Learn essential tools and techniques for potting your Azalea Bonsai, including the ideal soil composition and potting essentials. Understand the proper watering methods to ensure the health and vitality of your bonsai tree.
Discover the importance of fertilizing and maintaining the perfect environment for your Bonsai. We will also delve into pruning techniques, pest and disease prevention, and tips for displaying your plant in exhibitions.
Throughout this guide, we will provide you with step-by-step instructions and valuable tips to help you create and maintain a thriving collection. So let’s dive in and embark on a rewarding journey with these stunning bonsai trees.
Understanding the Azalea Bonsai: An Introduction
Azalea Bonsai, known for its exquisite flowers, delicate foliage, and compact size, has captured the hearts of bonsai enthusiasts worldwide. These miniature trees embody the essence of beauty and grace, offering a stunning representation of nature’s artistry in a manageable form.
Unlike other types of bonsai trees, Azalea trees have distinct characteristics that make them stand out. Their vibrant and abundant blooms, ranging from hues of pink, red, white, and purple, create a spectacle of color that captivates the eye.
The history and cultural significance of Azalea Bonsai add a layer of fascination to these enchanting plants. Originating from Asia, particularly Japan, it has been cultivated for centuries, symbolizing harmony, balance, and tranquility. They are often associated with the celebration of spring and are prominently featured in traditional bonsai exhibitions.
Caring for Azalea Bonsai requires attention to detail and a thorough understanding of their specific needs. In the following sections, we will guide you through the essentials of Azalea Bonsai care, including watering, pruning, and providing the ideal environment for these delicate beauties to thrive.
The History and Artistry Behind Azalea Bonsai
In this section, we will delve into the rich history of Azalea Bonsai and explore the artistry behind creating these beautiful trees. Throughout the centuries, it has been cultivated and admired for its exquisite beauty and cultural significance.
Azalea Bonsai has a fascinating history that dates back to ancient China and Japan. They were originally cultivated from wild azaleas, and through generations of selective breeding and cultivation techniques, they have evolved into the stunning bonsai trees we see today.
The artistry behind Azalea Bonsai lies in the meticulous process of shaping and styling these miniature trees. Skilled bonsai artists carefully shape the branches and leaves, delicately sculpting them to create harmonious compositions that resemble the natural growth patterns of full-sized azalea trees.
Creating an Azalea Bonsai masterpiece is truly an art form that requires patience, skill, and a deep understanding of horticulture. The process involves meticulously pruning, wiring, and training the branches to achieve the desired shape and aesthetic appeal.
Azalea Bonsai artistry also extends to the careful selection of pots and display stands. These elements are chosen to complement the tree’s characteristics and enhance its overall visual impact. The proper choice of pots and display stands takes into account factors such as color, size, and material, ensuring that they harmonize with the tree’s beauty.
The artistry behind Azalea Bonsai goes beyond the physical beauty of the trees. These miniature masterpieces evoke a sense of tranquility, balance, and harmony, reflecting the Zen philosophy that is deeply ingrained in bonsai culture. Azalea Bonsai represents a connection between nature and humans, reminding us of the beauty and fragility of life.
By appreciating the history and artistry behind Azalea Bonsai, you gain a deeper understanding and admiration for these remarkable trees. In the next section, we will explore various varieties of Azalea Bonsai, allowing you to discover the unique characteristics and charm of each.
Choosing Your Azalea Bonsai: Varieties Explained
In this section, we will explore different varieties of Azalea Bonsai and help you choose the right one for your collection. Azalea Bonsai trees come in a wide range of colors and sizes, each with its own unique characteristics and appeal. Whether you prefer vibrant and diverse flowers or compact and resilient trees, there is an Azalea Bonsai variety that will suit your preferences and style.
Satsuki Azalea: The Colorful Canvas
The Satsuki Azalea is renowned for its spectacular flower display. This variety offers a stunning range of colors and patterns, making it a favorite among bonsai enthusiasts. From vibrant pinks and reds to delicate whites and purples, the flowers of the Satsuki Azalea create a mesmerizing canvas of color. With proper care and maintenance, this variety can reward you with a breathtaking floral showcase.
Kurume Azalea: Compact and Resilient
The Kurume Azalea is known for its compact size and resilience, making it an excellent choice for beginners and those with limited space. This variety produces an abundance of small, bell-shaped flowers that adorn the tree in a vibrant display. The Kurume Azalea is highly adaptable and can tolerate a variety of growing conditions, making it a versatile addition to any bonsai collection.
Other Compelling Varieties for Your Collection
If you’re looking to diversify your Azalea Bonsai collection further, there are several other compelling varieties to consider. Some popular options include:
Indica Azalea: Known for its large and showy flowers, the Indica Azalea adds a bold and dramatic touch to any bonsai collection.
Kaempferi Azalea: This variety features striking flowers with intricate patterns and vibrant colors, making it a true showstopper.
Kiusianum Azalea: With its delicate pink flowers and compact growth habit, the Kiusianum Azalea adds an elegant charm to bonsai displays.
These are just a few examples of the many Azalea Bonsai varieties available. Each variety has its own unique beauty and characteristics, allowing you to create a diverse and captivating bonsai collection.
Variety
Description
Satsuki Azalea
Offers a range of vibrant flower colors and patterns.
Kurume Azalea
Compact size and resilient nature, suitable for beginners.
Indica Azalea
Large and showy flowers, add drama to bonsai displays.
Kaempferi Azalea
Striking flowers with intricate patterns.
Kiusianum Azalea
Delicate pink flowers and elegant charm.
Essential Tools for Azalea Bonsai Care
To properly care for your Azalea Bonsai, you will need specific tools. In this section, we will outline the essential tools required for Azalea Bonsai care. By having the right tools on hand, you will be able to maintain the health and aesthetics of your Azalea Bonsai.
1. Pruning Shears: Pruning shears are essential for trimming and shaping your Azalea Bonsai. They allow you to remove dead or overgrown branches and maintain the desired size and form of your tree. When using pruning shears, make clean cuts at a 45-degree angle to promote quick healing.
2. Concave Cutters: Concave cutters are specialized bonsai tools that are designed to make precise cuts when removing larger branches. They create a concave shape on the cut surface, which helps the wound heal quickly and smoothly. Use concave cutters for larger branches that require a deeper and cleaner cut.
3. Wire Cutters: Wire cutters are used for removing or adjusting bonsai wire during the shaping process. When wiring your Azalea Bonsai, it’s important to use the right gauge of wire and make sure it is applied in a way that allows for the tree’s growth while maintaining the desired shape. Wire cutters help you remove the wire without damaging the branches.
4. Root Pruning Tools: Root pruning is necessary to maintain the health of your Azalea Bonsai’s root system. Root pruning tools include root shears and root hooks, which are used to carefully trim and shape the roots during repotting. Root pruning promotes better root development and prevents the tree from becoming root-bound.
5. Watering Can: Proper watering is essential for the health of your Azalea Bonsai. A watering can with a narrow spout allows for precise watering, ensuring the soil is evenly moist but not waterlogged. Avoid using a strong stream of water that can dislodge the soil or damage the tree’s delicate branches.
6. Tweezers: Tweezers are useful for removing small debris, insects, or dead leaves from your Azalea Bonsai. They allow you to carefully clean and maintain the aesthetics of your tree without causing any damage.
7. Bonsai Soil Scoop: A bonsai soil scoop or spoon helps you accurately measure and distribute the soil during repotting. It allows for precise placement of soil around the roots, ensuring proper drainage and airflow.
8. Bonsai Brush: A soft bonsai brush is used to gently remove dust and debris from the leaves and branches of your Azalea Bonsai. Regular brushing helps keep the tree clean and promotes healthy growth.
9. Turntable: A bonsai turntable is a rotating platform that makes it easier to work on your Azalea Bonsai from all angles. It allows you to view and access different parts of the tree without constantly repositioning it.
By having these essential tools for Azalea Bonsai care, you will be well-equipped to maintain the health, beauty, and longevity of your bonsai tree.
Azalea Bonsai Soil Composition and Potting Essentials
The soil composition and potting technique are crucial elements in ensuring the health and growth of your Azalea Bonsai. The right soil composition provides the necessary nutrients and moisture required for your bonsai to thrive. Additionally, proper potting techniques ensure your Azalea Bonsai has sufficient space to grow and develop its root system.
Soil Composition:
When it comes to soil composition for Azalea Bonsai, two essential factors to consider are acidity and drainage. Azaleas prefer acidic soil conditions, with a pH level between 4.5 and 6.0. This acidic environment enables optimal nutrient absorption and promotes healthy growth. To achieve the ideal acidity level, you can use a specialized azalea bonsai soil mix or create your own by combining various organic materials such as peat moss, pine bark, and sphagnum moss.
Potting Essentials:
The potting process is a critical step in the care of your Azalea Bonsai. Here are some key points to remember when potting your Azalea Bonsai:
Choose a suitable bonsai pot: Select a pot that complements the size and style of your Azalea Bonsai. It should provide adequate space for root growth and have drainage holes at the bottom to prevent waterlogging.
Prepare the bonsai soil: Ensure that you have the appropriate soil mixture ready before potting your Azalea Bonsai. This mixture should meet the acidity requirements and have good drainage properties. You can include a layer of coarse substrate at the bottom of the pot to enhance drainage.
Carefully remove the bonsai from its current pot: Gently loosen the soil around the root system and carefully remove the bonsai from its current pot. Be cautious not to damage the roots during this process.
Trim excess roots and prune branches if needed: Inspect the root system and trim any excessively long or damaged roots. Additionally, prune any branches that may hinder the proper placement of the bonsai in the new pot.
Repot the Azalea Bonsai: Place the Azalea Bonsai in the new pot, ensuring that it is centered and positioned at the desired angle. Fill the pot with the prepared bonsai soil mixture, making sure to distribute it evenly around the roots.
Water the bonsai: After repotting, give your Azalea Bonsai a thorough watering to settle the soil and remove any air pockets. Provide adequate moisture without overwatering.
By following proper potting techniques and using the right soil composition, you can provide a healthy environment for your Azalea Bonsai to grow and flourish.
Steps to Potting Your Azalea Bonsai
Proper potting is crucial for the health and development of your Azalea Bonsai. Follow these step-by-step instructions to ensure the successful potting of your Azalea Bonsai tree.
Select the right pot: Choose a pot that is slightly larger than the current pot but not too big. The new pot should have drainage holes to prevent waterlogging.
Prepare the soil: Create a suitable soil mixture by combining well-draining bonsai soil with organic matter such as peat moss or pine bark. This will provide the necessary nutrients and moisture retention.
Remove the tree from its current pot: Gently tap the sides of the pot to loosen the soil and carefully lift the tree out, supporting the root ball with your hand. Take care not to damage the roots.
Inspect and trim the roots: Examine the roots for any damaged or tangled portions. Trim them with clean bonsai shears, removing any dead or unhealthy roots.
Position the tree in the new pot: Place the tree in the center of the new pot, ensuring it is upright and positioned at the desired angle.
Add the soil mixture: Gradually fill the pot with the prepared soil mixture, carefully working it around the roots and ensuring there are no air pockets. Gently tap the pot to help settle the soil.
Water thoroughly: After potting, water the bonsai thoroughly until water drains out from the bottom of the pot. This will help settle the soil and hydrate the roots.
Place in a suitable location: Find a location for your newly potted Azalea Bonsai where it can receive the right amount of sunlight and protection from extreme weather conditions.
By following these steps, you can ensure that your Azalea Bonsai is properly potted, providing it with the ideal environment for healthy growth and development.
Watering Your Azalea Bonsai: Techniques and Tips
Proper watering is essential for the health and vitality of your Azalea Bonsai tree. Understanding the correct techniques and tips for watering will ensure that your bonsai thrives and flourishes. In this section, we will provide you with valuable insights on how to water your Azalea Bonsai effectively.
Frequency: Azalea Bonsai trees require regular watering, typically every 2-3 days, depending on factors such as the climate, pot size, and soil condition. Monitor the moisture level of the soil to determine the ideal frequency for watering.
Amount: When watering your Azalea Bonsai, ensure that the entire root system receives moisture. Water the soil evenly until you see it draining from the drainage holes at the bottom of the pot.
Watering Methods: There are two popular methods for watering Azalea Bonsai: soaking and misting. For soaking, immerse the entire pot in a basin or sink filled with water for a few minutes. This allows the soil to absorb water from the drainage holes. Alternatively, misting involves spraying a fine mist of water onto the foliage and soil surface. This method is useful for supplementing watering between soakings.
Water Quality: The quality of water used for your Azalea Bonsai is crucial. Ideally, use rainwater, distilled water, or tap water that has been left standing for 24 hours to allow chlorine to evaporate. Avoid using hard water or water with high mineral content, as it can affect the acidity of the soil and potentially harm your bonsai.
Common Mistakes to Avoid:
Overwatering: Excess water can lead to root rot or other root-related issues. Ensure that the soil is well-drained and never let your bonsai sit in standing water.
Underwatering: Insufficient water can cause your Azalea Bonsai to become dehydrated. Regularly check the soil moisture and adjust your watering schedule accordingly.
Watering from the top: Avoid watering the foliage directly, as it can lead to waterlogged leaves and encourage fungal growth. Focus on watering the soil and roots instead.
By following these techniques and tips, you can provide the optimal watering conditions for your Azalea Bonsai, promoting healthy growth and vibrant blooms.
Nutrition: Fertilizing Your Azalea Bonsai Tree
Fertilizing is an essential aspect of Azalea Bonsai care as it provides the necessary nutrients for healthy growth and vibrant blooms. Proper fertilization ensures that your Azalea Bonsai receives all the essential elements it needs to thrive and flourish.
When it comes to fertilizing your Azalea Bonsai, it’s important to choose the right type of fertilizer and apply it at the appropriate times to maximize its benefits. Organic fertilizers, such as fish emulsion or compost, are often recommended for it, as they provide a slow release of nutrients and promote overall soil health.
When applying fertilizer, it’s essential to follow the instructions on the product label and avoid overfertilization, as it can burn the roots and cause damage to the tree. Generally, it is best to fertilize your Azalea Bonsai during the growing season, from spring to fall, reducing or stopping fertilization during the winter months.
Remember to water your Azalea Bonsai thoroughly before applying fertilizer to avoid burning the roots. This helps to ensure that the fertilizer is properly distributed throughout the root system.
To apply the fertilizer, you can use either a liquid or granular form. Liquid fertilizers are often diluted in water and applied during regular watering sessions, providing a gradual release of nutrients. Granular fertilizers can be applied directly to the soil, usually in small amounts, and then watered in to allow for absorption.
Maintaining the Perfect Environment for Azalea Bonsai
Creating the perfect environment for your Azalea Bonsai is crucial for its overall health and well-being. By providing the right conditions, you can ensure the longevity and vitality of your beautiful bonsai tree.
Whether you choose to keep your Azalea Bonsai indoors or outdoors, there are specific factors to consider to create an ideal environment:
Temperature:
Azalea Bonsai thrive in cool temperatures, ideally between 60°F and 70°F (15°C – 21°C). They are sensitive to extreme heat and cold, so it’s important to avoid exposing them to drastic temperature fluctuations.
Humidity:
Azalea Bonsai require high humidity levels to mimic their natural habitat. To increase humidity, you can place your bonsai tree on a humidity tray filled with water or use a humidifier.
Sunlight:
Azalea Bonsai prefers partial shade or filtered sunlight. Direct sunlight can scorch their delicate leaves, while insufficient light can hamper their growth and blooming. Place your plant in a location where it receives morning sun and afternoon shade.
Air Circulation:
Good air circulation is essential for preventing diseases and promoting healthy growth. Avoid placing your Azalea Bonsai in a stagnant or stuffy area. Instead, ensure proper ventilation by keeping a gentle breeze flowing around the tree.
Remember to monitor the environment regularly and make adjustments as needed to maintain the optimal conditions for your Azalea Bonsai. With the right environment, your bonsai tree will flourish and bring beauty to your home or garden.
Azalea Bonsai Pruning Techniques
Pruning is an important part of Azalea Bonsai care, as it helps maintain the desired shape and encourages new growth. With proper pruning techniques for azalea bonsai, you can enhance the aesthetic appeal and overall health of your Azalea Bonsai.
To effectively prune your plant, consider the following pruning techniques:
Branch selection: Carefully choose which branches to keep and which to remove. Remove any weak or diseased branches to promote the health of your bonsai tree.
Thinning: Thin out dense areas of foliage to allow for better airflow and light penetration. This will help prevent fungal diseases and promote balanced growth.
Pinching: Pinch off the tips of new shoots to encourage branching and create a fuller and more compact silhouette.
By utilizing these pruning techniques, you can shape your Azalea Bonsai tree according to your desired vision and promote its overall health and vitality.
Dealing with Pests and Diseases in Azalea Bonsai
Like any plant, it can be prone to pests and diseases. In this section, we will identify common pests and diseases that affect Azalea Bonsai, such as spider mites, vine weevils, and root rot. We will provide preventive measures and treatment options to keep your plant healthy and free from infestations.
When it comes to pests, spider mites are a common problem for Azalea Bonsai. These tiny pests can cause significant damage by feeding on the leaves, leaving behind yellow or brown spots. To prevent spider mite infestations, regularly check the undersides of the leaves for any signs of webs or pests. Introducing natural predators like ladybugs or using insecticidal soap can help control spider mite populations.
Vine weevils are another pest that can target Azalea Bonsai. These insects primarily attack the roots of the bonsai, causing wilting and stunted growth. You can prevent vine weevil infestations by inspecting the soil regularly and removing any grubs or larvae. Consider using nematodes, which are natural predators of vine weevil larvae, to control their populations effectively.
Azalea Bonsai are also susceptible to various diseases, such as root rot. Root rot can occur due to overwatering or poor drainage, leading to the decay of the roots. To prevent root rot, ensure proper watering practices, allowing the soil to dry out slightly before watering again. Additionally, planting Azalea Bonsai in well-draining soil and pots with drainage holes can help prevent waterlogged conditions and reduce the risk of root rot.
By being vigilant and taking proactive measures, you can protect your Azalea Bonsai from pests and diseases. Regular inspection, proper watering, and appropriate use of natural control methods will contribute to the overall health and vitality of your masterpiece.
Displaying Your Azalea Bonsai: Tips for Exhibition
When it comes to showcasing your plant in an exhibition or show, attention to detail is paramount. The goal is to create a visually stunning presentation that highlights the unique beauty of your masterpiece. Here are some tips and techniques to help you display your bonsai at its best.
First and foremost, selecting the right display stand is crucial. The stand should complement the style and aesthetics of your Azalea Bonsai, enhancing its overall presentation. Consider the height, material, and design of the stand to create a harmonious and balanced display.
In arranging the branches and flowers, aim for a natural and artistic composition. Gently bend and position the branches to create an appealing silhouette, taking care not to over-manipulate them. Balance is key, so distribute the foliage and flowers evenly throughout the tree. This will create a sense of harmony and visual appeal.
Additionally, pay attention to the overall cleanliness and grooming of your Azalea Bonsai. Remove any dead leaves or debris and ensure that the soil is neat and well-maintained. A clean and well-groomed bonsai will leave a lasting impression on the viewers.
By applying these tips and techniques, you can create an exhibition display that truly showcases the beauty and artistry of your plant. Remember, the key is to pay attention to detail and create a visually pleasing composition. With careful planning and execution, your plant will shine in any exhibition or show.
This page contains some affiliate links. Please check out our affiliate disclaimer for more information
Karen Phillips, Bonsai expert and blogger. Read more about me here
If you’re looking for a stunning addition to your indoor bonsai collection, the weeping willow bonsai (Salix babylonica) is a perfect choice. In this comprehensive care guide, we will explore everything you need to know to ensure the health and vitality of your weeping willow bonsai.
From bonsai care techniques to selecting the perfect bonsai tree, we’ve got you covered. Whether you’re a seasoned bonsai enthusiast or just starting your bonsai journey, this guide will provide valuable insights and tips to help you succeed.
So, let’s dive in and discover the enchanting world of weeping willow bonsai!
Discovering the Enchanting World of Weeping Willow Bonsai
History and Popularity of Weeping Willow Bonsai
Weeping Willow Bonsai has a rich and fascinating history that dates back centuries. Originating from China, these beautiful trees have captivated bonsai enthusiasts all over the world. The art of growing weeping willow bonsai began during the Tang Dynasty (618-907 AD) and has since evolved into a cherished tradition.
While other bonsai species have gained popularity over time, the weeping willow bonsai has managed to maintain its allure. Its unique appearance and graceful arching branches make it a favorite choice among bonsai lovers. The popularity of the weeping willow bonsai can be attributed to its aesthetic appeal and the deep sense of tranquility it brings to any space.
Understanding the Aesthetic Appeal
The aesthetic appeal of weeping willow bonsai lies in its elegant and flowing form. The long, slender leaves and drooping branches create a sense of movement and grace, reminiscent of a gentle breeze blowing through a willow grove. The cascading foliage, along with the tree’s ability to withstand gentle bending and shaping, adds to its allure as a bonsai species.
The weeping willow bonsai is often used to represent both strength and beauty in the bonsai world. Its delicate yet resilient nature symbolizes adaptability and endurance, making it a meaningful and aesthetically pleasing addition to any bonsai collection.
Weeping Willow Bonsai
Characteristics
Scientific Name
Salix babylonica
Origin
China
Popular Species
One of the most popular bonsai species
Aesthetic Appeal
Elegant, flowing form with cascading foliage
Symbolism
Strength, beauty, adaptability
Comparing Weeping Willow Bonsai with Other Bonsai Tree Species
When it comes to bonsai tree species, the weeping willow bonsai (Salix babylonica) stands out with its unique traits and charm. In this section, we will explore the distinct characteristics of weeping willow bonsai trees and compare them to other willow bonsai varieties.
Unique Traits of Weeping Willow Bonsai Trees
The weeping willow bonsai is beloved for its elegant, cascading branches that create a captivating visual display. Its long, slender leaves and slender stems lend a graceful touch to any bonsai collection. Additionally, weeping willow bonsai trees have a remarkable ability to adapt to different environments and thrive both indoors and outdoors.
Salix Babylonica vs. Other Willow Bonsai Varieties
In comparison to other willow bonsai varieties, the Salix babylonica, or weeping willow bonsai, offers a unique combination of aesthetic appeal and ease of care. While most willow bonsai trees display a more upright growth habit, the weeping willow bonsai’s cascading branches create a captivating and distinctive look.
To emphasize the differences, let’s take a closer look at a table highlighting the unique traits of the weeping willow bonsai:
Weeping Willow Bonsai (Salix babylonica)
Other Willow Bonsai Varieties
Elegant cascading branches
Upright growth habit
Long, slender leaves
Varying leaf shapes
Thrive in both indoor and outdoor environments
Preference for outdoor growth
Easy to care for and maintain
May require more specialized care
As you can see, the weeping willow bonsai stands apart with its unique traits, making it a captivating choice for bonsai enthusiasts.
Choosing The Perfect Weeping Willow Bonsai
When selecting a weeping willow bonsai tree, the right choice can make all the difference in creating a stunning and harmonious display in your bonsai collection. There are a few key factors to consider to ensure you choose the perfect weeping willow bonsai that meets your preferences and requirements.
1. Size and Age
Consider the size and age of the weeping willow bonsai tree you desire. Older and larger trees can offer a more mature and dramatic appearance, while smaller and younger trees provide flexibility for shaping and styling according to your design preferences.
2. Trunk Thickness and Shape
Examine the trunk of the weeping willow bonsai tree. A thick and well-developed trunk can contribute to the overall aesthetic appeal and stability of the bonsai. Additionally, consider the shape of the trunk, whether it possesses gentle curves or more pronounced twists, as this can add character and interest to the bonsai’s design.
3. Branch Structure
Evaluate the branching structure of the weeping willow bonsai tree. Look for a tree that has well-distributed branches, with no large gaps or overcrowded areas. A balanced and harmonious branch structure will enhance the visual appeal of the bonsai and allow for proper development during the styling process.
4. Foliage Density
Inspect the foliage density of the weeping willow bonsai tree. An ideal tree will have lush and healthy foliage that is evenly distributed across the branches. Avoid trees with sparse or yellowing foliage, as this may indicate underlying health issues.
5. Overall Health
Ensure the weeping willow bonsai tree you choose is in good health. Look for signs of vitality, such as vibrant leaves, healthy roots, and absence of pests or diseases. Investing in a healthy bonsai tree will increase the chances of successful cultivation and long-term enjoyment.
Factors to Consider
Important Considerations
Size and Age
Choose based on your desired aesthetic and styling preferences.
Trunk Thickness and Shape
Look for a well-developed trunk with an appealing shape.
Branch Structure
Ensure the branches are well-distributed and balanced.
Foliage Density
Opt for a tree with lush and evenly distributed foliage.
Overall Health
Choose a bonsai tree that displays signs of vitality and absence of pests or diseases.
Essential Steps for Planting and Potting
When it comes to planting and potting your weeping willow bonsai, there are a few essential steps to follow. These steps will ensure that your bonsai tree has the best possible start and will set the stage for optimal growth and development.
Selecting the Right Soil Mix
The type of soil mix you choose for your weeping willow bonsai is crucial for its overall health and growth. It’s important to select a well-draining soil mix that retains moisture and provides adequate nutrients. A suitable soil mix for weeping willow bonsai may include a combination of organic materials, such as compost, peat moss, and bonsai soil mix. This blend will create a balance between water retention and drainage, allowing the roots to thrive.
Choosing a Suitable Container
Choosing the right container for your weeping willow bonsai is another important step in its planting and potting process. The container should be proportionate to the size of your bonsai tree and provide enough space for its roots to grow. Additionally, the container should have drainage holes to ensure proper water drainage and prevent root rot. A shallow and wide container is generally preferred for weeping willow bonsai, allowing ample room for its cascading branches.
Planting Techniques for Optimal Growth
When planting your weeping willow bonsai, it’s essential to follow proper techniques to promote optimal growth. Start by gently removing the bonsai tree from its nursery container, being careful not to damage the roots. Loosen the root ball and prune any damaged or tangled roots. Place the tree in the selected container, ensuring that it is centered and at the desired angle. Fill the container with the selected soil mix, gently patting it down to secure the bonsai tree in place. Finally, water the tree thoroughly to settle the soil and provide essential hydration.
Following these essential steps for planting and potting your weeping willow bonsai will create a solid foundation for its growth and ensure that it thrives in its new container. With proper soil mix selection, a suitable container, and planting techniques, your bonsai tree will have the ideal conditions for optimal growth and development.
Mastering Weeping Willow Bonsai Care
Now that you’ve chosen the perfect weeping willow bonsai and learned the essential steps for planting and potting, it’s time to dive into the art of caring for your bonsai. Proper care is crucial for the health and longevity of your bonsai, so let’s explore some care tips and techniques to help you nurture your weeping willow bonsai.
Care Tips for Weeping Willow Bonsai
Light: Place your weeping willow bonsai in a bright location where it can receive indirect sunlight for at least 6 hours a day. Avoid placing it in direct sunlight, as it can scorch the delicate foliage.
Watering: Maintain moist but not waterlogged soil by watering your bonsai regularly. Check the soil moisture by inserting your finger about an inch deep into the soil. If it feels dry, it’s time to water. Use a watering can or a gentle spray bottle to ensure even distribution of water.
Humidity: Weeping willow bonsai thrives in high humidity environments. Mist the foliage regularly with water to increase humidity levels. You can also place the bonsai pot on a humidity tray filled with water and pebbles to enhance moisture around the tree.
Pruning: Regular pruning is essential to maintain the shape and size of your weeping willow bonsai. Remove any dead, damaged, or overgrown branches using clean pruning shears. Prune during the dormant season to minimize stress on the tree.
Fertilization: Feed your bonsai with a balanced, slow-release fertilizer during the growing season. Follow the manufacturer’s instructions for the appropriate amount and frequency of application. Fertilization helps provide essential nutrients for healthy growth and vibrant foliage.
Pest and Disease Control: Monitor your weeping willow bonsai regularly for signs of pests or diseases. Common pests include aphids, spider mites, and scale insects. If infestations occur, treat the affected areas with appropriate insecticides or natural remedies. Additionally, maintaining good airflow and proper watering practices can help prevent disease development.
By following these care tips and techniques, you can ensure that your weeping willow bonsai thrives and remains a beautiful addition to your home or garden. Remember, patience and dedication are key when nurturing bonsai trees, so enjoy the process and watch your bonsai flourish under your care.
Watering Your Weeping Willow Bonsai: Techniques and Tips
To ensure the health and vitality of your weeping willow bonsai, it is crucial to understand proper watering techniques and meet its specific water requirements. Improper watering can lead to root rot, leaf discoloration, and even the death of your bonsai. In this section, we will explore the importance of watering, techniques to follow, and how to identify signs of over or underwatering.
Understanding Water Requirements
The weeping willow bonsai has specific water needs that must be met to thrive. As a general guideline, bonsai trees should be watered when the top inch of the soil feels slightly dry. However, it’s important to consider factors such as temperature, humidity, and the size of your bonsai tree when determining its watering schedule. Adjustments may be necessary depending on the conditions in your region.
Identifying Signs of Over or Underwatering
Overwatering and underwatering both pose risks to the health of your weeping willow bonsai. It’s vital to be able to recognize the signs to take appropriate action.
Signs of overwatering:
Yellowing or browning of leaves
Wilting despite moist soil
Root rot or a foul odor
Signs of underwatering:
Wilted or crispy leaves
Soil that feels extremely dry throughout
Excessive leaf drop
Regular observation and checking the moisture levels of the soil are key to maintaining the proper balance of water for your weeping willow bonsai. Remember that each bonsai may have subtle variations in its water requirements, so it’s important to monitor them closely.
Feeding and Fertilizing to Nourish Your Bonsai
Feeding and fertilizing your weeping willow bonsai is crucial for maintaining its health and promoting optimal growth. Bonsai trees require a balanced blend of nutrients to thrive, and providing them with the right nutrition will ensure their longevity and vitality.
When it comes to feeding your weeping willow bonsai, there are a few key considerations to keep in mind:
Choose a suitable fertilizer: Selecting the right fertilizer is essential for providing your bonsai with the nutrients it needs. Look for a balanced, slow-release fertilizer specifically formulated for bonsai trees.
Follow the recommended dosage: Ensure you follow the instructions provided by the fertilizer manufacturer regarding dosage and application frequency. Over-fertilizing can be harmful to your bonsai, so it’s important to use the correct amount.
Timing is crucial: Timing your fertilization is important to support the growth cycles of your weeping willow bonsai. Generally, fertilization should be done during the growing season, from spring to early autumn, to provide the necessary nutrients for robust growth.
Consider organic options: Organic fertilizers can be a great choice for those who prefer a natural approach to bonsai care. Compost, worm castings, and seaweed extracts are popular organic options that provide a slow and steady release of nutrients.
Remember that each bonsai tree is unique, and its feeding requirements may vary. It’s essential to observe your weeping willow bonsai closely and adjust the feeding regimen based on its specific needs.
In addition to regular feeding, periodic soil testing can help determine if any specific nutrient deficiencies need to be addressed. If you notice any signs of nutrient deficiency, such as yellowing leaves or stunted growth, consider adjusting your fertilization routine accordingly.
By providing proper feeding and fertilization, you can ensure that your weeping willow bonsai receives the essential nutrients it needs to flourish and thrive.
Pruning and Styling
The art of bonsai is not only about cultivating and nurturing the perfect miniature tree but also about shaping and styling it to achieve a desired aesthetic. When it comes to weeping willow bonsai, pruning and styling play a crucial role in creating a visually appealing and harmonious masterpiece.
Pruning is an essential technique that helps maintain the size, shape, and overall health of your weeping willow bonsai. By selectively removing branches, you can enhance the tree’s form and encourage growth in desired areas. Regular pruning also promotes better airflow and sunlight penetration, ensuring the optimal development of your bonsai.
To start pruning your weeping willow bonsai, make sure you have the necessary tools such as bonsai shears, concave cutters, and branch cutters. Begin by removing any dead, damaged, or unhealthy branches. Next, focus on shaping the tree by carefully trimming back excessive growth and maintaining balance between branches. Remember to step back occasionally to assess the tree’s overall form and make adjustments as needed.
Styling your weeping willow bonsai involves creating a visually appealing composition that showcases the tree’s unique beauty. There are several styling techniques you can explore, including:
Informal Upright: This style mimics the natural growth habit of the weeping willow, with a slightly curved trunk and cascading branches.
Slanting: In this style, the trunk of the bonsai is angled to one side, creating a sense of movement and dynamics.
Windswept: The windswept style imitates the effect of strong winds on the tree, with branches slanting in one direction.
Cascade: This style resembles a waterfall, with the branches cascading down below the pot’s rim.
Each styling technique requires careful observation and artistic judgment to achieve the desired effect. You can also experiment with different wiring techniques to further refine the shape and position of branches. Just remember to handle the branches with care, as the wood of the weeping willow can be quite fragile.
By combining pruning and styling techniques, you can transform your weeping willow bonsai into a striking and captivating work of art. Enjoy the process of shaping and nurturing your bonsai, and witness the gradual transformation of a humble sapling into a breathtaking masterpiece.
Recognizing and Combating Common Pests and Diseases
While weeping willow bonsai trees are resilient and adaptable, they can still fall victim to pests and diseases. To ensure the health and longevity of your bonsai, it’s essential to be vigilant and proactive in pest control and disease prevention.
Identifying Common Bonsai Pests
Pests can wreak havoc on your weeping willow bonsai if left unchecked. Here are some common pests to watch out for:
Aphids
Scale insects
Caterpillars
Spider mites
Mealybugs
These pests can cause damage to the foliage, weaken the tree, and stunt its growth. Regular inspections of your bonsai will help you catch any infestations early on.
Diagnosing Bonsai Diseases
Bonsai trees are susceptible to different diseases that can impair their vitality and aesthetics. Here are some common diseases that may affect weeping willow bonsai:
Root rot
Fungal infections
Bacterial infections
Leaf spot
Diseases can manifest as discoloration, wilting, or spots on the foliage. Prompt identification and treatment are crucial to prevent the spread of diseases and minimize damage to your bonsai.
Effective Pest Control and Disease Prevention
To combat pests and prevent diseases, follow these essential guidelines:
Regularly inspect your bonsai for signs of pests or diseases.
Isolate any infected or infested bonsai to minimize the risk of spreading pests or diseases to other trees.
Monitor humidity levels and avoid overwatering, as excessive moisture can promote fungal and bacterial growth.
Practice good hygiene by removing fallen leaves, debris, and deadwood, which can attract pests and contribute to disease.
Maintain proper ventilation around your bonsai to prevent stagnant air, which can increase the risk of fungal infections.
Apply organic or chemical treatments specifically formulated for bonsai pests and diseases, following the instructions carefully.
By implementing these pest control and disease prevention strategies, you can keep your weeping willow bonsai healthy, vibrant, and free from the harmful effects of pests and diseases.
Overcoming Challenges in Growing Indoor Bonsai
Growing indoor bonsai, such as the weeping willow bonsai (Salix babylonica), can be a rewarding and fulfilling experience. However, it is not without its challenges. To ensure the health and vitality of your indoor bonsai, you need to address these challenges head-on and implement effective care techniques. Here are some essential tips to help you overcome the challenges of growing indoor bonsai.
1. Providing Adequate Light: One of the primary challenges of indoor bonsai cultivation is providing sufficient light. Weeping willow bonsai trees thrive in bright, indirect light. Place your bonsai near a south or west-facing window to maximize natural sunlight exposure. If natural light is limited, consider using grow lights to supplement the light requirements of your indoor bonsai.
2. Regulating Temperature and Humidity: Indoor environments often have fluctuating temperature and humidity levels, which can adversely affect the health of your weeping willow bonsai. To create a suitable microclimate, maintain a consistent temperature between 65-75°F (18-24°C) and humidity levels of around 50% to 60%. You can use a humidifier or pebble trays filled with water to increase humidity levels around your bonsai.
3. Watering and Moisture Control: Overwatering or underwatering is a common challenge for indoor bonsai enthusiasts. To avoid overwatering, check the moisture level of the soil regularly. Water the bonsai only when the top inch of the soil feels slightly dry. Ensure that the pot has proper drainage to prevent waterlogging. Mist the foliage occasionally to maintain the moisture balance.
4. Managing Air Circulation: Good air circulation is crucial for the overall health of your indoor bonsai. Stagnant air can promote the growth of pests and diseases. To improve air circulation, place your weeping willow bonsai in an area with adequate ventilation. You can also use a fan to gently circulate the air around your bonsai.
By addressing these challenges and implementing the right care techniques, you can successfully grow and nurture your weeping willow bonsai indoors. Remember to observe your bonsai closely and make adjustments to meet its specific needs. With patience and dedication, you can create a beautiful and thriving indoor bonsai display.
This page contains some affiliate links. Please check out our affiliate disclaimer for more information
Karen Phillips, Bonsai expert and blogger. Read more about me here
Welcome to our complete guide on growing and caring for your Wisteria Bonsai. Whether you are a beginner or an experienced bonsai enthusiast, this guide will provide you with expert tips and techniques to nurture and maintain a healthy and flourishing Bonsai tree. With its enchanting beauty and unique aesthetics, the Wisteria Bonsai is truly a stunning masterpiece that can bring joy and serenity to any space.
Throughout this guide, we will cover all aspects of Wisteria Bonsai care, from choosing the right species to optimal placement, watering techniques, pruning, and propagation. Our goal is to empower you with the knowledge and skills needed to create and maintain a beautiful bonsai tree.
So let’s dive in and discover the secrets of growing and caring for your Wisteria Bonsai. Get ready to embark on a journey of patience, beauty, and the art of bonsai cultivation.
Before we begin, let’s familiarize ourselves with the basics. The Wisteria Bonsai is a miniature tree that is cultivated and trained in a bonsai style. The delicate foliage and stunning cascades of flowers make it a popular choice among bonsai enthusiasts.
Are you ready to create your own masterpiece? Let’s get started!
Different species of Wisteria are used for making bonsai
When it comes to creating bonsai trees, there are several species of Wisteria that enthusiasts commonly turn to. Two of the most popular species are Wisteria sinensis, also known as Chinese Wisteria, and Wisteria floribunda, also known as Japanese Wisteria. Each species has its unique characteristics and requirements, which make them ideal for different bonsai styles.
Wisteria sinensis, or Chinese Wisteria, is known for its vigorous growth and beautiful clusters of lavender or violet flowers. It has a more compact growth habit elegance and refined aesthetics.
On the other hand, Wisteria floribunda, or Japanese Wisteria, is famous for its long, cascading clusters of flowers ranging from white and pink to deep purple. This species has a more rambling growth habit, making it particularly suitable for cascading and informal upright bonsai styles.
Whether you are growing Japanese Wisteria or Chinese Wisteria, it’s important to consider their specific care needs. Understanding their growth habits, pruning requirements, and flowering patterns will help you create and maintain a stunning bonsai tree. Whether you choose Wisteria sinensis or Wisteria floribunda, both species offer the opportunity to showcase the beauty of Wisteria in a miniature form.
Charm of Wisteria Bonsai
The Enchanting Aesthetic of Cascading Blossoms
One of the most captivating aspects of is its stunning aesthetic, characterized by cascading clusters of flowers in shades of blue, lavender, and white. The graceful flow of the blossoms creates a mesmerizing display, evoking a sense of tranquility and beauty in any setting. The delicate petals delicately hang from the branches, creating a breathtaking spectacle that is sure to capture the attention of all who behold it.
Species Spotlight: Chinese vs. Japanese Wisteria
When it comes to Wisteria Bonsai, two prominent species steal the spotlight: Chinese Wisteria (Wisteria sinensis) and JapaneseWisteria (Wisteria floribunda). While both species exhibit cascading blossoms, they possess distinct characteristics and growth habits that set them apart.
Chinese Wisteria is known for its vigorous growth and larger-sized flowers. It tends to bloom earlier in the spring and features a strong fragrance that permeates the surrounding area. Japanese Wisteria, on the other hand, offers smaller, more compact flowers and elegant foliage. It blooms slightly later in the season but rewards with a captivating display of lavender-colored flowers.
Size and Growth Expectations for Indoor and Outdoor Settings
Wisteria Bonsai has different size and growth expectations depending on whether it is cultivated indoors or outdoors. When grown indoors, it tends to be smaller in size and exhibits reduced growth due to limited space and controlled environmental conditions. However, it can still produce abundant flowers and retain its enchanting beauty.
In outdoor settings, Wisteria has the potential to grow larger, with long, woody branches and an impressive display of cascading blossoms. Given enough space to spread its roots and access to natural sunlight, outdoor it can flourish, reaching its full potential and creating a captivating focal point in any garden or landscape.
Proper placement is crucial for the successful growth and development of your Wisteria Bonsai tree. By understanding its sunlight needs and making seasonal adjustments, you can provide the ideal conditions for your bonsai to thrive.
Understanding Sunlight Needs and Seasonal Adjustments
Wisteria Bonsai trees require a generous amount of sunlight to thrive. They thrive when exposed to direct sunlight for at least 6 hours a day. Placing your bonsai in a spot that receives adequate sunlight is essential for its overall health and vitality. You can position your plant near a sunny window or outdoors on a patio or balcony. Monitor the sunlight exposure throughout the day and adjust its placement accordingly to optimize its exposure.
However, it’s important to note that the intensity and duration of sunlight change with the seasons. During the hot summer months, it’s crucial to shield your plant from prolonged exposure to intense sunlight, as it can cause leaf burn. You can provide partial shade using a sheer curtain or move your bonsai to a slightly shaded area during the hottest part of the day. In contrast, during the colder months, you can maximize sunlight exposure to encourage bud development and healthy growth.
Shielding From Frosts: Safeguarding Your Bonsai in Winter
Winter care is essential for protecting your Wisteria Bonsai from frosts and freezing temperatures. When the temperatures drop below freezing, it’s crucial to shield your bonsai from extreme cold to prevent damage to the delicate branches and roots.
One effective way to protect your Wisteria Bonsai is by placing it in a sheltered location, such as a greenhouse or a cold frame. These structures provide insulation and help maintain a stable temperature, protecting your bonsai from extreme cold. Additionally, you can wrap your bonsai with burlap or frost cloth to further insulate it and shield it from frost.
Another important aspect of winter care is monitoring soil moisture. While it’s important to avoid overwatering, it’s equally crucial to ensure that the soil doesn’t dry out completely. Check the moisture level regularly and water your Wisteria Bonsai when the top inch of the soil feels dry. Avoid watering in freezing temperatures, as the water can freeze and damage the roots.
By following these guidelines for proper placement, sunlight exposure, and winter care, you can create the optimal environment for your Wisteria Bonsai to thrive and delight you with its stunning beauty.
The Essentials of Wisteria Bonsai Watering Techniques
Watering is a crucial aspect of Wisteria Bonsai care. Proper watering techniques ensure the health and vitality of the tree. Here, we will cover the essentials of watering your plant, including frequency, amount, and watering methods. We will also discuss the specific water requirements of it and provide tips on how to avoid overwatering or underwatering, which can lead to detrimental effects on the tree’s health.
If you want your Wisteria Bonsai to thrive, it’s essential to get the watering right. Adequate hydration is vital for its growth and overall well-being. Let’s dive into the techniques that will help you maintain a healthy watering routine for your plant.
Frequency:
Wisteria Bonsai trees require a regular watering schedule to ensure they receive the moisture they need. As a general guideline, check the soil moisture every few days. If the top inch of soil feels dry, it’s time to water your bonsai.
Amount:
When watering your Wisteria Bonsai, it’s important to strike the right balance. Avoid under-watering, as it can lead to dehydration and weaken the tree. Conversely, overwatering can cause root rot and other issues. Aim for thorough watering, ensuring the water reaches the roots and saturates the soil without causing it to become waterlogged.
Watering Methods:
There are a few different methods you can use to water your Wisteria Bonsai effectively. The most common techniques include:
Top watering: Gently pour water onto the soil surface until it begins to drain out of the drainage holes. This ensures the entire root system is adequately hydrated.
Submersion: You can also place your Wisteria Bonsai in a basin of water for a few minutes, allowing the roots to absorb the moisture. Make sure not to leave it submerged for too long.
Drip irrigation: This method involves using a slow-drip system or a watering can with a fine nozzle to provide a controlled and even flow of water.
Remember, the specific water requirements may vary depending on factors such as climate, humidity levels, and the size of your bonsai tree. Regularly monitor the soil moisture and adjust your watering routine accordingly to meet the needs of your Wisteria Bonsai.
Feeding Your Wisteria Bonsai: Fertilization Fundamentals
Fertilization is an essential aspect of caring for your Wisteria Bonsai. Providing the correct nutrients at the appropriate times is crucial for promoting overall health and vibrant flowering. In this section, we will delve into the fundamentals of fertilizing your Wisteria Bonsai, including the types of fertilizers to use, application methods, and the frequency of fertilization. We will also highlight the specific nutritional needs of Wisteria Bonsai and offer tips to help you achieve optimal growth and stunning blooms.
Types of Fertilizers: There are various fertilizers available for Wisteria Bonsai, including organic and synthetic options. Organic fertilizers, such as compost, well-rotted manure, and fish emulsion, provide slow-release nutrients and improve soil structure. Synthetic fertilizers, on the other hand, offer immediate nutrients in a more concentrated form. It’s essential to choose a fertilizer with balanced ratios of nitrogen (N), phosphorus (P), and potassium (K) for optimal Wisteria Bonsai growth.
Application Methods: When applying fertilizer to your Wisteria Bonsai, be sure to follow the package instructions for the specific product you are using. Generally, it is recommended to apply granular or pelletized fertilizers by sprinkling them evenly on the soil surface. Liquid fertilizers can be mixed with water and used for regular watering. Take care not to over-fertilize, as it can lead to nutrient imbalances and harm the tree.
Frequency of Fertilization: The frequency of fertilizer application depends on the type of fertilizer used and the growth stage of your Wisteria Bonsai. During the growing season, from spring to fall, it is typically recommended to fertilize every 4-6 weeks. However, make sure to adjust the frequency based on the specific requirements of your bonsai tree and monitor its response to the fertilizer.
Nutritional Needs: Wisteria Bonsai has specific nutritional needs that should be met for optimal growth and flowering. It requires a balanced supply of macronutrients, such as nitrogen, phosphorus, and potassium, as well as micronutrients, including calcium, magnesium, and iron. A deficiency or excess of any of these nutrients can impact the health and aesthetics of your Wisteria Bonsai. Regularly monitoring the foliage and conducting soil tests can help identify nutrient deficiencies or imbalances.
Tips for Optimal Growth and Vibrant Blooms:
Apply fertilizer during the active growing season to support vigorous growth and stimulate flower formation.
Follow the recommended dosage and application instructions provided by the fertilizer manufacturer.
Monitor the health of your Wisteria Bonsai and adjust the fertilizer regimen accordingly.
Avoid fertilizing in extreme weather conditions, such as during periods of drought or excessive heat, as it can stress the tree.
Consider using slow-release fertilizers for prolonged nutrient availability and reduced risk of over-fertilization.
By understanding the fundamentals of fertilizing your Wisteria Bonsai and providing proper nutrition, you can ensure the health and vitality of your bonsai tree while enjoying its stunning blooms.
Pruning and Shaping Your Wisteria Bonsai
Pruning and shaping play a crucial role in maintaining the desired form and structure of your Wisteria Bonsai. By employing the right techniques and principles, you can create a masterpiece that reflects your artistic vision.
Timing is vital when it comes to pruning your Wisteria Bonsai. It is best to prune during the dormant season, typically in late winter or early spring. This promotes new growth and helps maintain the tree’s overall health.
When pruning, it is essential to use the proper tools, including bonsai shears or scissors. These specialized tools allow for precise cuts without damaging the tree. Be sure to clean and disinfect your tools before pruning to avoid the spread of diseases.
The steps involved in pruning your Wisteria Bonsai depend on your desired shape and style. Whether you want a formal upright, cascade, or semi-cascade form, you will need to carefully select which branches to remove and which to retain. Pruning techniques such as cutting back, thinning, and branch selection will help you achieve the desired aesthetic.
To encourage back-budding, which leads to the development of new branches, it is important to prune your Wisteria Bonsai correctly. Back-budding creates a dense foliage mass and enhances the overall visual appeal of your bonsai tree. By strategically pruning branches, you can stimulate the growth of new buds in desired areas.
Another aspect of pruning is ramification, which refers to the branching structure of your Wisteria Bonsai. Achieving balanced and well-distributed branches is essential for creating a harmonious bonsai tree. Regular pruning promotes ramification and helps maintain the aesthetic balance of your Wisteria Bonsai.
Key takeaways:
Prune your Wisteria Bonsai during the dormant season for optimal results.
Use bonsai shears or scissors to make precise cuts and maintain tool hygiene.
Choose the right pruning techniques based on your desired shape and style.
Encourage back-budding to promote the growth of new branches.
Promote ramifications for a balanced, visually appealing bonsai tree.
When and How to Repot Your Wisteria Bonsai
Repotting is an essential aspect of Wisteria Bonsai care. It rejuvenates the tree, promotes healthy root growth, and prevents root-bound conditions. Knowing the right time and technique for repotting is crucial for the long-term health and vitality of your Wisteria Bonsai.
Signs that indicate repotting is necessary:
Roots growing densely and circling the pot
Poor drainage despite proper watering
Stunted growth or lack of vigor
Soil breaking down and becoming compacted
When it comes to the timing of repotting, the best time is in early spring before the active growth period begins. This allows the tree to recover quickly and establish new roots before the growing season.
The steps involved in the repotting process:
Carefully remove the tree from the pot, gently loosening the root ball.
Inspect the roots for any signs of damage or disease. Trim away any dead or unhealthy roots.
Prepare a new pot with proper drainage holes and fill it with a well-draining, bonsai-specific soil mix.
Position the tree in the new pot, ensuring that the roots are spread out evenly and not bent or crowded.
Backfill the pot with the soil mix, gently firming it around the roots to eliminate air pockets.
Water the tree thoroughly, allowing the water to soak through the soil and drain away.
It is important to choose the right soil mix and pot size for your Wisteria Bonsai. A well-draining soil mix with good water retention properties, such as a blend of Akadama, lava rock, and pumice, is ideal for promoting healthy root development. Select a pot that is slightly larger than the current pot, allowing room for root growth while maintaining a balanced proportion with the tree.
Remember, repotting is a crucial part of Wisteria Bonsai care and should be performed every couple of years to ensure the ongoing health and vigor of your tree.
Propagation Techniques for Wisteria Bonsai Enthusiasts
As a bonsai enthusiast, you have the opportunity to expand your Wisteria Bonsai collection and create new trees through propagation techniques. Propagation allows you to cultivate new Wisteria Bonsai trees, preserving the unique beauty of this species. In this section, we will explore various propagation methods, each with its own benefits and challenges.
Seed Propagation: Growing Wisteria Bonsai from seeds is a rewarding but time-consuming process. Collect seeds from ripe pods and provide the optimal conditions for germination. However, keep in mind that growing Wisteria Bonsai from seeds may result in variations from the parent tree in terms of characteristics and growth patterns.
Cuttings: Taking cuttings is a popular and reliable method for propagating Wisteria Bonsai. Select healthy, young shoots and make clean cuts. Then, place the cuttings in a suitable growing medium, ensuring they receive the right amount of moisture and light. With proper care and nurturing, these cuttings will develop into new Wisteria Bonsai trees.
Air Layering: Air layering is a technique used to propagate mature branches of Wisteria Bonsai. Choose a healthy, vigorous branch and remove a ring of bark to encourage the growth of new roots. Apply rooting hormone to enhance root development, wrap the wounded area with moist sphagnum moss, and protect it with plastic wrap. Once the new roots have formed, you can separate the branch and pot it as a new Wisteria Bonsai tree.
Grafting: Grafting is an advanced propagation technique where a cutting from one Wisteria Bonsai tree (called the scion) is joined with a rootstock from another compatible tree. This technique allows you to combine desirable characteristics from different specimens, producing unique and customized Wisteria Bonsai trees.
To successfully propagate Wisteria Bonsai using these techniques, it is essential to understand the specific requirements, timing, and challenges associated with each method. Experimentation and patience will be key as you explore different propagation techniques to create beautiful and unique Wisteria Bonsai trees.
Defending Against Pests and Diseases in Wisteria Bonsai
Like any other plant, Wisteria Bonsai can be susceptible to pests and diseases. To ensure the health and vitality of your bonsai tree, it is important to be aware of common pests and diseases that can affect Wisteria Bonsai and know how to prevent, detect, and treat them.
Pest Infestations:
Common pests that can attack Wisteria Bonsai include aphids, spider mites, and scale insects. These pests feed on the sap of the tree, weakening its overall health and potentially causing damage. Early detection is key to preventing severe infestations.
Signs of Pest Infestation:
Wilting or drooping leaves
Discolored or yellowing foliage
Presence of sticky residue (honeydew) on leaves
Small webs or cotton-like masses on the branches
Visible insects crawling on the tree
Early detection and prompt action are crucial for effective pest control. Regularly inspect your Wisteria Bonsai for signs of infestation and take immediate steps to address the issue.
Prevention and Control:
To prevent pest infestations:
Regularly inspect your Wisteria Bonsai for signs of pests.
Maintain proper hygiene by removing fallen leaves and debris from the tree’s surroundings.
Ensure good air circulation by positioning the bonsai tree away from walls or other obstructing objects.
Consider using natural predators or parasitic insects to control pest populations.
If a pest infestation occurs:
Isolate the affected tree to prevent the pests from spreading to other plants.
Remove visible pests manually or by using a gentle stream of water.
Use organic pest control methods such as neem oil or insecticidal soap.
If necessary, consult with a professional for targeted chemical treatments.
Disease Prevention:
Wisteria Bonsai can also be vulnerable to diseases such as root rot, fungal infections, and leaf spot. To minimize the risk of disease:
Ensure proper drainage by using well-draining soil and a bonsai pot with sufficient holes.
Avoid overwatering the tree, as excess moisture can lead to root rot.
Prune the bonsai regularly to promote airflow and reduce the risk of fungal infections.
Monitor the tree for any signs of disease, such as discolored spots, wilting, or abnormal growth.
Early intervention is crucial for managing diseases effectively.
Choosing the Perfect Bonsai Pot for Your Wisteria
The choice of bonsai pot is critical for the overall aesthetic appeal and growth of your Wisteria Bonsai. Whether you are a beginner or an experienced bonsai enthusiast, selecting the right pot requires careful consideration of various factors such as size, shape, material, and drainage.
When choosing the size of the bonsai pot, it is essen tial to strike a balance between providing enough space for the roots to grow and maintaining the proportion with the tree’s overall size. A pot that is too small can constrain root development, while an excessively large pot may result in slower growth and hinder bonsai aesthetics.
Consider the shape of the bonsai pot to complement the style and characteristics of your Wisteria Bonsai tree. Traditional rectangular or oval pots are commonly used for formal upright or cascading styles, while round or square pots may be more suitable for informal upright or semi-cascade styles.
The material of the bonsai pot can also impact the tree’s growth and overall health. Clay or ceramic pots are popular choices due to their natural aesthetic appeal and ability to absorb and release moisture. Additionally, these materials provide insulation against extreme temperatures, benefitting the root system. Plastic pots, on the other hand, are lightweight and easier to handle, making them a practical option for beginners.
Proper drainage is crucial to prevent waterlogging and root rot. Ensure that your chosen bonsai pot has adequate drainage holes to allow excess water to escape. Additionally, consider using a layer of coarse gravel or bonsai soil at the bottom of the pot to improve drainage and ensure proper air circulation around the roots.
When potting your Wisteria Bonsai, it is important to follow proper techniques such as root pruning and establishing a stable and harmonious relationship between the tree and its container. These techniques help promote strong root growth, prevent root-bound conditions, and optimize the tree’s overall health and vigor.
By carefully selecting the perfect bonsai pot and employing proper potting techniques, you can enhance the beauty, health, and longevity of your Wisteria Bonsai tree. Let your potting choice reflect your style and showcase the exquisite nature of this captivating bonsai species.
Factors to Consider for Bonsai Pot Selection
Potential Impact
Size
Affects root growth and proportion
Shape
Complements bonsai style and characteristics
Material
Affects aesthetics, insulation, and moisture regulation
Drainage
Prevents waterlogging and root rot
Maintaining Humidity and Moisture for Wisteria Bonsai
To ensure the health and vigor of your Wisteria Bonsai, it is crucial to maintain the right levels of humidity and moisture. The optimal humidity requirements for Wisteria Bonsai are essential for its overall well-being and growth. Additionally, proper moisture control is necessary to prevent waterlogged conditions or root rot.
To create and maintain the ideal microclimate for your Wisteria Bonsai, there are several techniques you can employ. One method is to use a humidity tray, which consists of a shallow tray filled with water. Place your bonsai pot on top of the tray, ensuring that the water level is below the bottom of the pot. As the water evaporates, it increases the humidity around the bonsai, mimicking its natural environment.
Another way to maintain humidity is by misting the leaves of your Wisteria Bonsai. Fill a spray bottle with water and mist the foliage regularly, especially during hot and dry periods. This helps to keep the leaves hydrated and provides a humid environment for the tree.
When it comes to watering your Wisteria Bonsai, it’s important to strike a balance between providing adequate moisture and avoiding waterlogged conditions. The frequency of watering will depend on various factors such as the size of the bonsai, the type of soil, and the prevailing weather conditions.
Before watering, always check the moisture level of the soil by inserting your finger about an inch deep into the soil. If it feels dry, it’s time to water your Wisteria Bonsai. Use a watering can or hose with a gentle spray nozzle to water the tree thoroughly, ensuring that the water reaches the roots. Allow excess water to drain away completely.
Remember, overwatering can lead to root rot and other fungal problems, while underwatering can cause your Wisteria Bonsai to dry out. It’s important to find a balance and adjust your watering schedule accordingly to meet the tree’s moisture needs.
Humidity Maintenance Tips
Moisture Control Techniques
Use a humidity tray to increase moisture levels around the bonsai
Check the moisture level of the soil before watering
Mist the leaves regularly to provide humidity
Water thoroughly, ensuring water reaches the roots
Monitor the humidity levels in the bonsai’s environment
Avoid waterlogged conditions to prevent root rot
Adjust watering frequency based on the tree’s moisture needs
Find a balance between adequate moisture and avoiding dryness
Wisteria Bonsai: An Investment in Patience and Beauty
Growing and nurturing a Wisteria Bonsai is more than just a hobby; it’s an investment in patience and beauty. As a bonsai enthusiast, you understand the dedication required to transform a tiny sapling into a magnificent work of living art.
Creating a thriving Wisteria Bonsai tree takes time and commitment. It is a journey that requires your unwavering attention and care as you provide the necessary nutrients, shape the branches, and protect them from pests and diseases. While the process can sometimes test your patience, the ultimate rewards are truly worth every moment of anticipation.
Long-Term Commitment to Growth
Investing in a Wisteria Bonsai means embarking on a long-term commitment to its growth. Each year, as you tend to its needs and witness its progress, you’ll develop a deep connection with your bonsai. The relationship you form with your Wisteria Bonsai is not just about nurturing a plant; it’s about personal growth and the joy of witnessing the ever-evolving beauty that you help cultivate.
First Blossoms
The emergence of the first blossoms is an incredible milestone in the life of your Wisteria Bonsai. As you patiently wait for those delicate flowers to unfurl, you’ll experience a sense of awe and accomplishment. The vibrant hues and mesmerizing fragrance of the Wisteria blossoms will fill your soul with a deep sense of satisfaction, knowing that your dedication and efforts have borne fruit.
So, as you embark on your journey with Wisteria Bonsai, remember that it is not merely a tree but a living testament to your patience and love for nature. The investment you make in this captivating bonsai will reward you with a lifetime of beauty and fulfillment.
This page contains some affiliate links. Please check out our affiliate disclaimer for more information
Karen Phillips, Bonsai expert and blogger. Read more about me here
With their beautiful foliage and intricate root systems, this genus is a popular choice for bonsai lovers. From the majestic Ficus Retusa with its stately S-curved trunk to the graceful Ficus Benjamina with its weeping branches, each species brings its own charm and beauty to your bonsai collection.
In this guide, we will cover topics such as placement, lighting, watering, fertilizing, pruning and shaping techniques, as well as essential care tips to ensure your Ficus bonsai thrives. We will also discuss how to acquire one, combat pests and diseases, and appreciate the unique aerial roots and growths that make these trees truly special.
So, whether you’re looking to add a Ficus bonsai to your collection or already have one at home, this guide will be your go-to resource for everything related to Ficus bonsai care. Let’s dive in and discover the beauty and artistry of these mesmerizing miniature trees!
Diversity of Ficus Bonsai Species
When it comes to Ficus bonsai, there is a wide range of diverse and captivating species to explore. Each species offers unique characteristics and features, making them a fascinating choice for bonsai enthusiasts. Let’s delve into the details of some popular Ficus bonsai species:
Ficus Retusa (Ficus microcarpa) – The Stately S-Curved Bonsai
Ficus Retusa, also known as Ficus microcarpa, is a species that exhibits an elegant S-curved trunk, creating a distinctive and eye-catching aesthetic. Its glossy, dark green leaves add to its appeal, and it is known for its ability to develop aerial roots, enhancing its natural and striking appearance and it is also a rapidly growing plant. This species requires bright, indirect light and regular pruning to maintain its desired shape.
Ficus Benjamina – The Graceful Weeper
Ficus Benjamina, often referred to as the Weeping Fig, showcases gracefully drooping branches and cascading leaves, giving it a stunning and elegant appearance. Its small, ovate leaves are bright green, which beautifully contrasts with its pale, tan bark. This species requires ample sunlight and consistent moisture to thrive, but it’s important to avoid overwatering as it can lead to root rot.
Ficus Ginseng (‘Ginseng’)
Ficus Ginseng, also known as ‘Ginseng’, is one of the most popular bonsai species due to its unique and visually striking appearance. Its thick, bulbous trunk and intricate root system create a captivating bonsai that is often referred to as the “Ginseng Bonsai.” This species requires bright, indirect light, and proper watering techniques are crucial, as the soil should be allowed to dry out slightly between waterings.
Ficus Salicaria – Sleek Leaves and Elegant Form
The Ficus Salicaria, also known as the Willow Leaf Fig, boasts slender, elongated leaves and a graceful, upright form. Its glossy, dark green foliage and its ability to withstand various indoor conditions make it a popular choice for bonsai enthusiasts. This species thrives in bright, indirect light and requires regular pruning to maintain its sleek and elegant appearance.
Ficus Aurea – Florida’s Strangling Fig
Ficus Aurea, commonly known as the Florida Strangling Fig, is a unique species renowned for its aerial roots, which often grow downward from its branches to the ground, creating an impressive and distinctive visual display. Its small, oval-shaped leaves have a vibrant green color, and its gnarled trunk adds character and charm to this bonsai. This species requires bright, indirect light and proper humidity levels to flourish.
Each of these species offers its own allure and can add beauty to any bonsai collection. By understanding the specific characteristics and care requirements of each species, you can ensure the proper nurturing and growth of your bonsai.
Unique Traits of Ficus Bonsai Varieties
When it comes to Ficus bonsai, the variety of options available to bonsai enthusiasts is truly remarkable. Each variety of Ficus bonsai exhibits unique traits that set it apart from the rest. From different growth patterns to distinctive leaf shapes and even bark texture, there is something for every bonsai lover.
Let’s explore the fascinating world of Ficus bonsai varieties and uncover their exceptional features. Whether you prefer a bonsai with intricate aerial roots, elegant weeping branches, or sleek leaves, there is a Ficus bonsai variety that will capture your heart.
“The beauty of Ficus bonsai lies in their diversity. Each variety tells a unique story, offering an opportunity to create a truly one-of-a-kind masterpiece.”
One of the distinguishing factors among Ficus bonsai varieties is their growth patterns. Some varieties grow in a graceful weeping form, with cascading branches that create an elegant silhouette. Others exhibit stately S-curved trunks that add a sense of grandeur to any bonsai collection.
Leaf shape is another remarkable trait of Ficus bonsai varieties. While some varieties showcase small and compact leaves, others feature larger and more elongated leaves, adding visual interest and texture to the bonsai. The diversity of leaf shapes allows bonsai enthusiasts to express their artistic vision in countless ways.
The texture of the bark is yet another captivating feature of Ficus bonsai varieties. Some varieties develop smooth and polished bark, creating a refined and sophisticated appearance. In contrast, others display rough and textured bark that gives the bonsai a rugged and aged look. The bark texture adds depth and character to the bonsai, making it truly unique.
Selecting the right Ficus bonsai variety is a personal journey, based on individual preferences and desired aesthetics. Whether you are drawn to the intricate aerial roots of the Ficus Retusa or the sleek leaves of the Ficus Salicaria, each variety offers its own distinct charm.
Choosing Your Ficus Bonsai Species
Consider the following factors when choosing your Ficus bonsai species:
Leaf shape and size
Growth pattern
Bark texture
Aesthetic appeal
By understanding the unique traits of each species, you can make an informed decision and select the variety that best resonates with your artistic vision and personal preferences.
Ficus Bonsai Species
Unique Traits
Ficus Retusa
Stately S-Curved Trunks, Aerial Roots
Ficus Benjamina
Graceful Weeping Form, Small Leaves
Ficus Ginseng
Thick Trunk, Aerial Roots
Ficus Salicaria
Sleek Leaves, Smooth Bark
Ficus Aurea
Textured Bark
Table: Unique Traits of Ficus Bonsai Species
Essential Ficus Bonsai Care for Thriving Plants
Proper care is crucial for the health and vitality of your Ficus bonsai. By following essential care guidelines, you can ensure that your bonsai thrives and displays its natural beauty. Here are some important care tips to keep in mind:
Watering:Ficus bonsai plants require regular watering to maintain optimal health. It’s important to water your bonsai when the soil surface starts to dry out. However, be cautious not to overwater, as excessive moisture can lead to root rot. To determine the watering frequency, check the moisture level of the soil by gently inserting your finger about an inch deep. If the soil feels slightly damp, wait a little longer before watering.
Fertilizing: Ficus bonsai benefit from regular fertilization to support their growth and development. Use a balanced, slow-release fertilizer specifically formulated for bonsai plants. Follow the recommended dosage instructions on the fertilizer packaging and apply it during the growing season. Avoid fertilizing during winter dormancy.
Lighting: Ficus bonsai thrive in bright, indirect light. Place your bonsai near a window with filtered light or provide supplemental artificial lighting, especially during the winter months. Avoid exposing your bonsai to direct sunlight for extended periods, as it can scorch the leaves.
Temperature: Ficus bonsai prefer a moderate temperature range between 60°F and 75°F (15°C to 24°C). Protect your bonsai from extreme temperatures, both hot and cold. Sudden temperature fluctuations can cause stress and impact the overall health of your bonsai.
Pruning and Shaping: Regular pruning and shaping are essential for maintaining the desired form and aesthetics of your Ficus bonsai. Remove any dead, damaged, or overgrown branches and foliage to promote healthy growth. Additionally, use wiring and shaping techniques to guide the branches into the desired positions.
By adhering to these care practices, you can ensure that your Ficus bonsai remains healthy and vibrant. Remember to pay attention to your bonsai’s individual needs and make adjustments accordingly. With proper care, your Ficus bonsai will continue to thrive and bring beauty to your space.
Placement and Light for Ficus Bonsai Health
Proper placement and lighting are essential for maintaining the health and vitality of your Ficus bonsai. The right placement and adequate light exposure can promote healthy growth and prevent common issues like leaf drop or leggy growth.
When it comes to placement, Ficus bonsai thrive both indoors and outdoors. Indoors, choose a location that offers bright, indirect light. Avoid placing your bonsai near drafts or in areas with extreme temperature fluctuations. Ensure that the room is well-ventilated to prevent stagnant air and promote healthy growth.
If you choose to keep your Ficus bonsai outdoors, select a spot that receives filtered sunlight or partial shade. Avoid direct, intense sunlight, as it can scorch the leaves of your bonsai. Provide protection from strong winds, as they can cause dehydration and damage to the delicate foliage.
When it comes to light exposure, finding the right balance is crucial. Ficus bonsai thrive in bright, indirect light, but excessive light can lead to sunburn and leaf scorching. On the other hand, insufficient light can result in weak growth and sparse foliage.
To provide the optimal light conditions for your Ficus bonsai, consider the following tips:
Place your bonsai near a north or east-facing window indoors to ensure it receives bright, indirect light.
If your bonsai is placed further away from a window, consider using artificial grow lights to supplement the available light.
Monitor the light intensity throughout the day and make adjustments as needed. Use sheer curtains or blinds to filter direct sunlight if necessary.
If you keep your Ficus bonsai outdoors, provide shade during the hottest part of the day using a shade cloth or by placing it under a tree canopy.
Remember to regularly rotate your Ficus bonsai to ensure even light exposure on all sides and promote balanced growth. By paying attention to proper placement and light, you can help your Ficus bonsai thrive and maintain its health and beauty.
Watering Your Ficus Bonsai: A Delicate Balance
Proper watering is essential for maintaining the health and vitality of your Ficus bonsai. Finding the right balance can be a delicate task, as both overwatering and underwatering can have detrimental effects on your plant’s well-being. In this section, we will provide you with detailed guidance on watering your Ficus bonsai to ensure optimal growth and longevity.
Identifying When Your Ficus Bonsai is Thirsty
To keep your Ficus bonsai hydrated, it’s important to understand the signs that indicate it needs water. Here are some common indicators that your bonsai is thirsty:
Visual cues: Look out for wilting or drooping leaves. If the leaves appear limp or have lost their healthy green color, your Ficus bonsai may be in need of water.
Touch test: Gently touch the soil surface with your finger. If it feels dry to the touch, it’s likely time to water your bonsai. However, if the topsoil feels moist, it’s best to hold off on watering until it dries out slightly.
Weighing method: Lift your bonsai pot and get familiar with its weight when properly watered. As the soil dries out, the pot will become lighter, indicating that it’s time for watering.
By observing these cues and developing a watering routine based on your Ficus bonsai’s specific needs, you can ensure that it receives adequate hydration.
Avoiding Common Watering Mistakes
When it comes to watering your Ficus bonsai, there are a few common mistakes that you should avoid:
Overwatering: One of the most common mistakes is overwatering. Ficus bonsai prefer a slightly moist but well-drained soil. Overwatering can lead to root rot and other fungal issues. Only water your bonsai when the soil has partially dried out.
Improper watering techniques: Avoid pouring water directly onto the foliage or trunk of your bonsai. Instead, water the soil slowly and evenly until the water starts draining out from the bottom of the pot.
Neglecting environmental conditions: Adjust your watering frequency based on environmental conditions. Factors such as temperature, humidity, and season influence the water requirements of your bonsai. During hot and dry periods, you may need to water more frequently, while cooler and more humid conditions may require less frequent watering.
By avoiding these common mistakes and following the proper watering techniques, you can ensure the health and longevity of your Ficus bonsai.
Common Watering Mistakes
How to Avoid Them
Overwatering
Water your bonsai only when the soil has partially dried out. Avoid saturating the soil.
Improper watering techniques
Water the soil slowly and evenly, avoiding direct contact with the foliage or trunk.
Neglecting environmental conditions
Adjust watering frequency based on temperature, humidity, and season. Monitor the soil’s moisture level.
In conclusion, watering your Ficus bonsai requires a delicate balance. By identifying when your bonsai is thirsty and avoiding common watering mistakes, you can ensure its optimal health and growth. Remember to observe visual cues, perform the touch test, and develop a watering routine based on your bonsai’s specific needs. With proper watering, your Ficus bonsai will thrive and become a stunning centerpiece in your bonsai collection.
The Right Way to Fertilize Your Ficus Bonsai Tree
Fertilization is a crucial aspect of caring for your Ficus bonsai tree. Providing the right nutrients ensures optimal growth and overall health. In this section, we will explore the importance of fertilizing it and guide you on the proper techniques and schedule to follow.
Types of Fertilizers:
There are various types of fertilizers available for Ficus bonsai, including liquid, granular, and organic options. Liquid fertilizers are convenient and quickly absorbed by the roots, while granular fertilizers offer slow-release nutrients. Organic fertilizers provide natural nourishment, promoting long-term soil health. Choosing the right fertilizer depends on your preferences and the specific needs of your Ficus bonsai.
Fertilization Schedule:
The fertilization schedule for depends on the species and growth stage of your tree. As a general rule, it is recommended to fertilize Ficus bonsai during the growing season, typically from spring to early fall. However, it’s important to adjust the frequency based on the specific needs of your tree. A balanced fertilizer with a nitrogen-phosphorus-potassium (NPK) ratio of 10-10-10 or similar is suitable for most Ficus bonsai.
Applying Fertilizer:
To apply fertilizer to your, dilute liquid fertilizers according to the manufacturer’s instructions and water the tree with the solution. For granular fertilizers, follow the package instructions to determine the appropriate amount and sprinkle it evenly on the soil surface. Avoid direct contact with the trunk or foliage to prevent burning or damage.
Tips for Fertilizing:
Always water your Ficus bonsai before applying fertilizer to ensure proper absorption.
Avoid over-fertilizing, as it can lead to nutrient imbalances and harm the tree.
Monitor the foliage and soil condition to assess if your Ficus bonsai requires additional fertilization.
During the dormant period in winter, it’s best to reduce or entirely stop fertilization to allow the tree to rest.
Remember, proper fertilization is essential for the health and vigor of your Ficus bonsai tree. By understanding the right types of fertilizers, following a suitable schedule, and applying fertilizer correctly, you can ensure your bonsai thrives and remains beautiful for years to come.
Pruning and Shaping Techniques for Ficus Bonsai
When it comes to maintaining the desired form and aesthetics of your plant, proper pruning and shaping techniques are essential. By using the right tools and following the correct methods, you can create a stunning masterpiece that reflects your artistic vision.
To start, consider the different pruning purposes you may have for your Ficus bonsai. If you are looking to reduce the size of branches, use sharp pruning shears to carefully remove unwanted growth.
Leaf pruning can be achieved by pinching off individual leaves or removing entire clusters to encourage new growth. For trunk thickening, selective pruning can stimulate the growth of new branches and help achieve a more robust appearance.
Shaping your plant is another crucial aspect of maintaining its desired form. Wiring is a common technique used to guide the growth of branches and create natural bends. Wrap the wire gently around the branch, making sure not to damage the bark.
Guy-wires can also be used to support heavier branches and promote stronger growth. These techniques, when applied with care, can help you achieve the ideal shape and structure for your Ficus bonsai.
This page contains some affiliate links. Please check out our affiliate disclaimer for more information
Karen Phillips, Bonsai expert and blogger. Read more about me here
Welcome to our comprehensive guide on caring for bonsai pine trees. If you have a passion for these miniature trees and want to ensure their health and beauty, then you’ve come to the right place. In this article, we will take you through everything you need to know about bonsai pine tree care. From understanding the basics of bonsai pine trees to identifying the ideal pine species, from essential maintenance techniques to placement and sunlight needs, we’ve got you covered.
Proper care techniques are essential for maintaining the vitality of your bonsai pine trees. By following the right practices, you can nurture these elegant creations and enjoy their aesthetic appeal for years to come. Throughout this guide, we will discuss topics such as watering and drainage, fertilization practices, pruning and wiring, protection against pests, and advanced techniques for optimal pine tree care.
Whether you’re a beginner or an experienced bonsai enthusiast, this guide will provide valuable insights and expert advice to help you achieve success in caring for your bonsai pine trees. So let’s dive in and discover the secrets behind creating beautiful, healthy, and vibrant bonsai pine trees.
Understanding the Basics of Bonsai Pine Trees
In this section, we will delve into the fundamentals of bonsai pine trees, providing you with an introduction to this unique art form and the specific characteristics of pine trees that make them ideal for bonsai cultivation.
Bonsai, which translates to “tray planting” in Japanese, is the art of growing miniature trees in containers. It originated in Japan and has since become popular worldwide for its aesthetic appeal and meditative qualities.
When it comes to bonsai pine trees, it’s important to understand their specific growth patterns and characteristics. Pine trees are known for their distinct needle-like foliage and sturdy branches. These qualities make them particularly suitable for shaping and training in the bonsai style.
Bonsai pine trees require careful pruning and wiring to create the desired shape and form. The branches can be wired and shaped to achieve the desired curvature and overall design. Additionally, pine trees have the unique ability to produce back budding, allowing for the creation of fine ramification and dense foliage pads.
In the words of renowned bonsai artist Ryan Neil, “Understanding the fundamental principles of pine growth and the interplay between foliage, twigs, and branches is essential to achieving convincing and beautiful pine bonsai trees.”
Bonsai, including pine trees, has a rich history and carries cultural significance. The art form originated in Japan over a thousand years ago and has deep roots in Japanese culture and philosophy. Bonsai represents harmony, patience, and respect for nature, and it is seen as a form of meditation and self-expression.
Next, we will explore the different pine species that are commonly used for bonsai and learn about their unique characteristics and care requirements.
Identifying the Ideal Pine Species for Bonsai
When it comes to bonsai pine trees, choosing the right species is crucial for the overall success and aesthetics of your miniature masterpiece. Different pine species offer unique growth patterns, foliage characteristics, and overall suitability for bonsai cultivation. In this section, we will explore the various pine species that are commonly used for bonsai, helping you make informed decisions about the best pine species for your bonsai collection.
Two Flushes of Growth: Japanese Black and Red Pines
Japanese Black Pine (Pinus thunbergii) and Japanese Red Pine (Pinus densiflora) are two prime examples of pine species that exhibit two flushes of growth per year. These pines are highly sought after by bonsai enthusiasts for their distinctive needle clusters, excellent branching characteristics, and the ability to develop intricate trunk formations over time. The dual flushes of growth provide ample opportunities for refinement and styling.
Japanese Black Pine is known for its dark green foliage, rugged bark, and graceful appearance. It lends itself well to a variety of bonsai styles, including formal upright, informal upright, and slanting. Japanese Red Pine, on the other hand, features elegant, lustrous needles and an attractive reddish-brown bark. It is favored for its versatility and adaptability to different bonsai techniques and styles.
Both Japanese Black Pine and Japanese Red Pine require careful attention to pruning and candle management to maintain their desired shape and density. With their stunning aesthetics and growth characteristics, these pines are highly recommended for bonsai enthusiasts interested in creating refined and visually striking specimens.
One Flush Pines: Japanese White Pine and Others
Japanese White Pine (Pinus parviflora) is a popular choice for bonsai enthusiasts due to its elegant appearance, delicate needles, and unique bonsai-friendly growth habit. As a one-flush pine species, it produces new growth in spring, allowing for focused development and styling. Japanese White Pine is known for its graceful, flexible branches and attractive grayish-white bark, making it an excellent option for formal upright and cascade-style bonsai.
Aside from Japanese White Pine, several other pine species fall into the one-flush category. Scots Pine (Pinus sylvestris), Ponderosa Pine (Pinus ponderosa), Mountain Pine (Pinus mugo), and Bristlecone Pine (Pinus aristata) are noteworthy examples. Each of these species possesses unique characteristics, such as interesting bark textures and foliage variations, which can add depth and visual interest to your bonsai collection.
When selecting a one-flush pine species for bonsai, consider factors such as regional suitability, climate compatibility, and the specific requirements of the species. The diversity and beauty of one-flush pines make them a compelling choice for both bonsai beginners and experienced enthusiasts.
Essential Bonsai Pine Tree Maintenance Techniques
Proper maintenance is crucial for the health and longevity of bonsai pine trees. By implementing essential techniques and following best practices, you can ensure that your bonsai pines thrive and flourish in their miniature form. This section will guide you through the fundamental maintenance techniques that are essential for caring for bonsai pine trees.
1. Watering:The key to successful bonsai pine tree care lies in maintaining the right balance of moisture. It is important to water your bonsai pine regularly, ensuring that the soil is moist but not waterlogged. Use your finger to check the moisture level in the soil; if it feels slightly dry, it’s time to water. Avoid overwatering, as it can lead to root rot and other issues.
2. Soil and Pot Selection:The choice of soil and pot plays a crucial role in the health of your bonsai pine tree. Use well-draining soil specifically formulated for bonsai trees. Consider repotting your bonsai pine every two to three years to refresh the soil and promote root development. Choose a pot that allows for proper drainage and has enough space for the root system to grow.
3. Fertilization:Fertilizing your bonsai pine tree is vital to provide essential nutrients for growth and maintain its health. Use a balanced liquid fertilizer during the growing season, following the manufacturer’s instructions. Avoid over-fertilizing as it can lead to excessive growth and weaken the tree. Adjust the fertilizing schedule based on the specific needs of your bonsai pine.
4. Pruning and Wiring:Pruning and wiring techniques help shape your bonsai pine tree and maintain its desired form. Regular pruning helps control growth, promote branch development, and enhance the overall aesthetics of the tree. Wiring is used to guide the growth of branches and create appealing shapes. Be careful not to apply excessive force during wiring, as it can damage the delicate branches of the bonsai pine.
5. Repotting:Repotting is necessary to provide fresh soil and maintain the health of the root system. Repot your bonsai pine every two to three years, preferably during the spring season. Carefully remove the tree from its pot, trim the roots, and replant it in fresh soil. Repotting helps prevent root-bound issues and stimulates new growth.
6. General Care Tips:In addition to the specific maintenance techniques mentioned above, there are a few general care tips to keep in mind when caring for bonsai pine trees. Place your bonsai pine in a location that receives ample sunlight, avoiding extreme temperatures and drafts. Monitor your tree for any signs of pests or diseases, and take prompt action if detected. Regularly clean the tree’s leaves and remove any dead or yellowing foliage.
By following these essential bonsai pine tree maintenance techniques, you can create a thriving and visually captivating miniature tree that brings tranquility and beauty to your space. Implementing proper care practices will ensure that your bonsai pines continue to flourish for years to come.
Bonsai Pine Tree Placement and Sunlight Needs
Positioning Your Bonsai for Optimal Growth
Proper placement is crucial for the healthy growth of your bonsai pine tree. When deciding where to position your bonsai, consider factors such as light intensity, direction, and duration. Placing your tree in the right spot will ensure it receives the sunlight it needs to thrive.
First, identify a location that offers the ideal amount of sunlight for your bonsai pine tree. Different pine species have varying sunlight requirements, so it’s important to research and understand the specific needs of your tree.
Generally, bonsai pines require bright, indirect sunlight. Avoid placing them in full, direct sunlight for extended periods, as this can scorch the foliage. Instead, opt for a location with partial sun or filtered light, such as near a window with curtains or in a spot that receives morning or late afternoon sun.
Additionally, consider the position of your bonsai within its surroundings. Placing it on a south-facing windowsill or patio may provide ample sunlight, but it could also expose the tree to strong winds or extreme temperatures. Protect your bonsai pine tree from these harsh conditions to prevent stress and damage.
When positioning your bonsai, aim to provide consistent sunlight throughout the day. Rotating the tree periodically can ensure that all sides receive equal light exposure, promoting balanced growth.
Benefits of Adequate Sun Exposure
Adequate sunlight is essential for the health and development of your bonsai pine tree. Here are some benefits of providing your tree with the right amount of sun:
Enhanced growth: Sunlight is a crucial energy source that fuels photosynthesis in your bonsai tree. Sufficient sunlight allows the tree to produce the necessary carbohydrates for growth.
Color development: Sunlight plays a key role in the formation of pigments that give your bonsai pine tree its vibrant color. With proper sun exposure, your tree’s foliage will develop rich, deep hues.
Overall tree health: Sunlight stimulates the production of essential nutrients and strengthens the tree’s immune system, helping to combat pests and diseases.
Remember, while sunlight is important, it’s equally crucial to strike a balance. Overexposure to direct sunlight can harm your bonsai pine tree, so monitor its response and make adjustments as needed.
Sunlight Intensity
Light Duration
Ideal Placement
Bright, indirect sunlight
6-8 hours per day
Near a window with curtains or in a spot that receives morning or late afternoon sun
Partial sun or filtered light
4-6 hours per day
An east-facing windowsill or a shaded area in your garden
Full sun
2-4 hours per day
A south-facing windowsill or patio with protection from strong winds and extreme temperatures
Watering and Drainage for Bonsai Pine Trees
Proper watering and drainage are crucial for the health and vitality of bonsai pine trees. In this section, we will dive into the essential techniques and practices to ensure your bonsai pines thrive.
When it comes to watering your bonsai pine, it’s important to strike a balance. Too much water can lead to root rot and other moisture-related problems, while too little water can cause dehydration and stress. The frequency and volume of watering will depend on various factors such as the climate, pot size, and soil composition.
To determine when it’s time to water your bonsai pine, a simple yet effective method is to check the moisture level of the soil. Insert a finger about an inch deep into the soil. If it feels dry, it’s time to water. However, if it feels moist, it’s best to wait before watering again.
When watering your bonsai pine, it’s important to do so evenly and thoroughly. This ensures that the entire root system is adequately hydrated. Avoid watering only the surface of the soil, as it can lead to shallow root growth. Instead, water until you see it flowing out of the drainage holes at the bottom of the pot.
Another critical aspect of bonsai pine tree care is proper drainage. Good drainage is essential to prevent waterlogging and root rot. Ensure that your bonsai pot has sufficient drainage holes to allow excess water to escape.
Drainage screens or mesh can also be used to prevent soil from washing out of the pot while still allowing water to flow through. Additionally, using well-draining soil compositions that include components such as perlite or pumice can help improve drainage.
By following these watering and drainage practices, you can maintain the optimal moisture balance for your bonsai pine trees, promoting their health and overall growth.
Key Fertilization Practices for a Thriving Bonsai Pine
In order to ensure optimal growth and health for your bonsai pine tree, proper fertilization is essential. Providing the right nutrients is especially important for weak trees that need extra support. Additionally, understanding the impact of candle cutting on fertilizing schedules is crucial, particularly for two-flush pines. Here are some key fertilization practices to follow for healthy bonsai trees.
Feeding Weak Trees Year-Round
Weak bonsai pine trees require consistent feeding throughout the year to help them regain their strength. By providing a balanced fertilizer enriched with essential nutrients, you can promote healthy growth and combat weakness. It is recommended to use a slow-release fertilizer to ensure a steady and continuous supply of nutrients. Apply the fertilizer according to the manufacturer’s instructions and adjust the dosage based on the tree’s specific needs.
Adjusting Fertilizing Schedules Based on Candle Cutting
Candle cutting is a technique used in the maintenance of two-flush pines. It involves removing a portion of the tree’s new growth to encourage denser and more compact foliage. This pruning method has an impact on the fertilizing schedule of your bonsai pine. After candle cutting, it is crucial to reduce the amount of nitrogen-based fertilizer to prevent excessive growth. Instead, focus on using a balanced fertilizer with lower nitrogen content to promote overall health and balanced development.
Fertilizer Type
Nitrogen (N)
Phosphorus (P)
Potassium (K)
Slow-release granular fertilizer
Low
Medium
Medium
Organic liquid fertilizer
Low
Low
Low
Water-soluble fertilizer
High
Medium
Medium
When choosing a fertilizer for your bonsai pine tree, consider the specific nutrient requirements of the tree species and adjust the fertilizer’s composition accordingly. The table above provides a general overview of different fertilizer types and their nitrogen (N), phosphorus (P), and potassium (K) contents. Remember to always follow the instructions provided by the fertilizer manufacturer, as different brands may have specific guidelines for dosage and application frequency.
Pruning and Wiring Bonsai Pines: Enhancing Aesthetics and Growth
Pruning and wiring are essential techniques for maintaining the aesthetics and promoting healthy growth of bonsai pine trees. By selectively removing branches and shaping the tree, you can create stunning and unique designs that mimic the majestic beauty of full-sized pine trees. Additionally, wiring allows you to guide and position branches, further enhancing the overall appearance of your bonsai pine.
Pruning Techniques for Bonsai Pine Trees
Proper pruning is crucial for maintaining the shape and balance of your bonsai pine tree. Here are some steps to follow:
Start by evaluating the overall structure of your tree. Look for any branches that disrupt the desired shape or hinder the flow of the design.
Using sterile and sharp bonsai pruning shears, carefully remove the unwanted branches. Make clean cuts close to the trunk or main branch, ensuring that no stubs are left.
Avoid pruning more than one-third of the tree’s foliage at a time to prevent stress. Regularly assess the tree’s growth to determine when additional pruning is required.
Consider the desired style of your bonsai pine when pruning. For example, in the formal upright style, maintain a straight and symmetrical trunk with gradually tapering branches. In the informal upright style, create a more natural and asymmetrical shape. The cascading style involves allowing branches to cascade downward.
Remember: Pruning should be done during the tree’s dormant period, typically in late winter or early spring. This allows the tree to recover and heal properly before entering the active growth phase.
Wiring Techniques for Bonsai Pines
Wiring helps you shape and position the branches of your bonsai pine trees. Follow these steps to wire your tree effectively:
Select high-quality, flexible bonsai wire suitable for your tree’s strength and thickness. Copper or aluminum wire is commonly used for bonsai pines.
Start by securing one end of the wire to the base of the trunk or branch and gently wrap it around in a spiral motion, gradually moving toward the tip.
Ensure the wire is tight enough to hold the branch in the desired position but not so tight that it damages the tree. Leave some space between the wire and the bark to prevent wire marks.
Once the branch has been shaped, secure the other end of the wire by bending it back onto itself or using wire cutters to trim off any excess.
Be mindful of the wire’s position as the tree grows. Remove the wire before it cuts into the bark or causes any damage. Typically, wiring is left in place for several months or until the branch has hardened into the desired shape.
Note: Regularly check your bonsai pine for any signs of wire cutting into the bark, making adjustments as necessary to prevent injury to the tree.
Repotting Tips for a Healthy Bonsai Pine
Repotting plays a crucial role in maintaining the health and vitality of your bonsai pine tree. Follow these tips for successful repotting:
Repot your bonsai pine every 2-3 years to prevent root congestion and promote optimal growth.
Timing is important. Spring is the ideal time for repotting as the tree enters the active growth phase.
Choose a well-draining bonsai soil mix specifically formulated for pine trees. Avoid using regular potting soil, as it retains too much moisture.
Gently remove the tree from its current pot, taking care not to damage the delicate root system. Use a root rake or chopstick to untangle and prune any long or overly thick roots.
Place a layer of fresh soil in the bottom of the new pot and carefully position the tree, ensuring it is centered and at the desired height.
Fill the remaining space with the bonsai soil mix, gently pressing it to secure the tree. Water the tree thoroughly to settle the soil.
Propagation Methods: Cultivating Your Bonsai Collection
Expanding your bonsai collection can be an exciting journey. Here are a few propagation techniques to help you cultivate new bonsai trees:
Seeds: Collect seeds from mature pine cones and sow them in well-draining bonsai soil. Place the container in a warm and bright location, ensuring consistent moisture. Be patient, as pine seeds may take several months to germinate.
Cuttings: Take semi-hardwood cuttings from healthy pine branches during the growing season. Remove the lower leaves and dip the cut end in rooting hormone before planting in a well-draining medium. Maintain high humidity and provide indirect light until roots develop.
Air Layering: Select a healthy branch with desirable characteristics and make a small incision in the bark. Apply rooting hormone to the area and surround it with moist sphagnum moss. Wrap the moss with plastic wrap to create a humid environment. Once roots have formed, carefully remove the branch and pot it as a new bonsai tree.
Propagation techniques allow you to create unique bonsai trees while preserving the characteristics of the original pine species. Experiment with different methods to expand your collection and hone your skills as a bonsai enthusiast.
Technique
Benefits
Pruning
– Shapes the overall aesthetics of the tree – Maintains balance and symmetry – Controls growth and encourages denser foliage
Wiring
– Allows precise positioning of branches – Enhances the natural flow and movement of the tree – Creates artistic designs and unique bonsai styles
Repotting
– Prevents root congestion and improves nutrient absorption – Promotes healthy growth and development – Refreshes the soil and enhances overall tree health
Propagation
– Expands your bonsai collection – Preserves unique characteristics of pine species – Provides an opportunity for experimentation and personalization
Common Pests and How to Protect Your Bonsai Pine Tree
Pests can pose a significant threat to the health and vitality of your bonsai pine tree. Understanding the common pests that can affect bonsai pines and implementing effective pest control measures is essential for protecting your tree and ensuring its longevity.
Aphids: These small insects feed on the sap of bonsai pine trees, causing leaf curling and discoloration. To control aphids, regularly inspect your tree for signs of infestation and gently wash them off with a strong stream of water. In severe cases, consider treating your tree with an insecticidal soap or neem oil.
Spider Mites: Spider mites are tiny pests that can infest bonsai pine trees, causing yellowing leaves and webbing. To prevent spider mite infestation, regularly mist your tree to increase humidity and inspect the undersides of leaves for mites. In case of an infestation, treat your tree with a miticide, following the manufacturer’s instructions.
Scale Insects: Scale insects are small, immobile pests that attach themselves to the bark of bonsai trees. They feed on sap, causing yellowing leaves and a sticky residue. Remove scale insects from your tree by gently scrubbing them with a soft brush dipped in rubbing alcohol. Repeat the process regularly until the infestation is under control.
Caterpillars: Caterpillars can defoliate bonsai pine trees if left unchecked. Hand-pick the caterpillars from your tree and destroy them. If the infestation is severe, consider using an organic biopesticide to control their population.
In addition to pests, bonsai pine trees can also be susceptible to common diseases and issues such as fungal infections and root rot. To prevent these problems, ensure proper watering practices, avoid overwatering, and maintain good air circulation around the tree.
“Preventive measures and prompt action are crucial in protecting your bonsai pine tree from pests and disease. Regularly inspect your tree, provide optimal care, and address any issues promptly to ensure its health and vitality.”
To protect your bonsai pine tree from pests, it is important to be proactive and implement preventive measures. Regularly inspect your tree for signs of pests, such as yellowing leaves, leaf curling, or webbing. Additionally, practice good hygiene by keeping the soil surface clean and removing any fallen leaves or debris that may harbor pests. Prune and remove any infected or damaged branches to prevent the spread of pests or diseases.
By maintaining a healthy environment and providing proper care, you can significantly reduce the risk of pest infestations and protect the overall well-being of your beloved bonsai pine tree.
Advanced Techniques: Candling and Seasonal Care Adjustments
As you become more experienced in caring for bonsai pine trees, you can explore advanced techniques to enhance their growth and maintain their health. Two of these techniques are candling and making seasonal care adjustments. Understanding these techniques will allow you to take your bonsai pine care to the next level.
Seasonal Adjustments for Optimal Bonsai Pine Health
Seasonal changes can greatly affect the health of your bonsai pine trees. It’s important to make adjustments to your care routine to ensure their well-being throughout the year. As temperatures change, you’ll need to adapt your watering, fertilizing, and pruning practices. For example, in warmer months, you should increase the frequency of watering and consider using a slow-release fertilizer for consistent nutrient supply. In colder months, reduce watering frequency and avoid fertilizing to prevent stress on the trees. By making these seasonal adjustments, you can help your bonsai pines thrive in any weather conditions.
Candling: Enhancing Growth with Precision
Candling is a specialized technique used to shape the growth of bonsai pine trees. It involves removing or trimming the new shoots or “candles” that emerge from the branches in spring. By selectively removing or trimming these candles, you can encourage more balanced growth and develop the desired shape of your tree. The timing and techniques for candling vary depending on the pine species you’re working with. For example, Japanese Black Pines should be candled in early summer, while Japanese White Pines should be candled in late spring. By mastering the art of candling, you can sculpt your bonsai pine into a stunning masterpiece.
By incorporating these advanced techniques of candling and making seasonal care adjustments, you can elevate your bonsai pine tree care to new heights. These techniques will not only shape the growth of your trees but also ensure their optimal health throughout the year. Experiment with these techniques and observe the positive impact they have on your bonsai pine trees.
This page contains some affiliate links. Please check out our affiliate disclaimer for more information
Karen Phillips, Bonsai expert and blogger. Read more about me here
Welcome to our complete care guide for Bonsai Carmona microphylla! If you have a passion for bonsai trees and are looking to cultivate a thriving indoor bonsai tree, then you’ve come to the right place. In this guide, we will provide you with all the information you need to successfully care for your Carmona microphylla bonsai tree.
Bonsai Carmona microphylla, also known as the Fukien Tea Bonsai, is a small bonsai tree that brings beauty and tranquility into any space. Its lush green foliage, delicate flowers, and intricate branching structure make it a popular choice among bonsai enthusiasts. Taking care of this bonsai tree is a fulfilling and rewarding experience, and we are here to assist you every step of the way.
In this guide, we will explore the specific care requirements of the Bonsai Carmona microphylla, including pruning techniques, watering methods, fertilization essentials, and much more. We will also cover topics such as optimal placement, wiring and training, repotting, propagating, humidity control, and pest prevention. With our guidance, you will be equipped with the knowledge and techniques to cultivate and maintain a thriving Bonsai Carmona microphylla.
Throughout this guide, we will use real examples and provide practical tips that have been proven to work. Whether you are a beginner or an experienced bonsai enthusiast, this comprehensive care guide will serve as your go-to resource for all things related to Bonsai Carmona microphylla.
So, let’s embark on this bonsai journey together. Get ready to discover the art and science behind caring for this small yet enchanting bonsai tree. With patience, dedication, and the right knowledge, you will create a breathtaking display of nature in your own home.
Understanding Your Bonsai Carmona microphylla
To truly care for your Bonsai Carmona microphylla, it’s essential to understand its origin and nature, as well as its distinguishing features. The Fukien Tea Bonsai, also known as Carmona microphylla, is native to parts of Japan, Indonesia, Taiwan, and Australia but gets its name from its place of origin, Fukien or Fujian, China. This evergreen shrub belongs to the Boraginaceae plant family and has small leathery dark green leaves with little white hairs on their glossy surface. Understanding the differences between Carmona microphylla and Carmona retusa, another common bonsai species, is important for proper care. We will also explore the growth habits and visual characteristics of the Carmona microphylla, including its tree structure, bark, leaves, flowers, and fruit.
The Origin and Nature of the Fukien Tea Bonsai
The Fukien Tea Bonsai, scientifically known as Carmona microphylla, derives its name from its place of origin, Fukien or Fujian, China. This evergreen shrub, belonging to the Boraginaceae plant family, is native to Japan, Indonesia, Taiwan, and Australia as well. It is highly regarded in bonsai culture for its unique characteristics and adaptability.
Distinguishing Features of the Carmona microphylla
The Carmona microphylla, known as the Fukien Tea Bonsai, exhibits a distinct set of features that make it easily recognizable. Its small leathery dark green leaves have a glossy surface and are covered with fine white hairs. The bark of this bonsai species develops a polished appearance as it ages. It also produces small white flowers that emit a pleasant fragrance, creating a captivating visual and olfactory experience.
Carmona microphylla vs. Carmona retusa
It is important to differentiate between Carmona microphylla and Carmona retusa, as they are two closely related but distinct bonsai species. While both species share some similarities, such as their small leaf siz and ability to adapt to bonsai cultivation, there are notable differences in their growth habits and visual characteristics. Understanding these distinctions will help ensure proper care for your Carmona microphylla bonsai.
Growth Habits and Visual Characteristics
The Carmona microphylla bonsai exhibits specific growth habits that differentiate it from other bonsai species. Its tree structure boasts a compact and dense appearance, making it suitable for creating aesthetically pleasing designs. The bark develops interesting textures and colors over time, adding to the tree’s overall charm. The leaves are small, dark green, and glossy, creating a striking contrast against the bark and enhancing the bonsai’s visual appeal. Carmona microphylla also produces delicate white flowers and small red or black berries, further accentuating its beauty.
Optimal Placement for Thriving Bonsai Carmona microphylla
Choosing the right placement is crucial for the thriving growth of your Bonsai Carmona microphylla. Whether you plan to keep it indoors or outdoors, there are important factors to consider to ensure its health and vitality.
If you prefer to keep your Carmona microphylla bonsai indoors, it requires ample natural light. Place it right next to a window that receives the best light, preferably facing south or southeast. This will provide the bonsai tree with the necessary sunlight it needs for photosynthesis and overall growth.
If you choose to keep your bonsai Carmona microphylla outdoors, be mindful of the temperature requirements and sunlight exposure. This bonsai tree thrives in warm climates, ideally ranging between 65°F (18°C) and 75°F (24°C). Ensure the spot you choose is warm and sheltered, protected from extreme weather conditions and strong winds.
Humidity is another crucial aspect to regulate in both indoor and outdoor environments. Bonsai Carmona microphylla prefers moderate humidity levels, between 40% and 60%. To maintain an appropriate level of humidity, consider using a humidity tray or placing a bowl of water next to the bonsai tree. This will help prevent the leaves from drying out and ensure its overall well-being.
By carefully selecting the optimal placement for your Bonsai Carmona microphylla, you are providing it with the ideal conditions to thrive. Whether indoors or outdoors, ensure it receives ample light, appropriate temperatures, and well-regulated humidity. These considerations will contribute to the health and beauty of your Carmona microphylla bonsai for years to come.
Watering Techniques for a Healthy Bonsai Plant
Proper watering techniques are crucial for maintaining the health and vitality of your Bonsai Carmona microphylla. Understanding the frequency and amount of watering required is essential to ensure optimal growth and prevent issues such as overwatering or underwatering.
Frequency and Amount of Watering
The frequency of watering your bonsai tree will depend on various factors, including the climate, season, and specific needs of the Carmona microphylla. As a general rule, it is important to allow the soil to partially dry out before watering again. This helps prevent overwatering, which can lead to root rot and other detrimental effects.
When watering your Bonsai Carmona microphylla, ensure that you thoroughly wet the soil until the water drains out from the drainage holes at the bottom of the pot. This ensures that the entire root system receives adequate moisture. Avoid shallow watering, as it may lead to uneven water distribution and root drying.
Signs of Overwatering and Underwatering
Overwatering is a common mistake in bonsai tree care that can cause root rot and fungal infections. Signs of overwatering include yellowing or wilting leaves, stagnant growth, and a foul smell coming from the soil. If you notice these symptoms, it is crucial to adjust your watering schedule and allow the soil to dry out more between waterings.
On the other hand, underwatering can also be harmful to your Bonsai Carmona microphylla. Signs of underwatering include dry, brittle leaves, drooping foliage, and the soil pulling away from the sides of the pot. If you notice these symptoms, it is important to increase the frequency of watering and ensure that the soil is adequately moist during each watering session.
Choosing the Right Water for Your Bonsai Tree
Choosing the right water for your Bonsai Carmona microphylla is crucial for its overall health and well-being. While tap water is generally suitable for most bonsai trees, it is important to consider the quality of your tap water. If your tap water contains excessive chlorine or minerals, it may be necessary to use filtered water or let the tap water sit for 24 hours to allow the chlorine to evaporate before watering your bonsai tree.
Additionally, some bonsai enthusiasts prefer using rainwater or distilled water to ensure a consistent pH level and reduce the risk of potential mineral buildup in the soil. However, it is essential to monitor the pH levels of the soil and adjust accordingly to maintain the ideal growing conditions for your Carmona microphylla bonsai.
By following proper watering techniques, identifying signs of overwatering and underwatering, and choosing the right water for your Bonsai Carmona microphylla, you can ensure the health and vitality of your bonsai tree and foster its long-term growth and beauty.
Feeding Your Indoor Bonsai Tree: Fertilizing Essentials
Fertilizing is an essential aspect of bonsai tree care, and it plays a crucial role in the health and growth of your indoor Bonsai Carmona microphylla. Providing your bonsai tree with the right nutrients will ensure its overall well-being and help it thrive.
When it comes to fertilizing your indoor bonsai tree, it’s important to choose the right fertilizers that are specifically formulated for bonsai plants. Look for a balanced fertilizer with equal amounts of nitrogen (N), phosphorus (P), and potassium (K). These macro-nutrients are essential for healthy growth and should be present in a ratio of approximately 10-10-10 or 12-12-12.
Apply the fertilizer according to the instructions provided on the packaging. The frequency of fertilization will depend on the specific needs of your Carmona microphylla bonsai, but as a general guideline, you can fertilize once every two weeks during the growing season (spring and summer) and reduce it to once a month during the dormant period (fall and winter).
When fertilizing your indoor bonsai tree, it’s crucial to follow proper guidelines to prevent overfertilization, which can harm the roots and lead to nutrient burn. Always dilute the fertilizer to half or quarter strength to avoid damaging the delicate root system of your tree.
Here are some tips to help you troubleshoot common issues related to fertilizing your indoor Bonsai Carmona microphylla:
Nutrient deficiencies: If you notice yellowing leaves, stunted growth, or diminished flowering, it may indicate a nutrient deficiency. Adjust the fertilization schedule to provide your bonsai tree with a more frequent or higher dose of fertilizer to address the deficiency.
Nutrient excesses: On the other hand, if you observe salt deposits on the soil surface, leaf burn, or slowed growth, it’s a sign of nutrient excess. Flush the soil with water to remove any excess salts and reduce the frequency or concentration of fertilization to prevent further issues.
Feeding your indoor Bonsai Carmona microphylla with the right nutrients through proper fertilizing techniques will contribute to its lush foliage, vibrant flowering, and overall vitality. Remember to always pay attention to the specific needs of your bonsai tree and adjust the fertilization routine accordingly.
Bonsai Tree Pruning: Timing and Techniques
Pruning is an essential practice for maintaining the shape and health of your Bonsai Carmona microphylla. Proper pruning not only enhances the aesthetics of your bonsai tree but also stimulates new growth and prevents the emergence of unwanted branches. In this section, we will cover the timing and techniques for pruning your bonsai tree, ensuring its continued vitality and visual appeal.
Timing is crucial when it comes to bonsai tree pruning. To promote optimal growth and recovery, prune your Bonsai Carmona microphylla during its active growing season, preferably in the late spring or early summer. During this period, the tree is in its most vigorous state and can heal more quickly.
When pruning your bonsai tree, it is essential to have a clear goal in mind. Whether you aim to refine its shape, remove unwanted branches, or encourage a specific growth pattern, understanding your objectives will guide your pruning techniques.
There are different pruning methods you can employ depending on your goals:
Pinching: This technique involves using your fingertips or bonsai scissors to pinch off the tips of new branches or shoots. Pinching promotes ramification and stimulates the growth of smaller, more compact foliage.
Thinning: Thinning involves selectively removing certain branches or foliage to increase light penetration and improve airflow within the canopy. This technique helps prevent the development of weak or crowded branches.
Heading: Heading pruning involves cutting back a branch to a specific point, usually just above a bud or leaf node. This technique can be used to encourage back-budding, redirect growth, or control the overall size of the bonsai tree.
When pruning, it is essential to use the right tools to ensure clean cuts and minimize the risk of injury. Bonsai-specific tools, such as concave cutters, branch cutters, and pruning shears, are designed to make precise cuts without damaging the surrounding tissue. Always sanitize your tools before pruning to prevent the spread of any potential diseases.
Remember, pruning should be approached with care and precision. Avoid removing more than one-third of the tree’s foliage at a time, as this can stress the bonsai and compromise its health. Regularly assess your bonsai tree’s growth and shape to determine the need for pruning, keeping in mind its unique characteristics and growth patterns.
Pruning is a rewarding and creative aspect of bonsai tree care. By mastering the timing and techniques for pruning your Bonsai Carmona microphylla, you can sculpt and maintain a beautiful, thriving bonsai tree that showcases the artistry of nature.
Wiring and Training Your Bonsai Carmona microphylla
Wiring and training are fundamental techniques for shaping and guiding the growth of your Bonsai Carmona microphylla. By utilizing these methods, you can create the desired aesthetic and structure for your bonsai tree, turning it into a true masterpiece.
When it comes to wiring your bonsai tree, timing is crucial. You should wire your Carmona microphylla during the tree’s dormant period, which typically falls in late winter or early spring. This is when the tree’s branches are more flexible, allowing you to manipulate them into the desired positions. Be careful not to wire during the active growth phase, as it may cause damage to the tree.
To wire your Bonsai Carmona microphylla, follow these steps:
Select high-quality bonsai wire that is appropriate in thickness for the size of your tree branches. Ensure that the wire is strong enough to hold the branch in place but gentle enough not to cause damage.
Start at the base of the branch and gently wrap the wire around it, ensuring an even and consistent tension along the length of the branch. Avoid wrapping too tightly as it may cut into the bark and damage the branch.
Continue wrapping the wire up the branch, maintaining an angle that matches the desired position.
Once you reach the tip of the branch, twist the wire ends together to secure it in place.
Make adjustments to the position of the branch if needed, carefully bending it to achieve the desired shape.
Important tips for successful training:
Regularly check the wire for any signs of cutting into the branch. If you notice any indentations or pressure marks, gently loosen or remove the wire to prevent damage.
Monitor the growth of your bonsai tree and adjust the wiring as necessary to ensure it doesn’t constrict the branches and hinder their development.
Training is an ongoing process, and it requires patience and regular maintenance to achieve the desired results. Regularly inspect your bonsai tree and make any necessary adjustments to maintain its shape and aesthetics.
Training your Bonsai Carmona microphylla is a rewarding endeavor that allows you to customize and showcase your artistic vision. With proper wiring and training techniques, you can transform your bonsai tree into a captivating work of art.
Repotting Your Small Bonsai Tree: When and How
Signs That It’s Time to Repot
Knowing when to repot your small bonsai tree is crucial for its overall health and growth. There are several signs to look out for that indicate it’s time to repot your Carmona microphylla bonsai:
Root congestion: If you notice roots circling around the bottom of the pot or protruding from the drainage holes, it’s a clear sign that your bonsai is outgrowing its current pot and needs a larger one.
Nutrient deficiency: When the soil no longer provides adequate nutrients for your bonsai tree, you may observe stunted growth, yellowing leaves, or a general decline in overall health. Repotting allows you to refresh the soil and provide the necessary nutrients for your bonsai’s continued well-being.
Choosing the Correct Soil and Pot
Selecting the right soil and pot is essential for successful repotting of your Carmona microphylla bonsai:
Soil: Use a well-draining bonsai soil mix that retains moisture without becoming overly saturated. A mix of akadama, pumice, and lava rock is commonly used for bonsai trees, providing optimal drainage and aeration.
Pot: Choose a pot that is slightly larger than the current one, allowing room for root growth. Ensure the pot has adequate drainage holes to prevent waterlogged soil, as this can lead to root rot and other issues. Opt for a pot made of durable materials, such as ceramic or plastic, that will withstand the demands of bonsai tree care.
Minimizing Stress During the Repotting Process
Repotting can be a stressful experience for your bonsai tree, but you can minimize stress by following these tips:
Timing: Repot your Carmona microphylla bonsai during its dormant period in early spring or late winter. This ensures that it experiences minimal disruption and has ample time to recover before the growing season.
Gentle handling: Handle the roots and tree with care, avoiding any unnecessary roughness or damage. Gently remove the tree from the old pot and untangle any congested roots, being mindful not to break or tear them.
Pruning: Trim back any excessively long or damaged roots before placing the tree in its new pot. This encourages the development of new feeder roots and helps maintain a balanced root-to-foliage ratio.
Watering and aftercare: After repotting, water your bonsai thoroughly to settle the soil and promote root establishment. Place the tree in a shaded area for a few weeks to allow it to recover from any stress and gradually reintroduce it to its normal growing conditions.
Signs That It’s Time to Repot
Choosing the Correct Soil and Pot
Minimizing Stress During the Repotting Process
Root congestion
Use a well-draining bonsai soil mix
Repot during the dormant period
Nutrient deficiency
Select a pot slightly larger than the current one
Handle roots and tree with care
Excess water
Ensure the pot has adequate drainage holes
Trim back excessively long or damaged roots
Dried or damaged leaves
Opt for a pot made of durable materials
Water thoroughly and provide aftercare
Methods of Propagating Carmona microphylla Bonsai
Expanding your bonsai collection and sharing the beauty of Carmona microphylla bonsai with others is an exciting endeavor. There are two primary methods for propagating this bonsai tree: seed propagation and cuttings. Both techniques require specific steps and attention to detail to ensure successful propagation.
Seed propagation: Harvesting and planting seeds is one way to propagate Carmona microphylla bonsai. Follow these steps for successful seed propagation:
Collect mature seeds from the tree during the appropriate season.
Prepare a seed tray or small pots with well-draining soil mix.
Plant the seeds in the soil, ensuring they are not buried too deep.
Keep the soil consistently moist and warm.
Place the seed tray or pots in a location with indirect sunlight.
Monitor the moisture level and provide regular care until the seeds germinate and develop into seedlings.
Transplant the seedlings into individual pots once they have grown several sets of true leaves.
Cuttings: Taking cuttings from existing Carmona microphylla bonsai is another effective method of propagation. Follow these steps for successful cutting propagation:
Select a healthy branch or stem from the parent tree.
Using clean and sharp pruning shears, make a clean cut just below a node.
Remove any leaves from the lower half of the cutting.
Dip the cut end into a rooting hormone powder to promote root growth.
Prepare a well-draining rooting medium, such as a mix of peat and perlite.
Insert the cutting into the rooting medium, ensuring that at least one node is underground.
Mist the cutting with water and cover it with a plastic bag to create a humid environment.
Place the cutting in a warm location with indirect sunlight.
Maintain consistent moisture and periodically remove the plastic bag to prevent mold growth.
Monitor the cutting for new growth and root development.
Once the cutting has developed a strong root system, transplant it into a suitable bonsai pot.
Regardless of the propagation method you choose, patience, care, and attention to detail are key to successful propagation of Carmona microphylla bonsai. With proper techniques and nurturing, you can propagate these beautiful bonsai trees and continue to enjoy their elegance and charm.
Maintaining Proper Humidity Around Your Bonsai
Proper humidity is essential for the health and well-being of your Bonsai Carmona microphylla. Maintaining the right moisture levels will ensure that your bonsai tree thrives and remains resistant to common issues such as leaf drying, wilting, and pest infestations. In this section, we will explore effective methods for maintaining humidity around your bonsai tree, including the use of humidity trays, monitoring humidity levels, and adjusting humidity in different seasons.
Creating a Humidity Tray
One effective way to increase humidity around your Bonsai Carmona microphylla is by using a humidity tray. A humidity tray is a shallow tray filled with water that sits beneath the bonsai pot. It helps to create a localized moist environment that mimics the natural habitat of the bonsai tree. To create a humidity tray, place a tray filled with water near your bonsai tree, ensuring that the water level is below the tray’s surface. This method provides a constant source of humidity that slowly evaporates, maintaining the ideal moisture level for your bonsai.
Monitoring Humidity Levels
Regularly monitoring the humidity levels around your bonsai tree is crucial for maintaining optimal conditions. You can use a hygrometer, a device that measures humidity, to accurately gauge the moisture in the air. Aim for a humidity level between 50-60%, as this range closely resembles the natural environment that Bonsai Carmona microphylla thrives in. By regularly monitoring the humidity levels, you can make necessary adjustments to ensure that your bonsai tree remains healthy and vibrant.
Adjusting Humidity in Different Seasons
The humidity requirements for your Bonsai Carmona microphylla may vary depending on the season. During the warmer months, when the air tends to be drier, you may need to take additional steps to increase humidity. One effective method is to mist the foliage of your bonsai tree daily using a fine mist sprayer. This helps to replenish moisture on the leaves and creates a humid microclimate around the tree. In contrast, during colder months or in more humid climates, you may need to reduce humidity levels by providing proper ventilation and reducing watering frequency.
By maintaining the proper humidity levels around your Bonsai Carmona microphylla, you will provide the ideal growing conditions for your bonsai tree, promoting its overall health and vitality. The methods discussed in this section will help you create a thriving environment that encourages healthy growth and enhances the beauty of your bonsai.
Preventing and Treating Pests and Diseases
Like any other plant, Bonsai Carmona microphylla is susceptible to pests and diseases. It’s essential to implement effective strategies for prevention and treatment to ensure the long-term health of your bonsai tree. In this section, we will discuss common pests that can affect Carmona microphylla bonsai and explore both organic and chemical treatments. We will also emphasize the importance of preventive measures to maintain the overall well-being of your bonsai tree.
Common Pests That Affect Bonsai Carmona microphylla
Bonsai Carmona microphylla can be vulnerable to various pests that can potentially harm its health and appearance. These pests include:
Aphids
Mealybugs
Mites
Scale insects
Fungus gnats
Identifying the presence of these pests early on is crucial for swift action and controlling their population.
Using Organic and Chemical Treatments Safely
When it comes to treating pests and diseases on your Bonsai Carmona microphylla, you have a range of options to choose from. Organic treatments involve using natural substances and methods to repel or eliminate pests, while chemical treatments involve the use of synthetic pesticides or insecticides. It’s important to use both organic and chemical treatments safely, following the instructions and recommended dosages provided by the manufacturers.
Organic treatments for pests often include:
Neem oil
Essential oils
Soap-based insecticides
Diatomaceous earth
Chemical treatments may include:
Insecticidal sprays
Fungicides
Miticides
Select the appropriate treatment based on the severity of the infestation and your personal preferences. Always prioritize the well-being of your bonsai tree and follow the instructions carefully.
Preventive Measures for Long-Term Plant Health
Preventing pests and diseases is key to maintaining the long-term health of your Bonsai Carmona microphylla. Here are some preventive measures you can take:
Regularly inspect your bonsai tree for any signs of pests or diseases.
Keep your bonsai tree in a clean and well-maintained environment.
Ensure proper watering techniques and avoid overwatering, as excess moisture can attract pests.
Provide adequate airflow around the tree to discourage the growth of fungal or bacterial infections.
Quarantine any newly acquired plants to prevent the introduction of pests to your existing collection.
Monitor humidity levels and maintain optimal levels to reduce the risk of pests and diseases.
Implementing these preventive measures can significantly reduce the likelihood of pest infestations and diseases, promoting the overall health and vitality of your Bonsai Carmona microphylla bonsai tree.
Bonsai Carmona microphylla Tree Care Throughout the Seasons
Proper care for your Bonsai Carmona microphylla should be adjusted according to the changing seasons. By understanding the specific care requirements for each season, you can ensure the health and vitality of your bonsai tree year-round.
In the spring, as the temperatures start to rise, it’s important to monitor the watering of your Carmona microphylla bonsai. With increased sunlight and warmer weather, the tree’s water requirements may change. It’s essential to adjust your watering schedule accordingly, taking care not to overwater or underwater the bonsai tree. Additionally, spring is a good time to examine the soil and, if necessary, repot your bonsai to provide fresh nutrients and encourage healthy growth.
As summer arrives, your Carmona microphylla bonsai may benefit from regular misting to maintain adequate humidity levels. The intense heat and prolonged sunlight can cause the soil to dry out quickly, so be vigilant in monitoring the moisture levels and adjust your watering routine accordingly. Moreover, fertilizing your bonsai tree with a balanced fertilizer during the summer months will provide essential nutrients, promoting strong roots and vibrant foliage.
In the fall, as the temperatures start to cool down, your Carmona microphylla bonsai may enter a period of dormancy. The watering requirements may decrease, but it’s crucial to continue monitoring the soil moisture to ensure it doesn’t become too dry. Pruning can also be done during this time to shape the tree and remove any dead or diseased branches. Additionally, safeguarding your bonsai from sudden temperature drops by bringing it indoors or providing appropriate protection is essential for its survival.
During the winter, when the temperatures drop significantly, it may be necessary to move your Carmona microphylla bonsai indoors to protect it from freezing. Ensure that the bonsai receives ample light while being kept away from drafts and heating sources. Adjust your watering routine to ensure the soil remains slightly moist and avoid excessive fertilization. Periodic monitoring of the bonsai’s overall health and providing adequate humidity through methods such as using a humidity tray will help maintain its well-being.
By tailoring your care practices to the changing seasons, you can provide the optimal environment for your Bonsai Carmona microphylla to thrive. Adapting temperature, watering, fertilizing, and protection practices will promote healthy growth, encourage flowering, and support the overall well-being of your cherished bonsai tree.
This page contains some affiliate links. Please check out our affiliate disclaimer for more information
Karen Phillips, Bonsai expert and blogger. Read more about me here
Welcome to our comprehensive care guide for the Fukien Tea Bonsai Tree, also known as Carmona retusa. Whether you’re a bonsai enthusiast or just starting your journey with indoor bonsai trees, this guide is packed with valuable information to help you create and maintain a thriving miniature tree in your own home. From bonsai care tips and pruning techniques to Fukien tea bonsai care and creating bonsai tree designs, we’ve got you covered. Let’s dive in and explore the world of the beautiful Fukien Tea Bonsai Tree.
Understanding the Fukien Tea Bonsai Tree Environment
Understanding the natural habitat and growth habits of the Fukien Tea Bonsai Tree is crucial for providing the optimal environment for its growth. The Fukien Tea is a subtropical evergreen shrub native to East and Southeast Asia, and it thrives in temperatures around 70°F (20°C). While it is traditionally an indoor bonsai, it can be kept outside in very warm climates. This section will delve into the specific environmental requirements of the Fukien Tea Bonsai Tree and how to create the ideal conditions for its growth.
Optimal Placement for Your Fukien Tea Bonsai Tree
Indoor Positioning for Year-Round Beauty
Fukien tea bonsai is one of the best indoor bonsais. Proper placement is crucial for the health and aesthetics of your Fukien Tea Bonsai Tree. When keeping your bonsai tree indoors, it is important to provide the optimal environment to ensure its year-round beauty. One of the key considerations is lighting requirements.
Fukien Tea Bonsai Trees thrive in bright, indirect light. Place your bonsai tree near a window with eastern or western exposure to provide the ideal lighting conditions. Avoid placing it in direct sunlight, as it can cause leaf burn.
Another important aspect of indoor positioning is adapting to seasonal changes. As the seasons transition, the lighting conditions and temperature inside your home may vary. Pay attention to the changing daylight hours and adjust the placement of your bonsai tree accordingly. During the winter months, when daylight is limited, you may need to supplement the lighting with artificial grow lights to ensure your bonsai tree receives adequate light for healthy growth.
Temperature requirements are also essential for the well-being of your Fukien Tea Bonsai Tree. It prefers temperatures around 70°F (20°C). Keep your bonsai tree away from drafty areas and extreme temperature fluctuations, such as heating vents or air conditioning units. Maintaining stable temperatures within the preferred range will help your bonsai tree thrive and maintain its beautiful appearance.
Adapting to Seasonal Changes
Adapting to seasonal changes is an important part of caring for your Fukien Tea Bonsai Tree. As the seasons progress, temperature variations and daylight hours fluctuate, requiring adjustments in your bonsai care routine.
During the warmer months, it is beneficial to place your bonsai tree outdoors in a shaded or partially shaded area, provided the temperature is within its preferred range. Outdoor positioning allows the tree to benefit from natural sunlight and fresh air, promoting healthy growth and vibrant foliage. However, monitor the weather conditions and bring your bonsai tree indoors if there is a risk of extreme temperatures or adverse weather.
As autumn approaches and temperatures begin to drop, it is time to prepare your bonsai tree for the transition to the indoors. Gradually acclimate your bonsai tree to its indoor environment by reducing its exposure to direct sunlight and adjusting the watering and fertilizing schedule. This gradual transition will help minimize stress and ensure a smooth adjustment for your bonsai tree.
During the winter months, provide your Fukien Tea Bonsai Tree with a cooler environment, ideally around 60-65°F (15-18°C). This cooler temperature mimics its natural dormant period and allows the tree to rest and conserve energy. Reduce watering frequency during this time, as the tree will require less moisture. However, continue to monitor the soil to ensure it remains slightly moist but not overly saturated.
Ensuring Adequate Lighting and Temperature
In addition to indoor positioning and adjusting to seasonal changes, it is crucial to ensure adequate lighting and temperature for your Fukien Tea Bonsai Tree throughout the year.
As mentioned earlier, Fukien Tea Bonsai Trees thrive in bright, indirect light. If you are keeping your bonsai tree indoors, place it near a window with eastern or western exposure to provide optimal lighting conditions. Consider using curtains or blinds to filter intense sunlight and prevent leaf burn. If natural light is limited, supplement with artificial grow lights to ensure your bonsai tree receives the necessary light for healthy growth.
Temperature requirements play a significant role in the overall health and vitality of your bonsai tree. Ideally, maintain temperatures around 70°F (20°C) for consistent growth and development. Avoid exposing your bonsai tree to extreme temperature fluctuations, as they can cause stress and impact its overall well-being. Consider using a thermometer to monitor the temperature in the vicinity of your tree and make adjustments as needed to maintain the optimal temperature range.
By providing the optimal lighting conditions and maintaining stable temperatures, you will create a favorable environment for your Fukien Tea Bonsai Tree to thrive and showcase its natural beauty.
Watering Your Fukien Tea Bonsai Tree
Proper watering is crucial for maintaining the health and vitality of your Fukien Tea Bonsai Tree. Understanding watering techniques, timing, and the water requirements of your bonsai tree is essential. Here, you will find detailed information on how to water your bonsai tree effectively, ensuring its optimal growth and preventing water-related issues.
When it comes to watering your Fukien Tea Bonsai Tree, it’s important to strike the right balance between underwatering and overwatering. Overwatering can lead to root rot and other detrimental conditions, while underwatering can cause stress and wilting.
To determine when to water your bonsai tree, observe the moisture levels of the soil. Your Fukien Tea Bonsai Tree prefers slightly moist soil, but not overly saturated. Stick your finger about an inch into the soil; if it feels dry, it’s time to water your bonsai tree.
The frequency of watering depends on several factors, such as the size of your bonsai tree, the pot size, and the environmental conditions. As a general rule, it is recommended to water your Fukien Tea Bonsai Tree when the top layer of soil feels dry to the touch.
Here are some additional watering techniques to keep in mind:
Water your bonsai slowly and evenly, ensuring that moisture reaches all parts of the root system.
Consider using a watering can with a fine nozzle or a watering wand to distribute water gently.
Avoid watering your bonsai tree with chlorinated or hard water. If possible, use filtered or distilled water.
Pay attention to the weather conditions and adjust your watering schedule accordingly. During hotter months, your bonsai tree may require more frequent watering.
Remember to monitor your Fukien Tea Bonsai Tree closely and observe any signs that may indicate overwatering or underwatering. Overwatering signs include yellowing leaves, mold or fungus growth, and a foul odor. Underwatering signs include wilted or drooping leaves and dry soil.
By following these watering techniques and understanding the water requirements of your Fukien Tea Bonsai Tree, you can ensure its optimal health and beauty.
Fertilizing the Fukien Tea Bonsai Tree
Fertilizing is an essential aspect of bonsai care to ensure the proper growth and development of your Fukien Tea Bonsai Tree. By providing the necessary nutrients, you can promote healthy growth, vibrant foliage, and overall tree vitality. In this section, we will explore the importance of choosing the right fertilizer and discuss the frequency of fertilization through the seasons.
Choosing the Right Fertilizer
When it comes to selecting a fertilizer for your Fukien Tea Bonsai Tree, it is crucial to consider its specific nutritional requirements. Look for a balanced fertilizer that contains a mix of nitrogen, phosphorous, and potassium (N-P-K) in appropriate ratios. Nitrogen promotes leaf and stem growth, phosphorus stimulates root development, and potassium enhances overall tree health.
Opt for a slow-release or organic fertilizer to provide a steady supply of nutrients over time. These types of fertilizers release nutrients gradually, preventing the risk of overfeeding or nutrient imbalances. Additionally, organic fertilizers enrich the soil with beneficial microorganisms, enhancing soil fertility and long-term tree health.
Fertilization Frequency Through the Seasons
The frequency of fertilization for your Fukien Tea Bonsai Tree will vary depending on the season and the tree’s growth stage. As a general guideline, fertilize your bonsai tree every two to four weeks during the growing season, which typically spans from spring to early autumn. This will provide the necessary nutrients for vigorous growth during this period of active development.
During the dormant winter months, reduce the frequency of fertilization to once every four to eight weeks. The tree’s metabolic activity slows down during this time, and excessive fertilization can lead to nutrient buildup or nutrient stress. Adjust the fertilization schedule according to your specific climate and the winter conditions in your region.
Always follow the instructions provided by the fertilizer manufacturer and avoid overfertilization, as it can cause burns to the tree’s roots and foliage. Regularly monitor your Fukien Tea Bonsai Tree’s growth and adjust the fertilization schedule accordingly, taking into account the tree’s individual needs and response to the fertilizer.
Pruning and Wiring Techniques for Fukien Tea Bonsai Tree
Pruning and wiring are essential techniques for maintaining the shape, aesthetics, and overall health of your Fukien Tea Bonsai Tree. Proper pruning helps promote branching, denser foliage, and aesthetic appeal, while wiring allows you to shape and train the branches to achieve your desired design and form.
When it comes to pruning your Fukien Tea Bonsai Tree, timing is crucial. The best time to prune is during the warmer months, ideally in late spring or early summer when the tree is actively growing. This allows the tree to recover quickly and minimize stress. Use sharp bonsai scissors or shears to make clean cuts, ensuring that you remove any dead, damaged, or overgrown branches. Additionally, selectively pruning the tips of healthy branches can encourage back-budding, which leads to denser foliage and a more compact tree.
Wiring is another technique that allows you to shape and train the branches of your bonsai tree. Before wiring, make sure the branches you intend to wire are flexible enough for shaping. You can use aluminum or copper bonsai wire, choosing the appropriate thickness based on the branch’s size and the desired degree of movement. Start by anchoring the wire at the base of the branch and wrap it around gently, applying moderate tension to guide the branch into the desired position. It’s important not to overtighten the wire to avoid damaging the branch’s cambium layer.
It’s essential to monitor the wired branches regularly to prevent the wire from cutting into the bark. Once the branches have set in their new position, typically after a few months, you can remove the wire carefully to avoid any potential damage. It’s recommended to remove the wire in a reverse fashion, unwinding it in the same direction it was initially applied.
Remember, pruning and wiring should always be done with caution and in moderation. Over-pruning or excessive wiring can weaken the tree and cause stress. It’s important to strike a balance and maintain the overall health and vigor of your Fukien Tea Bonsai Tree.
How to Properly Repot the Fukien Tea Bonsai Tree
Repotting is a critical aspect of bonsai care that ensures the proper growth and development of your Fukien Tea Bonsai Tree. Understanding when to repot, choosing the right soil mixture, and providing proper root care are essential for maintaining the health and vigor of your bonsai tree.
When to Repot Your Bonsai
Knowing when to repot your Fukien Tea Bonsai Tree is crucial for its overall well-being. Repotting should be done when the tree has outgrown its current pot or when the soil becomes compacted, hindering proper drainage and root growth. It is recommended to repot your bonsai tree every two to three years, preferably in early spring before the new growth starts.
Choosing Soil Mixture and Root Care During Repotting
When repotting your Fukien Tea Bonsai Tree, selecting the right soil mixture is vital. A well-draining soil mixture that retains moisture without becoming waterlogged is ideal. A suitable soil mixture for your bonsai tree can include a combination of organic matter, such as peat moss or pine bark, and inorganic components like perlite or lava rock.
Carefully remove your bonsai tree from its current pot, taking care not to damage the roots. Gently prune any overcrowded or tangled roots, and make sure to remove any dead or decaying roots. When repotting, place your Fukien Tea Bonsai Tree in the new pot with fresh soil, ensuring that the roots are spread out evenly. Firmly pack the soil around the roots to provide stability.
After repotting, water your bonsai tree thoroughly to settle the soil and provide hydration to the roots. Place your bonsai tree in a shaded area for a few weeks to allow it to recover from the repotting process.
Propagation Methods for the Fukien Tea Bonsai Tree
Propagation is an exciting way to expand your bonsai collection and create new Fukien Tea Bonsai Trees. This section will explore two popular propagation methods: using seeds and taking cuttings.
Seeds: Collecting and growing bonsai seeds is a rewarding process. To collect seeds, wait for the Fukien Tea Bonsai Tree to produce fruit. Harvest the ripe, black seeds and remove any pulp. Fill a small pot with well-draining bonsai soil and plant the seeds at a depth of half an inch. Keep the soil moist and place the pot in a warm and well-lit area. With patience and care, the seeds will germinate, and you can nurture the seedlings into bonsai trees.
Cuttings: Taking cuttings is another propagation method that allows you to create new bonsai trees from existing ones. Select healthy branches on your Fukien Tea Bonsai Tree and make a clean cut just below a leaf node. Dip the cut end in rooting hormone to stimulate root formation. Plant the cutting in a well-draining soil mixture, such as peat moss and perlite, and keep it moist. Provide a humid environment by covering the cutting with a plastic bag or placing it inside a propagating box. In a few weeks, the cutting will develop roots, and you can transplant it into a bonsai pot.
Note: Propagation requires patience and proper care. It may take several months or even years for the new plants to develop into mature Fukien Tea Bonsai Trees. However, the satisfaction of successfully propagating your own bonsai trees is well worth the wait.
Maintaining Health: Pests and Diseases of the Fukien Tea Bonsai Tree
Like any other plant, the Fukien Tea Bonsai Tree is susceptible to pests and diseases. It’s important to be aware of the common pests and diseases that can affect the health and vitality of your bonsai tree. By understanding these potential threats, you can take proactive measures to ensure the long-term health and longevity of your Fukien Tea Bonsai Tree.
Common Pests:
Aphids: These small, sap-sucking insects can cause stunted growth and yellowing leaves. To control aphids, you can use insecticidal soap or a gentle spray of water to dislodge them.
Spider mites: These tiny pests can spin webs and cause leaf discoloration. Regularly misting your bonsai tree and keeping humidity levels high can help prevent spider mite infestations.
Scale insects: These small, immobile insects attach themselves to the stems and leaves, feeding on the sap of the tree. Use a cotton swab dipped in rubbing alcohol to remove scales from the bonsai tree.
Common Diseases:
Root rot: This fungal disease is often caused by overwatering or poor drainage. To prevent root rot, ensure that your bonsai tree is potted in well-draining soil and adjust your watering practices accordingly.
Powdery mildew: This fungal infection appears as a white powdery coating on the leaves. Prune affected leaves and improve air circulation around the tree to control powdery mildew.
Leaf spot: Leaf spot is characterized by dark, necrotic spots on the leaves. Remove and dispose of infected leaves and avoid overhead watering to prevent the spread of leaf spot.
Crafting the Aesthetics: Styling the Fukien Tea Bonsai Tree
Styling your Fukien Tea Bonsai Tree is a creative endeavor that allows you to showcase your unique artistic vision and create a visually striking bonsai design. By carefully selecting a bonsai style that complements the characteristics of the Carmona Retusa, you can enhance the natural beauty of your bonsai tree and create a captivating display.
Choosing a Bonsai Style that Complements the Carmona Retusa
When selecting a bonsai style for your Fukien Tea Bonsai Tree, it’s important to consider the tree’s characteristics, such as its foliage, trunk shape, and overall growth pattern. Popular bonsai styles that often complement the Carmona Retusa include the formal upright style, the informal upright style, and the cascading style. The formal upright style highlights the tree’s vertical growth, while the informal upright style emphasizes its elegant natural curves. The cascading style, on the other hand, showcases the delicate beauty of the Carmona Retusa’s cascading branches, creating a dramatic and eye-catching bonsai display. Choose a style that resonates with you and accentuates the unique features of your Fukien Tea Bonsai Tree.
Wiring and Reshaping Tips for Designing Your Bonsai
Wiring and reshaping are essential techniques in bonsai styling that allow you to shape and train the branches of your Fukien Tea Bonsai Tree to achieve the desired design. Before wiring, it’s important to ensure that your bonsai tree is healthy and strong. Carefully wrap bonsai wire around the branches, taking care not to damage the delicate bark. Guide the branches gently into the desired position, creating movement and balance in your bonsai design.
During the reshaping process, consider the overall aesthetics of your bonsai tree, striving for harmony between the trunk, branches, foliage, and pot. Prune excessive growth to maintain the desired shape and size, and regularly remove any dead or unhealthy branches. By combining wiring and reshaping techniques, you can create a visually captivating bonsai tree that showcases the unique beauty of the Fukien Tea Bonsai.
This page contains some affiliate links. Please check out our affiliate disclaimer for more information
Karen Phillips, Bonsai expert and blogger. Read more about me here
Have you ever wondered about the bonsai tree meaning and significance of bonsai trees? Beyond their charming appearance as miniature trees, bonsai holds a profound meaning that reaches far beyond their size. Bonsai trees are not merely decorative plants; they are living sculptures that symbolize harmony, balance, and tranquility.
The art of bonsai has a rich history and cultural significance, with origins in ancient China and Japan. These remarkable trees are not a specific species but rather any woody plant that has been trained and styled to maintain a small size through specific care and cultivation techniques, such as pruning and confinement to a pot. Each bonsai tree carries a unique and artistic energy that goes beyond mere aesthetics.
But what does a bonsai trees represent?
Different species of bonsai trees hold various meanings and messages, allowing you to express values and emotions. Bonsai trees also have a strong connection to Zen philosophy and mindfulness practices, promoting meditation and inner peace.
Integrating bonsai trees into your living space can enhance the harmony and aesthetic appeal of your home.
Meaning of Bonsai
盆栽, or bonsai in kanji, represents a profound fusion of artistry and nature, encapsulating the essence of patience (忍耐), harmony (調和), and respect for life (命を尊ぶ). These miniature trees, meticulously cultivated, mirror the beauty of the natural world in a confined space, reminding us of the elegance found in simplicity.
Beyond its aesthetic charm, 盆栽 encourages mindfulness (正念) and a deep connection with nature, imparting a sense of tranquility (静けさ) and balance (バランス) in our lives. It’s a testament to the enduring beauty crafted through dedication (献身), perseverance (忍耐), and the delicate interplay between human intervention and the resilience of nature.
Bonsai Tree History and Bonsai Significance
Bonsai trees have a long history and deep cultural roots in Asian culture, particularly in China and Japan. The art of bonsai tree originated in ancient China as penjing, which involves creating miniature trees and landscapes. It was later introduced to Japan during the Kamakura period and evolved into the practice of bonsai that we know today.
Bonsai trees were initially a status symbol and were cultivated by the elite of society. They were seen as a representation of nature’s beauty and harmony, and they were treasured as living works of art. The art of bonsai combines elements of horticulture and artistic vision, resulting in a unique and captivating form of artistry.
Bonsai artists carefully shape and train the trees, each with a narrative and aesthetic appeal. The intersection of art and horticulture in bonsai creates a dynamic and expressive art form that continues to be celebrated and appreciated. Today, bonsai trees are not only admired in their native countries but have also gained popularity worldwide, showcasing the cultural significance of a bonsai tree and its artistic value.
Bonsai has deep roots in Asian culture, with its origins in ancient China and its subsequent development and refinement in Japan. The practice of cultivating and shaping miniature trees reflects the reverence for nature and the pursuit of harmony and balance in both cultures.
Exploring the Intersection of Art and Horticulture
Bonsai is a unique art form that seamlessly blends the principles of horticulture with artistic expression. Bonsai artists skillfully shape, prune, and train each tree, bringing forth its inherent beauty and creating living sculptures. The result is a captivating art form that showcases the beauty of nature in a compact and harmonious way.
Historical Importance of Bonsai
Cultural Significance of Bonsai
Bonsai Art Value
Bonsai has a rich history in ancient China and Japan.
Bonsai represents nature’s beauty and the pursuit of harmony and balance.
Bonsai is treasured as a living work of art.
Bonsai originated as penjing in ancient China.
Bonsai was a status symbol and the practice was cultivated by the elite.
Bonsai requires a combination of horticulture and artistic vision.
Bonsai evolved and developed in Japan during the Kamakura period.
Bonsai continues to be celebrated and appreciated worldwide.
Bonsai showcases cultural significance and artistic value.
The Symbolic World of Bonsai: What Do These Mini Trees Represent?
Bonsai trees hold deep symbolism and represent a range of meanings and messages. Each bonsai tree species has its own symbolism, conveying different qualities and values. For example, the Chinese Elm bonsai symbolizes harmony, while the Ficus Retusa represents love and fertility. The Carmona bonsai is a symbol of courage, and the Ligustrum signifies friendship and peace. The Ilex Crenata, or Japanese Holly bonsai, is believed to protect from evil spirits and bring good luck.
The Juniper bonsai represents strength, power, and the ability to overcome challenges. The symbolic world of bonsai allows individuals to connect with nature and express their values and emotions through these miniature trees. Whether given as a gift or displayed in one’s own living space, bonsai trees create a meaningful and symbolic presence.
Bonsai as a Form of Self-Expression and Reflection
Bonsai trees provide a unique platform for self-expression and personal reflection. The art of shaping and styling a bonsai tree allows individuals to express their creativity and artistic vision. Each bonsai tree is a reflection of the artist’s skill and aesthetic preferences. Through the careful pruning and training of the tree, individuals can create a miniature representation of nature that reflects their own values, beliefs, and emotions.
Bonsai trees also require patience and dedication to maintain, providing an opportunity for personal growth and reflection. The act of caring for a bonsai tree can be a meditative practice, allowing individuals to connect with nature and cultivate inner peace. Bonsai trees serve as a reminder to slow down, appreciate the beauty of nature, and find harmony in the present moment.
Integrating a bonsai tree into your living space not only adds a touch of elegance and natural beauty but also allows you to showcase your unique personality and artistic sensibility. The shape, style, and overall design of your bonsai tree can be a reflection of your individuality and serve as a conversation starter. Whether you prefer a traditional formal upright style or a more innovative and creative design, your bonsai tree can serve as a representation of your self-expression and reflect your personal taste.
The Role of Bonsai in Zen Philosophy and Mindfulness Practices
Bonsai Impact on Zen Philosophy and the Art of Patience
Bonsai trees have a deep connection to Zen philosophy and mindfulness practices. In Zen Buddhism, bonsai trees are seen as a tool for meditation and focus. The process of caring for a bonsai tree requires a high level of attention to detail, patience, and discipline, which align with the principles of Zen philosophy.
Shaping and training a bonsai tree requires a deep understanding of the tree’s natural growth patterns and an ability to work in harmony with nature. This practice of mindfulness and sensitivity to the natural world is integral to the art of bonsai and is reflected in the serene and balanced aesthetics of bonsai trees.
Through the act of caring for a bonsai tree, individuals can cultivate a sense of calm, focus, and clarity, ultimately enhancing their overall well-being. The careful observation and nurturing of the bonsai tree’s growth process serve as a form of meditation, helping individuals develop patience and a deep connection to nature. Bonsai trees teach us the importance of embracing the present moment and finding beauty in simplicity.
By practicing the art of bonsai, individuals learn the value of patience and the art of letting things unfold naturally. The slow and deliberate process of shaping a bonsai tree mirrors the journey of personal growth and self-discovery. Bonsai enthusiasts develop a profound appreciation for the beauty that arises from taking the time to cultivate and nurture something over an extended period.
Meditation and the Living Bonsai: Cultivating Inner Peace
Bonsai trees serve as a gateway to mindfulness and the practice of meditation. The process of tending to a bonsai tree, from watering and pruning to shaping and repotting, requires a deep sense of presence and focus. As individuals engage in these tasks, they are encouraged to quiet their minds and immerse themselves in the present moment, fully attuned to the needs of the bonsai tree.
The art of shaping and training a bonsai tree is a meditative practice that fosters a sense of inner peace and tranquility. As individuals work on shaping the tree, they develop a connection with the natural world, cultivating a deep appreciation for its wisdom and beauty. The visual aesthetics of a well-maintained bonsai tree reflect a harmonious relationship between the artist and nature.
The act of meditating with a bonsai tree also promotes a sense of grounding and stability. The serene presence of a living bonsai tree creates a peaceful and calming atmosphere, allowing individuals to find solace and serenity in their daily lives. By observing the intricate beauty of a bonsai tree, one can experience a profound sense of interconnectedness with the larger ecosystem and gain a deeper understanding of the cycles of life and nature.
If you are intruiged about the cultural significance about Bonsai, then you should also explore different types of Bonsai plants
Cultural Significance of Bonsai: From Imperial Courts to Modern Exhibits
Bonsai trees have been revered and cherished throughout history in various cultures. In ancient China and Japan, these miniature trees held a special place in the hearts of the elite and were proudly displayed in imperial courts and revered temples. They were not merely seen as decorative elements but as a reflection of status, refined taste, and a profound appreciation for the beauty of nature.
Over time, the art of bonsai has transcended social boundaries and has become popular among people from all walks of life. Bonsai artists devote their skills and talent to shaping and styling each tree, giving it a unique voice and a narrative of its own. These living sculptures are not just mere plants but convey a sense of connection and storytelling, allowing individuals to engage with them on a deeper level.
The aesthetics of miniaturization in bonsai is truly captivating. The intricate details and delicate balance of a bonsai tree’s design evoke a sense of awe and admiration. These miniature trees capture the essence of nature in a compact and visually engaging form. Each bonsai tree tells a story, showcasing the mastery of the artist and their ability to create a harmonious and captivating representation of nature on a smaller scale.
To demonstrate the cultural significance and artistic value of bonsai, exhibitions and competitions have been held worldwide. These events celebrate the unique blend of horticulture and artistry that bonsai represents. They showcase the diverse styles and techniques employed by bonsai artists to create these captivating living sculptures. Bonsai exhibitions provide an opportunity for individuals to appreciate and immerse themselves in the rich history and aesthetic appeal of these miniature trees.
By exploring the cultural significance of bonsai and its evolution from imperial courts to modern exhibits, we gain a deeper understanding of the historical importance of bonsai and its enduring appeal as an art form.
“Bonsai trees are not mere plants; they are stories waiting to be told, capturing the beauty of nature in a captivating, miniaturized form.”
Bonsai Historical Significance
Bonsai Aesthetic Appeal
Cultural Influence
Originated in ancient China and Japan
Delicate balance and intricate details
Treasured by imperial courts and temples
Symbol of status and refined taste
Miniaturization captures nature’s essence
Influenced by Zen philosophy and mindfulness practices
Evolved into a popular art form
Artistic expression through shaping and styling
Worldwide exhibitions showcase bonsai artistry
The Artistic Energy of Bonsai: Techniques and Styles Through Time
The art of bonsai encompasses a wide range of techniques and styles that have evolved over time. Bonsai artists employ various pruning, wiring, and shaping techniques to create the desired form and aesthetic appeal of the tree.
Traditional bonsai styles include formal upright, informal upright, slanting, cascade, semi-cascade, and windswept, each representing different natural growth patterns. Bonsai trees can also be styled to resemble specific landscapes, such as mountains or forests.
The techniques and styles used in bonsai reflect the artist’s creativity, skill, and vision, resulting in diverse and captivating artistic expressions. Throughout history, the art of bonsai has seen the emergence of different schools and influential artists who have contributed to the development and refinement of bonsai techniques and styles.
Bonsai Technique
Description
Pruning
Trimming and shaping branches and foliage to achieve the desired form and size.
Wiring
Using wire to bend and position branches and trunks, creating curvature and movement in the tree.
Shaping
Manipulating the growth of the tree by directing branches and foliage in specific directions using wire and other techniques.
“Bonsai is like a blank canvas for artists, allowing them to sculpt and create living masterpieces.”
Symbolism in Bonsai Varieties: Uncovering the Messages Within
Each bonsai tree species carries its own symbolism and conveys specific messages and meanings. Decoding the symbolism behind different bonsai species allows individuals to connect with these miniature trees on a deeper level. For example, the Chinese Elm represents harmony and balance, while the Ficus Retusa symbolizes love and fertility. The Carmona bonsai signifies courage, and the Ligustrum embodies friendship and peace. The Ilex Crenata, or Japanese Holly bonsai, is believed to bring good luck and protect from evil spirits.
Gifting a bonsai tree to someone holds great significance and expresses friendship, respect, and even luck. Bonsai trees serve as thoughtful and unique gifts, symbolizing companionship and bringing joy to the recipient’s life.
Integrating Bonsai Into Your Living Space: Tips for Harmony and Aesthetic Appeal
Integrating bonsai trees into your living space can transform your home into a serene and visually captivating oasis. Whether you have a spacious outdoor area or a cozy indoor space, there are a few essential tips to consider for creating harmony and maximizing aesthetic appeal.
Firstly, when selecting a bonsai tree for your living space, take into account the specific species, size, and care requirements. Some bonsai trees thrive in indoor environments, while others flourish outdoors. Research and choose a species that suits your living space and lifestyle.
Next, find an ideal location in your home for your bonsai tree. Consider the amount of natural light and temperature conditions required by your chosen species. Placing your bonsai near a window or in a well-lit area can ensure its optimal growth. Additionally, maintaining a consistent temperature range will contribute to the tree’s overall health and vitality.
Proper care is key to sustaining the beauty and longevity of your bonsai tree. Follow essential bonsai care tips, such as watering, fertilizing, pruning, and repotting when necessary. Regularly monitor the moisture levels of the soil, as overwatering or underwatering can be detrimental to the health of your bonsai.
Integrating a bonsai tree into your living space is not only a visually appealing addition but also an opportunity for personal growth and connection with nature. As you nurture and care for your bonsai, you will develop a sense of tranquility and fulfillment. Let the presence of a bonsai tree in your home create a calm and harmonious ambiance, bringing the beauty of nature indoors.
This page contains some affiliate links. Please check out our affiliate disclaimer for more information
Karen Phillips, Bonsai expert and blogger. Read more about me here
Welcome to our comprehensive Chinese Elm Bonsai (Ulmus parvifolia) Care Guide. Known for its beauty and resilience, the Chinese Elm Bonsai is a popular choice among bonsai lovers. Its delicate, small leaves, rugged bark, and fine branches make it a stunning addition to any collection. Also, it is one of the fastest growing bonsai species.
Throughout this guide, we will delve into every aspect of Chinese Elm Bonsai care. From understanding the characteristics and origin of this species to mastering pruning and wiring techniques, we’ve got you covered.
Understanding the Chinese Elm Bonsai (Ulmus parvifolia)
The Chinese Elm Bonsai, scientifically known as Ulmus parvifolia, is a popular choice among bonsai enthusiasts. This section will provide a deeper understanding of the characteristics, origin, and versatility of the Chinese Elm Bonsai.
Characteristics and Origin of the Chinese Elm Bonsai
The Chinese Elm Bonsai is known for its unique characteristics that make it a prized bonsai species. It features small, glossy leaves that create a delicate and refined appearance. The tree’s rugged and gnarled bark adds to its charm and provides an aged and weathered look. Additionally, the Chinese Elm Bonsai has fine branches that can be easily trained and styled.
The Chinese Elm Bonsai originated from China, Korea, and Japan, where it thrives in various climates. Its ability to withstand different environmental conditions has contributed to its popularity as a bonsai tree.
Distinguishing between Ulmus Parvifolia and Similar Species
It is essential to differentiate Ulmus parvifolia from similar species to ensure proper care and cultivation. Some species, such as Japanese zelkova and Siberian elm, resemble the Chinese Elm Bonsai but have distinct characteristics. By carefully observing leaf shape, bark texture, and growth patterns, bonsai enthusiasts can accurately identify and care for their Chinese Elm Bonsai.
The Versatility of Chinese Elm Bonsai: Indoor and Outdoor Environments
One of the significant advantages of the Chinese Elm Bonsai is its adaptability to both indoor and outdoor environments. It can thrive indoors when provided with sufficient light and humidity. Alternatively, it can thrive outdoors, where it can benefit from natural sunlight and exposure to the elements. The versatility of the Chinese Elm Bonsai allows bonsai enthusiasts to choose the most suitable environment for their trees based on their preferences and local climate.
Optimal Placement for a Thriving Chinese Elm Bonsai
Proper placement is essential for ensuring the rapid growth and health of your Chinese Elm Bonsai. Whether you prefer to keep it indoors or outdoors, understanding the specific care requirements for each environment is crucial. Additionally, seasonal considerations play a significant role in determining the ideal placement for your bonsai tree.
Indoor Versus Outdoor Care
Chinese Elm Bonsai can thrive both indoors and outdoors, but they require different care approaches. Indoor bonsai care requires attention to factors such as light, humidity, and temperature. Place your Chinese Elm Bonsai near a bright window, preferably facing south or west, to provide sufficient sunlight. Additionally, maintain humidity levels by placing a humidity tray or misting the leaves regularly.
If you choose to cultivate your Chinese Elm Bonsai outdoors, make sure to consider its hardiness zone. While this species is adaptable to various climates, it generally prefers a moderate climate with temperatures ranging between 50°F and 90°F. Protect the bonsai from extreme temperatures and ensure it receives adequate sunlight to promote healthy growth.
Seasonal Considerations for Placement
Each season brings different environmental conditions that directly affect the placement of your Chinese Elm Bonsai. Here are some seasonal considerations to keep in mind:
Spring: During spring, gradually acclimate your bonsai to increased sunlight and higher temperatures. Consider moving it from a partially shaded area to a spot with full sun exposure.
Summer: Protect your Chinese Elm Bonsai from scorching heat by providing shade during the hottest hours of the day. Ensure proper watering to prevent dehydration.
Fall: As the weather cools down, gradually transition your bonsai to a partially shaded area to protect it from frost. Monitor watering needs carefully as the temperature drops.
Winter: Chinese Elm Bonsai can withstand winter temperatures, but it’s important to provide protection from freezing conditions. Place the bonsai in an area sheltered from cold winds and consider insulating the roots with a layer of mulch.
Remember that each bonsai tree is unique, and its response to different placement and care techniques may vary. Observe your Chinese Elm Bonsai closely and make adjustments accordingly to ensure its optimal growth and longevity.
Watering Your Chinese Elm Bonsai Tree
Proper watering is essential for the health and vitality of your Chinese Elm Bonsai. Inadequate or improper watering can lead to root rot, nutrient deficiencies, and overall decline of your bonsai tree. To ensure optimal growth and prevent any watering-related problems, it is important to follow the guidelines below:
Know when to water: It’s crucial to understand the moisture requirements of your Chinese Elm Bonsai. Check the soil regularly by inserting your finger about an inch deep into the soil. If it feels dry, it’s time to water.
Avoid overwatering: Chinese Elm Bonsai prefer slightly moist soil, but they do not tolerate waterlogged conditions. Ensure that the soil is well-draining, and excess water can freely flow out of the drainage holes in the bonsai pot.
Consider the weather: Adjust your watering routine according to the weather conditions. During hot and dry periods, you may need to water your bonsai tree more frequently, while during cooler and humid periods, you may need to reduce watering frequency.
By following these watering guidelines, you can ensure that your Chinese Elm Bonsai receives the right amount of water, promoting healthy growth and maintaining its beauty for years to come.
Feeding and Fertilizing Your Chinese Elm Bonsai
Feeding and fertilizing your Chinese Elm Bonsai is crucial for providing it with the necessary nutrients for growth. Just like any other plant, bonsai trees require regular feeding to support their health and vitality. In this section, we will guide you on selecting the right fertilizer for your bonsai tree’s needs and provide recommended fertilization schedules to ensure optimal growth and health of your Chinese Elm Bonsai.
Choosing the Right Fertilizer
When it comes to choosing the right fertilizer for your Chinese Elm Bonsai, it’s important to consider the unique nutritional requirements of bonsai trees. Look for a fertilizer specifically formulated for bonsai or use a balanced, slow-release organic fertilizer that provides essential macro and micronutrients. Opt for a fertilizer with a higher nitrogen content during the growing season to encourage foliage growth, and switch to a balanced formula during the dormant period to support root development.
It’s also essential to avoid overfertilization, as it can lead to nutrient burn and damage the roots. Follow the instructions on the fertilizer packaging and use it sparingly to ensure you’re providing the right amount of nutrients without overwhelming the tree.
Fertilization Schedules for Optimal Growth
Establishing a consistent fertilization schedule is key to promoting the optimal growth and health of your Chinese Elm Bonsai. However, it’s important to note that different fertilization schedules may vary based on factors such as the tree’s age, season, and overall health. As a general guideline, you can follow the recommendations below:
Early Spring: Begin fertilizing when new growth appears, using a balanced, slow-release fertilizer at half the recommended strength. This will provide a nutrient boost as the tree emerges from dormancy.
Spring to Summer: Increase the frequency of fertilization to once every two weeks using a balanced fertilizer. This will support vigorous foliage growth during this active growing period.
Late Summer to Early Fall: Gradually reduce the frequency of fertilization to once every three to four weeks. This transition helps prepare the tree for dormancy and prevents excessive growth that may be vulnerable to winter damage.
Winter: Suspend fertilization during the dormant season, as the tree’s metabolic activities slow down. This allows the tree to rest and conserve energy.
Remember to adjust the fertilization schedule based on your tree’s response and overall health. Monitor the growth and vigor, and make any necessary adjustments to the schedule to meet your Chinese Elm Bonsai’s specific needs.
Now that you understand the importance of feeding and fertilizing your Chinese Elm Bonsai, let’s move on to the next section, where we will delve into the essential techniques for pruning and wiring your bonsai tree.
Mastering Pruning and Wiring Techniques for Chinese Elm Bonsai
Pruning and wiring are essential techniques for shaping and maintaining the desired form of your Chinese Elm Bonsai. Proper pruning helps to control growth, encourage branching, and enhance the overall appearance of the tree. Wiring, on the other hand, allows you to bend and position branches to create the desired artistic composition.
To master these techniques for your Chinese Elm Bonsai, follow these step-by-step instructions:
Pruning
Start by observing the overall shape and structure of your bonsai tree. Identify the areas that require pruning to achieve the desired form.
Use sharp and clean pruning shears to make precise cuts. Remember to always make cuts at a slight angle just above a bud or leaf node.
Remove any dead, damaged, or diseased branches to promote a healthier tree.
Thin out overcrowded areas by selectively removing branches to create an open and balanced structure.
Regularly prune to maintain the shape and size of your Chinese Elm Bonsai. This helps to prevent the growth from becoming too dense and maintains the overall aesthetics.
Wiring
Choose the appropriate thickness and flexibility of the wire for the branches you want to shape. Copper wire is commonly used for most bonsai trees.
Begin wiring from the base of the branch, wrapping the wire in a spiral motion along the branch.
Avoid over-tightening the wire to prevent damaging the branch. Leave enough space for the branch to grow and thicken.
Bend the wired branches gently to achieve the desired shape. Take care not to apply excessive force that may break or snap the branch.
Periodically check the wire to ensure it does not cut into the bark. If necessary, adjust or remove the wire to prevent any damage.
Leave the wire on the branches for the appropriate amount of time, typically several months to allow the branch to set in the desired position.
Once the branch has taken the desired shape, remove the wire carefully by unwinding it in the reverse order of installation.
Mastering pruning and wiring techniques for your Chinese Elm Bonsai takes practice and patience. With time and experience, you will develop a keen eye for shaping your bonsai tree precisely and creating stunning compositions.
Remember to always consider the health and vitality of your Chinese Elm Bonsai when pruning and wiring. Avoid excessive pruning that could weaken the tree, and monitor the wired branches to prevent any damage caused by the wire.
By honing your pruning and wiring skills, you can create a meticulously crafted Chinese Elm Bonsai that showcases the artistry of bonsai and brings beauty to any environment.
Essential Techniques for Repotting Chinese Elm Bonsai
The Best Time to Repot
Repotting is a crucial process in the care of Chinese Elm Bonsai that promotes root growth and overall health. Knowing the best time to repot is essential to ensure the success of this procedure. The optimal time for repotting Chinese Elm Bonsai is during the early spring, just before the growth season begins. This allows the tree to recover quickly and establish its roots in the new pot.
How to Prune the Roots
Pruning the roots of Chinese Elm Bonsai is an important step to maintain its health and vigor. When repotting, carefully remove the tree from its current pot and gently comb out the roots to remove any excess soil and detangle them. Trim any damaged or excessively long roots using sharp, sterile bonsai pruning shears. Proper root pruning stimulates new root growth and helps maintain the tree’s compact size.
Choosing Soil and Pots for Your Bonsai
The choice of soil and pots for your Chinese Elm Bonsai is crucial for its growth and development. Use a well-draining bonsai soil mix that provides good aeration and moisture retention. Avoid heavy soils that retain excess water, as they can lead to root rot. Ceramic or unglazed clay pots are ideal for Chinese Elm Bonsai as they allow for proper airflow and water drainage. Select a pot size that accommodates the current root system and provides room for future growth.
Propagating Chinese Elm Bonsai: Methods and Tips
Propagating Chinese Elm Bonsai allows you to create new trees and expand your collection. There are different methods of propagation, including seed propagation and cutting propagation, which we will discuss in this section. With the right techniques and tips, you can successfully propagate your Chinese Elm Bonsai and enjoy the rewards of your efforts.
Seed Propagation
Seed propagation is one method to propagate Chinese Elm Bonsai. To start, collect mature seeds from the tree during the appropriate season. Prepare a well-draining bonsai soil mix, and sow the seeds in small containers or seed trays. Keep the soil evenly moist until germination occurs. This process typically takes a few weeks to a couple of months, depending on the conditions. Once the seedlings are established, transplant them into individual bonsai pots and continue caring for them as they grow.
Cutting Propagation
Another method of propagation is through cuttings. Select healthy branches or shoots from the Chinese Elm Bonsai that are suitable for rooting. These cuttings should be around 4-6 inches in length, with a few sets of leaves. Remove the lower leaves and dip the cut end in rooting hormone to promote root development. Plant the cutting in a well-draining bonsai soil mix and keep it moist. Place a plastic bag or cover over the cutting to create a humid environment, which encourages root growth. After a few weeks, you should notice roots forming. At this point, you can transplant the cutting into a larger pot and allow it to further develop.
Regardless of the method you choose, here are some tips to help you succeed in propagating Chinese Elm Bonsai:
Use a well-draining bonsai soil mix to prevent waterlogging and promote root health.
Keep the soil consistently moist, but avoid overwatering, as it can lead to root rot.
Provide a warm and humid environment for the propagated plants to encourage root development.
Protect the cuttings or seedlings from direct sunlight, as they may be more sensitive to intense light.
Monitor the progress of the propagated plants closely and make necessary adjustments to ensure their success.
With patience and proper care, you can propagate Chinese Elm Bonsai and continue to grow your collection. Experiment with different methods and techniques to find what works best for you. Remember to enjoy the journey of nurturing and shaping these beautiful bonsai trees.
Protecting Your Chinese Elm Bonsai from Pests and Diseases
Protecting your Chinese Elm Bonsai from pests and diseases is crucial for ensuring its overall health and longevity. By implementing effective pest control and practicing preventive care, you can maintain the beauty and vitality of your bonsai tree. Additionally, knowing how to reactively address common diseases will help you promptly resolve any issues that may arise.
Common Pests Affecting Chinese Elm Bonsai
Chinese Elm Bonsai can be susceptible to various pests. It is essential to identify and address these issues early on to prevent significant damage. Some common pests that may affect your bonsai tree include:
Aphids
Scale insects
Spider mites
Caterpillars
Mealybugs
It is important to regularly inspect your Chinese Elm Bonsai for any signs of pest infestation. Look for sticky residue, discoloration, distorted leaves, or webs. If you notice any of these symptoms, take immediate action to control the pests and prevent further damage to your bonsai tree.
Preventive and Reactive Care for Common Diseases
Preventive care is key to keeping your Chinese Elm Bonsai disease-free. By following these practices, you can minimize the risk of diseases impacting your tree:
Ensure proper watering, as overwatering or underwatering can lead to root rot and fungal diseases.
Maintain good air circulation around your bonsai tree to prevent the development of mold and fungal infections.
Regularly clean and sanitize your tools to avoid spreading diseases between plants.
Use high-quality, well-draining soil to prevent the accumulation of excess moisture.
However, despite your best efforts, your Chinese Elm Bonsai may still encounter diseases. Reactively addressing these issues is crucial to prevent their spread. Some common diseases that may affect your bonsai tree include:
Fungal infections
Bacterial infections
Leaf spot diseases
Root rot
When dealing with diseases, it is important to promptly diagnose and treat the specific issue. This may involve removing infected leaves or branches, applying appropriate fungicides or bactericides, or adjusting watering and environmental conditions.
Proper pest control and preventive care are essential in maintaining the health and beauty of your Chinese Elm Bonsai. By regularly inspecting your bonsai tree, implementing preventive measures, and addressing pests and diseases promptly, you can ensure that your Chinese Elm Bonsai thrives for years to come.
Styling and Shaping Your Chinese Elm Bonsai
When it comes to bonsai, styling and shaping your Chinese Elm Bonsai is an art form that allows you to create a masterpiece. One popular technique to achieve the desired look is the clip and grow method. This technique involves selectively pruning and wiring the branches to encourage the growth of new shoots, allowing you to sculpt your bonsai tree according to your vision.
The Art of Bonsai Styling: Clip and Grow Method
The clip and grow method is a fundamental technique used by bonsai enthusiasts to shape and refine their trees. It involves carefully trimming the branches using sharp pruning shears or bonsai scissors, taking into account the desired form and proportions. By strategically removing branches and encouraging growth in specific areas, you can create a bonsai tree with a natural, balanced appearance.
Creating Aesthetically Pleasing Forms
The key to creating aesthetically pleasing forms in your Chinese Elm Bonsai lies in understanding the principles of bonsai design. Balance, asymmetry, and harmony are essential elements to consider when styling and shaping your bonsai tree. By carefully observing the tree’s natural growth patterns and working with its unique characteristics, you can create captivating bonsai forms that evoke a sense of tranquility and beauty.
Remember to regularly prune and wire your Chinese Elm Bonsai to maintain its desired shape. As the tree grows, continues to refine its form by removing unwanted branches and encouraging growth in the desired areas. Patience and attention to detail are key in achieving a well-shaped and visually pleasing bonsai tree.
This page contains some affiliate links. Please check out our affiliate disclaimer for more information
Karen Phillips, Bonsai expert and blogger. Read more about me here
Welcome to our comprehensive guide on caring for and growing orange tree bonsai. Whether you’re a seasoned bonsai enthusiast or just starting your bonsai journey, this guide will provide you with all the information you need to cultivate a healthy and thriving orange tree bonsai.
Orange tree bonsai, also known as miniature citrus trees, are captivating and rewarding plants to grow. Not only do they add a touch of natural beauty to your space, but they also provide you with the opportunity to enjoy the benefits of bonsai cultivation.
In this guide, we will cover essential topics such as providing the ideal positioning for your orange bonsai tree, managing humidity and temperature, choosing the right soil mix, watering effectively, fertilizing properly, repotting when necessary, styling and shaping your bonsai, and more.
With expert tips and step-by-step instructions, you’ll be equipped with the knowledge to care for your orange tree bonsai with confidence. So, let’s dive in and discover the art of orange tree bonsai care together.
Discovering the Calamondin Orange Tree Bonsai
The calamondin orange tree bonsai is a popular choice among bonsai enthusiasts. This unique bonsai variety features evergreen leaves, exquisite fragrant flowers, and small, edible oranges. Its compact size and elegant appearance make it a delightful addition to any bonsai collection.
The Charm of Miniature Citrus Bonsai
Miniature citrus bonsai, like the calamondin orange tree bonsai, exude a distinct charm that captivates bonsai enthusiasts. These diminutive trees offer all the beauty and elegance of their full-sized counterparts, condensed into a delicate and compact form. Miniature citrus bonsai, with their intricate branching structures and intricate foliage, create a sense of tranquility and sophistication wherever they are displayed.
Culinary and Aesthetic Benefits of Calamondin Bonsai
One of the unique benefits of growing a calamondin orange tree bonsai is the opportunity to harvest and enjoy its edible fruit. The small oranges produced by the tree are tangy and flavorful, making them perfect for culinary use. Whether used in salads, beverages, or as a zesty garnish, the edible bonsai fruit adds a delightful touch to any dish.
Aside from their culinary appeal, calamondin bonsai trees also offer aesthetic benefits. Their glossy green leaves, fragrant flowers, and miniature oranges create a picturesque and visually appealing display. The vibrant colors and intricate details of the calamondin bonsai make it a stunning focal point in any bonsai collection or indoor garden.
By cultivating a calamondin orange tree bonsai, you can experience the joy of nurturing a living work of art while enjoying the culinary delights it offers.
The Ideal Positioning for Orange Bonsai Trees
Proper positioning plays a crucial role in the health and growth of orange bonsai trees. Whether you choose to keep your bonsai indoors or outdoors, understanding the optimal placement is essential for its overall well-being.
When positioning your orange tree bonsai, keep in mind the sunlight requirements necessary for its growth. Orange bonsai trees thrive in bright, indirect sunlight. They typically require around 6 to 8 hours of sunlight each day to thrive, but too much direct sunlight can damage their delicate leaves.
Remember to protect your bonsai from scorching afternoon sunlight by providing shade or adjusting the position.
If you decide to keep your bonsai indoors, choose a well-lit area near a window that receives ample indirect sunlight. An east-facing or south-facing window is often ideal to provide the right amount of light for your indoor orange tree bonsai.
On the other hand, if you prefer to keep your bonsai outdoors, find a location that offers a balance of sunlight and shade. Position your orange tree bonsai where it can receive morning sunlight and partial shade during the hottest part of the day.
Remember, proper positioning not only ensures adequate sunlight but also helps regulate the temperature and moisture levels necessary for your bonsai’s growth.
Indoor Bonsai Positioning
Outdoor Bonsai Positioning
Place near an east-facing or south-facing windowEnsure it receives bright, indirect sunlightProtect from scorching afternoon sunlight
Select a location with morning sunlightProvide partial shade during the hottest part of the dayEnsure a balance between sunlight and shade
By carefully considering the positioning of your orange bonsai trees, both indoors and outdoors, you can create the optimal environment for their growth and ensure their long-term success.
Managing Humidity and Temperature for Optimal Growth
Proper management of humidity and temperature is crucial for the health and vitality of your orange tree bonsai. These miniature citrus trees require specific environmental conditions to thrive and mimic their natural habitat. By creating a tropical environment indoors and coping with dry air in winter, you can ensure the optimal growth of your indoor bonsai trees throughout the year.
Create a Tropical Environment Indoors
To provide the ideal humidity levels for your orange tree bonsai, you can take several measures:
Place a humidity tray filled with water and pebbles near your bonsai tree. As the water evaporates, it will increase the surrounding humidity.
Mist the foliage of your bonsai tree regularly using a fine mist spray bottle. This will create a humid microclimate around the tree.
Group your bonsai trees together to create a mini greenhouse effect, where the transpiration from one tree increases the overall humidity.
These techniques will help create a tropical environment that mimics the humidity levels that orange tree bonsai thrive in.
Coping with Dry Air in Winter for Indoor Bonsai Trees
Dry air in winter can pose challenges for indoor bonsai trees, including orange tree bonsai. To cope with dry air and ensure the health of your bonsai, consider the following:
Place a humidifier near your bonsai to increase the moisture levels in the air.
Avoid placing your bonsai near sources of dry heat, such as radiators, as they can further dehydrate the air.
Mist the foliage of your bonsai regularly, especially during periods of dry indoor air.
By addressing the dry air conditions during winter, you can help your indoor orange tree bonsai thrive and prevent the negative effects of low humidity.
Orange Tree Bonsai Soil Preferences
When it comes to the health and growth of your orange tree bonsai, understanding its soil preferences is essential. The right soil mix provides the necessary nutrients, drainage, and pH level for your bonsai to flourish. Let’s explore the ideal soil conditions for your orange bonsai tree.
For orange tree bonsai, it is recommended to use a well-draining soil mix that promotes root health. The soil should have a balanced texture, allowing water to permeate without becoming waterlogged. A suitable soil mix for your orange bonsai can include a combination of organic matter, such as peat moss or compost, and inorganic components like perlite or pumice.
Pro Tip: It’s important to avoid using regular garden soil for your orange bonsai, as it tends to retain excess moisture and can suffocate the roots. Opt for a specialized bonsai soil mix to provide optimal growing conditions.
In addition to the texture and drainage capacity, the acidity level of the soil is crucial for citrus bonsai trees. Orange bonsai, like other citrus varieties, prefer slightly acidic soil with a pH level between 6 and 7. Maintaining the right pH balance is essential for nutrient absorption and overall tree health. You can test the pH level of your soil using a home testing kit or consult with a reputable bonsai supplier for guidance.
Creating the perfect soil environment for your orange tree bonsai may require some experimentation and adjustments. Regularly monitoring the moisture levels and ensuring proper drainage will help prevent waterlogged roots and fungal diseases. Remember to repot your bonsai periodically to refresh the soil and promote healthy root growth.
By paying attention to the soil preferences of your orange tree bonsai, you’ll provide it with the necessary foundation for optimal growth and beauty. Let’s move on to the next section and delve into the art of watering your bonsai.
The Art of Watering an Orange Tree Bonsai
When it comes to caring for your orange tree bonsai, proper watering is an art that requires balance and understanding. Finding the right balance between hydration and avoiding overwatering is crucial for the health and vitality of your bonsai.
Finding the Right Balance
Watering your orange tree bonsai is all about finding the sweet spot where your tree gets enough moisture without drowning its delicate roots. Overwatering can lead to root rot and other fungal diseases, while underwatering can cause the bonsai to wilt and suffer from dehydration.
To find the right watering balance, consider the following factors:
Observe the soil moisture: Stick your finger about an inch into the soil to check for moisture. If it feels moist, wait a little longer before watering. If it feels dry, it’s time to water.
Pay attention to the bonsai’s appearance: If the leaves appear droopy or the soil looks parched, it’s a sign that your bonsai needs water. On the other hand, if the leaves turn yellow or show signs of root rot, you may be overwatering.
Consider the season: Bonsai trees have different watering needs depending on the season. During the warmer months, your tree may need more frequent watering, while in winter, you can reduce the amount of water to prevent waterlogging.
The Impact of Environmental Factors on Watering Schedule
Environmental factors such as temperature and humidity can greatly affect your bonsai’s watering schedule. Understanding these factors is essential for maintaining the proper balance of moisture for your orange tree bonsai.
Temperature: Higher temperatures increase the rate of evaporation, leading to faster drying of the soil. In hot weather, you may need to water your bonsai more frequently to prevent dehydration. Conversely, during cooler temperatures, the soil will take longer to dry, so you’ll need to adjust your watering accordingly.
Humidity: High humidity can slow down the rate of evaporation, which means your bonsai may require less frequent watering. On the other hand, low humidity can cause the soil to dry out faster, necessitating more frequent watering. The use of humidity trays or misting can help regulate the moisture levels around the bonsai.
By closely monitoring the environmental conditions and adjusting your watering practices accordingly, you can ensure that your orange tree bonsai receives the right amount of water at the right time, promoting its health and growth.
Environmental Factors
Watering Frequency
High Temperature
More frequent watering
Low Temperature
Less frequent watering
High Humidity
Less frequent watering
Low Humidity
More frequent watering
Nourishing Your Orange Tree Bonsai With Proper Fertilization
Proper fertilization is essential for the growth and nourishment of your orange tree bonsai. Providing your bonsai with the right nutrients will ensure its health and vitality. Let’s explore the different aspects of bonsai tree fertilization, including choosing the right fertilizer and establishing a feeding schedule.
Choosing the Right Fertilizer
When it comes to citrus bonsai trees like the orange tree bonsai, it’s crucial to select a fertilizer specifically formulated for their needs. Look for a citrus bonsai fertilizer that contains the necessary nutrients to support healthy growth and fruit development. These fertilizers are typically rich in nitrogen, phosphorus, and potassium, as well as micronutrients essential for citrus trees.
Pro tip: Consider using an organic citrus bonsai fertilizer to promote overall soil health and provide a more natural source of nutrients for your bonsai.
The Frequency and Timing of Feeding
Establishing a feeding schedule is essential for maintaining the optimal health of your orange tree bonsai. Citrus bonsai trees typically require regular feeding during the growing season to support their growth, flower production, and fruit development. However, the feeding frequency may vary depending on factors such as the age of your bonsai, its size, and the specific fertilizer used.
As a general guideline, feed your orange tree bonsai every two weeks during the active growing season, from spring to early fall. During the dormant season (late fall and winter), reduce the feeding frequency to once every four to six weeks, as your bonsai’s growth slows down.
Pro tip: Always follow the instructions provided by the fertilizer manufacturer for the best results. Adjust the feeding schedule based on the specific needs of your orange tree bonsai and observe how it responds to the fertilizer.
Providing your orange tree bonsai with proper fertilization is crucial for its growth and vitality. By choosing the right fertilizer and establishing a feeding schedule, you can ensure that your bonsai receives the essential nutrients it needs to thrive. Remember to monitor your bonsai’s response to fertilization and make adjustments as necessary for optimal results.
Benefits of Proper Fertilization for Orange Tree Bonsai
Common Types of Citrus Bonsai Fertilizer
Promotes healthy growth and developmentEnhances flower productionImproves fruit quality and yieldStrengthens overall tree healthPrevents nutrient deficiencies
Recognizing the Need for Repotting and Root Pruning
Repotting and root pruning are crucial aspects of orange tree bonsai care. It is essential to understand when your bonsai requires repotting and the best time to perform this task. Additionally, proper root pruning techniques are vital for maintaining the balance between root growth and overall bonsai health.
The Best Time to Repot
Knowing when to repot your orange bonsai is essential for its long-term health and development. As a general guideline, repotting is typically done every one to two years, depending on the growth rate of your bonsai. However, there are specific signs that indicate your bonsai needs repotting. These signs include:
Roots circling around the edge of the pot
Excessive root growth, causing the pot to become cramped
Poor drainage and water retention issues
Stunted growth or lack of healthy foliage
Observing these signs and regularly assessing the root health of your orange bonsai will help you determine when it’s time for repotting.
Steps for Repotting and Root Trimming
When it’s time to repot your orange tree bonsai, follow these step-by-step instructions to ensure a successful repotting process:
Carefully remove the bonsai from its current pot, gently loosening the root ball.
Examine the roots to identify any unhealthy or excessive growth. Trim away long, thick, or damaged roots using sharp and clean bonsai shears, maintaining a balance between root pruning and preserving the overall health of the tree.
Prepare a new pot with fresh bonsai soil mix, ensuring proper drainage. The soil should be slightly acidic and well-draining to support the growth of your orange bonsai.
Place the bonsai in the new pot, positioning it carefully to optimize its aesthetic appeal.
Fill the gaps around the roots with fresh soil, gently compacting it to provide stability.
Water the bonsai thoroughly, allowing the water to flow out of the drainage holes.
Place the repotted bonsai in a suitable location with the right amount of sunlight and humidity.
Following these steps will ensure that your orange tree bonsai has a healthy root system and is well-prepared for continued growth and development.
The Fundamentals of Styling and Shaping an Orange Tree Bonsai
Styling and shaping play a critical role in the care of orange tree bonsai. By employing bonsai styling techniques, you can create the desired aesthetic for your bonsai, showcasing its elegance and charm. The shaping of branches and foliage allows you to manipulate the growth pattern to achieve a visually appealing result.
To style your orange tree bonsai, it’s important to understand the different techniques and principles involved. Consider the natural growth pattern of citrus trees and select a style that complements it, such as the formal upright style or the informal upright style. These styles accentuate the innate beauty of the bonsai and give it a distinct character.
When shaping your orange tree bonsai, pay attention to the branches and foliage. Prune branches to achieve the desired structure and balance. Use wire to gently guide branches into the desired position, allowing them to set over time. Remember to consider the overall aesthetics of your bonsai and strive for a harmonious balance between branches and foliage.
The art of styling and shaping an orange tree bonsai requires patience and experimentation. As you gain experience, you’ll become more adept at creating beautiful bonsai tree aesthetics. With time and practice, you’ll master the techniques necessary to transform your orange tree bonsai into a stunning work of art.
Pruning and Trimming Techniques for Orange Tree Care
Pruning and trimming are essential for maintaining the health and appearance of your orange tree bonsai. By using proper bonsai pruning techniques, you can shape and encourage healthy growth in your bonsai tree. Here are some tips and guidelines for effective pruning and trimming:
1. Tools for Bonsai Pruning
Use the right tools to ensure clean and precise cuts. Sharp and clean pruning shears, concave cutters, and knob cutters are commonly used for bonsai pruning. These tools allow you to make accurate and controlled cuts without causing unnecessary damage to your bonsai tree.
2. Types of Pruning Cuts
There are several types of cuts used in bonsai pruning. Here are a few common techniques:
Thinning: This involves removing excess branches or foliage to improve airflow and light penetration.
Heading: This involves cutting back a branch or twig to encourage new growth.
Pinching: This involves gently pinching off the tips of new growth to control the overall shape and size of the bonsai tree.
3. Pruning Needs for Orange Tree Bonsai
Orange tree bonsai require regular pruning to maintain their shape and health. Here are a few pruning needs specific to orange tree bonsai:
Remove suckers: Suckers are shoots that emerge from the base of the tree or the roots. They should be removed as they can draw energy away from the main branches and affect the overall health of the bonsai.
Thin out dense foliage: Orange tree bonsai can develop dense foliage, which can limit airflow and light penetration. Thinning out the foliage will help maintain a balanced crown and promote healthy growth.
Shape branches: Pruning can be used to shape and style the branches of your orange tree bonsai. Remove any branches that are crossing or growing in undesirable directions.
4. Timing
Pruning is best done during the tree’s dormant period, usually in late winter or early spring. This allows the bonsai tree to recover and heal before entering the active growing season. Avoid pruning during the hot summer months, as it may stress the tree.
5. Aftercare
After pruning your orange tree bonsai, monitor its progress and ensure it receives proper care. Keep the bonsai well-watered and provide it with adequate sunlight and nutrients.
By mastering the art of bonsai pruning and trimming, you can keep your orange tree bonsai in optimal condition, promoting its health and enhancing its aesthetic appeal.
Orange Tree Bonsai Care During the Winter Months
Winter care is crucial for the survival and health of your orange tree bonsai. As the colder months approach, it’s important to make the necessary adjustments to ensure your bonsai thrives. Two key aspects to focus on during winter are maintaining warmth and light for your bonsai, as well as altering watering and feeding routines accordingly.
Maintaining Warmth and Light for Your Bonsai
During the winter, it’s essential to provide your orange tree bonsai with adequate warmth and light. If your bonsai is kept indoors, place it in a well-lit area, preferably near a south-facing window to maximize sunlight exposure. Supplemental grow lights can also be used to provide the necessary light intensity.
For outdoor bonsai, it’s crucial to protect them from freezing temperatures. Consider utilizing protective coverings, such as frost blankets or cold frames, to shield your bonsai from harsh weather conditions. Additionally, you can move your bonsai to a sheltered location, such as a porch or greenhouse, to provide extra warmth and protection.
Altering Watering and Feeding Routines Seasonally
Watering and feeding routines should be adjusted to accommodate the seasonal changes during winter. As the temperature drops, the water requirements of your bonsai decrease. Be sure to monitor the moisture level of the soil and water only when the top inch feels dry. Overwatering can lead to root rot and other diseases.
In terms of feeding, decrease the frequency of fertilization during the winter months. The reduced growth rate of your bonsai during this period means it requires fewer nutrients. Adjust the feeding schedule to provide fertilizers with lower nitrogen content and focus on phosphorous and potassium, which promote root development and overall health.
By implementing these winter care practices, you can ensure the continued vitality and well-being of your orange tree bonsai throughout the colder months. Remember to monitor your bonsai’s temperature, light exposure, watering, and feeding routine to provide the optimal conditions for its growth and survival during winter.
Dwarf Orange Tree Bonsai: Miniaturization at its Best
Dwarf orange tree bonsai offer a perfect miniaturization of these beautiful citrus trees. With their compact size and stunning aesthetic appeal, they are a delightful addition to any bonsai collection. These miniature citrus trees capture the essence of their larger counterparts in a small package, making them an ideal choice for bonsai enthusiasts looking to create captivating displays.
With proper cultivation and care, dwarf orange tree bonsai can thrive and showcase their unique qualities. By maximizing their potential as captivating bonsai specimens, you can create an enchanting miniature world of citrus trees.
Embrace the beauty of miniature citrus trees with dwarf orange bonsai. Their delicate foliage, petite proportions, and vibrant fruit offer a truly enchanting experience for bonsai enthusiasts of all levels. Whether you’re a beginner or an experienced bonsai cultivator, the dwarf orange bonsai is sure to captivate and delight.
Citrus Bonsai Tree Varieties Suitable for Bonsai
When it comes to bonsai cultivation, citrus bonsai tree varieties offer a diverse range of options to explore. These miniature citrus trees not only add beauty to your bonsai collection but also provide unique characteristics and appeal. Let’s delve into the world of citrus bonsai and discover the fascinating qualities they possess.
Characteristics of the Calamondin Bonsai
One of the most popular citrus bonsai varieties is the calamondin bonsai. This delightful tree features glossy, dark green leaves, fragrant white flowers, and small, round fruits that resemble miniature oranges. The calamondin bonsai is known for its hardiness and ability to adapt to both indoor and outdoor environments, making it an excellent choice for beginners and experienced enthusiasts alike. With its beautiful foliage and edible fruits, the calamondin bonsai is a true delight to behold.
Bonsai Potential of Miniature Citrus Types
Aside from the calamondin bonsai, there is a wide array of miniature citrus types that possess great bonsai potential. From the vibrant colors of the kumquat bonsai to the unique foliage of the yuzu bonsai, each variety offers its own distinct charm. These miniature citrus trees can be styled and shaped in various bonsai techniques, allowing you to create fascinating compositions that reflect your personal aesthetic. Explore the possibilities and find the perfect citrus bonsai variety that resonates with your vision.
Citrus Bonsai Variety
Characteristics
Lemon Bonsai
Distinctive fragrance, glossy leaves, and small fruits
Orange Bonsai
Vibrant foliage, fragrant flowers, and miniature oranges
Lime Bonsai
Fragrant leaves, small green fruits, and compact growth habit
Grapefruit Bonsai
Large leaves, fragrant flowers, and miniature grapefruits
Tangerine Bonsai
Fragrant blossoms, glossy leaves, and petite tangerines
Explore the captivating world of citrus bonsai varieties and discover the endless possibilities they offer. Whether you choose the popular calamondin bonsai or opt for a different miniature citrus type, cultivating these trees as bonsai specimens will bring joy and beauty to your gardening experience.
Dealing with Pests and Diseases in Orange Bonsai Care
Pests and diseases can pose challenges to the health and vitality of your orange tree bonsai. It is essential to identify and manage them effectively to maintain a healthy and pest-free environment for your bonsai.
Common Citrus Pests
There are several pests that can affect citrus bonsai trees. Familiarize yourself with the following common citrus pests:
– Aphids: These small insects feed on the sap of the bonsai, causing leaf curling and yellowing. – Scale Insects: They appear as small, immobile bumps on the bonsai branches and leaves. – Spider Mites: These tiny pests cause yellowing and stippling of the foliage. – Citrus Leafminers: The larvae of citrus leafminers create winding trails on the leaves, affecting their aesthetics and health.
Preventative Measures and Solutions
To prevent and control pests in your orange bonsai, consider the following preventative measures and solutions:
Maintain a clean and tidy bonsai environment to minimize pest infestations.
Regularly inspect your bonsai for signs of pests, such as yellowing leaves, distorted growth, or the presence of insects.
Isolate any infested bonsai to prevent the spread of pests to other trees.
Use organic pest control methods, such as neem oil or insecticidal soaps, to treat infestations.
Monitor the humidity levels around your bonsai, as some pests thrive in high humidity.
Encourage beneficial insects, such as ladybugs, lacewings, and parasitic wasps, which can help control pest populations.
By implementing these preventative measures and taking swift action to address any pest issues, you can ensure the continued health and vitality of your orange tree bonsai.
Orange Tree Bonsai: A Rewarding Endeavor for Beginners
Are you a beginner in the world of bonsai cultivation? Embark on a fulfilling and rewarding bonsai journey with the beauty of orange tree bonsai. Whether you have a green thumb or are new to gardening, orange tree bonsai offer an excellent opportunity to explore the art of bonsai and experience the joy of nurturing a living masterpiece.
To start your orange bonsai journey, it’s important to select a healthy specimen. Look for a young orange tree with vibrant foliage and well-developed branching structure. This will provide a solid foundation for your bonsai and make the nurturing process easier for beginners like you.
Understanding the basic care needs of your orange tree bonsai is crucial. Provide the ideal positioning for your bonsai, ensuring it receives ample sunlight and the right temperature. Additionally, learn the art of watering, fertilizing, and repotting your bonsai when necessary. These fundamental practices will help your orange tree bonsai thrive and ensure its long-term health.
Mastering styling and shaping techniques is one of the most rewarding aspects of orange tree bonsai care. With patience and practice, you can create unique and captivating designs that reflect your personal aesthetic. Experiment with different styles and techniques, and let your creativity blossom as you shape and manipulate your orange tree bonsai to perfection.
This page contains some affiliate links. Please check out our affiliate disclaimer for more information
Karen Phillips, Bonsai expert and blogger. Read more about me here
Choosing the right soil is crucial for the health and vigor of bonsai trees. The quality of soil directly affects the growth and overall well-being of the plant.
Using garden soil can be harmful as it tends to harden when dry, making watering difficult. Good bonsai soil should have a balance of water retention, drainage, and aeration.
Organic and inorganic soils are the two main categories to consider. Organic soil components, such as peat and compost, break down over time and reduce drainage. In contrast, inorganic components like fired clays and volcanic rocks provide better drainage and aeration.
Popular soil ingredients for bonsai include Akadama, pumice, lava rock, organic potting compost, and fine gravel. Different tree species require different soil mixtures, such as deciduous bonsai soil and coniferous bonsai soil.
It is important to personalize your soil mix based on your tree’s needs and evaluate commercial bonsai tree soil mixes. Additionally, climate and pH levels play a role in adapting soil mixtures for bonsai.
Regular assessment and amendments are necessary for maintaining healthy bonsai tree soil. Insights from expert bonsai cultivators can provide valuable information on soil choices, and troubleshooting common issues with bonsai soils is essential. Tips for finding quality soil ingredients online and locally will help bonsai enthusiasts source the best soil for their trees.
The Importance of Choosing the Right Soil for Bonsai
The quality of soil directly impacts the health and vigor of bonsai trees. Choosing the right soil is crucial for their overall well-being. Soil provides the necessary nutrients, water, and aeration for the roots to grow and thrive. Poor soil quality can lead to stunted growth, root rot, and even the death of the bonsai.
Why Soil Quality Matters for Bonsai Health and Vigor
The importance of soil quality cannot be overstated when it comes to the health and vigor of bonsai trees. High-quality soil ensures that the roots receive the necessary nutrients, water, and oxygen they need to thrive. Good soil composition promotes robust root development, which is essential for overall tree health and growth. It also improves the tree’s ability to withstand environmental stressors and disease.
The right soil provides a balanced environment for the roots, allowing for proper water retention, drainage, and aeration. This balance ensures that the tree’s roots are neither waterlogged nor deprived of moisture. It allows for optimal nutrient uptake and prevents the risk of root rot and other root-related issues. When the soil quality is poor, the bonsai tree may suffer from nutrient deficiencies, weakened immune system, and reduced overall vitality.
By choosing the right soil for your bonsai, you can provide the optimal conditions for its growth, ensuring that it remains healthy and vibrant for years to come.
Dangers of Using Garden Soil for Bonsai Trees
Using garden soil for bonsai trees can pose several dangers to their health. Garden soil tends to harden when dry, making it difficult to water the bonsai properly. It lacks the necessary balance of water retention, drainage, and aeration that is essential for the health of bonsai trees.
Furthermore, garden soil may contain weeds, pests, and diseases that can harm the bonsai. Contaminated soil can introduce harmful pathogens and pests that can weaken and even kill the tree. Additionally, garden soil may not provide the ideal nutrient composition required for bonsai tree growth, leading to nutrient deficiencies.
For these reasons, it is crucial to avoid using garden soil and instead opt for specially formulated bonsai tree soil that meets the specific needs of your tree.
Understanding Bonsai Soil Composition
Bonsai soil composition plays a crucial role in the overall health and vitality of your bonsai tree. To create an ideal environment for your bonsai, it’s important to understand the characteristics of good bonsai soil mixes and the balance of water-retention, drainage, and aeration.
Good bonsai soil mixes have the following characteristics:
Water retention: Bonsai soil should have the ability to hold sufficient moisture for the tree between waterings. This helps prevent the roots from drying out and provides essential hydration.
Drainage: Proper drainage is essential to prevent waterlogging and root rot. Excess water should be able to flow out of the pot easily, ensuring the well-being of the bonsai.
Aeration: Aeration is crucial for the root system as it allows oxygen to reach the roots, promoting healthy growth. Bonsai soil should provide adequate airflow to the roots, facilitating nutrient absorption and overall tree health.
By achieving the right balance of these characteristics in your bonsai soil mix, you can create an optimal environment for the growth and development of your bonsai tree.
Organic vs. Inorganic Bonsai Soils
When it comes to choosing the right soil for your bonsai, you have two main options: organic and inorganic. Each type of soil has its own unique characteristics and benefits that can significantly impact the health and growth of your bonsai tree.
Pros and Cons of Organic Soil Components
Organic bonsai soil is composed of natural materials such as peat, compost, and bark. These components offer some advantages but also come with a few drawbacks.
Pros of organic soil components:
Improved water retention: Organic materials have the ability to hold moisture, ensuring that your bonsai tree receives adequate hydration between watering sessions.
Nutrient supply: Organic soil components slowly release nutrients over time, providing a steady source of nourishment for your bonsai.
Cons of organic soil components:
Drainage issues: Over time, organic materials can break down and become compacted, reducing the soil’s drainage capabilities. This can lead to waterlogging and root rot if not managed properly.
Decomposition: As organic components decompose, they can create smaller particles that further reduce drainage and aeration. This can negatively impact the health of your bonsai’s roots.
While organic soil can be beneficial, it requires regular monitoring and potential amendments to maintain optimal conditions for your bonsai.
Benefits of Inorganic Components for Drainage and Aeration
Inorganic bonsai soil, on the other hand, is composed of materials such as fired clays and volcanic rocks. These components offer several benefits that contribute to improved drainage and aeration.
Benefits of inorganic soil components:
Enhanced drainage: Inorganic materials do not decompose like organic ones, ensuring that water flows through the soil and does not become stagnant. This helps to prevent root rot and other water-related issues.
Improved aeration: Inorganic components create air pockets in the soil, allowing oxygen to reach the roots. This promotes healthy root growth and overall tree vigor.
Stability: Inorganic materials provide stability to the soil structure, preventing compaction and maintaining open spaces for root development.
Inorganic soil components offer long-term benefits for bonsai trees, as they do not degrade over time like organic materials. They provide a stable and well-draining environment for healthy root growth.
Top Inorganic Soil Ingredients for Bonsai
Inorganic soil ingredients play a significant role in creating a well-draining and aerated bonsai soil. These ingredients provide the necessary structure and balance for the roots to thrive. Two popular inorganic soil ingredients for bonsai are fired clays and volcanic rocks.
Discovering the Role of Fired Clays and Volcanic Rocks
Fired clays, such as Akadama, are specifically produced for bonsai purposes. Akadama has unique properties that make it an excellent choice for bonsai tree soil. It helps improve water retention while providing adequate drainage and aeration. When sifted and used in a mix, Akadama creates an optimal environment for bonsai tree roots to grow and expand.
Volcanic rocks, including pumice and lava rock, also play a vital role in bonsai soil mixes. These rocks contribute to the overall drainage and aeration of the soil. Pumice, in particular, is known for its ability to retain water and nutrients while promoting root ramification. This helps create a healthy and robust root system for bonsai trees.
By incorporating fired clays like Akadama and volcanic rocks into your bonsai soil mix, you can ensure proper drainage, aeration, and water retention – key factors in maintaining the health and vitality of your bonsai trees.
Inorganic Soil Ingredient
Role in Bonsai Soil
Unique Properties
Akadama
Improves water retention, drainage, and aeration
Specifically produced for bonsai purposes
Pumice and lava rock
Contribute to drainage and aeration
Retains water and nutrients, promotes root ramification
How the Right Bonsai Soil Affects Watering and Feeding
The right bonsai soil composition plays a crucial role in watering and feeding practices. Well-draining soil allows for proper water flow through the pot, preventing waterlogging and ensuring the roots receive sufficient hydration without rotting.
Adequate drainage also helps in nutrient absorption by preventing nutrient buildup that can lead to salt accumulation and root damage. Bonsai tree soil with good aeration allows the roots to breathe and uptake nutrients effectively. The right soil composition, therefore, directly affects the watering and feeding routines necessary for the bonsai’s optimal health and growth.
The Scoop on Organic Potting Composts and Bonsai
When it comes to creating the perfect soil mix for your bonsai, organic potting compost can play a vital role. This type of compost is typically a blend of organic materials that can enhance the overall health and growth of your bonsai trees.
When to Use Peat, Perlite, and Sand in Your Bonsai Mix
Within the organic potting compost, three key components that are commonly used in bonsai soil mixes are peat, perlite, and sand. Each of these components serves a specific purpose in creating a well-balanced bonsai mix.
Peat: Peat is known for its excellent water retention capabilities. Adding peat to your bonsai mix can help ensure that your trees receive adequate moisture between waterings, promoting healthy root development.
Perlite: Perlite is a lightweight volcanic rock that improves drainage and aeration. It helps prevent waterlogging and ensures the roots have access to oxygen, which is crucial for their overall health and vigor.
Sand: Sand aids in drainage and provides stability to the soil mix. Additionally, it contributes to aeration, allowing airflow through the roots and promoting healthy root growth.
When using these organic components in your bonsai mix, it’s important to consider the specific needs of your bonsai species and the desired characteristics of the soil mix. The proportions of peat, perlite, and sand can be adjusted based on these factors, allowing you to create an optimal growing environment for your bonsai trees.
A Review of Popular Bonsai Soil Mixes
Choosing the right soil mix is essential for the health and vitality of your bonsai trees. Different tree species have specific soil requirements to support their growth. In this section, we will explore the recommended soil mix ratios for deciduous bonsai and coniferous and pine bonsai.
Deciduous Bonsai Soil Mix Ratios
Deciduous bonsai trees, such as maple and elm, thrive in a soil mix that provides the right balance of water retention, drainage, and aeration. The recommended soil mix ratio for deciduous bonsai is typically 50% Akadama, 25% pumice, and 25% lava rock. This composition allows for adequate water retention while ensuring proper drainage and aeration for the roots.
Coniferous and Pine Bonsai Soil Formulations
Coniferous and pine bonsai have different soil formulation requirements compared to deciduous trees. The recommended soil mix for these bonsai types generally consists of equal parts Akadama, pumice, and lava rock, each comprising approximately 33% of the mix. This balanced composition provides the ideal conditions for coniferous and pine bonsai, promoting healthy root development and overall tree health.
It is important to note that these soil mix ratios may vary based on the specific needs of your tree and your personal preferences as a bonsai cultivator. Experimentation and observation are key to finding the perfect soil mix that best suits your bonsai’s requirements.
Custom Mixes vs. Pre-Made Soil
Bonsai enthusiasts have the option to create custom soil mixes or purchase pre-made bonsai soil mixes. Custom mixes allow you to personalize your bonsai tree soil to meet the specific needs of your tree. By adjusting the proportions of different soil components, you can achieve the perfect balance of water retention, drainage, and aeration for your bonsai. This personalized approach ensures that your tree receives the optimal growing conditions it requires.
On the other hand, pre-made bonsai soil mixes offer convenience and consistency. These mixes are specifically formulated for bonsai cultivation, saving you time and effort in creating your own custom mix. They often contain a well-balanced blend of soil components that provide the necessary properties for healthy bonsai growth.
When evaluating commercial bonsai soil mixes, it’s important to consider the quality of the components. Look for mixes that use high-quality soil ingredients to ensure the long-term health of your bonsai. Consider the reputation of the manufacturer and read reviews or seek feedback from other bonsai growers to determine the effectiveness of the soil mix.
Ultimately, the choice between custom and pre-made bonsai soil mixes depends on your preferences and the specific needs of your tree. Some bonsai enthusiasts enjoy the creative process of customizing their own soil mix, while others prefer the convenience and reliability of pre-made mixes. Whatever option you choose, the most important factor is to prioritize the health and well-being of your bonsai by providing it with the best soil possible.
How to Adapt Bonsai Soil Mixtures for Your Climate
Climate plays a significant role in the adaptation of bonsai soil mixtures. Factors such as rainfall, wind exposure, and watering habits need to be considered when creating the ideal soil mix for your bonsai tree.
Accommodating for Rainfall
In regions with heavy rainfall, it is important to adjust the soil mix to allow for faster drainage and prevent waterlogging. Excessive moisture can lead to root rot and other health issues. By incorporating components that promote better drainage, such as pumice or lava rock, you can create a soil mix that can effectively handle the increased rainfall.
Managing Wind Exposure
Areas with high winds can cause the soil to dry out quickly, resulting in poor water retention. To counteract this, you may need to include components in your bonsai soil mix that help retain more moisture, such as Akadama or organic potting compost. These materials can help create a more stable moisture level and prevent your bonsai from drying out too quickly.
Adjusting Watering Habits
Your watering habits should also align with the climate you are in. In drier climates, you may need to water your bonsai more frequently to compensate for the lack of natural rainfall. This may require a soil mix that retains moisture for longer periods, such as one with higher proportions of Akadama or organic potting compost.
Understanding the specific needs of your bonsai tree in relation to the climate it is grown in is crucial for creating the most suitable soil mix. By adapting your bonsai soil mixtures to accommodate factors like rainfall, wind exposure, and watering habits, you can provide optimal growing conditions for your bonsai and ensure its health and vitality.
pH Levels and Their Impact on Bonsai Soil Mixes
The pH levels of the soil have a significant impact on the quality and health of bonsai soil mixes. pH refers to the acidity or alkalinity of the soil, and it plays a vital role in nutrient availability to the roots of bonsai trees. The pH level directly affects the absorption and uptake of essential minerals necessary for the bonsai’s growth and development.
Different bonsai species have distinct pH requirements to thrive optimally. Some species prefer acidic soil, while others thrive in neutral or slightly alkaline conditions. Understanding the specific pH requirements of your bonsai tree is essential for selecting the appropriate soil mix and creating the ideal growing environment. By providing the right pH levels, you can ensure that your bonsai tree has access to the nutrients it needs to flourish.
When determining the pH levels of your bonsai tree soil, it is crucial to conduct regular soil testing. This will give you valuable insights into the acidity or alkalinity of the soil and allow you to make any necessary adjustments. pH testing kits are readily available and easy to use, enabling you to monitor and maintain the optimal pH levels for your bonsai trees.
Creating a Bonsai Soil Mix: A Step-by-Step Guide
Creating the ideal soil mix for your bonsai is essential for its growth and overall health. The right balance of water retention, drainage, and aeration is key to providing the necessary environment for your bonsai tree to thrive. Here is a step-by-step guide to help you create a bonsai soil mix that meets your tree’s needs:
Start with a base material: Begin by selecting a high-quality base material that provides good drainage. Akadama, a fired clay soil component, is a popular choice for bonsai soil mixtures. It offers excellent water retention while allowing adequate drainage.
Add an aggregate for improved aeration: To enhance aeration, incorporate an aggregate material into the mix. Pumice and lava rock are commonly used aggregates that provide air pockets within the soil, promoting root health and oxygen circulation.
Include organic matter for nutrient retention: To ensure your bonsai receives the necessary nutrients, add organic matter to the soil mix. This can include components such as compost or a high-quality organic potting mix. Organic matter helps retain nutrients and promotes microbial activity in the soil.
Customize ratios based on tree species: Different bonsai species have varying needs when it comes to soil composition. Research the specific requirements of your tree species and adjust the ratios of the base material, aggregate, and organic matter accordingly.
Blend thoroughly: Combine the base material, aggregate, and organic matter in a large container or on a tarp. Thoroughly mix the components together until they are well-blended and evenly distributed throughout the soil.
Test the soil mix: Before using the soil mix for your bonsai, perform a simple test to ensure it has the desired characteristics. Squeeze a handful of the soil mix in your hand and then release. It should hold its shape briefly before crumbling. This indicates a good balance of water retention and drainage.
Adjust as needed: If the soil mix is too sandy and doesn’t retain enough water, add more organic matter. If it retains too much water and is clay-like, increase the amount of aggregate. Continuously test and adjust the soil mix until you achieve the desired properties.
Creating a bonsai soil mix may require some experimentation and adjustment to find the perfect blend for your tree’s specific needs. By following this step-by-step guide, you can create a well-balanced soil mix that provides optimal conditions for your bonsai’s growth and longevity.
The Role of Mycorrhizae in Bonsai Soil Health
Mycorrhizae play a vital role in ensuring the health and vitality of bonsai soil. These beneficial fungi establish a mutually beneficial relationship with the roots of bonsai trees, providing numerous advantages. By forming a network of hyphae, mycorrhizal fungi enhance nutrient absorption by the roots, making them more efficient in acquiring essential elements from the soil. They also aid in water absorption, improving the tree’s ability to utilize moisture effectively.
Incorporating mycorrhizal fungi into the bonsai soil mix can have a profound positive impact on the overall health and growth of the tree. These fungi not only enhance nutrient uptake but also contribute to root development, increasing the root surface area and enabling optimal nutrient and water absorption. The symbiotic relationship between mycorrhizal fungi and bonsai trees ultimately results in improved vigor, resilience, and longevity.
To ensure the presence of mycorrhizae in your bonsai tree soil, you can either introduce them through commercially available inoculants or promote their natural colonization by maintaining a healthy and diverse soil ecosystem. By providing a suitable habitat and proper care, you can encourage the growth and establishment of mycorrhizal fungi in your bonsai soil, reaping the benefits of this symbiotic relationship.
In the journey to maintain bonsai soil health, understanding the role of mycorrhizae and actively incorporating them into your soil mix can significantly contribute to the long-term success of your bonsai trees.
DIY Bonsai Soil Mixes: Ingredients to Avoid
Creating your own bonsai soil mix can be a cost-effective and rewarding way to care for your bonsai tree. However, it’s important to be aware of certain ingredients that should be avoided to ensure the health and well-being of your tree.
When selecting soil components for your DIY bonsai soil mix, keep in mind the following common mistakes and ingredients to avoid:
Garden Soil: Garden soil is not suitable for bonsai trees as it tends to compact and harden when dry, making it difficult for water to penetrate and drain properly. It also lacks the necessary balance of water retention, drainage, and aeration that bonsai trees require.
Topsoil: Similar to garden soil, topsoil is not ideal for bonsai trees due to its poor drainage and potential for compaction. It may also contain weed seeds, pests, and diseases that can harm your bonsai.
Low-Quality Potting Mix: Using a low-quality potting mix can lead to various issues such as poor drainage, compaction, and inadequate aeration. It’s essential to select a high-quality potting mix specifically formulated for bonsai or opt for individual soil components.
By avoiding these ingredients and selecting high-quality soil components, you can create a DIY bonsai soil mix that provides the necessary water retention, drainage, and aeration for your tree’s optimal growth.
Testing and Adjusting Your Bonsai Soil Over Time
Regularly testing and adjusting your bonsai soil is essential for maintaining optimal soil conditions to promote the health and vitality of your bonsai trees. By assessing the water retention, drainage, and aeration of the soil, you can make necessary adjustments to ensure your bonsai’s long-term well-being.
Observing how your bonsai tree responds to watering is a practical way to assess the water retention of the soil. By observing the moisture levels in the pot and the time it takes for the soil to dry out after watering, you can determine if the soil is retaining too much or too little water. If the soil retains too much water, it can lead to root rot and other moisture-related issues.
On the other hand, if the soil dries out too quickly, it may indicate poor water retention, which can negatively impact the tree’s health. Adjusting the proportions of specific components in your soil mix, such as increasing the percentage of organic matter for better water retention or adding inorganic materials for improved drainage, can help achieve a balanced water retention level.
In addition to assessing water retention, it is crucial to evaluate the drainage and aeration of your bonsai soil. Proper drainage allows excess water to flow out of the pot, preventing waterlogging and the development of root rot. If you notice that water takes a long time to drain or remains stagnant in the pot, it is an indicator that the soil mix may need adjustment.
Similarly, inadequate aeration can hinder root growth and nutrient absorption. If you find that the soil is compacted or lacks sufficient aeration, you can consider incorporating materials like volcanic rocks or pumice into your soil mix to improve aeration and prevent compaction.
Regular assessment and adjustment of your bonsai soil composition ensures that your tree’s specific needs are met, resulting in healthier and more vibrant growth.
Soil amendments are another important aspect of maintaining optimal bonsai soil conditions. As your bonsai tree grows, it may require additional nutrients to support its development. By periodically incorporating organic matter, such as compost or slow-release fertilizer, into the soil, you can provide essential nutrients that promote healthy root growth and overall tree health.
It is advisable to research the specific nutrient requirements of your bonsai species and consult with experienced bonsai cultivators to determine the most suitable amendments for your tree’s needs.
Regularly testing and adjusting your bonsai soil composition ensures that your tree’s specific needs are met, resulting in healthier and more vibrant growth. By closely monitoring the water retention, drainage, and aeration of the soil, and making necessary adjustments and amendments, you can create an optimal soil environment that supports the overall health and longevity of your bonsai trees.
Troubleshooting Common Issues with Bonsai Soils
Bonsai soils, like any other type of soil, can sometimes present challenges and issues that need to be addressed for the health and well-being of the tree. Understanding common issues and knowing how to fix them is essential for maintaining the overall health and vitality of your bonsai. Here are some common problems with bonsai soils and tips for troubleshooting:
Poor Drainage
Poor drainage is a common issue with bonsai soils. If the soil retains too much water and doesn’t drain properly, it can lead to root rot and other problems. To improve drainage, you can:
Assess your soil mix: Check if there is an imbalance of components that could be causing poor drainage. Adjust the proportions of organic and inorganic materials accordingly.
Increase aeration: Incorporate inorganic components like pumice or volcanic rocks into the soil mix to promote better aeration and drainage.
Amend the soil: If the soil is too compacted, add coarse sand or perlite to loosen it up and improve drainage.
Compacted Soil
Compacted soil can hinder root growth and prevent proper water and nutrient absorption. To address compacted soil:
Aerate the soil: Gently loosen the soil around the roots using a root hook or chopstick. Be careful not to damage the roots in the process.
Repotting: If the soil is severely compacted, consider repotting the bonsai. Replace the old soil with fresh, well-draining soil to promote healthy root growth.
Excessive Water Retention
Excessive water retention can result in waterlogging, leading to root rot and other issues. Here’s how you can tackle this problem:
Assess soil composition: Check if the soil mix contains organic components that have broken down and are holding too much water. Adjust the soil mix by reducing the organic component and increasing the inorganic material.
Add inorganic materials: Incorporate materials like pumice or lava rock into the soil mix to improve drainage and reduce water retention.
Watering practices: Adjust your watering schedule and ensure that you’re not overwatering the bonsai. Allow the soil to dry out slightly between waterings to prevent waterlogging.
Inadequate Aeration
Inadequate aeration can hinder root development and inhibit the uptake of oxygen, leading to poor tree health. To enhance aeration:
Assess soil structure: Check if the soil mix is compacted or if the particles are too fine. Incorporate coarse materials like pumice or perlite into the mix to improve aeration.
Repotting: If the existing soil is preventing proper aeration, consider repotting the bonsai with fresh, well-aerated soil.
By troubleshooting common issues with bonsai soils, you can ensure that your bonsai trees have the optimal growing environment they need to thrive.
This page contains some affiliate links. Please refer to our affiliate disclaimer for more information
Karen Phillips, Bonsai expert and blogger. Read more about me here
If you’re a bonsai enthusiast, you know the joy that comes with cultivating and nurturing miniature trees. Bonsai trees have been an integral part of Japanese culture for centuries, and today, they’re popular all over the world. There are various types of bonsai plants, each with unique characteristics and requirements.
From indoor plants to outdoor trees, beginner-friendly varieties to rare and exotic species, bonsai gardening offers numerous choices for nature lovers. In this section, we’ll introduce you to the diverse world of bonsai plants, covering the different types and species available to bonsai enthusiasts. We’ll explore indoor and outdoor varieties, common and rare types, flowering and fruiting plants and much more. Get ready to be enchanted by the world of bonsai gardening.
Popular Indoor Bonsai Plants
Transform your home into an indoor garden sanctuary with these popular bonsai plants that thrive in indoor environments. These plants not only add a touch of nature to your home but can also have beneficial effects on your well-being.
These are just a few of the many indoor bonsai plants available. When choosing one, consider the level of care necessary, its appearance, and how it will fit into your home’s decor. Make sure to follow proper care instructions, including watering, pruning, and repotting, to ensure your bonsai thrives.
Outdoor Bonsai Trees for All Seasons
If you’re looking to add natural beauty to your outdoor space, outdoor bonsai trees are an excellent choice. These stunning miniature trees can withstand a range of weather conditions, from cold winters to hot summers, and offer year-round interest.
Some popular outdoor bonsai trees include:
Bonsai Tree
Seasonal Highlights
Japanese Maple
Red leaves in the fall, delicate leaves in spring
Florida Elm
Attractive bark, green leaves in the summer, yellow leaves in the fall
When selecting an outdoor bonsai tree, consider the amount of sun or shade in its intended location, as well as the overall climate of your region. With proper care and attention, your outdoor bonsai tree can become a cherished addition to your backyard or patio.
Comparison of Indoor vs. Outdoor Bonsai Plants
Feature
Indoor Bonsai Plants
Outdoor Bonsai Trees
Type of environment
Controlled indoor environment
Varying outdoor environments
Light requirements
Low to medium light
Full or partial sunlight
Humidity levels
40-60%
Varies depending on species
Temperature fluctuations
Avoid extreme temperature changes
Tolerates seasonal changes
Species variety
More limited due to indoor constraints
Wide variety of species available
Choosing the right bonsai plant for your environment can make all the difference in its growth and longevity. By considering factors such as lighting, humidity, temperature, and soil type, you can help your bonsai thrive and flourish for years to come.
Common Bonsai Tree Varieties
As a bonsai enthusiast, you may be wondering about the most common bonsai tree varieties widely grown and admired worldwide. Here are some of the most popular bonsai tree types:
Bonsai Tree Type
Description
Japanese Maple (Acer palmatum)
With its delicate leaves and stunning fall colors, Japanese Maple is a favored choice among bonsai enthusiasts.
Juniper (Juniperus)
With its hardy nature and twists and turns, juniper bonsai trees are easy to maintain and add an interesting element to any bonsai collection.
Jade (Crassula ovata)
Commonly referred to as the money tree, the reliable, and easy-to-care-for Jade bonsai is a popular novice choice that can grow for decades.
Chinese Elm (Ulmus parvifolia)
Due to its small leaves and numerous branches, the Chinese Elm is considered an excellent bonsai tree variety for beginners.
Ficus Bonsai (Ficus benjamina)
The evergreen Ficus bonsai is a hardy species that can withstand a range of different conditions and is excellent both indoors and outdoors.
Eastern White Cedar (Thuja occidentalis)
The dwarf Eastern White Cedar is known for its symmetrical growth and needle-like leaves, making it an excellent option for bonsai enthusiasts seeking a classic coniferous style.
These are just a few examples of the common bonsai tree varieties available to collectors. Selecting the perfect bonsai plant for your collection will depend on your personal preferences, level of experience, and the environment you plan to cultivate the tree in. With so many options to choose from, we’re confident you’ll find the perfect bonsai tree for you.
Rare and Exotic Bonsai Plant Types
For those seeking to add a unique touch to their bonsai collection, rare and exotic bonsai plant types offer a plethora of options. Here are some of the most coveted species among bonsai enthusiasts:
Native to Southeast Asia, this stunning plant produces white flowers and is renowned for its vibrant and glossy foliage.
Brazilian Raintree Bonsai
With its distinctive leaf shape and striking orange bark, this tropical bonsai plant is a rare beauty that can flourish indoors or outdoors, depending on the climate.
Japanese White Pine Bonsai
A highly sought-after species, this bonsai plant boasts striking needles that are soft to the touch and can be wired into different shapes, making it a favorite among bonsai artists.
Chinese Elm Bonsai
This elegant bonsai plant can grow up to 60 feet tall in the wild but can be easily maintained as a miniature tree. Its distinctive bark and compact foliage make it a prized addition to any bonsai garden.
These rare and exotic bonsai plant types prove that there’s always something new to discover in the world of bonsai cultivation. Whether you choose to showcase the vibrant foliage of a Fukien Tea Bonsai or the striking bark of a Brazilian Raintree Bonsai, rare and exotic bonsai plant types are sure to impress and inspire.
Beginner-Friendly Bonsai Tree Species
If you are a beginner to the art of bonsai, you may be wondering which bonsai tree species are the best for you. The following bonsai tree species are ideal for beginners, as they are easy to care for and do not require a lot of maintenance:
These beginner-friendly bonsai trees are perfect for those just starting out with bonsai gardening. They are resilient and forgiving, allowing for more room for error as you learn the ins and outs of bonsai care. With time and practice, you can work your way up to more challenging bonsai trees and create a beautiful, thriving bonsai collection.
Miniature Bonsai Trees
If you’re looking for bonsai plant varieties with delicate beauty and intricate details, miniature bonsai trees are the perfect choice. These small bonsai plants are often less than six inches tall and offer all the beauty of their larger counterparts in a smaller package.
The cypress bonsai plant variety is known for its evergreen foliage, small cones, and attractive bark, adding natural charm to your home.
Miniature bonsai trees make great decorative additions to desks, windowsills, and other tiny spaces. Their small size also makes them perfect for beginners who want to try out bonsai gardening before moving to larger plants – a great way to become more familiar with bonsai care and techniques.
Explore the captivating world of miniature bonsai plants and find the perfect addition to your home.
Flowering Bonsai Plants
If you’re looking for a splash of color in your bonsai collection, consider adding some flowering bonsai plants. These species produce vibrant blooms in various shapes and sizes, adding an extra touch of beauty to your indoor or outdoor garden.
Other flowering bonsai plants include the Japanese quince, hibiscus, and bougainvillea, each with their unique blooms and colors. Keep in mind that some flowering species require specific care and pruning to ensure prolific blooms, so be sure to research the requirements of your chosen plant.
Evergreen Bonsai Trees
If you’re looking for a bonsai tree that retains its foliage throughout the year, an evergreen bonsai may be just what you need. These bonsai trees provide a sense of tranquility, making them perfect for creating calming environments in your home.
Some popular types of evergreen bonsai trees include:
Bonsai Tree Name
Characteristics
Japanese Black Pine
Dark green needles, rugged bark that flakes off in patches
Boxwood
Small glossy leaves, slow growth rate, adaptable to many styles
Juniper
Needle-like leaves, can be trained into many styles, drought-resistant
Holly
Spiky leaves, small white flowers, vibrant red berries
Each evergreen bonsai tree has its unique features, making it an exciting addition to any collection. Whether you prefer a classic Japanese Black Pine or a spiky Holly, an evergreen bonsai tree can be the perfect centerpiece for your home or garden.
Deciduous Bonsai Trees
If you’re looking to add a dynamic and ever-changing element to your bonsai collection, look no further than deciduous bonsai trees. These trees undergo dramatic seasonal changes, shedding their leaves in the fall to reveal intricate branching structures and then blooming beautifully in the spring. The most popular deciduous bonsai tree species include maple, elm, and beech trees.
Maple Trees
Maple trees are a favorite among bonsai enthusiasts due to their stunning fall foliage. With shades ranging from bright yellows to fiery oranges and reds, maple bonsai trees are sure to add a burst of color to any collection. Additionally, their delicate branching structure makes them well-suited to bonsai styling techniques like wire training.
Elm Trees
With their gnarled and twisted branches, elm bonsai trees have a distinctly natural and rustic feel. These trees are known for their sturdy trunks and roots, making them incredibly resilient and easy to care for. Elm bonsai trees are a popular choice for beginners looking to experiment with bonsai styling techniques.
Beech Trees
Beech bonsai trees are highly prized for their striking winter silhouettes, with smooth, gray trunks and delicate branching patterns. These trees are slow-growing and can live for several centuries, making them a highly sought-after addition to any bonsai collection.
Fruiting Bonsai Varieties
One of the most exciting aspects of growing bonsai plants is the opportunity to harvest your own miniature fruits. Certain types of bonsai trees produce delicious and visually appealing fruits, making them a delightful addition to any collection. Some common varieties of fruiting bonsai plants include:
When selecting a fruiting bonsai tree, it is important to consider the specific care requirements and growing conditions necessary for each plant variety. With proper cultivation techniques, you can enjoy the unique beauty and taste of fresh fruits grown right from your bonsai collection.
Shohin Bonsai – the Art of Small Bonsai
If you are looking for a small-sized bonsai plant that oozes elegance and charm, then Shohin Bonsai is an excellent choice. Defined as any bonsai tree between 3-8 inches in height, Shohin Bonsai is ideal for those with limited space or those looking to showcase multiple bonsai trees in a small area.
While Shohin Bonsai may be small, they never compromise on the level of detail and craftsmanship. These bonsai plants require tremendous skill and patience to cultivate, showcasing intricate branching patterns, vibrant foliage, and tiny fruits and flowers.
The art of Shohin Bonsai has been perfected over centuries in Japan, where it’s found a loyal following among bonsai enthusiasts around the world. With its delicate beauty and meticulous attention to detail, a Shohin Bonsai can be the centerpiece of any collection, adding a touch of refinement and sophistication to your home or garden.
Among the popular bonsai plant varieties that can be trained as Shohin Bonsai are the Japanese Maple, Boxwood, Azalea, and Pine. These bonsai trees can be shaped and styled in various ways, including cascading, slanting, and informal upright styles, creating a diversity of options for every bonsai enthusiast.
Whether you are a seasoned bonsai gardener looking to diversify your collection or a novice trying your hand at cultivating a bonsai tree for the first time, Shohin Bonsai is an excellent choice for its captivating beauty and delicate details.
Shohin Bonsai Varieties
Bonsai Plant Variety
Bonsai Style
Japanese Maple
Slanting Style
Boxwood
Informal Upright Style
Azalea
Cascading Style
Pine
Semi-Cascade Style
Discover the captivating art of Shohin Bonsai and add an extra touch of elegance and sophistication to your bonsai collection.
Bonsai Forests and Group Plantings
If you are looking to create a truly breathtaking display of bonsai plants, bonsai forests and group plantings provide a stunning option. Rather than displaying individual trees, group plantings mimic the appearance of a natural woodland scene, with multiple trees artfully arranged together.
The types of bonsai plant varieties best suited for forest and group plantings are those that have a similar growth habit and complement each other visually. Consider using a variety of evergreen and deciduous bonsai trees, differing in size and texture, to create an eye-catching display.
When designing a bonsai forest or group planting, it’s essential to pay attention to the arrangement of your trees, carefully considering aspects such as height, shape, and placement. It’s also vital to ensure that each tree is visible and highlighted, while still fitting seamlessly into the overall scene.
Examples of Bonsai Forests and Group Plantings
Bonsai Plant Varieties
Description
Juniper and Pine
The combination of these evergreen trees with different shades of green creates a stunning display of texture and color.
Maple and Elm
These deciduous trees complement each other beautifully, with the bright colors of the maple leaves providing a striking contrast against the elm’s textured bark.
Beech and Hazel
The small size and delicate foliage of these trees make them ideal for creating a peaceful, wooded scene, true to life.
Conclusion
Now that you’ve learned about the different types of bonsai plants, it’s time to start your own bonsai journey! Whether you choose a popular indoor bonsai, a rare and exotic species, or a beginner-friendly tree, there’s a bonsai plant out there waiting for you.
Remember to pay attention to your chosen plant’s specific needs and environment, and don’t be afraid to experiment with different styles and techniques. With patience and care, your bonsai plant can become a beautiful and rewarding addition to your home or garden.
So what are you waiting for? Start exploring the wondrous world of bonsai plants today!
FAQ
What are the different types of bonsai plants?
The world of bonsai plants offers a rich variety of options, including flowering bonsai, evergreen bonsai, deciduous bonsai, fruiting bonsai, and miniature bonsai trees, to name just a few.
What are some popular indoor bonsai plants?
Some popular indoor bonsai plants include the Ficus bonsai, Jade bonsai, Chinese Elm bonsai, and Juniper bonsai. These plants are well-suited to indoor environments and can thrive with proper care.
Which outdoor bonsai trees are suitable for all seasons?
Outdoor bonsai trees that can withstand different weather conditions and offer visual interest throughout the year include the Japanese Maple bonsai, Pine bonsai, Japanese Black Pine bonsai, and Cypress bonsai.
What are some common bonsai tree varieties?
Common bonsai tree varieties include the Japanese Maple bonsai, Juniper bonsai, Pine bonsai, Chinese Elm bonsai, and Ficus bonsai. These varieties are popular among bonsai enthusiasts due to their unique characteristics.
Are there any rare and exotic bonsai plant types?
Yes, bonsai collectors often seek out rare and exotic species, such as the Japanese White Pine bonsai, Ginkgo bonsai, Wisteria bonsai, Blackthorn bonsai, and Azalea bonsai. These unique plants are prized for their rarity and beauty.
Which bonsai tree species are beginner-friendly?
Beginner-friendly bonsai tree species include the Chinese Elm bonsai, Juniper bonsai, Ficus bonsai, Jade bonsai, and the Japanese Maple bonsai. These species are relatively easy to care for and are ideal for those new to bonsai gardening.
What are miniature bonsai trees?
Miniature bonsai trees are small-sized bonsai plants that showcase delicate beauty and intricate details. These tiny trees captivate with their compact foliage and stunning craftsmanship.
Are there bonsai plants that produce flowers?
Yes, there are bonsai plants that produce stunning flowers. Some examples include the Azalea bonsai, Cherry Blossom bonsai, Wisteria bonsai, and Bougainvillea bonsai. These flowering bonsai add an extra touch of vibrancy to any collection.
What are evergreen bonsai trees?
Evergreen bonsai trees retain their lush foliage throughout the year, providing a sense of tranquility. Some popular evergreen bonsai tree species include the Juniper bonsai, Pine bonsai, Cypress bonsai, and Spruce bonsai.
What are deciduous bonsai trees?
Deciduous bonsai trees undergo seasonal leaf changes, creating dynamic and captivating displays. Common deciduous bonsai tree species include the Japanese Maple bonsai, Trident Maple bonsai, and Zelkova bonsai.
Are there bonsai plant varieties that bear fruits?
Yes, there are bonsai plant varieties that bear fruits, allowing enthusiasts to enjoy the beauty of nature and even harvest their own miniature bounty. Examples include the Fig bonsai, Pomegranate bonsai, and Olive bonsai.
What is Shohin bonsai?
Shohin bonsai refers to the art of cultivating small-sized bonsai plants. These delicate creations showcase intricate details and require meticulous craftsmanship. Shohin bonsai are highly prized among bonsai enthusiasts for their unique charm.
What are bonsai forests and group plantings?
Bonsai forests and group plantings involve arranging multiple bonsai trees to mimic a natural woodland scene. This technique creates a captivating display that showcases the diversity and beauty of nature in miniature form.
Which bonsai plants are suitable for specific environments?
There are bonsai plants suited for specific environments, such as indoor bonsai plants like the Ficus bonsai and Chinese Elm bonsai, and outdoor bonsai trees like the Pine bonsai and Japanese Maple bonsai. It is important to choose bonsai plants that will thrive in your chosen setting.
This page contains some affiliate links. Please check out our affiliate disclaimer for more information
Karen Phillips, Bonsai expert and blogger. Read more about me here
Embark on the rewarding journey of bonsai tree maintenance, a craft that requires precision, patience, and a touch of love. Rest assured, this bonsai tree care guide will illuminate your path to nurturing your miniature trees, transforming them into living sculptures that captivate and inspire. Whether you are cradling the beginning of a new hobby or aiming to refine your green-thumb skills, the essential practices detailed here will ensure your bonsai thrives, becoming a testament to your dedication and care.
Understanding the Art of Bonsai: An Introduction
Embarking on the journey of bonsai tree care essentials is not merely about plant maintenance; it’s an entry into an ancient tradition that holds deep historical and cultural significance. The art of bonsai mirrors the philosophies of patience, balance, and harmony. As you delve into this captivating world, you are cultivating more than just miniature trees – you are shaping living sculptures that require a conscientious commitment to master.
Bonsai as an art form originated over a thousand years ago in Asia, and has been cultivated over the centuries to express nature’s beauty in a small, contemplative format. This living art combines horticultural techniques and Asian aesthetics, resulting in a disciplined creative expression. As you nurture your bonsai, you’re not just participating in plant care; you’re stepping into a meditative practice that involves careful observation and thoughtful interaction with your growing piece of art.
Patience is key as bonsai trees grow and develop very slowly, allowing you the time to reflect on the beauty of nature and the importance of nurturing life.
Every aspect of bonsai, from the careful trimming of leaves to the selective pruning of branches, is done with a deliberate intention, honing your ability to visualize the future potential of your bonsai.
Understanding the philosophical underpinnings can enhance your appreciation for each curve and contour in your bonsai’s design, connecting you to the spiritual essence of this art form.
By mastering the art of bonsai, you not only cultivate living art but also cultivate inner tranquility and undeterred focus. The relationship you build with your bonsai can become a deeply personal journey, reflecting the very essence of bonsai tree care essentials: a blend of art, science, and spirituality.
The Ideal Environment for Your Bonsai Tree
Keeping your bonsai tree healthy and vibrant requires much more than simple potting; it demands the creation of a microcosm that mirrors the ideal bonsai environment. Every element, from light to moisture, plays a pivotal role in the longevity and beauty of your miniature landscape. By optimizing these conditions, you foster an ecosystem that is both supportive and nurturing for your bonsai’s growth and wellbeing.
Light Requirements for Healthy Bonsai Growth
Like all living plants, your bonsai tree requires sufficient light to fuel its photosynthesis process. Bonsai trees flourish under a dedicated balance of light exposure, which significantly impacts foliage quality and growth rate. Understanding your specific tree’s light requirements is essential, as some species demand full sun, while others thrive in partial shade. An indirect, yet bright, lighting scenario is often the key to keeping your bonsai’s foliage dense and its growth regular. East or west-facing windowsills are typically ideal locations to provide natural sunlight without the risks of scorching associated with direct midday exposure.
Temperature and Humidity Control
Temperature control is a subtlety that can make or break your bonsai tree health. Most bonsai species prefer a stable temperature range, avoiding extremes that can stress the plant. In addition, maintaining proper humidity around your bonsai is crucial, as it simulates the moist, ambient environment that these trees enjoy naturally. A humidity tray filled with water and pebbles placed beneath your bonsai pot can aid humidity control without risking waterlogged soil.
Choosing the Right Location for Your Bonsai
Pinpointing the right spot to place your bonsai can be considered an art form in itself. This ideal location must cater to light requirements, provide temperature control, and ensure humidity control. You’re looking for a Goldilocks zone where each of these factors is just right. Often, this will be an interior space away from drafts and heat sources, which could dry out the foliage prematurely. On the flip side, proximity to a window with sheer curtains might provide the perfect soft light and warmth to keep your bonsai content. Remember, it’s all about crafting an environment where your bonsai can prosper year-round.
Watering Your Bonsai Tree: Techniques and Tips
Maintaining the perfect balance in bonsai tree watering can be likened to an art form. Understanding the subtle nuances can make a significant difference in the health and growth of your bonsai. Get it right, and you’ll see your bonsai flourish with vibrancy; get it wrong, and you risk stunting its potential.
How to Determine if Your Bonsai Needs Water
Check the moisture of the soil before watering. The top layer should feel slightly dry to the touch.
Be mindful of the specific needs of your bonsai species, as some may require more frequent watering than others.
Consider the pot size and soil composition. Smaller pots and porous soil mixtures typically need watering more often.
Watering Technique
Use a soft watering can or hose with a fine nozzle to gently soak the soil, ensuring you do not disturb the soil or roots.
Water until you see a slight runoff from the drainage holes, indicating saturation.
Avoid watering during the heat of the day to minimize evaporation and leaf burn. Early morning or late afternoon is ideal.
Frequency of Watering
Seasonal changes impact how often your bonsai needs water. More frequent watering is often required in the warmer months and less during the cooler seasons.
Indoor heating and air conditioning can also influence the watering schedule by affecting the humidity level and temperature around your bonsai.
Keep a regular check on your bonsai’s soil moisture to establish a consistent watering routine.
Watering your bonsai tree correctly is a fundamental aspect of bonsai tree care tips. Avoid common pitfalls such as overwatering, which can lead to root rot, and underwatering, which can cause your bonsai to dehydrate and wilt. By being attentive to your bonsai’s needs and responding with appropriate watering practices, you’re setting the stage for a thriving, beautiful bonsai that can be enjoyed for many years to come.
Bonsai Tree Soil Composition and Repotting Essentials
Optimizing your bonsai tree’s health begins beneath the surface, with the foundation of proper soil composition and timely repotting. As a dedicated bonsai caretaker, understanding the intricacies of soil mixtures and recognizing the signs for repotting will empower you to maintain the delicate balance vital for your tree’s growth.
Characteristics of Bonsai Soil Mixes
The ideal bonsai tree soil composition fulfills several crucial roles – from providing support to facilitating proper drainage and aeration. Unlike regular houseplant soil, bonsai mixtures are specially tailored to mimic the natural conditions where these trees would typically grow in the wild. Let’s delve into what makes bonsai soil stand out:
Drainage: Ensures excess water can easily escape, preventing root rot.
Aeration: Keeps the roots oxygenated, which is essential for the health of the tree.
Water Retention: While quick drainage is critical, the soil must still retain enough moisture to hydrate the roots between waterings.
Nutrient Composition: While bonsai trees are fed with fertilizer, the soil itself can hold and sometimes supply nutrients.
Structure and Particle Size: Bonsai soil is typically more granular, which aids in preventing the compaction that can harm fine roots.
With these characteristics in mind, selecting the appropriate soil mixture is a delicate balance that can differ depending on your tree’s species and environmental conditions.
Signs It’s Time to Repot Your Bonsai Tree
Repotting bonsai trees is not a yearly task but a crucial intervention guided by the observation of certain symptoms. Knowing when to repot is as important as knowing how. Below are key indicators that your bonsai is ready for a fresh pot:
Your tree appears to be top-heavy and is tipping its pot.
The water takes longer to seep through the soil, or the soil stays waterlogged longer than usual.
Roots are circling the pot’s bottom or emerging from drainage holes.
The growth of your bonsai has significantly slowed down without any other apparent cause.
If you notice any of these signs, it may be time to repot your bonsai, ideally during its specific repotting season which often coincides with the early growth phases in spring.
Indicator
Meaning
Recommended Action
Water Drainage
Slower than usual
Examine roots and prepare for repotting
Root Visibility
Roots are visible outside the pot
Choose a larger pot and repot
Growth Rate
Decreased without other causes
Repot to refresh soil and give roots space
Adhering to the right bonsai tree soil composition and repotting schedule is a substantial part of bonsai mastery. Your commitment to these practices will reflect in the luscious vitality and allure of your bonsai, ensuring its place as a central piece of living art in your space.
Bonsai Tree Fertilization: When and How to Fertilize
Fertilization is a critical element of bonsai tree care for beginners and veteran enthusiasts alike, ensuring your miniaturized trees receive all the nutrients they need. Striking the right balance is essential—too little fertilizer and your bonsai might be deprived of essential nutrients, too much and you might damage its delicate root system. Below, you’ll find the best practices for bonsai tree fertilization to guarantee robust growth throughout the seasons.
Understanding Fertilizer Types
Balanced Fertilizers: Look for a balance of Nitrogen (N), Phosphorous (P), and Potassium (K), often depicted in a ratio such as 10-10-10.
Slow-Release Fertilizers: These provide a steady supply of nutrients over a period of time, beneficial for consistent growth.
Liquid Fertilizers: Fast-acting and easy to control, liquid fertilizers are ideal for precise nutrient management but require more frequent application.
Organic Options: Organic fertilizers, like fish emulsion or cottonseed meal, release nutrients slowly as they break down, and can improve soil health over time.
When to Fertilize Your Bonsai
Fertilization should align with your bonsai’s active growth periods. Typically, this means fertilizing in the spring as new growth appears and continuing through the summer. Reduce the frequency of fertilization or stop altogether during the dormant winter months to avoid forcing growth during a time your bonsai should be resting. Climate and indoor conditions may affect this schedule slightly.
Applying Fertilizer
Always water your bonsai thoroughly before fertilizing to prevent root burn and ensure even distribution of nutrients.
Follow the instructions on your fertilizer’s packaging for dosage, and err on the side of caution—over-fertilization can be harmful.
Apply fertilizer to the soil’s surface, avoiding direct contact with the trunk or leaves.
For liquid fertilizers, use a watering can or sprayer for an even application; for granular types, sprinkle evenly across the soil.
The following table provides a quick reference guide for fertilizer application throughout the year:
Season
Type of Fertilizer
Frequency
Spring (Active Growth)
Balanced, Liquid, or Slow-Release
Every 2-4 weeks
Summer (Continued Growth)
Balanced or Slow-Release
Every 4-6 weeks
Autumn (Slowing Growth)
Lower Nitrogen Mix
Once at season’s start
Winter (Dormant Period)
None or Very Low Nitrogen
Generally not recommended
Adapting your bonsai tree fertilization practices to the specific needs of your tree will ultimately lead to a more thriving and aesthetically pleasing bonsai. Always observe your tree’s response to fertilization and adjust your methods and frequency accordingly. With dedicated care and attention, even beginners can master the art of bonsai and enjoy the full beauty and tranquility these living sculptures bring.
Bonsai Tree Pruning Techniques for Ideal Shape and Health
Pruning your bonsai tree is essential not just for maintaining its miniature stature, but also for ensuring its overall health and aesthetic appeal. By grasping these essential bonsai tree pruning techniques, you can encourage a strong, vibrant structure and sculpt your bonsai into a work of art. As you learn to read your bonsai’s unique anatomy and respond to it with your tools, you become an artist who brings out its inherent beauty while keeping it healthy and balanced.
The Anatomy of a Bonsai for Pruning Purposes
Understanding the anatomy of your bonsai is crucial to making the right cuts during pruning. Familiarize yourself with the various parts of your bonsai—recognizing the apical buds, lateral branches, sacrificial branches, and structural roots are integral to shaping the tree. Observing the way your bonsai grows and reacts to each cut gives you insight into how to best approach its care.
A well-pruned bonsai not only looks more pleasing but also has improved vigor. Regular pruning helps to prevent diseases and encourages new growth in desired directions, contributing significantly to the bonsai tree health. Familiarization with the bonsai’s structure ensures each cut promotes the development of a sturdy and harmonious form.
Seasonal Pruning: Timing is Everything
The timing of your pruning efforts plays a pivotal role in the health and development of your bonsai. Each season offers a different opportunity for shaping and improving your tree, with a focus on structural pruning in the winter, when the tree is dormant, and pinching growth in the spring and summer to refine its shape.
Spring is an excellent time for judicious trimming to enforce the desired shape as the tree enters its growth phase. In summer, pruning can be done to thin out foliage and allow light to reach the inner branches, encouraging even growth. Autumn pruning is limited as the tree prepares for dormancy, but you may still remove any undesirable growth. Following a seasonal pruning schedule not only helps in keeping with the natural cycle of the tree but also prevents undue stress.
Season
Pruning Focus
Bonsai Health Benefit
Winter (Dormant Season)
Structural Pruning
Sets the foundation for the year’s growth
Spring (Growth Season Start)
Pinching Back New Shoots
Encourages desired shape and branch division
Summer (Active Growth)
Thinning Out Foliage
Improves light exposure and airflow
Autumn (Growth Slows Down)
Removing Undesirable Growth
Prepares tree for winter dormancy
Incorporating these bonsai tree pruning techniques not only increases your tree’s longevity but also enhances your connection with this living art. And as you tend to your bonsai, remember that each cut is a meditation on beauty, health, and the passage of time.
Bonsai Tree Care Guide: Daily and Seasonal Routines
Caring for a bonsai tree is both an art and a science, one that can seamlessly blend into the ebb and flow of your everyday life. With this bonsai tree care guide, you will gain access to structured bonsai tree care instructions that prioritize the health of your bonsai with daily and seasonal practices. As living sculptures that reflect our dedication and attention, bonsais require specific routines throughout the year. So, let’s step into a world where daily bonsai care and seasonal bonsai maintenance become a harmonious part of your daily existence.
Morning Check: Begin each day with a check-up. Observe the moisture level of the soil, assessing whether your bonsai is in need of water, but resist the urge to water on a schedule—instead, water when needed.
Weekly Observations: Dedicate time weekly to examine leaf color and check for any signs of stress or pests. Early detection is crucial for addressing issues before they escalate.
Seasonal Adjustments: As the seasons shift, so will the needs of your bonsai. Modulate watering, sun exposure, and fertilization to align with the current season.
By integrating these daily observations with your regular routine, you establish a responsive care regimen tailored to the unique needs of your bonsai. Seasonal changes, after all, play a pivotal role in how your bonsai will thrive.
Season
Key Tasks
Notes
Spring
Begin fertilization routine.Prune to shape new growth.Water more frequently as growth accelerates.
Spring is the season of awakening; your bonsai will transition from dormancy into a period of vigorous growth.
Summer
Monitor daily, water as required.Shield from excessive midday heat.Continue fertilization.
Summer heat can be intense. Providing shade during the hottest parts of the day can prevent leaf burn.
Autumn
Prepare for dormancy; reduce feeding.Gradually decrease watering.Prune sparingly, focusing on dead branches.
Autumn’s cooler temperatures and reduced light signal your bonsai to begin preparing for its restful period.
Winter
Protect from frost.Minimize watering to prevent root rot.Avoid any major pruning or repotting.
Winter is a time for rest. Your bonsai’s metabolism slows down, as should your maintenance activities.
Establishing a caretaking routine that includes the above daily bonsai care and seasonal bonsai maintenance will ensure that your miniature tree remains a source of beauty and pride year-round. It is not just about keeping a plant alive; it’s about cultivating a living piece of art that matures and blossoms under your dedicated care. Let your bonsai journey be a reflection of patience and mindfulness, embracing the rhythm of nature’s cycles in your dedicated practice.
Identifying and Preventing Common Bonsai Pests and Diseases
As a bonsai enthusiast, the health of your miniature tree is paramount. Vigilance in recognizing signs of bonsai pests and diseases early in their onset can make all the difference in preserving your bonsai’s beauty and longevity. Bonsai tree health issues may not always be conspicuous, but knowing what symptoms to look for will help you take swift and effective action.
Recognizing Bonsai Tree Health Issues Early
Early detection of health issues is crucial in preventing small problems from becoming larger crises for your bonsai. Watch for yellowing leaves, stunted growth, wilting, or visible pests as clear indicators of distress. It’s also wise to regularly inspect the underside of leaves and the soil for any signs of infestation or disease. By maintaining a close relationship with your bonsai, you’ll notice when something is amiss and can address it promptly.
Some common symptoms to be on the lookout for are:
Discoloration or spots on leaves and branches
Webbing on the plant, indicating spider mite presence
Soft, mushy areas in the trunk or roots, often a sign of rot
Sudden leaf drop or die back on branches
Molds or mildew on the soil or plant surfaces
When identifying such symptoms, it’s essential to consider environmental factors and your bonsai’s specific care routine as potential contributors to health issues before jumping to conclusions.
Natural and Chemical Treatment Options
Once you’ve identified a pest infestation or disease, several treatment options are available. You may prefer to start with natural remedies, such as introducing predator insects that feed on harmful pests or applying neem oil as an organic pesticide. For fungal diseases, proper air circulation, decreased humidity, and sunlight exposure might be the first line of defense.
If natural methods are insufficient, you might need to resort to chemical treatments. It’s important to use these sparingly and according to the instructions, avoiding over-application to minimize harm to your bonsai and the environment. Here’s a succinct table outlining common bonsai health issues and corresponding treatment options:
Health Issue
Natural Treatment
Chemical Treatment
Spider Mites
Introduce predatory mites, apply horticultural oils or soaps
Use miticides per label directions
Fungal Diseases
Improve air circulation, prune affected areas
Apply fungicides ensuring thorough coverage
Scale Insects
Handpicking, apply horticultural oil
Use systemic insecticides for severe cases
Aphids
Encourage beneficial insects, spray with strong water jet
Utilize specific aphid-targeting pesticides
Root Rot
Improve drainage, repot with fresh soil
Fungicides may aid in severe situations
Prevention remains the best cure for maintaining your bonsai’s health. Implement a regular care routine including inspection, cleaning of tools, quarantining of new plants, and the maintenance of proper watering and feeding schedules. By fostering a strong and resilient bonsai, you reduce the likelihood of pests and diseases taking hold, ensuring your bonsai continues to grow and flourish.
Wiring Techniques for Sculpting Your Bonsai
Molding the perfect shape of your bonsai is an art that often involves a technique known as wiring. Bonsai tree wiring techniques allow you to direct and style the branches and trunk of your plant. When executed correctly, wiring is a powerful method of sculpting bonsai trees to your desired form. Below are step-by-step instructions to ensure you apply the wires effectively and care for your bonsai during the wiring process.
Assess your bonsai’s structure to decide which branches require wiring. Your goal is to enhance its natural shape, encouraging a balanced and harmonious appearance.
Select the appropriate wire gauge based on the thickness of the branches; this typically ranges from 1mm to 4mm. Aluminum or copper wire can be used, with aluminum being more pliable and easier for beginners.
Start by anchoring the wire to the trunk or a well-established branch, wrapping the wire at an angle of about 45 degrees around the branch you wish to shape. Be cautious not to wrap too tightly.
Move systematically, wiring branches from the trunk outwards, and remember to wire pairs of branches with a single wire when possible for added stability.
Use your fingers to gently bend the wired branches into the desired position. Avoid sharp bends that might break the branch.
Regularly inspect your bonsai for signs that the wire is cutting into the growing bark. Wires should typically be removed after one growing season or sooner if necessary.
When sculpting bonsai trees, it’s critical to understand that the bonsai’s health is paramount. Wiring inaccurately or for too long can damage the branches and trunk, so it’s important to monitor and adjust the wires as your bonsai grows. Here is a checklist to keep in mind:
Task
Description
Interval
Wire Inspection
Check for wire marks or indentations on branches and trunk.
Every few weeks
Repositioning
Adjust the shape of branches as needed, avoid severe bends.
As necessary
Wire Removal
Carefully remove wires that are beginning to embed into bark.
Before the wire cuts into bark
Post-Wiring Care
Allow branches to set after wire removal and trim any unwanted growth.
After wire removal
The process of wiring is as much about patience and observation as it is about the physical act of bending and shaping. Whether you’re a seasoned bonsai enthusiast or a beginner, mastering bonsai tree wiring techniques will greatly enhance your bonsai sculpting skills. With time and practice, you can transform a simple plant into a stunning bonsai masterpiece.
Bonsai Tree Styles and Shapes: A Visual Guide
Embark on a journey through the captivating world of bonsai tree styles and shapes, where each curve and contour is a stroke of living sculpture. The mastery involved in shaping these miniature trees is not just about the practical steps — it’s a true art form. It requires an understanding of bonsai aesthetics and harmony, as well as the patience to see your vision come to life over time. Let’s delve into the most popular styles and how you can cultivate them to enrich your bonsai presentation.
Popular Bonsai Aesthetics and How to Achieve Them
Different bonsai tree shapes inspire various moods and reflect natural landscapes in miniature form. Here are some of the most beloved and how to achieve them:
Formal Upright (Chokkan): This style features a straight trunk with branches that grow at regular intervals. It’s ideal for beginners due to its relatively simple wiring and pruning techniques.
Informal Upright (Moyogi): Here, the trunk slightly curves in a more naturalistic fashion. Achieving this look involves careful wiring and the strategic selection of branches to create informal yet balanced lines.
Slanting (Shakan): To emulate the slanting style, the tree’s trunk leans to one side as if blown by wind. Anchor the trunk at an angle and wire the branches to sweep in the same direction.
Cascade (Kengai): Ideal for conifers, cascades mimic trees that grow over cliffs with branches that fall downward below the base of the pot. This requires strong wiring and judicious pruning over several seasons.
Semi-Cascade (Han-Kengai): Similar to the full cascade, but branches level out before dipping below the pot’s base, often seen in nature on trees growing on mountain sides or beside water.
The path to creating these bonsai shapes starts with envisioning how each tree interacts with its environment — then replicating those forces through pruning and wiring to shape each tree’s narrative.
The Role of Bonsai Pots in Tree Presentation
As much as the style of the tree itself matters, so does the bonsai pot in creating a harmonious presentation. The right pot not only complements the tree’s form but enhances its aesthetic appeal and can influence the perception of the bonsai tree’s style. Here is what to consider:
Style
Suggested Pot Shape
Pot Color and Texture
Formal Upright
Rectangular or Oval
Subdued colors with smooth texture to not distract from the tree’s formality
Informal Upright
Oval or Round
Glazed with colors that complement the tree – consider blues and greens to signify nature
Slanting
Deep and Sturdy
Earthen tones with rough textures, providing a grounded appearance
Cascade
Tall and Narrow
Neutral colors with a glossy finish, allowing the dramatic tree form to stand out
Semi-Cascade
Shallow and Wide
Colors that reflect the surrounding landscape, sand-colored or soft pastels, for balance
Grasping the essence of bonsai aesthetics, from tree shapes to the choice of pot, is key in mastering the bonsai presentation. Strive to match the pot with the style of the bonsai — after all, it serves as the stage upon which your bonsai performs and presents itself to the world.
Selecting Bonsai Trees and Plants for Beginners
The art of bonsai tree care for beginners starts with selecting bonsai trees that are resilient and suitable for newcomers. It can be tempting to choose a bonsai solely based on its beauty, but as a beginner, your focus should be on finding species that are forgiving and easier to maintain. Here’s a guide to help you make the best choice for your burgeoning bonsai journey.
When it comes to bonsai tree care for beginners, certain species stand out for their hardiness and ability to withstand common beginner mistakes. Species like the Ficus, Juniper, and Chinese Elm are known for their robust nature, making them ideal for those just starting out. These species are flexible when it comes to watering and light conditions, and they can recover more readily from pruning errors.
Before you select your bonsai, inspect the tree for signs of good health:
Look for a strong trunk with an interesting shape; this serves as the backbone of your bonsai.
Clear, vibrant leaves or needles indicate that the bonsai has been well-cared-for.
Ensure there are no signs of pests or diseases, like spotted leaves or a sticky residue.
Examine the soil in the pot; it should be moist but not waterlogged, with a loose, textured consistency.
Check the roots if visible; they should appear firm and spread out, not circling tightly around the pot.
As you take your first step in selecting bonsai trees, here is a quick reference table for some beginner-friendly species:
Species
Description
Care Level
Ficus
Has a thick trunk and is tolerant of low humidity and indoor conditions.
Easy
Juniper
Features needle-like foliage and prefers cooler temperatures and plenty of sunlight.
Moderate
Chinese Elm
Adaptable tree with small leaves, perfect for indoor or outdoor environments.
Easy
Maple
Known for their seasonal color change and detailed leaves; they require more precise care.
Challenging
Finally, consider the initial setup for your bonsai. It’s not just about the tree; the pot, soil, and initial shape will also play essential roles in your bonsai’s overall development. Opt for a starter kit designed specifically for beginners, as these often come with the necessary tools and instructions to help you embark on your bonsai care journey.
Remember, bonsai tree care for beginners is a learning process filled with trial and error. By selecting bonsai trees that are more accommodating, you’ll give yourself the time and space to hone your skills, ensuring a pleasant and fulfilling bonsai experience.
Advanced Bonsai Tree Care Tips for Experienced Enthusiasts
As you delve deeper into the world of bonsai, refining your craft with advanced bonsai tree care tips becomes essential to enhancing the beauty and stature of your miniature trees. For the experienced bonsai enthusiasts, this journey entails intricate pruning methods, precise watering schedules, and a deeper understanding of your bonsai’s individual needs. This dedication not only nurtures the tree but also furthers your own growth as a diligent cultivator of nature.
Understanding Your Tree’s Unique Physiology
Studying the specific species of your bonsai enables you to tailor your care approach, catering to its unique water, light, and nutrient requirements.
Identify subtleties in leaf color, bark texture, and root vigor to ensure the health and longevity of your bonsai.
Mastering the Art of Pruning
Advanced pruning techniques such as defoliation, root-pruning, and branch reduction can shape your bonsai to perfection, reflecting its full artistic potential.
Fine-tune your understanding of the tree’s growth patterns to time these pruning measures for optimal results.
Optimizing Soil and Fertilization
As an experienced practitioner, know that the soil mix is not one-size-fits-all. By crafting soil compositions that cater to your bonsai’s type, you provide the best environment for its roots to absorb nutrients efficiently.
Implement a fertilization schedule that complements your tree’s growth cycles, using both organic and chemical fertilizers in moderation.
Experiment with different substrates to elevate drainage and aeration, thereby mitigating root diseases and promoting robust growth.
To further enhance your bonsai’s aesthetics and health, let’s explore how different care techniques impact various elements of the bonsai:
Element of Care
Techniques
Impact
Foliage Management
Defoliation, shoot pinching
Denser canopy and finer leaves
Root Care
Root-pruning, air layering
Better nutrient absorption, tree health
Watering
Automated misting, soil moisture monitoring
Balanced hydration, avoided root rot
Seasonal Adjustments
Sheltering in winter, strategic sun exposure
Continuous growth, protection from the elements
Creating Microclimates
By manipulating temperature, humidity, and light within a specific space, you can create optimal living conditions for your bonsai to prosper. Tailoring these factors to mirror your bonsai’s natural habitat encourages authentic growth patterns and resilience.
Advancement through Trial and Error
Each tree will respond differently to care techniques, making observation your greatest tool for success.
Maintain detailed records of care practices to analyze what works best and adapt as needed, keeping the vitality of your bonsai in focus.
Your commitment to these advanced bonsai tree care tips ensures that the art you cultivate reaches its pinnacle, resonating not just with the aesthetic demands of bonsai culture but with the individual spirit of each tree. Continue to nurture your bonsai with the same patience and passion that has brought you to this advanced stage, and your bonsai will serve as a testament to your mastery of this ancient art form.
The Spiritual and Cultural Significance of Bonsai Trees
The art of bonsai is a practice steeped in tradition, resonating deeply with the spiritual significance of bonsai. These miniature masterpieces are more than just horticultural wonders; they are living symbols embodying centuries of cultural heritage and philosophical thought. Cultivating a bonsai tree transcends the physical act of gardening to become an immersive experience, bridging the gap between humanity and nature.
Incorporating bonsai into your space invites a sense of peace and meditative reflection. The meticulous care and patience required to nurture these trees often lead to personal introspection and a deeper connection with the rhythms of life. It’s this intimate interaction that highlights the cultural significance of bonsai, transforming the practice into an art form that teaches the values of patience, simplicity, and harmony.
Bonsai as a Meditative Practice: Cultivators often find that tending to bonsai trees provides a calming, meditative experience, where the focus required can help quiet the mind and reduce stress.
Historical Significance in Religion: Bonsai trees have been integrated into religious rituals and practices in various cultures, commonly associated with the pursuit of harmony between man, the soul, and nature.
The Symbolism of Miniaturized Nature: Bonsai trees represent the grandeur of nature in a compact form, offering a unique perspective on the natural world and reminding us of our place within it.
Bonsai in various traditions convey a myriad of meanings—some see them as symbols of honor and prestige, others as emblems of balance and tranquility, and still others as a connection to ancient customs and the ancestral past. The duality of strength and fragility inherent in these trees serves as a powerful metaphor for human existence.
It’s this rich tapestry of meanings that has allowed bonsai to play a vital role in cultural exchange, teaching and inspiring people across the globe. The practice has evolved but the essence remains: each bonsai is a testament to the serenity and profound beauty of the natural world, encapsulated in miniature form.
“Care for a bonsai is a practice of contemplation, a silent art that demands our presence, awareness, and integrity.”
As you continue your journey with bonsai, consider the layers of meaning each tree may hold. Whether you seek a spiritual anchor, a cultural artifact, or simply a beautiful living centrepiece, bonsai trees offer a silent, yet eloquent narrative on the enduring connection between art, nature, and the human spirit.
Maintaining Bonsai Tree Health Through All Seasons
With each change in season comes a shift in care to ensure your bonsai continues to flourish. This seasonal bonsai tree care guide outlines a cyclical approach to maintaining bonsai health year-round. Spring heralds growth and renewal, while winter calls for protection and perseverance. Here’s how you can adjust your care tactics to align with these seasonal rhythms.
Spring Care Rituals for a Thriving Bonsai
As winter’s chill wanes and the warmth of spring takes hold, your bonsai requires attentive reviving rituals to kickstart its growth. This is the ideal time to begin ramping up your watering routine, but always let the soil’s moisture level be your guide.
A balanced fertilization strategy is critical; apply a nutrient-rich feed to support the burgeoning new leaves and branches. Pruning is also on the agenda – trim back any unwanted growth from the winter, and shape your bonsai to your desired aesthetic. Observing these spring care rituals will set a robust foundation for your bonsai’s health throughout the active growing months.
Protecting Your Bonsai During Harsh Winters
Winter’s harsh conditions call for steadfast measures to shield your cherished bonsai. Start by reducing your watering schedule as growth slows and your bonsai enters a state of dormancy. This period is not for growth but for conservation. If your bonsai resides outdoors, consider relocating it to a sheltered area to protect it from frostbite.
For indoor bonsais, maintain ambient humidity levels to counteract the drying effects of heating systems. Wrapping pots in insulative materials and avoiding fertilization during these months will further ensure that your bonsai endures the cold season unscathed, ready to emerge vibrant as spring returns.
This page contains some affiliate links. Please check out our affiliate disclaimer for more information
Karen Phillips, Bonsai expert and blogger. Read more about me here
Growing a Juniper Bonsai combines creativity with horticultural skills, resulting in a living masterpiece that can bring both aesthetic pleasure and a sense of accomplishment. Here, we will journey through the essentials of nurturing Juniper bonsai—starting with the basics and advancing to the intricacies of maintenance and aesthetics. Embrace the rewarding process of caring for bonsai trees and watch as your bonsai transforms with your dedicated effort and attentiveness.
Understanding the Juniper Bonsai Tree
When diving into the world of bonsai cultivation, the Juniper tree stands as a paragon of versatility and beauty. Discovering the nuances of the Juniper Bonsai tree is akin to uncovering the rich traditions and innovative practices that intertwine within this horticultural art form. Not merely a plant but a canvas for expression, Juniper Bonsai which is one of the fastest growing bonsai trees offer a distinctive blend of ruggedness and grace that captures the imaginations of both novice and seasoned bonsai enthusiasts.
Each species of the Juniper offers a different aesthetic, with variations that provide a range of textures and forms. From the Shimpaku with its lush, dark foliage and twisting trunk to the rocky mountain Juniper, known for its silvery-blue needles, aspiring bonsai artists can find a specimen that resonates with their creative vision.
Juniper Bonsai trees are ideal for both beginners and experts due to their hardiness.
The natural resilience of the Juniper tree allows it to thrive in a variety of climates.
With proper care, Junipers can live for many decades, maturing into truly elegant bonsai specimens.
Understanding and appreciating the distinct traits of the Juniper Bonsai tree truly sets the groundwork for successful cultivation.
“The Juniper Bonsai is not just a tree but a living sculpture, evolving with time and reflecting the care of its gardener.”
Comparing different bonsai tree varieties can broaden your horizons and enable you to tailor your approach to meet the specific needs of your chosen Juniper Bonsai.
Juniper Bonsai Variety
Characteristics
Ideal For
Shimpaku (Juniperus chinensis)
Lush, dark green foliage with flexible branches
Bonsai artists looking for shape versatility
Chinese Juniper (Juniperus chinensis var. sargentii)
Tighter foliage, compact growth
Those with limited space
Rocky Mountain Juniper (Juniperus scopulorum)
Silvery-blue needles and rugged trunk form
Enthusiasts seeking a distinct, natural look
Each of these Juniper bonsais carries its own charm and presents unique opportunities for shaping and styling. Your journey with the Juniper Bonsai will be as much about growing a beautiful tree as it is about personal growth and the joy that comes from cultivating living art.
Choosing the Right Juniper Bonsai for You
Bonsai cultivation begins with a critical step: choosing Juniper Bonsai that aligns with your aspirations and environment. As a beginner’s guide to juniper bonsai, let’s explore the factors integral to selecting a Juniper Bonsai that not only thrives under your care but also brings you profound satisfaction.
Consider the size of the bonsai. Do you have space constraints? Smaller varieties may be more practical for indoors.
Assess the tree’s health. Look for a vibrant color, sturdy needles, and signs of new growth.
The age of the bonsai can influence its care needs and price—older trees typically require more intricate care but exhibit a mature grace.
Examine the style and form of the tree. Does its shape resonate with you? Different stylizations may also imply varying levels of care.
By considering these factors, you can select a juniper bonsai that not only fits your current environment and skill level but also has the potential to grow as you do in this artful horticultural practice.
“A juniper bonsai is like a companion on the journey of growth; choose one that speaks to your spirit and thrives in your care.”
Size
Health Indicators
Age Consideration
Stylization
Mame (miniature) to Dai (large)
Green foliage, no brown/dry needles
Young (Less than 10 years), Mature (10-25 years), Old (25+ years)
Informal Upright, Slanting, Cascade, etc.
Suitable for limited space
Flexible branches, indicate good health
Older bonsais demand more precise care
Aligned with your aesthetic preference
A good understanding of your own capabilities and the conditions at home will lead you to a wise selection for your budding hobby. Factor in these elements, and you’ll be on track to selecting the ideal juniper bonsai that not only thrives but also enriches your space and spirit.
The Ideal Environment for Your Juniper Bonsai
Creating an ideal environment for your Juniper Bonsai is crucial to its health and longevity. The key to thriving bonsai tree care is to understand and replicate, as closely as possible, the natural habitat of these resilient trees. A thoughtfully crafted environment will cater to their needs for proper light, temperature, and humidity levels.
Light Requirements
Light is the source of life for all plants, and your Juniper Bonsai is no exception. Meeting the light requirements for bonsai is essential:
Provide your Juniper Bonsai with about 5-6 hours of direct sunlight daily.
During the intense midday heat, especially in summer, protect the tree from excessive sunlight to prevent scorching.
If growing indoors, position your bonsai near a south-facing window or complement natural light with grow lights.
Remember that a lack of light can be just as detrimental as too much light. Striking a healthy balance is key to maintaining the vibrant color and growth patterns of your bonsai.
Temperature and Humidity
Juniper Bonsai trees thrive in environments that mimic their natural outdoor conditions, which often means cooler temperatures and fluctuations across seasons. Here are some tips to keep their surroundings ideal:
Maintain a temperature range that mirrors the shifting outdoor climate, generally between 60-70°F (15-21°C) during growing seasons.
Increase humidity around the tree, especially when kept indoors, using a tray filled with water and pebbles placed underneath the bonsai pot.
During winter, protect your bonsai from extreme cold, which may require moving it to a sheltered location.
Adjusting care throughout the seasons is vital for bonsai tree care, as varying light exposure and temperature/humidity levels promote healthy dormancy and growth periods.
Season
Temperature Range (°F)
Humidity Level
Light Exposure
Spring/Summer
60-70
High
Full – Filtered Sunlight
Fall
55-65
Medium
Reduced Sunlight
Winter
Below 55
Low
Indirect Sunlight/Artificial Light
By closely monitoring and adjusting the conditions of their environment, you’ll provide your Juniper Bonsai with the stable, nurturing space it needs. Cater to its light, temperature, and humidity preferences, and your bonsai will reward you with beauty and vigor, epitomizing the essence of bonsai care.
Planting Your Juniper Bonsai
Planting Juniper Bonsai starts with the selection of the right bonsai soil and bonsai pot, which are pivotal for the health and aesthetics of your tree. To facilitate your bonsai’s longevity and showcase its natural beauty, let’s delve into the best practices for potting, ensuring optimum growth and vigor.
Selecting Soil and Pot
The correct bonsai soil not only supports the tree’s growth but also ensures the right balance of drainage, water retention, and aeration. Selecting bonsai soil tailored for Juniper Bonsai is thus a decision that requires forethought and consideration.
A mix of akadama, pumice, and lava rock, in the right proportions, is commonly recommended for junipers.
Soil should provide a good balance of moisture retention and drainage to prevent root rot.
An organic component can be beneficial but should not dominate the mix to ensure proper drainage.
Choosing a bonsai pot that complements your tree aesthetically while also considering its functional needs is an art in itself.
Select a pot that is proportional to the size of your bonsai tree to ensure it isn’t overpowered or lost within the container.
Ensure the pot has adequate drainage holes to help prevent water logging.
Consider the pot’s color and finish; these should complement the tree’s foliage and bark rather than compete with it.
Can break down over time; may need regular replacement
Pumice
Helps aerate soil and retains moisture
Becomes waterlogged if not balanced with other components
Lava Rock
Ensures good drainage and adds structure
Choose smaller rocks to prevent displacement of roots
Organic Material
Benefits microorganisms and can help retain nutrients
Use sparingly to prevent water retention and soil compacting
With these guidelines in hand, you’re now ready to plant your Juniper Bonsai with a solid foundation that will support its growth and help manifest the living art that is bonsai. Remember that the harmony of the bonsai soil and the bonsai pot is not only functional but also an extension of your creative expression.
Selecting the right soil and pot for your Juniper Bonsai isn’t just a practical matter; it’s a way to honor the tree’s lineage and ensure its story continues beautifully.
Watering Your Juniper Bonsai
One of the essential bonsai tree care tips lies in mastering the art of watering bonsai. Whether a seasoned bonsai cultivator or a beginner, knowing when and how to water your Juniper Bonsai is vital for its health and longevity. Let’s delve into a comprehensive guide on watering practices that will keep your bonsai flourishing.
Consistent and correct watering practices are the lifeline of bonsai trees, guarding against the perils of both drought and excess moisture.
Your Juniper Bonsai is unique, and its water requirements are distinct. Several factors will determine the right watering schedule, including the size of the bonsai, the size of the pot, the soil composition, and the ambient environmental conditions. Observing the soil moisture is key—when the top layer becomes slightly dry, it’s time to water again.
Check soil moisture: Before watering, perform a simple finger test or use a moisture meter to ensure the soil is slightly dry.
Water thoroughly: When it’s time to water, do so until excess water drains through the bottom holes of the pot, ensuring complete soil saturation.
Never water on a strict schedule: Adapt your watering frequency to the real-time needs of your bonsai, rather than sticking to a rigid timetable.
Mind the seasons: Your Juniper Bonsai will require more water during the active growth months of spring and summer and less during the dormant winter period.
Recognizing the signs of improper watering will help you adjust your approach and prevent long-term damage to your bonsai.
Condition
Under-Watering Signs
Over-Watering Signs
Soil
Dry, pulling away from pot edges
Constantly wet, algae or moss growth
Foliage
Wilting, yellowing, or dropping off
Leaves turn dark and soft; potential root rot
Roots
Dry and brittle to the touch
Spongy texture, dark coloration
In your quest to perfect watering bonsai, consider these guidelines as a roadmap to fostering the well-being of your Juniper Bonsai. Caring for your bonsai means vigilance and adaptation to its needs, ensuring that your bonsai tree care routine nourishes and sustains life. Imbue your bonsai practice with patience and attentiveness, and watch as your tree not only survives but thrives under your dedicated stewardship.
Nutrition and Fertilizing Basics
Just as a balanced diet is vital for your health, so is the right mix of nutrients essential for the vitality of your Juniper Bonsai. To maintain its miniature grandeur, understanding the fertilizing basics and ensuring proper bonsai nutrition is key. Let’s explore what your Juniper Bonsai needs and how you can provide it.
The necessary nutrients can be divided into two categories: macronutrients and micronutrients. Macronutrients, including nitrogen (N), phosphorus (P), and potassium (K), are required in larger quantities, whereas micronutrients, such as iron, magnesium, and calcium, are needed in smaller amounts yet are just as crucial.
Remember, balance is the cornerstone of effective fertilization—it’s not only about the quantity but the proportionate balance of nutrients.
Fertilizers come in various forms, including granules, liquids, and slow-release pellets. Granular fertilizers are mixed directly into the soil, liquid fertilizers are diluted and added during watering, and slow-release pellets gradually release nutrients over time.
To simplify your fertilizing routine, follow a schedule that adjusts to the growth cycle of your Juniper Bonsai:
Spring to Summer: This is the active growth period; fertilize every two weeks with a balanced N-P-K fertilizer.
Fall: Rim back to monthly fertilizing, with an emphasis on phosphorus and potassium to strengthen roots and prepare for dormancy.
Winter: Generally, avoid fertilizing as your bonsai tree is dormant during this time.
When applying fertilizers, it’s essential to follow these simple steps:
Ensure the soil is moist before fertilizing to avoid root burn.
Apply according to the instructions—over-fertilizing can be harmful.
Distribute evenly to promote uniform growth and nutrient uptake.
Below is a table summarizing the fertilizing needs for your Juniper Bonsai:
Season
Macronutrients
Micronutrients
Fertilizer Type
Frequency
Spring to Summer (Growth)
Equal N-P-K ratio
Provide as included in chosen fertilizer
Granules, Liquid, Slow-release
Every two weeks
Fall (Preparation)
Low nitrogen, higher phosphorus and potassium
As needed basis
Slow-release preferrable
Once a month
Winter (Dormant)
Avoid fertilization
Avoid fertilization
None
Pause fertilizing
In conclusion, a judicious approach to fertilizing basics and paying careful attention to bonsai nutrition will reward you with a robust and elegant Juniper Bonsai that looks and feels its best, ready for the next stages of care and styling.
Pruning Juniper Bonsai Tree
Pruning your Juniper Bonsai tree is a vital component of the bonsai care regimen, serving two primary purposes: maintaining the health of your tree and achieving the desired aesthetic form. Engaging in regular pruning activities helps in controlling growth and infusing the tree with a sense of maturity and elegance that only proper shaping bonsai tree techniques can provide.
When to Prune
Identifying the optimal pruning schedule for bonsai is integral to the well-being of your Juniper Bonsai. For structural pruning, aimed at shaping the main branches, the best time is during the late winter or early spring, just before the onset of the new growth period. This timing allows you to see the tree’s structure without the obstruction of foliage. Maintenance pruning, which involves removing unwanted growth to refine the tree’s shape, can be done throughout the growing season, typically from spring to autumn.
The right moment to prune is when the tree shows signs of active growth, exemplified by new shoots and elongated foliage. This is a clear indicator that your Juniper Bonsai is ready to be shaped for the season ahead.
Pruning Techniques
Bonsai pruning techniques require precision and an artistic touch. When shaping your Juniper Bonsai, there are two main methods to consider: pinching and trimming. Pinching involves the careful removal of new growth tips using your fingers, ideal for subtle shaping and maintaining the tree’s miniature size. Trimming, on the other hand, uses sharp scissors or bonsai shears to cut away larger, unwanted branches and foliage, shaping the overall structure of the tree.
Always use sharp, clean tools to make precise cuts and prevent damage to the plant tissue.
When trimming, aim to cut just above a leaf pair or node to encourage healthy regrowth in a desirable direction.
Regularly assess your bonsai’s shape from different angles to ensure a balanced and harmonious form.
Below are essential tools and tips to keep in mind while engaging in bonsai pruning:
Tools
Usage
Tips
Concave Cutters
Removing branches, leaving a concave wound for better healing
Choose the correct size to match the branch thickness for a clean cut
Bonsai Shears
Trimming foliage and small branches
Keep them sharp to ensure health by preventing fraying and infections
Bonsai Wire Cutters
Removing wires without damaging the bark
Use these rather than standard wire cutters to protect your bonsai’s delicate branches
Knob Cutters
Creating deeper hollow areas for large cuts to heal with minimal scarring
Apply only on significant branches where a concave cutter is insufficient
Embrace pruning as an ongoing journey rather than a one-time event. It’s an art that requires patience and visual foresight, envisioning the future form of your prized Juniper Bonsai tree as you carefully guide its growth with every cut. With persistent care and practice, your bonsai will develop into a stunning representation of natural beauty and horticultural prowess.
Shaping and Wiring Techniques
Embarking on the intricate journey of shaping bonsai trees, particularly the Juniper Bonsai, calls for a blend of artistry and technical prowess. Wiring is a cornerstone technique used by bonsai enthusiasts to coax branches into the desired shape. In this guide, you’ll discover the essentials of bonsai wiring techniques that will enable you to sculpt your bonsai into a living work of art without harming the tree.
To start shaping your bonsai tree, selecting the appropriate wire is imperative. There are two main types of wire used in bonsai: aluminum and copper. Aluminum is malleable, easy to work with, and ideal for beginners or trees with softer wood. Copper wire, on the other hand, has greater holding power, making it suitable for trees with harder wood or for securing larger branches.
Before you begin wiring, it’s essential to understand the growth pattern of your Juniper Bonsai. Each species and individual tree may have unique characteristics that affect how and where the wires should be placed. For effective wiring, follow these steps:
Measure the branches and select a length of wire about one-third longer than the branch you wish to shape.
Choose a wire gauge that can support the branch without breaking, typically one-third the thickness of the branch.
Starting at the trunk, anchor the wire securely against the tree, taking care not to damage the bark.
Wrap the wire around the branch in a consistent spiral, maintaining a 45-degree angle with gentle, even pressure.
Once the wire is in place, bend the branch gradually to the desired shape, repositioning your fingers closer to the bend to reduce the risk of snapping.
While wiring is an exciting step in designing your bonsai, remember that the health of the tree is paramount. Make sure not to wrap wires too tightly, as this can cut into the bark and cause lasting damage. Monitor your wired bonsai regularly, as growing branches can expand and cause wire marks. Typically, wires should be removed after one growing season.
Patience is the trusted companion in the art of bonsai wiring—rushing can lead to harm, but with careful and gradual adjustments, your bonsai will flourish in its sculpted form.
Consult this table to select the right wire for your juniper bonsai:
Branch Thickness
Suggested Wire Gauge (Aluminum)
Suggested Wire Gauge (Copper)
1/8″ – 1/4″ (Thin Branches)
1.0 mm – 1.5 mm
1.0 mm (or not recommended)
1/4″ – 1/2″ (Medium Branches)
2.0 mm – 2.5 mm
1.5 mm – 2.0 mm
1/2″ – 3/4″ (Thick Branches)
3.0 mm – 3.5 mm
2.5 mm – 3.0 mm
3/4″ and above (Large Branches)
4.0 mm and up
3.5 mm and up
In shaping your bonsai trees, always remain cognizant of the tree’s health, growth patterns, and the timeline for leaving wires in place. With practice and a respectful approach to the tree’s natural tendencies, bonsai wiring techniques can help you create an ever-evolving masterpiece of nature in your living space.
Repotting Your Juniper Bonsai
Understanding the importance of repotting bonsai is crucial for the longevity and health of your Juniper Bonsai. Over time, the soil in your bonsai pot can become compacted and lose its nutritional value, which can lead to a decline in the tree’s health. Moreover, the roots may become pot-bound, restricting the growth and preventing adequate nutrient uptake. Here’s your step-by-step guide on when and how to rep your cherished tree:
When to Repot?
Repotting is typically required every two to five years, depending on the age and size of the tree.
Younger trees grow more quickly and may need to be repotted more often.
The ideal time to repot is in the early spring as the Juniper Bonsai is emerging from its dormant winter phase and before new growth begins.
Signs That Repotting is Needed
The tree’s growth has slowed down significantly.
Water runs straight through the pot, indicating compacted soil.
Roots are circling the pot or growing out of the drainage holes.
How to Repot Your Juniper Bonsai
Prepare a new pot and bonsai soil mix that is well-draining and appropriate for your Juniper Bonsai.
Remove the tree gently from its current pot, carefully loosening the roots.
Trim back a third of the root ball to encourage new growth, using a sharp, sterilized tool.
Refill the new pot with a layer of fresh soil, and place the tree in the center.
Backfill with soil, ensuring there are no air pockets. Water thoroughly after repotting.
Repotting bonsai requires a gentle touch and an understanding of the tree’s needs. It’s not just about maintenance—it’s about providing a fresh foundation for continued growth and health.
Age of Tree
Repotting Frequency
Best Season for Repotting
Root Pruning
Under 10 Years
Every 2-3 Years
Early Spring
Yes, Prune Conservatively
10 to 25 Years
Every 3-4 Years
Early Spring
Minimal Pruning
Over 25 Years
Every 4-5 Years
Early Spring
Prune Only If Necessary
Beyond the physical act of repotting, remember that this is an opportunity to inspect the roots for any signs of disease or rot, addressing any issues immediately. Through mindful bonsai care, repotting can rejuvenate your Juniper Bonsai, encouraging vibrant growth and providing a refreshed space for the tree to thrive in the years to come.
Common Pests and Diseases
As elegant as your Juniper Bonsai may appear, it is not immune to the threats posed by various bonsai pests and bonsai tree diseases. Recognizing the symptoms and preventing bonsai diseases and pest infestations are vital in maintaining the health of your miniature tree. Let’s explore common adversaries of the Juniper Bonsai and equip you with strategies for treating bonsai pests and illnesses effectively.
Preventing and Treating Issues
Prevention is undoubtedly the best defense against pests and diseases. Cultivating a routine that includes regular inspection of leaves, branches, and soil can save you from future troubles. If your keen eye does detect a problem, there are both organic and chemical solutions available.
Common pests that target Juniper Bonsai include spider mites, aphids, scale insects, and mealybugs. Each leaves telltale signs, such as yellowing leaves, sticky residue, or visible webbing. On the disease front, fungal infections like juniper tip blight and root rot are notorious adversaries, typically revealed by discolored foliage and weak growth.
Here’s a practical approach to keep your Juniper Bonsai hale and hearty:
Isolate new plants for a period before introducing them to your garden to prevent the spread of undetected issues.
Maintain proper hygiene by disinfecting tools and cleaning fallen debris regularly.
Ensure your bonsai is receiving appropriate light, humidity, and air circulation to stave off disease.
Treating issues, when they arise, calls for prompt and effective action:
For pests like spider mites and aphids, a strong jet of water may dislodge them.
Organic insecticides, such as neem oil or insecticidal soap, can treat infestations without harming beneficial insects.
In case of severe infestations, consider chemical pesticides, but be sure to follow application instructions precisely to avoid damaging your bonsai.
For fungal diseases, prune away the infected parts and apply a fungicide, ensuring the product is safe for use on Junipers.
Addressing bonsai health issues early on ensures your tree continues to thrive, preserving not just its aesthetic appeal but its longevity as well.
Pest/Disease
Identification
Organic Treatments
Chemical Treatments
Spider Mites
Yellowing needles, fine webbing
Water spray, Neem oil
Miticides approved for bonsai use
Aphids
Sticky residue, distorted growth
Insecticidal soap, Neem oil
Contact insecticides as per label directions
Scale Insects
Bumps on branches, yellowing leaves
Horticultural oil, Alcohol swabs
Systemic pesticides for severe cases
Mealybugs
White cottony masses, weak growth
Neem oil, Alcohol swabs
Systemic insecticides when necessary
Juniper Tip Blight
Brown tips, dieback of shoots
Pruning, Improved air flow
Fungicides labeled for tip blight control
Root Rot
Soft, brown roots, wilting
Improved drainage, Sterilized soil
Fungicides after removing affected roots
Remember, the secret to sustaining a healthy Juniper Bonsai lies not only in recognizing bonsai tree diseases and bonsai pests but also in adopting a careful and proactive approach to preventing bonsai diseases and pests. By doing so, you enrich your bonsai’s environment, ultimately enhancing your relationship with this exquisite living art form.
A Guide to Winter Care
As the chill of winter approaches, ensuring the well-being of your Juniper Bonsai becomes paramount. Winter care for bonsai hinges on specific measures you’ll need to adopt, to shield these delicate trees from the harsh elements. Protecting bonsai in winter is not simply a responsibility; it’s a form of respect for the living art you’re nurturing. Let’s delve into the key steps for safeguarding your treasured tree during the colder months.
“Winter’s touch can be unforgiving to a bonsai tree. It’s the diligent care during these months that sets the foundation for the year’s growth to come.”
Assess Your Climate: Different climates necessitate different approaches to winter care. In colder regions, your Juniper Bonsai may require more substantial protection from frost and freezing temperatures.
Outdoor Shelter: If your bonsai resides outdoors, consider placing it on the ground in a sheltered area. The earth’s warmth can offer a degree of insulation. Additionally, you can surround the pot with mulch or bury it in the ground to shield the roots from extreme cold.
Indoor Environment: For areas with severe winters, bringing your Juniper Bonsai indoors is advisable. However, choose a cool, well-ventilated space such as an unheated garage or porch, as typical indoor temperatures and dry air can negatively affect the tree’s dormancy.
Watering Adjustments: During winter, your bonsai will require less water. Monitor the soil’s moisture as overwatering can lead to root rot, especially in cooler temperatures where evaporation rates are lower.
Caring for your Juniper Bonsai during winter is a delicate balance—it’s neither the time for growth nor for neglect. Below is a detailed table that highlights the key winter care practices and their importance:
Action
Reason
Benefits
Reducing Water Frequency
Lower evaporation rates and reduced growth activity
Prevents root rot and conserves the bonsai’s energy reserves
Providing Insulation Barrier
Shield roots from freezing temperatures
Promotes root health and primes the tree for spring rejuvenation
Moving to Cold but Protected Area
Ensure dormancy without exposing to extreme cold
Allows natural rest period while preventing frost damage
Maintaining Air Circulation
Avoid accumulation of moisture and potential fungal growth
Circulates fresh air to keep the tree healthy
These tailored actions will not only prevent the winter chill from causing irreparable harm to your bonsai but will also set the stage for it to flourish once warmer days return. By heeding these winter care tips, you demonstrate a commitment to the longevity and beauty of your Juniper Bonsai that exemplifies true mastery of the art of bonsai.
Displaying Your Juniper Bonsai
Reaching the stage where you’re ready to display your Juniper Bonsai is a testament to your dedication and skill in the craft of bonsai. The display itself is an art, integrating bonsai aesthetics into your living environment to enhance both the tree’s inherent beauty and the ambiance of its surroundings. In this section, we will explore key factors in Selecting bonsai display location and provide actionable Bonsai display tips to ensure your bonsai presentation captivates and inspires.
Choosing a Location
When selecting a display location for your bonsai, both the health of the tree and the aesthetic impact must be considered. A well-chosen spot accentuates the tree’s form, color, and texture, while also providing the necessary environmental conditions it requires. Below are essential factors you should consider:
The location should offer ample natural light without direct exposure to harsh sunlight, which might damage the foliage.
Consider the backdrop; a simple, neutral background will make the nuances of your bonsai stand out.
Avoid placing the bonsai near heat sources or drafty windows, as stable temperatures are crucial for its wellbeing.
Ensure the spot is away from high-traffic areas to minimize the risk of accidental bumps or knocks.
Viewing height is also important; the ideal height is around eye level when seated, creating an intimate and immersive experience.
Presentation Tips
With the perfect location identified, your focus shifts to the presentation of your bonsai. A thoughtful presentation takes into account every detail, from the choice of stand to additional accents that complement the tree. Incorporate these tips to showcase your Juniper Bonsai:
Select a stand that contrasts with the pot for balance and to accentuate the tree’s structure. Traditional wooden stands are often a good fit.
Ensure the color, shape, and size of the pot harmonize with the bonsai. The pot is an extension of your bonsai’s aesthetic.
Consider seasonal changes and update your display accordingly with complementary elements like a small scroll, or a subtle figurine to represent the current season.
Leave ample space around the bonsai to avoid a cluttered appearance, allowing onlookers to appreciate the presentation without distraction.
Use directional lighting to cast gentle shadows and highlight the tree’s best features without overpowering it.
The table below summarizes the key considerations for presenting your Juniper Bonsai effectively:
Aspect
Consideration
Detail
Stand
Material and Color
Select a stand that offers stability and contrasts pleasingly with the pot.
Background
Color and Texture
Choose a neutral background to prevent visual competition with the bonsai.
Complementary Elements
Type and Seasonality
Accents like scrolls or stones can signify the season and add depth to the display.
Space
Clearance
Provide sufficient clear space around the bonsai to ensure it remains the focal point.
Lighting
Intensity and Direction
Make use of soft, directional lighting to enhance the bonsai’s features.
Through attentive location selection and a detailed approach to presentation, you can create an impressive display that embodies the spirit of bonsai aesthetics and honors the tranquility inherent to the art form. It is in the subtle details that the spirit of the bonsai truly shines, transforming the act of displaying bonsai trees into a profound gesture of artistic expression and contemplation.
Propagation: Growing New Juniper Bonsai Trees
Embarking on the journey of growing juniper bonsai trees through propagation is both a rewarding and fascinating endeavor. The propagation process allows you to create a new generation of Juniper Bonsai trees, either from cuttings or from seeds. In this section, we will walk you through the steps necessary to successfully propagate your own Juniper Bonsai and provide the initial care needed to ensure a healthy start.
There are two primary methods of propagation for these resilient trees: propagating from cuttings and growing from seeds. Each method has its own set of steps, requirements, and timelines. With patience and attentiveness, you can watch as your efforts lead to the growth of a new bonsai to nurture and enjoy.
“Through propagation, a single Juniper Bonsai can become the ancestor of an entire grove, a living legacy of beauty and peace.”
Propagating from Cuttings
Propagation from cuttings is a popular method for its relatively quicker results and the clone-like replication of the parent tree’s characteristics. Here is how you can start growing juniper bonsai trees from cuttings:
Begin by selecting a healthy branch from an established Juniper Bonsai—ideally one that is pencil-thick and has several sets of needles.
Cut the branch at a 45-degree angle to increase the surface area for rooting, and remove the lower third of foliage to expose the stem.
Dip the cutting end into rooting hormone to encourage root development.
Plant the cutting in a well-draining soil mix, typically a combination of coarse sand, peat, and perlite.
Water the cuttings and place them in a bright, indirect light location, ensuring a high-humidity environment to prevent desiccation.
With proper care, roots should begin to form within a few weeks, after which you can gradually acclimate the cutting to less humid conditions.
Growing from Seeds
Growing juniper bonsai trees from seeds requires time and patience but can be incredibly rewarding, as you watch the gradual emergence and development of a new tree. Below are the instructions to start your seedling:
Obtain Juniper seeds which can be collected from berries of mature trees or purchased.
Stratify the seeds, simulating winter conditions, by placing them in a mix of sand and peat moss inside a sealed bag in the refrigerator for about three months.
After stratification, sow the seeds in a well-draining soil mix, placing them just below the surface, and gently water.
Place the containers in a warm, sunny spot—using a greenhouse or plastic cover can help maintain consistent temperature and moisture levels.
Once sprouted, provide the seedlings with plenty of light and water when the soil begins to dry. As they grow, you can begin the process of shaping and caring for them as bonsai.
Whether you choose cuttings or seeds, each method of propagation brings a unique sense of fulfillment as you watch your Juniper Bonsai trees take root and flourish. Following these steps will ensure that your new bonsai starts with the best possible chance for success, grounding it in a strong foundation for future growth.
Method
Propagation Steps
Timeframe
Notes
Cuttings
Select branch, prepare to cut, use rooting hormone, plant, and provide high humidity.
Root development within a few weeks.
Clones the parent tree, faster results.
Seeds
Stratify seeds, sow in a well-draining mix, and water provide light and warmth.
Germination varies, often several weeks to months.
A longer process allows for genetic diversity.
Understanding propagation is foundational to the practice of growing juniper bonsai trees. With a touch of patience and careful attention to detail, you can give life to new bonsai trees that carry the essence of their ancestors while forging their own unique identities in your bonsai collection.
Where to Find Juniper Bonsai for Sale
Embarking on the journey of buying bonsai trees, especially if you’re seeking Juniper bonsai for sale, requires a keen eye for quality and a knowledge of reputable sources. The popularity of these awe-inspiring miniature trees has led to a myriad of options available both online and at local nurseries. This section will guide you through finding the best Juniper Bonsai trees, ensuring you get a healthy and authentic specimen for your collection.
When considering buying bonsai trees, it’s essential to verify the tree’s health and authenticity. Whether you’re walking into a nursery or browsing an online retailer, assess the tree’s condition by looking at the foliage—lush and green is a good sign, while yellow or browning leaves may indicate neglect. Additionally, inspect the trunk and branches for scars or other damage, which can affect the tree’s long-term growth.
“A healthy bonsai is a happy bonsai—start your journey with a tree that shows no signs of distress for a rewarding cultivation experience.”
For those who prefer the convenience of shopping from home, several well-known online bonsai retailers take great care in packing and shipping these delicate trees. Local nurseries and garden centers, meanwhile, offer the advantage of seeing the bonsai in person and often provide expert advice from knowledgeable staff.
Finding Quality Juniper Bonsai Trees
Understanding where and how to procure a high-quality Juniper Bonsai can make all the difference in your bonsai tree journey. Here are several avenues to explore:
Specialized online bonsai stores often have a wide range of Juniper bonsai for sale, with clear pictures and detailed descriptions.
Many local gardening stores and nurseries stock bonsai trees and may offer Juniper varieties suitable for all levels of expertise.
Bonsai clubs and societies are excellent resources for connecting with local growers and suppliers who are passionate about their craft.
Bonsai exhibitions and shows provide opportunities to purchase trees and gain insights from the growing community.
Shopping for a Juniper Bonsai is as much about finding a healthy tree as it is about connecting with the right seller. Establish relationships with trusted suppliers who value the health and lineage of their bonsai trees. They should be willing to provide you with all the necessary information to care for your new bonsai properly.
Resource
Benefits
Considerations
Online Bonsai Retailers
Convenience, variety, and detailed information
Unable to physically inspect the tree before purchase
Local Nurseries
Ability to handpick and get expert advice
May to have a limited selection compared to online
Bonsai Clubs/Societies
Access to knowledgeable enthusiasts and unique specimens
May require memberships or attendance at meetings/events
Bonsai Shows/Exhibitions
Opportunity to buy premium trees and gain valuable insights
Events may happen infrequently
In conclusion, finding the right Juniper bonsai for sale is multifaceted, blending the excitement of the search with the attentiveness needed to choose a tree that will thrive in your care. Whether you prefer the in-person approach of local nurseries or the expansive selection offered by online retailers, ensure that you’re equipped with the knowledge to identify a healthy, vibrant tree. With the correct information and resources, buying bonsai trees becomes an extension of the art and joy of bonsai itself.
Conclusion
As you stand at the end of this enlightening journey, reflect on the rich tapestry of skills and knowledge you’ve acquired in Mastering Juniper Bonsai care. Your bonsai tree journey is one filled with growth, not only for the Juniper Bonsai but for you as well. Embrace the elegant dance of patience and attentiveness that these living sculptures demand; every pruning, watering, and repotting is a step towards horticultural harmony. You’ve gathered the wisdom to nurture and shape these magnificent trees into forms that capture both the spirit of nature and the essence of your dedication.
As with any art, the path of bonsai care is an ongoing process of learning and love. Apply the tips and techniques you have learned with confidence, knowing they stem from a tradition as ancient as the trees you tend. Whether gazing upon the serenity of the Juniper Bonsai in your living room or sharing the experience with fellow enthusiasts, the rewards of this ancient horticultural practice are immeasurable. Let the tranquility of the Juniper Bonsai infuse your life, bringing peace and satisfaction in its wake.
Your narrative with bonsai is just beginning, and each day presents opportunities to delve deeper into this meditative practice. It’s a narrative entwined with nature’s slow yet persistent rhythm—a journey that promises as much personal growth as that of your cherished bonsai. As these miniature giants flourish under your care, let them stand as a testament to the gentle dedication that you’ve woven into their existence. So go ahead, continue your Mastering Juniper Bonsai care, and let every twist and turn of your bonsai tree journey become a milestone in your life’s own story.
FAQ
What makes the Juniper Bonsai Tree a popular choice for bonsai artists?
The Juniper Bonsai Tree is lauded for its hardiness, flexibility in styling, and the variety of stunning natural forms it can take. These qualities, along with its evergreen nature and ease of care, make it a favorite among both beginner and expert bonsai enthusiasts.
How do you choose the right Juniper Bonsai Tree for a beginner?
When selecting a Juniper Bonsai for a beginner, consider a healthy tree with a strong structure, manageable size, and a style that resonates with your personal aesthetic preferences. Beginners need to choose a tree that’s well-suited to their environment and level of care that they can provide.
What are the ideal light requirements for a Juniper Bonsai Tree?
Juniper Bonsai Trees thrive best with ample light. They should receive about six hours of direct sunlight daily. However, protection from the harsh midday sun during the peak of summer can help prevent scorching their delicate foliage.
What’s the best way to water a Juniper Bonsai Tree?
Watering a Juniper Bonsai Tree requires attentiveness. Water when the top layer of soil becomes slightly dry, using a watering can with a fine nozzle to ensure a gentle and thorough soaking. It’s crucial to avoid both over-watering and under-watering by observing the soil’s moisture level closely.
How often should you fertilize a Juniper Bonsai Tree?
Typically, fertilizing your Juniper Bonsai Tree every month during the growing season (spring through fall) with a balanced, slow-release fertilizer is recommended. Reduce feeding in the winter months when the tree’s growth naturally slows down.
When is the best time for pruning a Juniper Bonsai Tree?
The best time for structural pruning of a Juniper Bonsai Tree is during the late winter or early spring. However, maintenance pruning and pinching can be done throughout the growing season to maintain shape and encourage dense foliage.
Can Juniper Bonsai Trees be shaped with wiring, and how is it done?
Yes, Juniper Bonsai Trees are particularly amenable to shaping with wiring. This process involves wrapping wire around the branches to guide their growth and can be done anytime the tree is actively growing. It’s important to monitor the wired branches regularly to prevent the wire from cutting into the expanding bark.
How do you repot a Juniper Bonsai Tree, and how often should it be done?
Repotting provides fresh soil and encourages a compact root system. You should repot a Juniper Bonsai every two to three years in early spring, carefully removing the tree from its pot, pruning the roots, and placing it into fresh soil with proper drainage.
What common pests and diseases can affect Juniper Bonsai Trees?
Common pests that can afflict Juniper Bonsai Trees include spider mites and scale insects. Diseases such as tip blight or root rot can also occur. To ward off these issues, maintain proper watering, adequate air circulation, and regular inspections to catch problems early.
Where can I purchase a Juniper Bonsai Tree?
Juniper Bonsai Trees for sale can be found at local plant nurseries, specialty bonsai shops, and online marketplaces. When purchasing, look for reputable vendors with expertise in bonsai to ensure you’re getting a healthy tree and accurate care information.